和活动一样,Fragment也有生命周期。
官方文档中有详细的文字说明,不过最好还是实践下,熟悉过程。
http://developer.Android.com/guide/components/fragments.html
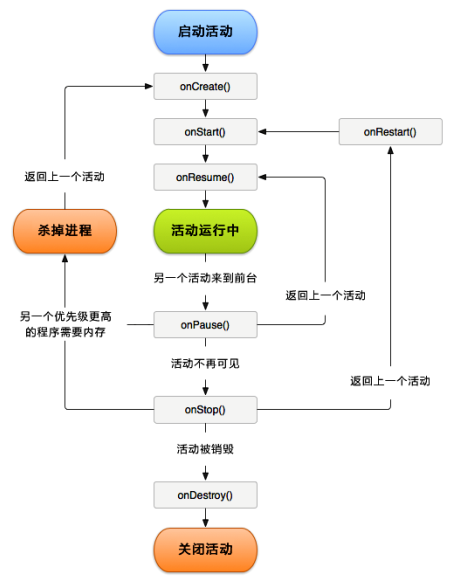
1、Activity生命周期图:
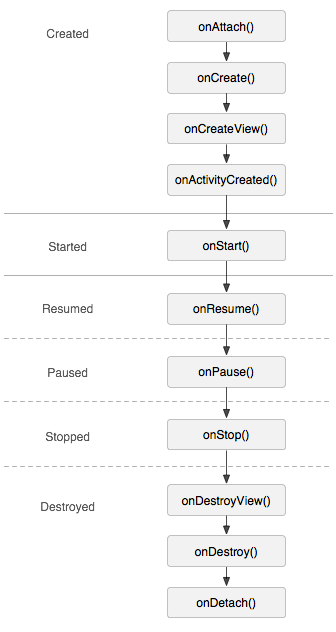
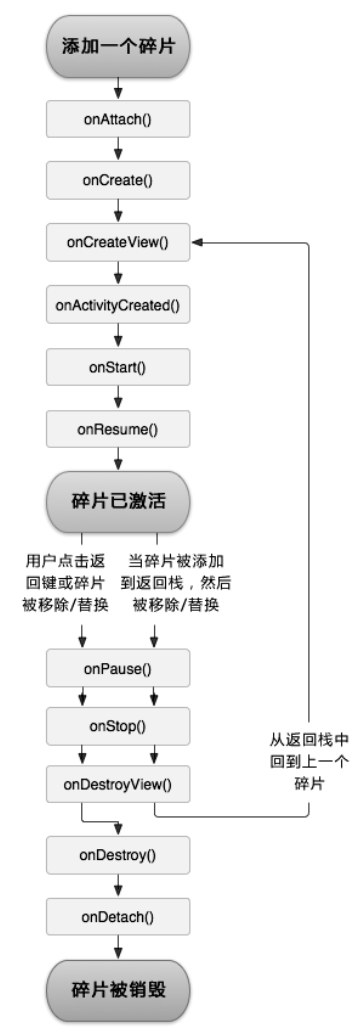
2、Fragment生命周期图:
3、二者对比图

上图(左边:Activity,右边:Fragment)可见:Activity和Fragment的生命周期回调方法一一对应。
4、碎片的状态和回调
1. 运行状态
当一个碎片是可见的,并且它所关联的活动正处于运行状态时,该碎片也处于运行状态。
2. 暂停状态
当一个活动进入暂停状态时(由于另一个未占满屏幕的活动被添加到了栈顶),与它相关联的可见碎片就会进入到暂停状态。
3. 停止状态
当一个活动进入停止状态时,与它相关联的碎片就会进入到停止状态。或者通过调用 FragmentTransaction 的 remove()、 replace()方法将碎片从活动中移除,但有在事务提交之前调用 addToBackStack()方法,这时的碎片也会进入到停止状态。总的来说,进入停止状态的碎片对用户来说是完全不可见的,有可能会被系统回收。
4. 销毁状态
碎片总是依附于活动而存在的,因此当活动被销毁时,与它相关联的碎片就会进入到销毁状态。或者通过调用 FragmentTransaction 的remove()、 replace()方法将碎片从活动中移除,但在事务提交之前并没有调用 addToBackStack()方法,这时的碎片也会进入到销毁状态。
Fragment 类中也提供了一系列的回调方法,以覆盖碎片生命周期的每个环节。其中, 活动中有的回调方法,碎片中几乎都有,不过碎片还提供了一些附加的回调方法,那我们就重点来看下这几个回调。
1. onAttach()
当碎片和活动建立关联的时候调用。
2. onCreateView()
为碎片创建视图( 加载布局)时调用。
3. onActivityCreated()
确保与碎片相关联的活动一定已经创建完毕的时候调用。
4. onDestroyView()
当与碎片关联的视图被移除的时候调用。
5. onDetach()
当碎片和活动解除关联的时候调用。
6.onStop()
和activity一致,fragment不可见时调用, 可能情况:activity被stopped了 或者 fragment被移除加入到回退栈中,一个stopped的fragment仍然是活着的如果长时间不用也会被移除
5、体验活动的生命周期
代码:
创建一个Fragmentone布局:
<?xml version="1.0" encoding="utf-8"?>
<LinearLayout xmlns:android="http://schemas.android.com/apk/res/android"
    android:orientation="vertical"
    android:layout_width="match_parent"
    android:layout_height="match_parent">

    <Button
        android:id="@+id/btn"
        android:layout_width="match_parent"
        android:layout_height="wrap_content"
        android:text="切换到下一个Fragment"/>

</LinearLayout>
创建一个fragmentTwo布局:
<LinearLayout xmlns:android="http://schemas.android.com/apk/res/android"
    android:orientation="vertical"
    android:layout_width="match_parent"
    android:layout_height="match_parent">

    <TextView
        android:layout_gravity="center_horizontal"
        android:gravity="center"
        android:layout_width="wrap_content"
        android:layout_height="wrap_content"
        android:textSize="20sp"
        android:text="This is a fragment_two"
        />

</LinearLayout>
将FragmentOne加入主布局activity_main中:
import android.app.Fragment;
import android.content.Context;
import android.os.Bundle;
import android.support.annotation.Nullable;
import android.util.Log;
import android.view.LayoutInflater;
import android.view.View;
import android.view.ViewGroup;

public class FragmentOne extends Fragment {

    public static final String TAG = "FragmentOne";

    @Override
    public void onCreate(Bundle savedInstanceState) {
        super.onCreate(savedInstanceState);
        Log.d(TAG,"onCreate");
    }

    @Override
    public void onAttach(Context context) {
        super.onAttach(context);
        Log.d(TAG,"onAttach");
    }

    @Nullable
    @Override
    public View onCreateView(LayoutInflater inflater, ViewGroup container, Bundle savedInstanceState) {
        Log.d(TAG,"onCreateView");
        View view = inflater.inflate(R.layout.fragment_one,container,false);
        return view;
    }


    @Override
    public void onActivityCreated(Bundle savedInstanceState) {
        super.onActivityCreated(savedInstanceState);
        Log.d(TAG,"onActivityCreated");
    }

    @Override
    public void onStart() {
        super.onStart();
        Log.d(TAG,"onStart");
    }

    @Override
    public void onResume() {
        super.onResume();
        Log.d(TAG,"onResume");
    }

    @Override
    public void onPause() {
        super.onPause();
        Log.d(TAG,"onPause");
    }

    @Override
    public void onStop() {
        super.onStop();
        Log.d(TAG,"onStop");
    }

    @Override
    public void onDestroyView() {
        super.onDestroyView();
        Log.d(TAG,"onDestroyView");
    }

    @Override
    public void onDestroy() {
        super.onDestroy();
        Log.d(TAG,"onDestroy");
    }

    @Override
    public void onDetach() {
        super.onDetach();
        Log.d(TAG,"onDetach");
    }
}
创建fragmentTwo类继承自Fragment类:
import android.app.Fragment;
import android.os.Bundle;
import android.support.annotation.Nullable;
import android.view.LayoutInflater;
import android.view.View;
import android.view.ViewGroup;

/**
 * Created by YQ950209 on 2016/10/15.
 */

public class fragmentTwo extends Fragment {

    @Nullable
    @Override
    public View onCreateView(LayoutInflater inflater, ViewGroup container, Bundle savedInstanceState) {
        View view = inflater.inflate(R.layout.fragment_two,container,false);
        return view;
    }

}
主活动,通过button动态添加fragmentTwo:
package com.turo.fragmenttest;

import android.app.FragmentTransaction;
import android.os.Bundle;
import android.support.v7.app.AppCompatActivity;
import android.view.View;
import android.widget.Button;

public class MainActivity extends AppCompatActivity implements View.OnClickListener{

    @Override
    protected void onCreate(Bundle savedInstanceState) {
        super.onCreate(savedInstanceState);
        setContentView(R.layout.activity_main);
        Button button = (Button) findViewById(R.id.btn);
        button.setOnClickListener(this);
    }

    @Override
    public void onClick(View view) {
        switch (view.getId()) {
            case R.id.btn:
                fragmentTwo fragment = new fragmentTwo();
                android.app.FragmentManager fragmentManager = getFragmentManager();
                FragmentTransaction transaction = fragmentManager.beginTransaction();
                transaction.replace(R.id.two_layout,fragment);
                transaction.addToBackStack(null);
                transaction.commit();
                break;
            default:
                break;

        }
    }
}
运行程序,打印信息:

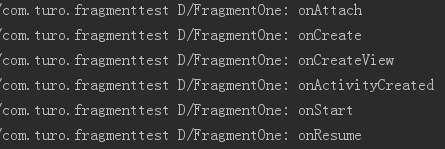
当 FragmentOne 第一次被加载到屏幕上时,会依次执行 onAttach()、
onCreate()、 onCreateView()、 onActivityCreated()、 onStart()和 onResume()方法。
点击button切换到FragmentTwo,不加addToBackStack()方法:

可见,如果在替换的时候没有调用 addToBackStack()方法,此时的 RightFragment 就会进入销毁状态, onDestroy()和onDetach()方法就会得到执行。
点击button,加上addToBackStack()方法:

addToBackStack,顾名思义就是加入返回栈的意思,这里的意思就是我们在切换时会把FragmentOne加入到返回栈,此时的FragmentOne处于停止状态,不至于销毁。
点击back键返回FragmentOne:

由于FragmentOne重新回到了运行状态,因此 onActivityCreated()、onStart()和 onResume()方法会得到执行。注意此时 onCreate()和 onCreateView()方法并不会执行,因为我们借助了addToBackStack()方法使得 FragmentOne 和它的视图并没有销毁。
再次点击back键退出程序:

没什么好说的,退出程序依次会执行 onPause()、onStop()、onDestroyView()、 onDestroy()和 onDetach()方法,最终将活动和碎片一起销毁。看到这里不知大家是否对Fragment生命周期有更深刻的理解,如果还是模糊,强烈建议结合图三——Activity和Fragment生命周期对比图,再次阅读!
写在后面
楼主是一个应届毕业生,不是什么大牛,写博客只是为了巩固自己所学的基础,不喜勿喷,如若有错误,欢迎各位读者指出,万分感谢!


 993
993

 被折叠的 条评论
为什么被折叠?


