背景
从Sring2 开始,为了响应JDK1.5退出的注解功能,Spring 开始大量假如注解来代替xml配置。Spring 的注解主要用来配置注入Bean,切面相关的配置(@Transactional)。随着Spring版本的不断迭代更新,注解被大量使用。越来越多的自定义注解也出现在自己的项目中来提供便捷配置。
1、组合注解与元注解
- 解释
- 组合注解
- 被注解的注解称之为组合注解
- 组合注解具备元注解的功能
- spring 本身也有很多组合注解,比如:@Configuration 就是一个组合@Component注解,表明这个类其实也是一个Bean
- 元注解
- 可以注解到别的注解上的注解
- spring 的很多注解都可以作为元注解
- @Target(ElementType.TYPE)
@Retention(RetentionPolicy.RUNTIME)
@Documented
- 组合注解
- 示例
- (1) 组合注解
package com.tsshare.srcspringbootexampletsshare.day1.annotation;

import org.springframework.context.annotation.ComponentScan;
import org.springframework.context.annotation.Configuration;

import java.lang.annotation.*;

/**
 * @author guabei
 * @title: Compose
 * @projectName spring-boot-build
 * @description: 自定义组合注解
 * @date 2020/1/823:03
 */
@Target(ElementType.TYPE)
@Retention(RetentionPolicy.RUNTIME)
@Documented
@Configuration //<1>
@ComponentScan //<2>
public @interface ComposeConfigAndCompScan {
	//<3>
	String[] value() default {};
}
- <1> 组合 @Configuration 元注解
- <2> 组合 @ComponentScan 元注解
- <3> 覆盖value 参数
- (2) 演示服务的Bean
package com.tsshare.srcspringbootexampletsshare.day1.service;

import org.springframework.stereotype.Service;

/**
 * @author guabei
 * @title: DemoService
 * @projectName spring-boot-build
 * @description: 实例bean
 * @date 2020/1/823:30
 */
@Service
public class DemoService {

	public void demoOutPut(){
		System.out.println("从组合注解配置照样获得的Bean");
	}
}
- (3) 新的配置类
package com.tsshare.srcspringbootexampletsshare.day1;

import com.tsshare.srcspringbootexampletsshare.day1.annotation.ComposeConfigAndCompScan;

/**
 * @author guabei
 * @title: DemoConfig
 * @projectName spring-boot-build
 * @description: 配置注解的示例
 * @date 2020/1/823:51
 */
@ComposeConfigAndCompScan(value = {"com.tsshare.srcspringbootexampletsshare.day1"}) //<1>
public class DemoAnnoConfig {
}
* <1> 使用@ComposeConfigAndCompScan 组合代替@Configuration + @ComponentScan
- (4) 运行
package com.tsshare.srcspringbootexampletsshare.day1;

import com.tsshare.srcspringbootexampletsshare.day1.DemoAnnoConfig;
import com.tsshare.srcspringbootexampletsshare.day1.service.DemoService;
import org.springframework.context.annotation.AnnotationConfigApplicationContext;

/**
 * @author chenzhenfei
 * @title: AnnoMain
 * @projectName spring-boot-build
 * @description: 测试
 * @date 2020/1/823:40
 */

public class AnnoMain {
	public static void main(String[] args) {
		AnnotationConfigApplicationContext context =new AnnotationConfigApplicationContext(DemoAnnoConfig.class);
		DemoService demoService =context.getBean(DemoService.class);
		demoService.demoOutPut();
		context.close();
	}
}
* 结果显示

2、条件注解@Conditional
- 2.1 解释
@Conditional 根据满足某一特定条件创建一个特定的Bean,比方说,当某一个jar包在一个类路径下的时候,自动配置一个或者多个Bean;或者只有某个Bean 被创建才会创建两外一个Bean。总的来说,就是根据特定条件来控制Bean的创建行为,这样我们可以利用这个特性进行一些自动配置。在spring boot 中将会大量应用到条件注解,下面将演示一个@Conditional 的示例来向大家暂时其作用
- 2.2 示例
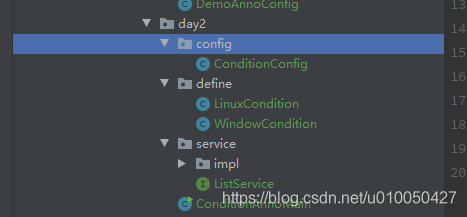
1 、判断条件定义 建立项目

(1) 判断windows 的条件
package com.tsshare.srcspringbootexampletsshare.day2.define;

import org.springframework.context.annotation.Condition;
import org.springframework.context.annotation.ConditionContext;
import org.springframework.core.type.AnnotatedTypeMetadata;

/**
 * @author guabei
 * @title: WindowCondition
 * @projectName spring-boot-build
 * @description: window 条件定义
 * @date 2020/1/90:25
 */
public class WindowCondition implements Condition {
	@Override
	public boolean matches(ConditionContext context, AnnotatedTypeMetadata metadata) {
		return context.getEnvironment().getProperty("os.name").contains("Windows");
	}
}
(2) 判断linux的条件
package com.tsshare.srcspringbootexampletsshare.day2.define;

import org.springframework.context.annotation.Condition;
import org.springframework.context.annotation.ConditionContext;
import org.springframework.core.type.AnnotatedTypeMetadata;

/**
 * @author guabei
 * @title: WindowCondition
 * @projectName spring-boot-build
 * @description: linux 条件定义
 * @date 2020/1/90:25
 */
public class LinuxCondition implements Condition {
	@Override
	public boolean matches(ConditionContext context, AnnotatedTypeMetadata metadata) {
		return context.getEnvironment().getProperty("os.name").contains("Linux");
	}
}
2 、 定义不同系统下的配置Bean 的实体类
(1) 接口
package com.tsshare.srcspringbootexampletsshare.day2.service;

/**
 * @author guabei
 * @title: ListService
 * @projectName spring-boot-build
 * @description: 接口案例
 * @date 2020/1/90:29
 */
public interface ListService {
	String showListCmd();
}
(2)window 所要创建Bean 类
package com.tsshare.srcspringbootexampletsshare.day2.service.impl;

import com.tsshare.srcspringbootexampletsshare.day2.service.ListService;

/**
 * @author guabei
 * @title: WindowListService
 * @projectName spring-boot-build
 * @description: WindowListService
 * @date 2020/1/90:30
 */
public class WindowListService implements ListService {
	@Override
	public String showListCmd() {
		return "Windows - dir";
	}
}
(2)linux 所要创建Bean 类
package com.tsshare.srcspringbootexampletsshare.day2.service.impl;

import com.tsshare.srcspringbootexampletsshare.day2.service.ListService;

/**
 * @author guabei
 * @title: WindowListService
 * @projectName spring-boot-build
 * @description: WindowListService
 * @date 2020/1/90:30
 */
public class LinuxListService implements ListService {
	@Override
	public String showListCmd() {
		return "Linux - ls";
	}
}
3、配置生成Bean 的类
```java
package com.tsshare.srcspringbootexampletsshare.day2.config;

import com.tsshare.srcspringbootexampletsshare.day2.define.LinuxCondition;
import com.tsshare.srcspringbootexampletsshare.day2.define.WindowCondition;
import com.tsshare.srcspringbootexampletsshare.day2.service.ListService;
import com.tsshare.srcspringbootexampletsshare.day2.service.impl.LinuxListService;
import com.tsshare.srcspringbootexampletsshare.day2.service.impl.WindowListService;
import org.springframework.context.annotation.Bean;
import org.springframework.context.annotation.Conditional;
import org.springframework.context.annotation.Configuration;

/**
 * @author guabei
 * @title: ConditionConfig
 * @projectName spring-boot-build
 * @description: TODO
 * @date 2020/1/90:32
 */
@Configuration
public class ConditionConfig {
	@Bean
	/**
	 * <1>
	 */
	@Conditional(WindowCondition.class)
	public ListService windowListService(){
		return new WindowListService();
	}
	@Bean
	/**
	 * <2>
	 */
	@Conditional(LinuxCondition.class)
	public ListService LinuxListService(){
		return new LinuxListService();
	}

}
- <1> 通过@Conditional 注解,符合WindowCondition条件则实例化WindowListService;
- <2> 通过@Conditional 注解,符合LinuxCondition条件则实例化LinuxListService;
4、运行测试
package com.tsshare.srcspringbootexampletsshare.day2;

import com.tsshare.srcspringbootexampletsshare.day1.DemoAnnoConfig;
import com.tsshare.srcspringbootexampletsshare.day1.service.DemoService;
import com.tsshare.srcspringbootexampletsshare.day2.config.ConditionConfig;
import com.tsshare.srcspringbootexampletsshare.day2.service.ListService;
import org.springframework.context.annotation.AnnotationConfigApplicationContext;
import org.springframework.context.annotation.ConditionContext;

/**
 * @author guabei
 * @title: AnnoMain
 * @projectName spring-boot-build
 * @description: 测试
 * @date 2020/1/823:40
 */

public class ConditionAnnoMain {
	public static void main(String[] args) {
		AnnotationConfigApplicationContext context =new AnnotationConfigApplicationContext(ConditionConfig.class);
		ListService demoService =context.getBean(ListService.class);
		String out = demoService.showListCmd();
		System.out.println(context.getEnvironment().getProperty("os.name")+" 系统下的列表命令为:" +out);
		context.close();
	}
}
5、输出结果如图

6、后续复杂类型的注解可以以上分析方式去了解他的实现逻辑。


 128
128


 被折叠的 条评论
为什么被折叠?


