


一、思路解析
1.1 方法调用示例
    //Application中初始化
    public class App extends Application {
        @Override
        public void onCreate() {
            super.onCreate();
            //初始化图片加载库
            DxImageLoader.getInstance().init(getApplicationContext());
        }
    }

    //activity中调用
    ImageView imageView0 = (ImageView) findViewById(R.id.image0);
    DxImageLoader.getInstance().
    load(imgUrls[0]). //load图片地址
    placeholder(R.drawable.default_pic_loading). //placeholder占位图
    error(R.drawable.app_bg). //error错误图
    into(imageView0);  //into显示图片的imageView
1.2 思路解析
二、线程池ExecutorService
2.1创建线程池
    /**cpu核心数*/
    public static final int CPU_COUNT = Runtime.getRuntime().availableProcessors();
    /**线程池线程数*/
    private static final int CORE_POOL_SIZE = CPU_COUNT + 1;
    /**最大线程数*/
    private static final int MAX_POOL_SIZE = 2 * CPU_COUNT + 1;
    /**线程存活时间(单位:TimeUnit.SECONDS)*/
    private static final long KEEP_ALIVE = 5L;
    /**图片加载线程池*/
    public static final ExecutorService threadPoolExecutor = new ThreadPoolExecutor(CORE_POOL_SIZE,
            MAX_POOL_SIZE, KEEP_ALIVE, TimeUnit.SECONDS, new LinkedBlockingQueue<Runnable>());
为了更好地使用和管理线程池,我们这里使用ThreadPoolExecutor来创建,可以传入我们指定的参数,指定工作线程数量,最大的线程数量,线程存活事件,至于线程数量怎么定,请看上面的代码。
你也可以使用系统提供好的方法创建线程池:
    ExecutorService fixedThreadPool = Executors.newFixedThreadPool(5);
    ExecutorService singleThreadPool = Executors.newSingleThreadExecutor();
    ExecutorService cachedThreadPool = Executors.newCachedThreadPool();
    ScheduledExecutorService scheduledThreadPool = Executors.newScheduledThreadPool(5);
    ScheduledExecutorService singleThreadScheduledPool = Executors.newSingleThreadScheduledExecutor();
线程池详细介绍:
Android性能优化之使用线程池处理异步任务
三、内存缓存LruCache
在规定的内存大小范围内,把近期最少使用的数据从缓存中移除,保留使用最频繁的数据。
int maxMemory = (int) (Runtime.getRuntime().maxMemory() / 1024);
        int memoryCacheSize = maxMemory / 8;
        mMemoryCache = new LruCache<String, Bitmap>(memoryCacheSize){
            @Override
            protected int sizeOf(String key, Bitmap value) {
                return value.getByteCount() / 1024;// 获取一个key对应的bitmap占用运行内存大小
                               //至于为什么要除以1024,上面的maxMemory 也是除以1024得到的结果,
                               //取到的都是Byte 单位转成kb计算机的基本存储单位
            }
        };
1TB = 1024GB
1GB = 1024MB
1MB = 1024KB
1KB = 1024Byte
1Byte = 8bit
LruCache详细介绍:
LruCache详解之 Android 内存优化
四、文件缓存DiskLruCache
4.1 下载
由于DiskLruCache并不是由Google官方编写的,所以这个类并没有被包含在Android API当中,我们需要将这个类从网上下载下来,然后手动添加到项目当中。DiskLruCache的源码在Google Source上,地址如下:
无法翻墙的请点击:http://download.csdn.net/detail/sinyu890807/7709759
最近好像很难翻墙,都被XX了。

4.2 创建
是无法直接new的,需要用一个静态方法open来创建:
    /**
     * Opens the cache in {@code directory}, creating a cache if none exists
     * there.
     *
     * @param directory a writable directory 缓存文件路径
     * @param appVersion  app版本号
     * @param valueCount the number of values per cache entry. Must be positive.key
     * 一个对于多少个value,一般都是一对一
     * @param maxSize the maximum number of bytes this cache should use to store
     * 最大缓存空间
     * @throws IOException if reading or writing the cache directory fails
     */
    public static DiskLruCache open(File directory, int appVersion, int valueCount, long maxSize)
            throws IOException {
        if (maxSize <= 0) {
            throw new IllegalArgumentException("maxSize <= 0");
        }
        if (valueCount <= 0) {
            throw new IllegalArgumentException("valueCount <= 0");
        }

        // prefer to pick up where we left off
        DiskLruCache cache = new DiskLruCache(directory, appVersion, valueCount, maxSize);
        if (cache.journalFile.exists()) {
            try {
                cache.readJournal();
                cache.processJournal();
                cache.journalWriter = new BufferedWriter(new FileWriter(cache.journalFile, true),
                        IO_BUFFER_SIZE);
                return cache;
            } catch (IOException journalIsCorrupt) {
//                System.logW("DiskLruCache " + directory + " is corrupt: "
//                        + journalIsCorrupt.getMessage() + ", removing");
                cache.delete();
            }
        }

        // create a new empty cache
        directory.mkdirs();
        cache = new DiskLruCache(directory, appVersion, valueCount, maxSize);
        cache.rebuildJournal();
        return cache;
    }
open方法创建的时候需要传入四个参数,第一个是缓存路径,我们写一个方法来获取,回根据是否存储外置sdcard来创建不同的缓存路径,有sd卡的情况下回优先使用sd卡:
    /**
     * 获取设备的缓存路径
     * @param context
     * @param dirName  缓存文件夹dx_cache_images
     * @return
     */
    public File getDiskCacheDir(Context context, String dirName) {
        String cachePath;
        if (Environment.MEDIA_MOUNTED.equals(Environment.getExternalStorageState())
                || !Environment.isExternalStorageRemovable()) {
            cachePath = context.getExternalCacheDir().getPath();
        } else {
            cachePath = context.getCacheDir().getPath();
        }
        return new File(cachePath + File.separator + dirName);
    }
第二个参数是app版本号,我们直接读取app版本号就行了:
    /**
     * 获取app版本号
     * @param context
     * @return
     */
    public int getAppVersion(Context context) {
        try {
            PackageInfo info = context.getPackageManager().getPackageInfo(context.getPackageName(), 0);
            return info.versionCode;
        } catch (PackageManager.NameNotFoundException e) {
            e.printStackTrace();
        }
        return 1;
    }
第三个参数直接写1,key和value的关系一般情况下都是一对一的。
第四个参数是缓存最大值,在我们使用这个最大值之前最好是先判断一下可用的缓存最大值。
完整创建代码:
     File diskCacheDir = getDiskCacheDir(context,"dx_cache_images");
        if(!diskCacheDir.exists()){
            diskCacheDir.mkdirs();
        }
        if(diskCacheDir.getUsableSpace() >= MAX_DISK_CACHE_SIZE){  //返回分区可用字节的大小
            try {
                //缓存文件, app版本号, 一个key对于多少个value, 最大缓存空间,
                mDiskLruCache = DiskLruCache.open(diskCacheDir, getAppVersion(context), 1, MAX_DISK_CACHE_SIZE);
            } catch (IOException e) {
                e.printStackTrace();
            }
        }
五、Bitmap压缩
至于为啥是压缩Bitmap而不是压缩Drawable ,可以简单地理解为 Bitmap 储存的是 像素信息,Drawable 储存的是 对
Canvas 的一系列操作。而 BitmapDrawable 储存的是「把 Bitmap 渲染到 Canvas
上」这个操作。所以Bitmap才是图片存储之根本,但是在我们拿到Bitmap的时候,Bitmap已经存在于内存中了,所以需要在把图片的数据读取到内存以Bitmap存放之前就对数据进行压缩才有效。
Bitmap压缩分为质量压缩和尺寸压缩,质量压缩是在图片尺寸不改变,也就是因它不会减少图片的像素。它是在保持像素的前提下改变图片的位深及透明度等,来达到压缩图片的目的。注意:质量压缩不会减少图片的运行内存占用,Bitmap运行内存的占用是跟尺寸相关的,尺寸不变,无论图片质量多差都是占用一样的运行内存,但是,质量压缩是会减少文件缓存大小的。
尺寸压缩就是根据你需要的具体尺寸和图片本身的尺寸来按照比例缩放,通过缩放图片像素来减少图片占用运行内存大小。
5.1 Options类介绍
要实现高效加载Bitmap,首先我们要了解Options类的几个参数,因为正是通过合理的配置这几个参数,我们才能够实现高效的加载Bitmap对象。Options类是BitmapFactory的一个静态内部类,我们来看一下它的源码:
public static class Options {
    public Options() {
        inDither = false;
        inScaled = true;
        inPremultiplied = true;
    }
    ...
    public Bitmap inBitmap; //用于实现Bitmap的复用,下面会具体介绍
    public int inSampleSize;  //采样率
   public boolean inPremultiplied;
   public boolean inDither;  //是否开启抖动
   public int inDensity; //即上文我们提到的inDensity
   public int inTargetDensity;  //目标屏幕密度,同上文提到的含义相同
   public boolean inScaled;    //是否支持缩放
   public int outWidth;   //图片的原始宽度
   public int outHeight;  //图片的原始高度
   ...
}
5.2 质量压缩
public static void compressBitmapToFile(Bitmap bmp, File file){
    // 尺寸压缩倍数,值越大,图片尺寸越小
    int ratio = 2;
    // 压缩Bitmap到对应尺寸
    Bitmap result = Bitmap.createBitmap(bmp.getWidth() / ratio, bmp.getHeight() / ratio, Config.ARGB_8888);
    Canvas canvas = new Canvas(result);
    Rect rect = new Rect(0, 0, bmp.getWidth() / ratio, bmp.getHeight() / ratio);
    canvas.drawBitmap(bmp, null, rect, null);

    ByteArrayOutputStream baos = new ByteArrayOutputStream();
    // 把压缩后的数据存放到baos中
    result.compress(Bitmap.CompressFormat.JPEG, 100 ,baos);
    try {
        FileOutputStream fos = new FileOutputStream(file);
        fos.write(baos.toByteArray());
        fos.flush();
        fos.close();
    } catch (Exception e) {
        e.printStackTrace();
    }
}
质量压缩本次没有采用,就是说sd卡的缓存都是缓存的原始图片
5.3 尺寸压缩(操作Options的inSampleSize )
   /**
     * 压缩从文件取出的bitmap
     * @param fd
     * @param dstWidth
     * @param dstHeight
     * @return
     */
    private Bitmap decodeSampledBitmapFromFD(FileDescriptor fd, int dstWidth, int dstHeight) {
        final BitmapFactory.Options options = new BitmapFactory.Options();
        options.inJustDecodeBounds = true;
        BitmapFactory.decodeFileDescriptor(fd, null, options);
        options.inSampleSize = calInSampleSize(options, dstWidth, dstHeight);
        options.inJustDecodeBounds = false;
        return BitmapFactory.decodeFileDescriptor(fd, null, options);
    }
    /**
     * 根据给出的宽高计算图片的采样率
     * @param options
     * @param dstWidth
     * @param dstHeight
     * @return
     */
    private int calInSampleSize(BitmapFactory.Options options, int dstWidth, int dstHeight) {
        //图片本来的宽高
        int rawWidth = options.outWidth;
        int rawHeight = options.outHeight;
        int inSampleSize = 1;
        //当图片本来的宽高 大于 需要的苦宽高 就减小采样率
        if (rawWidth > dstWidth || rawHeight > dstHeight) {
            float ratioWidth = (float) rawWidth / dstHeight;
            float ratioHeight = (float) rawHeight / dstHeight;
            inSampleSize = (int) Math.min(ratioWidth, ratioHeight);
        }
        return inSampleSize;
    }
其中很关键的一个参数就是inSampleSize采样率,inSampleSize的默认值和最小值为1(当小于1时,解码器将该值当做1来处理),且在大于1时,该值只能为2的幂(当不为2的幂时,解码器会取与该值最接近的2的幂,)。其值只能为2的0次方,1次方,2次方 …,也就是0、2、4、8、16 …. 。如我们需要的是在2和3采样率之间,用2的话图片就大了一点,但是用3的话图片质量就会有很明显的下降。这样也无法完全满足我的需要。不过这个方法的好处是大大的缩小了内存的使用,在读存储器上的图片时,如果不需要高清的效果,可以先只读取图片的边,通过宽和高设定好取样率后再加载图片,这样就不会过多的占用内存。
5.4 Bitmap复用(操作Options的inBitmap)
这个参数用来实现Bitmap内存的复用,但复用存在一些限制,具体体现在:在Android 4.4之前只能重用相同大小的Bitmap的内存,而Android 4.4及以后版本则只要后来的Bitmap比之前的小即可。使用inBitmap参数前,每创建一个Bitmap对象都会分配一块内存供其使用,而使用了inBitmap参数后,多个Bitmap可以复用一块内存,这样可以提高性能。
但是 Bitmap的复用在实际使用中是有问题的,所以本次也没有采用:
因为之前遇到过不同的ImageView设置不同ScaleType,然后使用同一张图片会造成相互影响,设置图片圆角也是,所以这也是使用inBitmap要注意的地方。
有兴趣的看看google官方Bitmap复用例子DisplayingBitmaps,代码自己去下载吧!
图片压缩文章推荐
http://www.jianshu.com/p/e9e1db845c21
六、完整代码
package com.dximageloader;
import android.content.Context;
import android.content.pm.PackageInfo;
import android.content.pm.PackageManager;
import android.graphics.Bitmap;
import android.graphics.BitmapFactory;
import android.os.Environment;
import android.os.Handler;
import android.os.Looper;
import android.util.Log;
import android.util.LruCache;
import android.widget.ImageView;
import java.io.BufferedInputStream;
import java.io.BufferedOutputStream;
import java.io.Closeable;
import java.io.File;
import java.io.FileDescriptor;
import java.io.FileInputStream;
import java.io.IOException;
import java.io.OutputStream;
import java.net.HttpURLConnection;
import java.net.URL;
import java.security.MessageDigest;
import java.security.NoSuchAlgorithmException;
import java.util.concurrent.ExecutorService;
import java.util.concurrent.LinkedBlockingQueue;
import java.util.concurrent.ThreadPoolExecutor;
import java.util.concurrent.TimeUnit;
/**
* Created by dawish on 2017/6/25.
*/
public class DxImageLoader {
/**
* 文章导读---------------------------------------------------
* Android DiskLruCache完全解析,硬盘缓存的最佳方案 http://blog.csdn.net/guolin_blog/article/details/28863651
* Android性能优化之使用线程池处理异步任务 http://blog.csdn.net/u010687392/article/details/49850803
* Android开发之高效加载Bitmap http://www.cnblogs.com/absfree/p/5361167.html
* Android线程同步 http://blog.csdn.net/peng6662001/article/details/7277851/
*
* 方法调用顺序-----------------------------------------------
* load --> placeholder --> error --> into
*
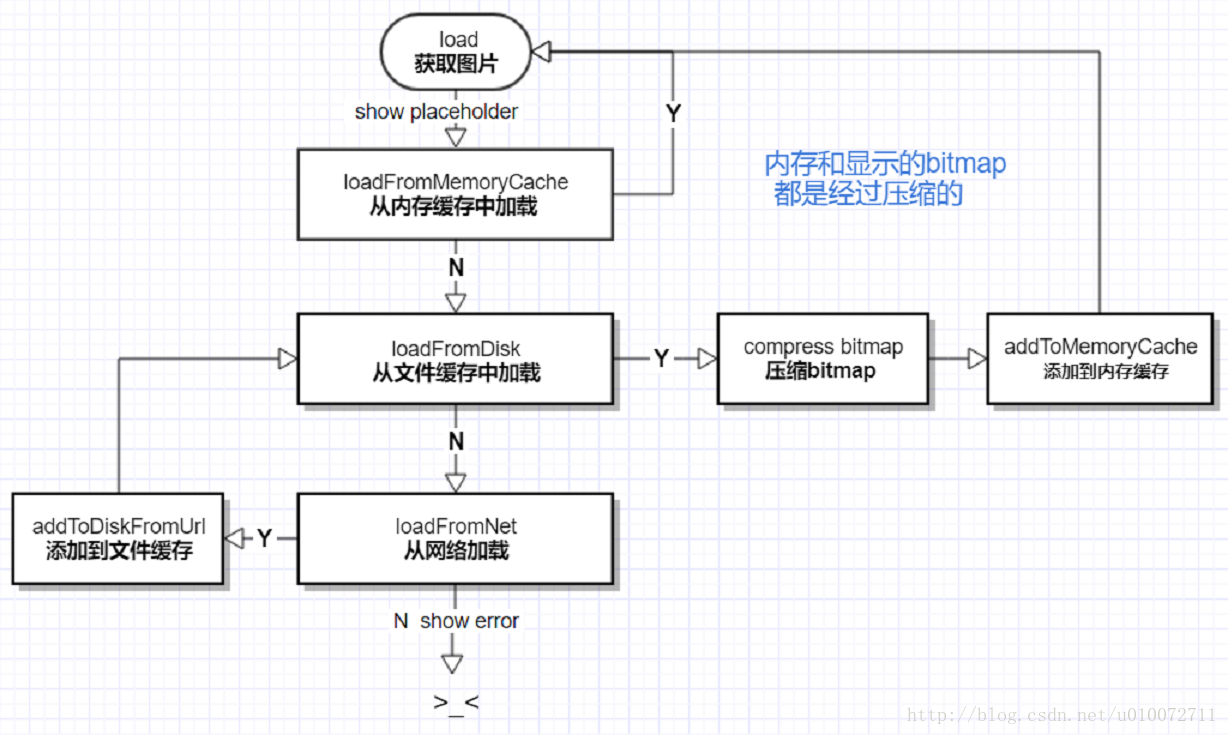
* 图片加载顺序---------------------------------------------
* loadFromMemoryCache 成功返回bitmap
* loadFromDisk =》addToMemoryCache 获取成功并压缩后把bitmap添加到运行内存 返回bitmap
* ↑
* <----------------------------------
* ↑
* loadFromNet =》 addToDisk =》 loadFromDisk 网络获取成功后
* 调用loadFromDisk添加到文件缓存(返回压缩的bitmap 并添加到运行内存)
*
*
*/
private final static String TAG = "DxImageLoader";
/**单例*/
private static DxImageLoader mInstance;
/**最大的文件缓存量*/
private static final int MAX_DISK_CACHE_SIZE = 10 * 1024 * 1024;
/**cpu核心数*/
public static final int CPU_COUNT = Runtime.getRuntime().availableProcessors();
/**线程池线程数*/
private static final int CORE_POOL_SIZE = CPU_COUNT + 1;
/**最大线程数*/
private static final int MAX_POOL_SIZE = 2 * CPU_COUNT + 1;
/**线程存活时间(单位:TimeUnit.SECONDS)*/
private static final long KEEP_ALIVE = 5L;
/**图片加载线程池*/
public static final ExecutorService threadPoolExecutor = new ThreadPoolExecutor(CORE_POOL_SIZE,
MAX_POOL_SIZE, KEEP_ALIVE, TimeUnit.SECONDS, new LinkedBlockingQueue<Runnable>());
/**内存缓存*/
private LruCache<String, Bitmap> mMemoryCache;
/**文件缓存*/
private DiskLruCache mDiskLruCache;
/**主线的handler方便在其他的线程中显示UI操作*/
private Handler mMainHandler = new Handler(Looper.getMainLooper());
private DxImageLoader(){
}
private boolean inited = false;
/**单例模式*/
public static DxImageLoader getInstance(){
if(null == mInstance){
synchronized (DxImageLoader.class){
if(null == mInstance){
mInstance = new DxImageLoader();
}
}
}
return mInstance;
}
public void init(Context context){
Log.i(TAG, TAG+" init");
int maxMemory = (int) (Runtime.getRuntime().maxMemory() / 1024);
int memoryCacheSize = maxMemory / 8;
mMemoryCache = new LruCache<String, Bitmap>(memoryCacheSize){
@Override
protected int sizeOf(String key, Bitmap value) {
return value.getByteCount() / 1024;// 获取图片占用运行内存大小
}
};
File diskCacheDir = getDiskCacheDir(context,"dx_cache_images");
if(!diskCacheDir.exists()){
diskCacheDir.mkdirs();
}
if(diskCacheDir.getUsableSpace() >= MAX_DISK_CACHE_SIZE){ //返回分区可用字节的大小
try {
//缓存文件, app版本号, 一个key对于多少个value, 最大缓存空间,
mDiskLruCache = DiskLruCache.open(diskCacheDir, getAppVersion(context), 1, MAX_DISK_CACHE_SIZE);
} catch (IOException e) {
e.printStackTrace();
}
}
inited = true;
}
/**
* 如果不存在于内存就add
* @param key
* @param bitmap
*/
private void addToMemoryCache(String key, Bitmap bitmap) {
if (loadFromMemoryCache(key) == null) {
Log.i(TAG,"addToMemoryCache");
mMemoryCache.put(key, bitmap);
}
}
/**
* 首选 1
* 根据key值获取内存中的bitmap
* @param key
* @return
*/
private Bitmap loadFromMemoryCache(String key) {
return mMemoryCache.get(key);
}
/**
* 次选 2
* 从文件缓存中获取图片 (这个步骤会对返回和内存缓存的bitmap进行压缩)
* @param url url(也是存取图片的key)
* @param dstWidth
* @param dstHeight
* @return
* @throws IOException
*/
private Bitmap loadFromDisk(String url, int dstWidth, int dstHeight) throws IOException {
if (Looper.myLooper() == Looper.getMainLooper()) {
Log.i(TAG, "should not Bitmap in main thread");
}
if (mDiskLruCache == null) {
return null;
}
Bitmap bitmap = null;
String key = getKeyFromUrl(url);
DiskLruCache.Snapshot snapshot = mDiskLruCache.get(key);
if (snapshot != null) {
FileInputStream fileInputStream = (FileInputStream) snapshot.getInputStream(0);
FileDescriptor fileDescriptor = fileInputStream.getFD();
bitmap = decodeSampledBitmapFromFD(fileDescriptor, dstWidth, dstHeight);
if (bitmap != null) {
addToMemoryCache(key, bitmap);
}
}
return bitmap;
}
/**
* 最后选 3
* 运行内存和文件中都没有获取到后就从网络获取
* 从网络获取成功后添加到 文件缓存 和 内存缓存
* @param url
* @param dstWidth
* @param dstHeight
* @return
* @throws IOException
*/
private Bitmap loadFromNet(String url, int dstWidth, int dstHeight) throws IOException {
if (Looper.myLooper() == Looper.getMainLooper()) {
throw new RuntimeException("Do not load Bitmap in main thread.");
}
if (mDiskLruCache == null) {
return null;
}
String key = getKeyFromUrl(url);
DiskLruCache.Editor editor = mDiskLruCache.edit(key);
if (editor != null) {
OutputStream outputStream = editor.newOutputStream(0);
if (addToDiskFromUrl(url, outputStream)) {
editor.commit();
} else {
editor.abort();
}
mDiskLruCache.flush();
}
return loadFromDisk(url, dstWidth, dstHeight);
}
/**
* 根据url用http的方式获取图片 写入到DiskLruCache的输出流
* @param urlString
* @param outputStream 写到DiskLruCache的输出流
* @return
*/
public boolean addToDiskFromUrl(String urlString, OutputStream outputStream) {
HttpURLConnection urlConnection = null;
BufferedInputStream bis = null;
BufferedOutputStream bos = null;
try {
final URL url = new URL(urlString);
urlConnection = (HttpURLConnection) url.openConnection();
bis = new BufferedInputStream(urlConnection.getInputStream());
bos = new BufferedOutputStream(outputStream);
int byteRead;
while ((byteRead = bis.read()) != -1) {
bos.write(byteRead);
}
return true;
}catch (IOException e) {
e.printStackTrace();
} finally {
if (urlConnection != null) {
urlConnection.disconnect();
}
close(bis);
close(bos);
}
return false;
}
/**
* 关闭流
* @param stream
*/
public void close(Closeable stream) {
if (stream != null) {
try {
stream.close();
} catch (IOException e) {
e.printStackTrace();
}
}
}
/**
* 压缩从文件取出的bitmap
* @param fd
* @param dstWidth
* @param dstHeight
* @return
*/
private Bitmap decodeSampledBitmapFromFD(FileDescriptor fd, int dstWidth, int dstHeight) {
final BitmapFactory.Options options = new BitmapFactory.Options();
options.inJustDecodeBounds = true;
BitmapFactory.decodeFileDescriptor(fd, null, options);
options.inSampleSize = calInSampleSize(options, dstWidth, dstHeight);
options.inJustDecodeBounds = false;
return BitmapFactory.decodeFileDescriptor(fd, null, options);
}
/**
* 根据给出的宽高计算图片的采样率
* @param options
* @param dstWidth
* @param dstHeight
* @return
*/
private int calInSampleSize(BitmapFactory.Options options, int dstWidth, int dstHeight) {
//图片本来的宽高
int rawWidth = options.outWidth;
int rawHeight = options.outHeight;
int inSampleSize = 1;
//当图片本来的宽高 大于 需要的苦宽高 就减小采样率
if (rawWidth > dstWidth || rawHeight > dstHeight) {
float ratioWidth = (float) rawWidth / dstHeight;
float ratioHeight = (float) rawHeight / dstHeight;
inSampleSize = (int) Math.min(ratioWidth, ratioHeight);
}
return inSampleSize;
}
/**
* 获取设备的缓存路径
* @param context
* @param dirName 缓存文件夹dx_cache_images
* @return
*/
public File getDiskCacheDir(Context context, String dirName) {
String cachePath;
if (Environment.MEDIA_MOUNTED.equals(Environment.getExternalStorageState())
|| !Environment.isExternalStorageRemovable()) {
cachePath = context.getExternalCacheDir().getPath();
} else {
cachePath = context.getCacheDir().getPath();
}
return new File(cachePath + File.separator + dirName);
}
/**
* 获取app版本号
* @param context
* @return
*/
public int getAppVersion(Context context) {
try {
PackageInfo info = context.getPackageManager().getPackageInfo(context.getPackageName(), 0);
return info.versionCode;
} catch (PackageManager.NameNotFoundException e) {
e.printStackTrace();
}
return 1;
}
/**
* 图片url作为存取的key做md5处理
* @param url
* @return
*/
private String getKeyFromUrl(String url) {
String key;
try {
MessageDigest messageDigest = MessageDigest.getInstance("MD5");
messageDigest.update(url.getBytes());
byte[] m = messageDigest.digest();
return byteToString(m);
} catch (NoSuchAlgorithmException e) {
key = String.valueOf(url.hashCode());
}
return key;
}
/**
* byte To String
* @param b
* @return
*/
private static String byteToString(byte[] b){
StringBuffer sb = new StringBuffer();
for(int i = 0; i < b.length; i ++){
sb.append(b[i]);
}
return sb.toString();
}
/**
* step 1(必须步骤)
* 加载图片的url地址,返回RequestCreator对象
* @param url
* @return
*/
public RequestCreator load(String url) {
return new RequestCreator(url);
}
/**
* 图片创建类
*/
public class RequestCreator implements Runnable{
String url; //图片请求url
int holderResId; //默认显示的图片
int errorResId; //加载失败的图片
ImageView imageView; //
int dstWidth; //期望的宽
int dstHeight; //期望的高
/**
*
* @param url 初始化图片的url地址
*/
public RequestCreator(String url) {
this.url = url;
}
/**
* step 2(可无步骤)
* 设置默认图片,占位图片
* @param holderResId
*/
public RequestCreator placeholder(int holderResId) {
this.holderResId = holderResId;
return this;
}
/**
* step 3(可无步骤)
* 发生错误加载的图篇
* @param errorResId
*/
public RequestCreator error(int errorResId) {
this.errorResId = errorResId;
return this;
}
/**
* step 4(必须步骤)
* 提供设置图片的核心方法
*
* @param imageView
*/
public void into(ImageView imageView) {
// 变成全局的
this.imageView = imageView;
if(imageView!=null){
this.dstWidth = imageView.getWidth();
this.dstHeight = imageView.getHeight();
}
//向线程池中添加任务
threadPoolExecutor.execute(this);
}
/**
* step 4(必须步骤)
* 提供设置图片的核心方法
*
* @param imageView
*/
public void into(ImageView imageView, int dstWidth, int dstHeight) {
// 变成全局的
this.imageView = imageView;
this.dstWidth = dstWidth;
this.dstHeight = dstHeight;
//向线程池中添加任务
threadPoolExecutor.execute(this);
}
@Override
public void run() {
//开始加载图片
try {
//显示占位图
if(holderResId!=0){
displayImage(holderResId);
}
Bitmap bitmap;
Log.i(TAG, "开始任务");
String key = getKeyFromUrl(url);
bitmap = loadFromMemoryCache(key);
if (bitmap != null) {
Log.i(TAG, "loadFromMemoryCache");
displayImage(bitmap);
return;
}
bitmap = loadFromDisk(url, dstWidth, dstHeight);
if (bitmap != null) {
Log.i(TAG, "loadFromDisk");
displayImage(bitmap);
return;
}
bitmap = loadFromNet(url, dstWidth, dstHeight);
if (bitmap != null) {
Log.i(TAG, "loadFromNet");
displayImage(bitmap);
return;
}
if(0 != errorResId) displayImage(errorResId);
} catch (IOException e) {
e.printStackTrace();
displayImage(errorResId);
}
}
private void displayImage(final Bitmap bitmap){
mMainHandler.post(new Runnable() {
@Override
public void run() {
imageView.setImageBitmap(bitmap);
}
});
}
private void displayImage(final int resId){
mMainHandler.post(new Runnable() {
@Override
public void run() {
imageView.setImageResource(resId);
}
});
}
}
/**
* 取消所有任务
*/
public void cancelAllTask(){
if(mMainHandler!=null){
mMainHandler.removeCallbacksAndMessages(null);
}
if(threadPoolExecutor!=null){
threadPoolExecutor.shutdownNow();
}
}
}
七、Github地址
https://github.com/Dawish/CustomViews/tree/master/Dximageloader


 1747
1747

 被折叠的 条评论
为什么被折叠?
被折叠的 条评论
为什么被折叠?
 到【灌水乐园】发言


