


转载请标明出处:http://blog.csdn.net/u010136741/article/details/41893675 , 本文出自:【木木--MAIKA】
本来是想写这样一篇文章的分析”FrameLayout,并写一个圆形菜单的Layout",结果代码到一半,发现我还是太菜鸟了,源码看到一半就头大!只能放弃看源码,百度相关博客!
写作目的源于市面是很多圆环菜单组合,甚至有些是可以转动的,所以本人不自量力,看过一些demo之后,想自己写个简单自定义控件,就叫CircleLayout吧!
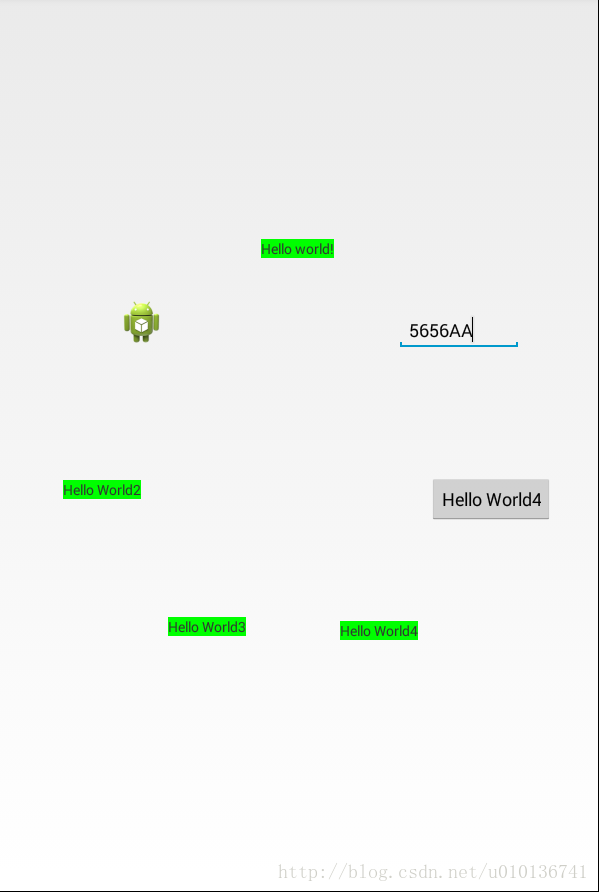
最后实现了一个简单的CircleLayout,效果如下:
好,现在开始讲解:
首先,我们知道,像LinearLayou,RelativeLayou,FrameLayou都是继承自ViewGroup,所以我们自然而然的会让CircleLayout继承自ViewGroup,然后发现要重写onLayout方法。
onLayout方法主要是对子控件进行定位。然后,还要重写onMeasure方法。然后还要未这个控件添加两个自定义属性radius和offset,即半径和偏移角度:
自定义属性的实现:
一、在res/values 文件下定义一个attrs.xml 文件.代码如下:
<?xml version="1.0" encoding="utf-8"?>
<resources>

    <declare-styleable name="CircleLayout">
        <attr name="radius" format="dimension" />
        <attr name="offset" format="integer" />
    </declare-styleable>

</resources>
在layout 文件中,要声明新的命名空间:
xmlns:circle="http://schemas.android.com/apk/res/com.kylin.demo_circlelayout"
   <com.kylin.demo_circlelayout.CircleLayout
        android:layout_width="match_parent"
        android:layout_height="wrap_content"
        android:layout_marginTop="10dp"
        circle:radius="200dp" >
然后在类的构造方法中获取属性值:
	public CircleLayout(Context context, AttributeSet attrs) {
		super(context, attrs);
		setWillNotDraw(false);
		TypedArray a = context.obtainStyledAttributes(attrs,
				R.styleable.CircleLayout);
		radius = a.getDimension(R.styleable.CircleLayout_radius, 20);
		offset = a.getInteger(R.styleable.CircleLayout_offset, 0);
		System.out.println("radius:"+radius);
		// TODO Auto-generated constructor stub
	}
贴上整个类的代码:
package com.kylin.demo_circlelayout;

import android.content.Context;
import android.content.res.TypedArray;
import android.util.AttributeSet;
import android.view.View;
import android.view.ViewGroup;

public class CircleLayout extends ViewGroup{

	private float radius;//圆半径
	private int mDegreeDelta; //角度间距
	private int offset;//偏移角度

	public CircleLayout(Context context, AttributeSet attrs, int defStyle) {
		super(context, attrs, defStyle);
		// TODO Auto-generated constructor stub
	}

	public CircleLayout(Context context, AttributeSet attrs) {
		super(context, attrs);
		TypedArray a = context.obtainStyledAttributes(attrs,
				R.styleable.CircleLayout);
		//圆半径
		radius = a.getDimension(R.styleable.CircleLayout_radius, 20);
		//偏移角度
		offset = a.getInteger(R.styleable.CircleLayout_offset, 0);
		System.out.println("radius:"+radius);
		// TODO Auto-generated constructor stub
		a.recycle();
	}

	public CircleLayout(Context context) {
		super(context);
		// TODO Auto-generated constructor stub
	}


	@Override
	protected void onLayout(boolean changed, int left, int top, int right, int bottom) {
		// TODO Auto-generated method stub
		//获取子view个数
		final int count = getChildCount();
		//计算各个子view之间的角度差
		mDegreeDelta = 360/count;


		final int parentLeft = getPaddingLeft();
		final int parentRight = right - left - getPaddingRight();

		final int parentTop = getPaddingTop();
		final int parentBottom = bottom - top - getPaddingBottom();

		if (count < 1 ) {
			return;
		}
		System.out.println(Math.cos(0*Math.PI/180));
		for (int i = 0; i < count; i++) {

			final View child = getChildAt(i);
			if (child.getVisibility() != GONE) {

				final int width = child.getMeasuredWidth();
				final int height = child.getMeasuredHeight();

				int childLeft;
				int childTop;
				if (count == 1) {
					childLeft = parentLeft + (parentRight - parentLeft - width) / 2;
					childTop = parentTop + (parentBottom - parentTop - height) / 2 ;
					child.layout(childLeft, childTop,childLeft+width,childTop+height);

				}else{

					childLeft = (int) (parentLeft + (parentRight - parentLeft-width) / 2-(radius * Math.sin((i*mDegreeDelta+offset)*Math.PI/180)));
					childTop = (int) (parentTop + (parentBottom - parentTop-height) / 2-(radius * Math.cos((i*mDegreeDelta+offset)*Math.PI/180))) ;
					child.layout(childLeft, childTop,childLeft+width,childTop+height);

				}

			}
		}

	}


	@Override
	protected void onMeasure(int widthMeasureSpec, int heightMeasureSpec)
	{
		/**
		 * 获得此ViewGroup上级容器为其推荐的宽和高,以及计算模式
		 */
		int sizeWidth = MeasureSpec.getSize(widthMeasureSpec);
		int sizeHeight = MeasureSpec.getSize(heightMeasureSpec);

		// 计算出所有的childView的宽和高
		measureChildren(widthMeasureSpec, heightMeasureSpec);
		setMeasuredDimension(sizeWidth, sizeHeight);
	}


}
在onlayout方法中:
判断子控件的个数,如果只有一个,就让他置于圆心,
然后是布局文件:
<RelativeLayout xmlns:android="http://schemas.android.com/apk/res/android"
    xmlns:tools="http://schemas.android.com/tools"
    xmlns:circle="http://schemas.android.com/apk/res/com.kylin.demo_circlelayout"
    android:layout_width="match_parent"
    android:layout_height="match_parent"
    android:paddingBottom="@dimen/activity_vertical_margin"
    android:paddingLeft="@dimen/activity_horizontal_margin"
    android:paddingRight="@dimen/activity_horizontal_margin"
    android:paddingTop="@dimen/activity_vertical_margin"
    tools:context=".MainActivity" >

    <com.kylin.demo_circlelayout.CircleLayout
        android:layout_width="match_parent"
        android:layout_height="wrap_content"
        android:layout_marginTop="10dp"
        circle:radius="200dp" >

        <TextView
            android:layout_width="wrap_content"
            android:layout_height="wrap_content"
            android:background="#0f0"
            android:text="@string/hello_world" />

        <ImageView
            android:layout_width="wrap_content"
            android:layout_height="wrap_content"
            android:contentDescription="@string/testing"
            android:src="@drawable/ic_launcher" />

        <TextView
            android:layout_width="wrap_content"
            android:layout_height="wrap_content"
            android:background="#0f0"
            android:text="@string/hello_world2" />

        <TextView
            android:layout_width="wrap_content"
            android:layout_height="wrap_content"
            android:background="#0f0"
            android:text="@string/hello_world3" />

        <TextView
            android:layout_width="wrap_content"
            android:layout_height="wrap_content"
            android:background="#0f0"
            android:text="@string/hello_world4" />

        <Button
            android:layout_width="wrap_content"
            android:layout_height="wrap_content"
            android:text="@string/hello_world4" />

        <EditText
            android:layout_width="wrap_content"
            android:layout_height="wrap_content"
            android:hint="@string/hello_world4" />
    </com.kylin.demo_circlelayout.CircleLayout>

</RelativeLayout>
如果不定义offset属性值,默认属性值为0,即第一个子控件在圆的顶部。
在调试过程中,还重写了ondraw方法,发现未被调用,百度了下,才知道viewgroup默认不调用ondraw方法,要在构造方法中setWillNotDraw(false);才会执行ondraw方法。
没怎么写过博客,实在写得不好!然后代码也有很多不足和完善的地方,望各位看官谅解!希望大家多提宝贵意见!!
最后,附上相关博客文章
感谢他们的分享,也希望大家能分享好的资源和文章!
最后,附上github源码


 2862
2862


 被折叠的 条评论
为什么被折叠?
被折叠的 条评论
为什么被折叠?
 到【灌水乐园】发言


