


概述
JavaFX Canvas API提供了一个可以灵活的画笔。 它由javafx.scene.canvas包中的Canvas,CanvasBuilder和GraphicsContext等3个类声明。 使用此API创建Canvas对象,获取其GraphicsContext以及调用绘图操作以在屏幕上呈现自定义形状。 因为Canvas是Node子类(个人理解:即叶子节点),它可以在JavaFX场景图中使用。
绘制基本形状
如下创建一个Canvas,获取其GraphicsContext,并为其绘制一些基本形状。 使用GraphicsContext类的方法可以实现线条,椭圆,圆角矩形,圆弧和多边形。

示例1:绘制基本形状
package canvastest;

import javafx.application.Application;
import javafx.scene.Group;
import javafx.scene.Scene;
import javafx.scene.canvas.Canvas;
import javafx.scene.canvas.GraphicsContext;
import javafx.scene.paint.Color;
import javafx.scene.shape.ArcType;
import javafx.stage.Stage;

public class BasicOpsTest extends Application {

    public static void main(String[] args) {
        launch(args);
    }

    @Override
    public void start(Stage primaryStage) {
        primaryStage.setTitle("Drawing Operations Test");
        Group root = new Group();
        Canvas canvas = new Canvas(300, 250);
        GraphicsContext gc = canvas.getGraphicsContext2D();
        drawShapes(gc);
        root.getChildren().add(canvas);
        primaryStage.setScene(new Scene(root));
        primaryStage.show();
    }

    private void drawShapes(GraphicsContext gc) {
        gc.setFill(Color.GREEN);
        gc.setStroke(Color.BLUE);
        gc.setLineWidth(5);
        gc.strokeLine(40, 10, 10, 40);
        gc.fillOval(10, 60, 30, 30);
        gc.strokeOval(60, 60, 30, 30);
        gc.fillRoundRect(110, 60, 30, 30, 10, 10);
        gc.strokeRoundRect(160, 60, 30, 30, 10, 10);
        gc.fillArc(10, 110, 30, 30, 45, 240, ArcType.OPEN);
        gc.fillArc(60, 110, 30, 30, 45, 240, ArcType.CHORD);
        gc.fillArc(110, 110, 30, 30, 45, 240, ArcType.ROUND);
        gc.strokeArc(10, 160, 30, 30, 45, 240, ArcType.OPEN);
        gc.strokeArc(60, 160, 30, 30, 45, 240, ArcType.CHORD);
        gc.strokeArc(110, 160, 30, 30, 45, 240, ArcType.ROUND);
        gc.fillPolygon(new double[]{10, 40, 10, 40},
                       new double[]{210, 210, 240, 240}, 4);
        gc.strokePolygon(new double[]{60, 90, 60, 90},
                         new double[]{210, 210, 240, 240}, 4);
        gc.strokePolyline(new double[]{110, 140, 110, 140},
                          new double[]{210, 210, 240, 240}, 4);
    }
}
如例1所示,Canvas被实例化为300X250.然后通过调用canvas.getGraphicsContext2D()获得GraphicsContext。 通过调用strokeLine,fillOval,strokeArc和fillPolygon等方法执行一系列基本绘图操作。
渐变及阴影
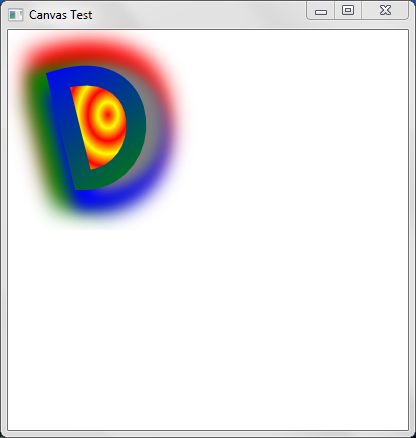
通过绘制自定义形状以及一些渐变和阴影来尝试更多的GraphicsContext方法。 如下图所示:
The code for this example is organized so that each drawing operation is carried out in its own private method. This allows you to test out different features by simply invoking (or commenting out) the methods of interest. Just keep in mind that in terms of learning the Canvas API, the code to focus on is the underlying calls to the Canvas or GraphicsContext objects.
There are five main parts to this pattern.
First, the position of the Canvas is set at coordinates(0,0). This is done by invoking the code in Example 2, which applies a translation transformation to the underlying Canvas object.
Example 2 Moving the Canvas
private void moveCanvas(int x, int y) {
    canvas.setTranslateX(x);
    canvas.setTranslateY(y);
}
You can pass in other values as parameters to move the Canvas to a new location. The values that you pass in will be forwarded to the setTranslateX and setTranslateY methods, and the Canvaswill move accordingly.
Next, the primary shape (which looks like the capital letter "D") is drawn on screen. This is done with a bezier curve, invoked through the bezierCurveTo method of the GraphicsContecxt object.
Example 3 Drawing a Bezier Curve (Capital "D") On Screen
private void drawDShape() {
    gc.beginPath();
    gc.moveTo(50, 50);
    gc.bezierCurveTo(150, 20, 150, 150, 75, 150);
    gc.closePath();
}
You can experiment with this shape by changing the parameter values. The bezierCurveTo will stretch and pull the shape as you do.
After that, a red and yellow RadialGradient provides the circular pattern that appears in the background.
Example 4 Drawing a RadialGradient
private void drawRadialGradient(Color firstColor, Color lastColor) {
    gc.setFill(new RadialGradient(0, 0, 0.5, 0.5, 0.1, true,
               CycleMethod.REFLECT,
               new Stop(0.0, firstColor),
               new Stop(1.0, lastColor)));
    gc.fill();
}
Here, the setFill method of the GraphicsContext accepts a RadialGradient object as its parameter. Again, you can experiment with different values, or pass in different colors as you prefer.
A LinearGradient colors the custom "D" shape, from blue to green:
Example 5 Drawing a LinearGradient
private void drawLinearGradient(Color firstColor, Color secondColor) {
    LinearGradient lg = new LinearGradient(0, 0, 1, 1, true,
                        CycleMethod.REFLECT,
                        new Stop(0.0, firstColor),
                        new Stop(1.0, secondColor));
    gc.setStroke(lg);
    gc.setLineWidth(20);
    gc.stroke();
}
This code sets the stroke of the GraphicsContext to use the LinearGradient, then renders the pattern with gc.stroke().
And finally, the multi-colored drop shadow is provided invoking applyEffect on the GraphicContext object.
Example 6 Adding a DropShadow
private void drawDropShadow(Color firstColor, Color secondColor,
                            Color thirdColor, Color fourthColor) {
    gc.applyEffect(new DropShadow(20, 20, 0, firstColor));
    gc.applyEffect(new DropShadow(20, 0, 20, secondColor));
    gc.applyEffect(new DropShadow(20, -20, 0, thirdColor));
    gc.applyEffect(new DropShadow(20, 0, -20, fourthColor));
}
As shown in Example 6, this effect is applied by creating a DropShadow object with a specified color, which gets passed to the applyEffect method of the GraphicsContext object.
Interacting with the User
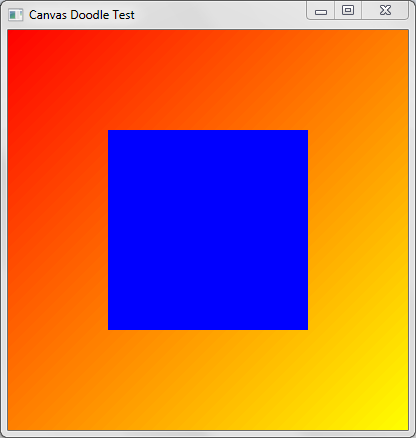
In the following demo (project CanvasDoodleTest) a blue square appears on screen, which will slowly be erased as the user drags the mouse across its surface.
Figure 3 Interacting with the User
Description of "Figure 3 Interacting with the User"
You have already seen how to create basic shapes and gradients, so the code in Example 7 focuses only on the portions responsible for interacting with the user.
Example 7 Interacting with the User
    ...

private void reset(Canvas canvas, Color color) {
    GraphicsContext gc = canvas.getGraphicsContext2D();
    gc.setFill(color);
    gc.fillRect(0, 0, canvas.getWidth(), canvas.getHeight());
}

@Override
public void start(Stage primaryStage) {
    ...
    final GraphicsContext gc = canvas.getGraphicsContext2D();
    ...

    // Clear away portions as the user drags the mouse
       canvas.addEventHandler(MouseEvent.MOUSE_DRAGGED,
       new EventHandler<MouseEvent>() {
           @Override
           public void handle(MouseEvent e) {
               gc.clearRect(e.getX() - 2, e.getY() - 2, 5, 5);
           }
       });

    // Fill the Canvas with a Blue rectnagle when the user double-clicks
       canvas.addEventHandler(MouseEvent.MOUSE_CLICKED,
        new EventHandler<MouseEvent>() {
            @Override
            public void handle(MouseEvent t) {
                if (t.getClickCount() >1) {
                    reset(canvas, Color.BLUE);
                }
            }
        });
...
Example 7 defines a reset method that fills the entire rectangle with its default blue color. But the most interesting code appears in the start method, which is overridden to interact with the user. The first commented section adds an event handler to process MouseEvent objects as the user drags the mouse. With each drag, the clearRect method of the GraphicsContext object is invoked, passing in the current mouse coordinates, plus the size of the area to clear away. As this takes place, the background gradient will show through, as seen in Figure 4.
Figure 4 Clearing Away the Rectangle
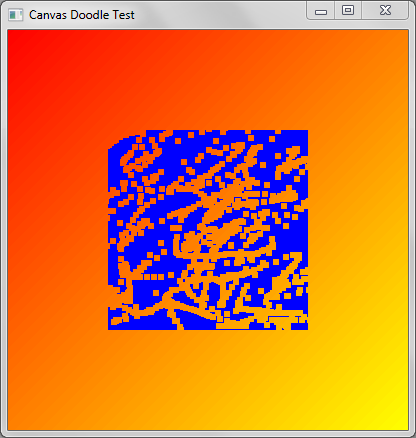
Description of "Figure 4 Clearing Away the Rectangle"
The remaining code simply counts the number of clicks, and resets the blue square to its original state if the user double-clicks the mouse.
Creating a Simple Layer System
You can also instantiate multiple Canvas objects, and use them to define a simple layer system. Switching layers therefore becomes a matter of selecting the desired Canvas and writing to it. (A Canvas object is completely transparent, and shows through until you draw on parts of it.)
This final demo (LayerTest project) defines such a system by adding creating two Canvas objects, placed directly on top of each other. As you click on the screen, a colored circle will appear on the layer that is currently selected. You can change layers by using the ChoiceBox at the top of the screen. Circles added to layer 1 will be green. Circles added to layer 2 will be blue.
Figure 5 Creating a Simple Layer System
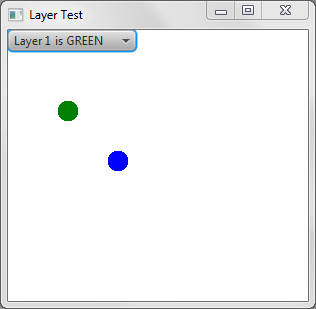
Description of "Figure 5 Creating a Simple Layer System"
The GUI for this demo uses a BorderPane to manage its components. A ChoiceBox is added to the top, and the two Canvas objects are added to a Panel which is then added to the center of the screen.
Example 8 Creating and Adding the Layers
    ...

private void createLayers(){
    // Layers 1&2 are the same size
    layer1 = new Canvas(300,250);
    layer2 = new Canvas(300,250);

    // Obtain Graphics Contexts
    gc1 = layer1.getGraphicsContext2D();
    gc1.setFill(Color.GREEN);
    gc1.fillOval(50,50,20,20);
    gc2 = layer2.getGraphicsContext2D();
    gc2.setFill(Color.BLUE);
    gc2.fillOval(100,100,20,20);
}
    ...

private void addLayers(){
    // Add Layers
    borderPane.setTop(cb);
    Pane pane = new Pane();
    pane.getChildren().add(layer1);
    pane.getChildren().add(layer2);
    layer1.toFront();
    borderPane.setCenter(pane);
    root.getChildren().add(borderPane);
}
    ...
User interaction is accomplished by adding an event handler directly to each layer. Clicking on the Canvas will generate a MouseEvent, which when received, will draw a circle at the current mouse location.
Example 9 Adding Event Handlers
private void handleLayers(){
    // Handler for Layer 1
    layer1.addEventHandler(MouseEvent.MOUSE_PRESSED,
    new EventHandler<MouseEvent>() {
        @Override
        public void handle(MouseEvent e) {
            gc1.fillOval(e.getX(),e.getY(),20,20);
        }
    });

    // Handler for Layer 2
    layer2.addEventHandler(MouseEvent.MOUSE_PRESSED,
        new EventHandler<MouseEvent>() {
            @Override
            public void handle(MouseEvent e) {
                gc2.fillOval(e.getX(),e.getY(),20,20);
            }
        });
    }
Because both layers are placed directly on top of each other, only the topmost Canvas will process the mouse clicks. To move a specific layer to the front of the stack, simply select it from the ChoiceBox component at the top of the screen.
Example 10 Selecting a Layer
private void createChoiceBox(){
    cb = new ChoiceBox();
    cb.setItems(FXCollections.observableArrayList(
              "Layer 1 is GREEN", "Layer 2 is BLUE"));
    cb.getSelectionModel().selectedItemProperty().
    addListener(new ChangeListener(){
    @Override
    public void changed(ObservableValue o, Object o1, Object o2){
        if(o2.toString().equals("Layer 1 is GREEN")){
            layer1.toFront();
          }else if(o2.toString().equals("Layer 2 is BLUE")){
              layer2.toFront();
                }
            }
        });
        cb.setValue("Layer 1 is GREEN");
    }
As shown in Example 10, a ChangleListener is registered on the ChoiceBox, and brings the selected layer to the foreground by invoking toFront() on the appropriate Canvas. Layer selection will become even more apparent as you switch layers after adding lots of blue and green circles. You will be able to tell (from looking at the circle edges) which layer has been moved to the front. Figure 6 and Figure 7 show what this looks like.
Figure 6 Selecting Layer 1
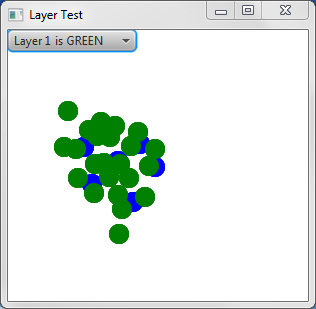
Description of "Figure 6 Selecting Layer 1"
Figure 7 Selecting Layer 2
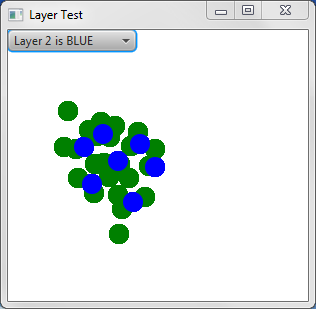
Description of "Figure 7 Selecting Layer 2"
The ability to select layers is common in software applications, such as image manipulation programs. And because each Canvas object is a Node, you are free to apply all the standard transformations and visual effects that you would on other components.


 1074
1074

 被折叠的 条评论
为什么被折叠?
被折叠的 条评论
为什么被折叠?
 到【灌水乐园】发言


