


目录
Python插件:pymysql 、requests 、jsonschema 、parameterized 、htmltestreport
一、Requests库
1、Requests库安装和简介
1.1 简介
Requests库 是 Python编写的,基于urllib 的 HTTP库,使用方便。
1.2 安装
方法1:
pip install requests方法2:
豆瓣镜像:https://pypi.douban.com/simple/
pip install requests -i https://pypi.douban.com/simple/
1.3 查验
步骤1:pip 中查验
# 方法1
pip list

# 方法2
pip show 库名
步骤2:pycharm 中查验


2、设置http请求语法
resp = requests.请求方法(
                url='URL地址',
                params={k:v},
                headers={k:v},
                data={k:v},
                json={k:v},
                cookies='cookie数据'(如:令牌))
请求方法:
get请求 - get()
post请求 - post()
put请求 - put()
delete请求 - delete()url: 待请求的url - string类型
params:查询参数 - 字典
headers:请求头 - 字典
data:表单格式的 请求体 - 字典
json:json格式的 请求体 - 字典
cookies:cookie数据 - string类型resp:响应结果
2.1 案例1
入门案例:使用Requests库访问 百度 http://www.baidu.com

2.2 案例2
【带 查询参数 的get请求】使用Requests库,请求 tpshop商城 搜索商品接口。查询 iphone
import requests
# 发送 get 请求,指定 url,获取 响应结果
# 方法1:
# resp = requests.get(url="http://tpshop-test.itheima.net/Home/Goods/search.html?q=iPhone")
# 方法2:
resp = requests.get(url="http://tpshop-test.itheima.net/Home/Goods/search.html",
                    params={"q": "iPhone"})
# 查询响应结果
print(resp.text)
2.3 案例3
【带 表单数据 的post请求】使用Requests库,完成 tpshop商城 登录接口调用。返回 ”验证码错误“ 即可。
import requests

# 发送 post 请求,指定url、请求头、请求体, 获取响应结果
resp = requests.post(
        url="http://tpshop-test.itheima.net/index.php?
            m=Home&c=User&a=do_login&t=0.7094195931397276",
        headers={"Content-Type": "application/x-www-form-urlencoded"},
        data={"username": "13012345678", "password": "1234567", "verify_code":"8888"})

# 打印响应结果 - 文本
print(resp.text)
# 打印响应结果 - json
print(resp.json())
2.4 案例4
【带 json数据 的 post请求】使用Requests库,完成 iHRM系统 成功登录。返回 ”令牌数据“。
import requests

# 发送 post 登录请求,指定 url、请求头、请求体,获取响应结果
resp = requests.post(url="http://ihrm-test.itheima.net/api/sys/login",
                    # headers={"Content-Type": "application/json"},
                    json={"mobile": "13800000002", "password": "123456"})
# 打印响应结果
print(resp.json())
2.5 案例5
【发送 put、delete请求】使用Requests库发送 ihrm系统 修改员工信息、删除员工信息 请求。
# -------- 修改 put
import requests

resp = requests.put(
    url="http://ihrm-test.itheima.net/api/sys/user/1467780995754229760",
    headers={"Authorization": "Bearer 4c51c601-c3f7-4d1a-a738-7848f2439f45"},
    json={"username": "齐天大圣"})

print(resp.json())

# -------- 删除 delete
import requests

resp = requests.delete(
    url="http://ihrm-test.itheima.net/api/sys/user/1467780995754229760",
    headers={"Authorization": "Bearer 4c51c601-c3f7-4d1a-a738-7848f2439f45"})

print(resp.json())
3、Cookie
3.1 Cookie简介
- 简介:工程师 针对 http协议是无连接、无状态特性,设计的 一种技术。 可以在浏览器端 存储用户的信息。
- 特性:
- cookie 用于存储 用户临时的不敏感信息。
- cookie 位于浏览器(客户端)端。默认大小 4k(可以调整)
- cookie 中的数据,可以随意被访问,没有安全性可言。
- cookie 中存储的数据类型, 受浏览器限制。
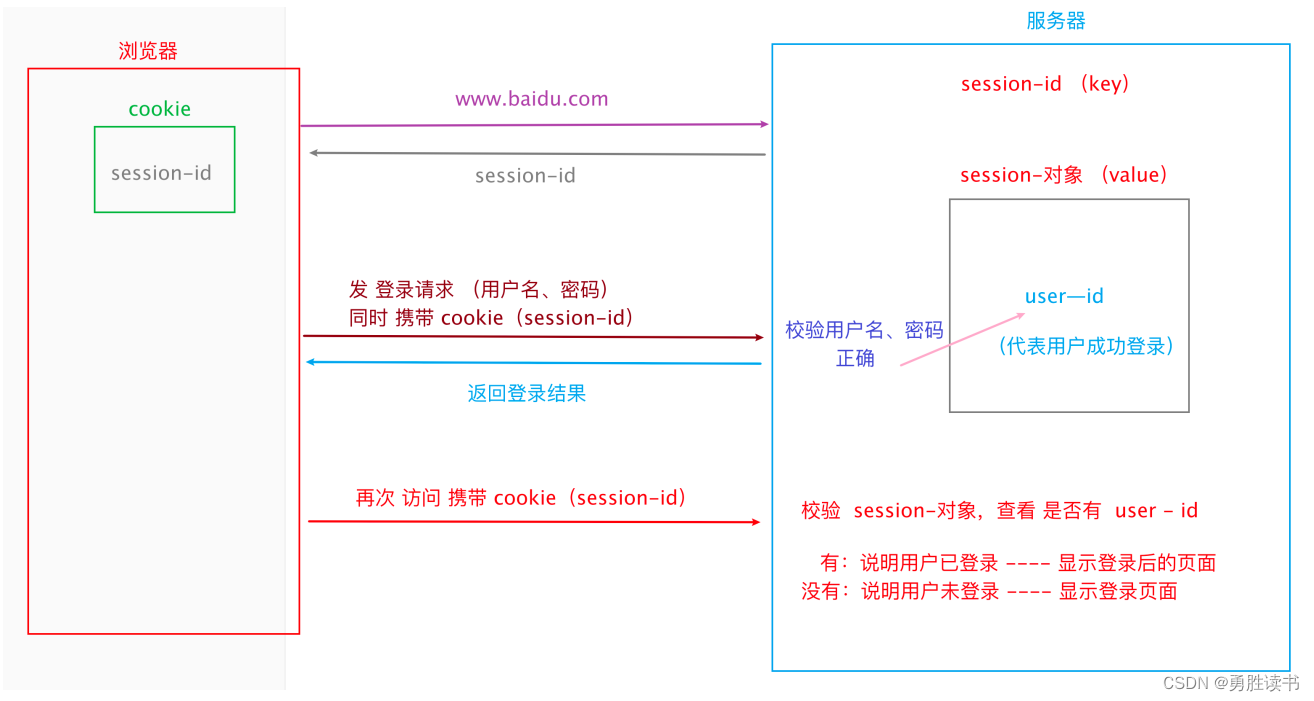
3.2 Cookie+Session认证方式
在计算机中,认证用户身份的方式有多种!学习路线中接触 2种:
- ihrm项目:token认证。
- tpshop项目:cookie+Session认证。
3.3 案例
完整实现 TPshop商城登录,并获取 “我的订单” 页面数据。
获取验证码:http://tpshop-test.itheima.net/index.php?m=Home&c=User&a=verify登录:http://tpshop-test.itheima.net/index.php?m=Home&c=User&a=do_login
我的订单:http://tpshoptest.itheima.net/Home/Order/order_list.html
import requests

# 发送 获取验证码请求
resp_v = requests.get(url="http://tpshop-test.itheima.net/index.php?
m=Home&c=User&a=verify&r=0.21519623710645064")

# 从 获取验证码 的响应结果,提取 cookie
my_cookie = resp_v.cookies

# 发送 登录请求 url、请求头、请求体。 携带 cookie。 得响应结果
resp = requests.post(url="http://tpshop-test.itheima.net/index.php?
m=Home&c=User&a=do_login&t=0.7094195931397276",
                    # headers={"Content-Type": "application/x-www-form-urlencoded"},
                    data={"username": "13012345678", "password": "12345678", "verify_code":
"8888"},
                    cookies=my_cookie)

# 打印响应结果
print(resp.json())

# 发送 查看我的订单 请求
resp_o = requests.get(url="http://tpshop-test.itheima.net/Home/Order/order_list.html",
                    cookies=my_cookie)
print(resp_o.text)
4、Session
4.1 Session简介
- 简介:也叫 会话。通常出现在网络通信中,从客户端借助访问终端登录上服务器,直到 退出登录 所产生的通信数据,保存在 会话中。
- 特性:
- Session 用于存储 用户的信息。
- Session 位于服务端。大小直接使用服务器存储空间
- Session 中的数据,不能随意被访问,安全性较高。
- Session 中存储的数据类型,受服务器影响,几乎能支持所有的数据类型。
4.2 Session自动管理Cookie
因为 Cookie 中的 数据,都是 Session 传递的。因此,Session 可以直接 自动管理 cookie
4.3 案例
借助session重新实现 上述 TPshop商城登录,并获取 “我的订单” 页面数据。
实现步骤:
1. 创建一个 Session 实例。
2. 使用 Session 实例,调 get方法,发送 获取验证码请求。(不需要获取cookie)
3. 使用 同一个 Session 实例,调用 post方法,发送 登录请求。(不需要携带 cookie)
4. 使用 同一个 Session 实例,调用 get方法,发送 查看我的订单请求。(不需要携带 cookie)
import requests
# 1. 创建一个 Session 实例。
session = requests.Session()
# 2. 使用 Session 实例,调 get方法,发送 获取验证码请求。(不需要获取cookie)
resp_v = session.get(url="http://tpshop-test.itheima.net/index.php?
m=Home&c=User&a=verify&r=0.21519623710645064")
# 3. 使用 同一个 Session 实例,调用 post方法,发送 登录请求。(不需要携带 cookie)
resp = session.post(url="http://tpshop-test.itheima.net/index.php?
m=Home&c=User&a=do_login&t=0.7094195931397276",
                    data={"username": "13012345678", "password": "12345678", "verify_code":
"8888"})
print(resp.json())
# 4. 使用 同一个 Session 实例,调用 get 方法,发送 查看我的订单请求。(不需要携带 cookie)
resp_o = session.get(url="http://tpshop-test.itheima.net/Home/Order/order_list.html")

print(resp_o.text)
4.4 面试题 Cookie 和 Session 区别
1. 数据存储位置:
cookie存储在浏览器;session存储在服务器。
2. 安全性:
cookie中的数据可以随意获取,没有安全性可言。Session的数据多为加密存储,安全较高!
3. 数据类型:
cookie支持的数据类型受浏览器限制,较少;Session直接使用服务器存储,支持所有数据类型
4. 大小:
cookie大小默认 4k; Session 大小约为服务器存储空间大小
5、获取指定响应数据
常用:
- 获取 URL:resp.url
- 获取 响应状态码:resp.status_code
- 获取 Cookie:resp.cookies
- 获取 响应头:resp.headers
- 获取 响应体:
- 文本格式:resp.text
- json格式:resp.json()
import requests
resp = requests.get(url="http://www.baidu.com")
# - 获取 URL:resp.url
print("url =", resp.url)
# - 获取 响应状态码:resp.status_code
print("status_code =", resp.status_code)
# - 获取 Cookie:resp.cookies
print("cookies =", resp.cookies)
# - 获取 响应头:resp.headers
print("headers =", resp.headers)
# - 获取 响应体:
# - 文本格式:resp.text
print("body_text =", resp.text)
# - json格式:resp.json() 当显示 JSONDecodeError 错误时,说明 resp 不能转换为 json格式数据。
print("body_json =", resp.json())
二、UnitTest框架
UnitTest 是开发人员用来实现 “单元测试” 的框架。测试工程师,可以在自动化 “测试执行” 时使用。
使用 UnitTest 的好处:
1. 方便管理、维护测试用例。
2. 提供丰富的断言方法。
3. 生成测试报告。(需要插件 HTMLTestReport)
参考:软件测试 —— Python(七)之UnitTest框架与测试报告
ihrm案例
==登录成功==
import unittest

# 定义测试类
class TestIhrmLogin(unittest.TestCase):
    # 添加测试方法
    def test01_login_ok(self):
        # 发送 post 登录请求,指定 url、请求头、请求体,获取响应结果
        resp = requests.post(url="http://ihrm-test.itheima.net/api/sys/login",
                            json={"mobile": "13800000002", "password": "123456"})
        # 打印响应结果
        print(resp.json())
        # 断言- 响应状态码为 200
        self.assertEqual(200, resp.status_code)
        # 断言 success 的值为 true
        self.assertEqual(True, resp.json().get("success"))
        # 断言 code 的值为 10000
        self.assertEqual(10000, resp.json().get("code"))
        # 断言 message 的值为 操作成功!
        self.assertIn("操作成功", resp.json().get("message"))
assertEqual(参1,参2) :
参1:预期结果。 参2:实际结果。
成功:完全相等。断言通过。不报错!
失败:报错!
assertIn(参1,参2):
参1:预期结果。参2:实际结果。
成功:实际结果中,包含预期结果。断言通过。不报错!
失败:报错!


 2268
2268


 被折叠的 条评论
为什么被折叠?
被折叠的 条评论
为什么被折叠?
 到【灌水乐园】发言


