


目录
一、接口自动化测试框架
1、目录结构
7 部分(5个目录、2个文件):
- api/: 存储接口对象层(自己封装的 接口)
- scripts/: 存储测试脚本层 (unittest框架实现的 测试类、测试方法)
- data/: 存储 .json 数据文件
- report/: 存储 生成的 html 测试报告
- common/: 存储 通用的 工具方法
- config.py: 存储项目的配置信息(全局变量)
- run_suite.py: 组装测试用例、生成测试报告的 代码


二、封装iHRM登录
==登录接口==
1、普通方式实现
import unittest
import requests

class TestIhrmLogin(unittest.TestCase):

    # 测试方法1,登录成功
    def test01_login_success(self):
        # 组织url
        url = "http://ihrm-test.itheima.net/api/sys/login"
        header = {"Content-Type": "application/json"}
        json_data = {"mobile": "13800000002", "password": "123456"}
        resp = requests.post(url=url, headers=header, json=json_data)
        print("登录成功:", resp.json())

        # 断言
        self.assertEqual(200, resp.status_code)
        self.assertEqual(True, resp.json().get("success"))
        self.assertEqual(10000, resp.json().get("code"))
        self.assertIn("操作成功", resp.json().get("message"))

    # 测试方法2,密码错误
    def test02_pwd_err(self):
        # 组织url
        url = "http://ihrm-test.itheima.net/api/sys/login"
        header = {"Content-Type": "application/json"}
        json_data = {"mobile": "13800000002", "password": "123456789"}
        resp = requests.post(url=url, headers=header, json=json_data)
        print("密码错误:", resp.json())

        # 断言
        self.assertEqual(200, resp.status_code)
        self.assertEqual(False, resp.json().get("success"))
        self.assertEqual(20001, resp.json().get("code"))
        self.assertIn("用户名或密码错误", resp.json().get("message"))
2、登录接口对象层
1. 在 api/ 下,创建 ihrm_login_api.py 文件。
2. 在 文件内,封装 IhrmLoginApi 类,添加 login 类方法。
3. 安照 普通方式实现,分析。实现 login 类方法。分析:
import requests

class IhrmLoginApi(object):

    # 登录方法
    @classmethod
    def login(cls, json_data):
        url = "http://ihrm-test.itheima.net/api/sys/login"
        header = {"Content-Type": "application/json"}
        resp = requests.post(url=url, headers=header, json=json_data)
        return resp

if __name__ == '__main__':
    data = {"mobile": "13800000002", "password": "123456"}
    resp = IhrmLoginApi.login(data)
    print(resp.json())

3、登录接口测试用例层
1. 在 scripts/ 下,创建 test_ihrm_login.py 文件
2. 在 文件内,创建 测试类 TestIhrmLogin 从 unittest.TestCase 继承
3. 添加 测试方法, 并实现import unittest from api.ihrm_login_api import IhrmLoginApi class TestIhrmLogin(unittest.TestCase): # 登录成功 def test01_login_success(self): # 组织请求数据 json_data = {"mobile": "13800000002", "password": "123456"} # 调用自己封装的接口 resp = IhrmLoginApi.login(json_data) print("登录成功:", resp.json()) # 断言 self.assertEqual(200, resp.status_code) self.assertEqual(True, resp.json().get("success")) self.assertEqual(10000, resp.json().get("code")) self.assertIn("操作成功", resp.json().get("message")) # 手机号为空 def test02_mobile_none(self): # 组织请求数据 json_data = {"mobile": None, "password": "123456"} # 调用自己封装的接口 resp = IhrmLoginApi.login(json_data) print("手机号为空:", resp.json()) # 断言 self.assertEqual(200, resp.status_code) self.assertEqual(False, resp.json().get("success")) self.assertEqual(20001, resp.json().get("code")) self.assertIn("用户名或密码错误", resp.json().get("message")) # 密码错误 def test03_pwd_err(self): # 组织请求数据 json_data = {"mobile": "13800000002", "password": "123456890"} # 调用自己封装的接口 resp = IhrmLoginApi.login(json_data) print("密码错误:", resp.json()) # 断言 self.assertEqual(200, resp.status_code) self.assertEqual(False, resp.json().get("success")) self.assertEqual(20001, resp.json().get("code")) self.assertIn("用户名或密码错误", resp.json().get("message"))
4、封装断言方法
1. 在 common/ 下,新建文件 assert_util.py 文件,
2. 在文件内,添加 函数 assert_util()
3. 在 函数内,实现通用的断言函数。
4. 在 测试方法中,使用 直接封装的 通用断言函数, 实现断言
# 定义 通用断言方法
def assert_util(self, resp, status_code, success, code, message):
    self.assertEqual(status_code, resp.status_code)
    self.assertEqual(success, resp.json().get("success"))
    self.assertEqual(code, resp.json().get("code"))
    self.assertIn(message, resp.json().get("message"))
使用断言方法
assert_util(self, resp, 200, True, 10000, "操作成功")
assert_util(self, resp, 200, False, 20001, "用户名或密码错误")
assert_util(self, resp, 200, False, 20001, "用户名或密码错误")
三、参数化
参数化的核心:数据驱动(用数据驱动测试用例执行)
- 数据驱动:针对一个接口,只写一个测试方法。用一份测试数据文件,管理各个测试用例的测试数据。
参考文章:软件测试 —— Python(七)之UnitTest框架与测试报告
1、回顾UnitTest参数化
1.1 原始案例
import unittest

# 待 测试方法
def add(x, y):
    return x + y

class TestAdd(unittest.TestCase):
    def test01_add(self):
        res = add(10, 20)
        self.assertEqual(30, res)

    def test02_add(self):
        res = add(100, 200)
        self.assertEqual(300, res)

    def test03_add(self):
        res = add(1000, 20)
        self.assertEqual(1020, res)
1.2 参数化实现
实现步骤:
1. 导包 from parameterized import parameterized
2. 在通用测试方法上一行,添加 @parameterized.expand()
3. 给 expand() 传入 [(),(),()] 格式数据。( 调用 read_json_data() )
4. 修改 通用测试方法形参,按 数据中的 key 设计 参数。
5. 在 通用测试方法 内,使用形参import unittest from parameterized import parameterized # 待 测试方法 def add(x, y): return x + y data = [ {"x": 10, "y": 20, "except": 30}, {"x": 100, "y": 200, "except": 300}, {"x": 1000, "y": 20, "except": 1020}, {"x": 4, "y": 18, "except": 23} ] # [{},{},{}] ---> [(),(),()] def read_json_data(): list_data = [] for item in data: tmp = tuple(item.values()) list_data.append(tmp) return list_data class TestAdd(unittest.TestCase): # 通用测试方法(实现参数化) @parameterized.expand(read_json_data()) def test_add(self, x, y, except_data): res = add(x, y) self.assertEqual(except_data, res)
1.3 从json文件读取
创建 json 文件,写入 [{},{},{}] 格式数据
[
{"x": 10, "y": 20, "except": 30},
{"x": 100, "y": 200, "except": 300},
{"x": 1000, "y": 20, "except": 1020},
{"x": 4, "y": 18, "except": 22}
]
修改 读取数据的 read_json_data 函数,添加 打开json文件,读数据的代码
# [{},{},{}] ---> [(),(),()]
def read_json_data():
    list_data = []
    # 从 .json 文件中,读取 [{},{},{}] 数据
    with open("./params_data.json", "r", encoding="utf-8") as f:
        data = json.load(f)
        for item in data:
            tmp = tuple(item.values())
            list_data.append(tmp)
    return list_data
2、登录接口参数化
2.1 组织数据文件
[
{
"desc": "登录成功",
"req_data": {
"mobile": "13800000002",
"password": "123456"
},
"stauts_code": 200,
"success": true,
"code": 10000,
"message": "操作成功"
},
{
"desc": "手机号为空",
"req_data": {
"mobile": null,
"password": "123456"
},
"stauts_code": 200,
"success": false,
"code": 20001,
"message": "用户名或密码错误"
},
{
"desc": "密码错误",
"req_data": {
"mobile": "13800000002",
"password": "123456789"
},
"stauts_code": 200,
"success": false,
"code": 20001,
"message": "用户名或密码错误"
},
{
"desc": "多参",
"req_data": {
"mobile": "13800000002",
"password": "123456",
"abc": "123"
},
"stauts_code": 200,
"success": true,
"code": 10000,
"message": "操作成功"
},
{
"desc": "少参",
"req_data": {
"password": "123456"
},
"stauts_code": 200,
"success": false,
"code": 20001,
"message": "用户名或密码错误"
},
{
"desc": "无参",
"req_data": null,
"stauts_code": 200,
"success": false,
"code": 99999,
"message": "抱歉,系统繁忙,请稍后重试!"
},
{
"desc": "错误参数",
"req_data": {
"abc": "13800000002",
"password": "123456"
},
"stauts_code": 200,
"success": false,
"code": 20001,
"message": "用户名或密码错误"
}
]
2.2 读取数据文件
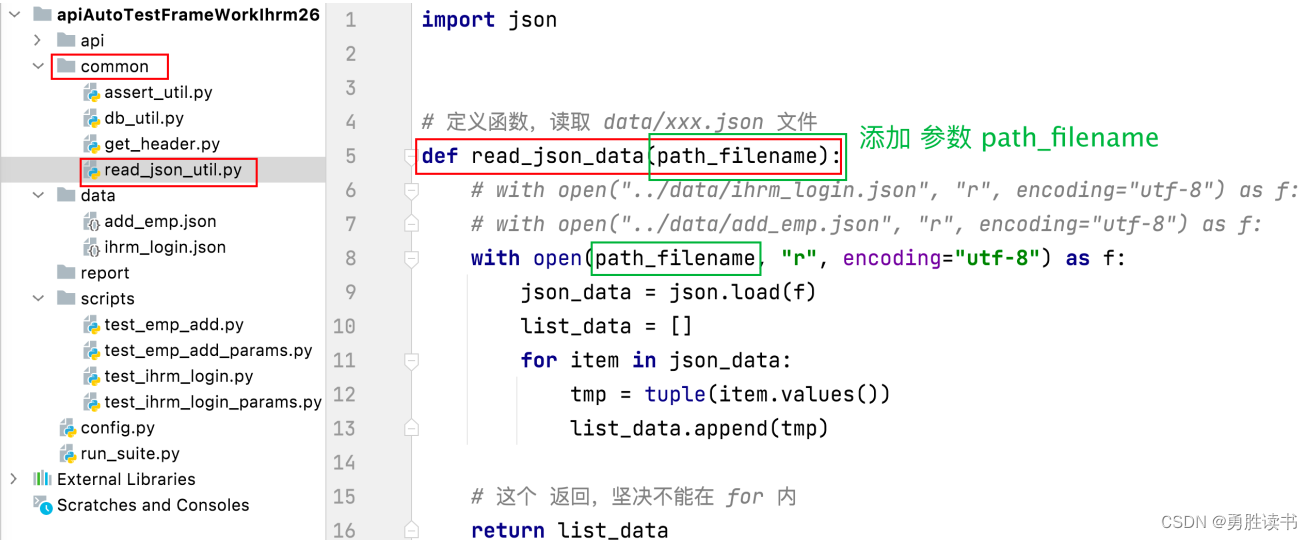
1. 在 common/ 下 创建 read_json_util.py 文件
2. 在 文件内,定义函数,从 json文件中读取数据,转换成 元组列表,返回import json # 定义函数,读取 data/xxx.json 文件 def read_json_data(): with open("../data/ihrm_login.json", "r", encoding="utf-8") as f: json_data = json.load(f) list_data = [] for item in json_data: tmp = tuple(item.values()) list_data.append(tmp) # 这个 返回,坚决不能在 for 内 return list_data if __name__ == '__main__': ret = read_json_data() print(ret)# 测试结果 [('登录成功', {'mobile': '13800000002', 'password': '123456'}, 200, True, 10000, '操作成功'), ('手 机号为空', {'mobile': None, 'password': '123456'}, 200, False, 20001, '用户名或密码错误'), ('密码错 误', {'mobile': '13800000002', 'password': '123456789'}, 200, False, 20001, '用户名或密码错误'), ('多参', {'mobile': '13800000002', 'password': '123456', 'abc': '123'}, 200, True, 10000, '操作成 功'), ('少参', {'password': '123456'}, 200, False, 20001, '用户名或密码错误'), ('无参', None, 200, False, 99999, '抱歉,系统繁忙,请稍后重试!'), ('错误参数', {'abc': '13800000002', 'password': '123456'}, 200, False, 20001, '用户名或密码错误')]
2.3 使用 parameterized 实现参数化
步骤:
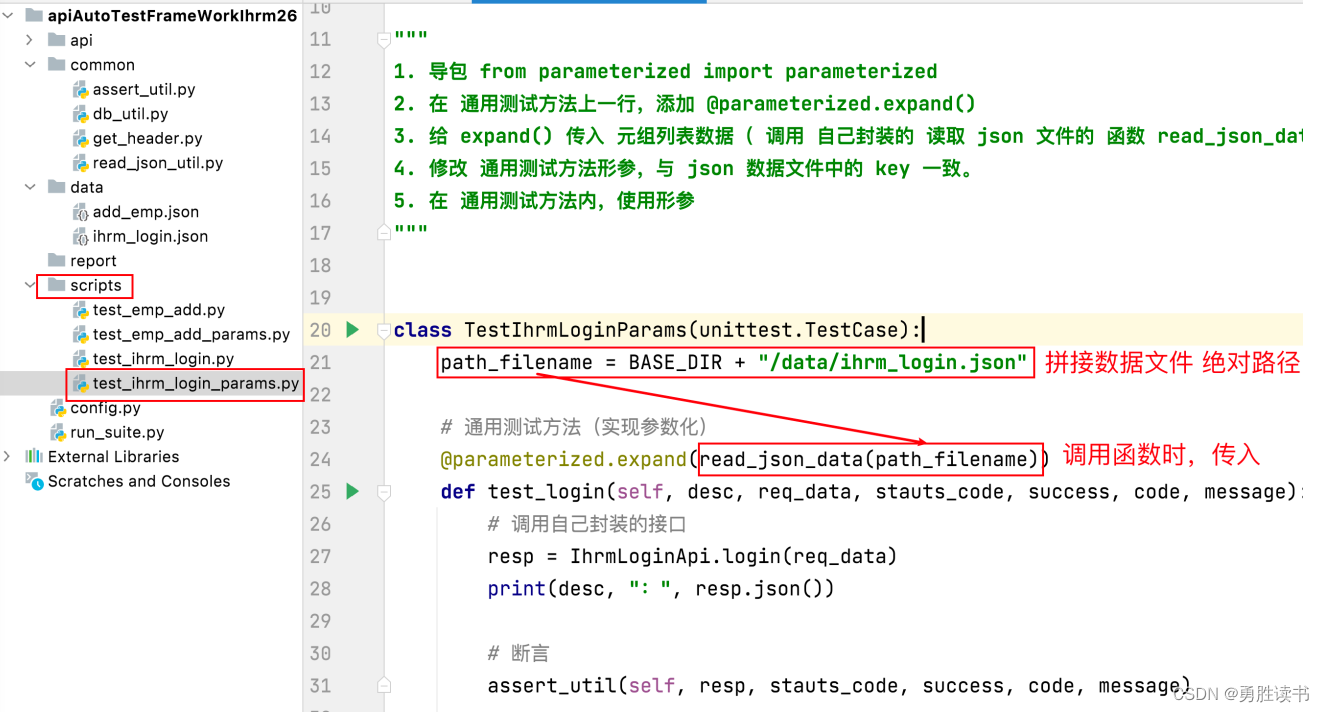
1. 导包 from parameterized import parameterized
2. 在 通用测试方法上一行,添加 @parameterized.expand()
3. 给 expand() 传入 元组列表数据( 调用 自己封装的 读取 json 文件的 函数 read_json_data() )
4. 修改 通用测试方法形参,与 json 数据文件中的 key 一致。
5. 在 通用测试方法内,使用形参import unittest from api.ihrm_login_api import IhrmLoginApi from common.assert_util import assert_util from common.read_json_util import read_json_data from parameterized import parameterized """ 1. 导包 from parameterized import parameterized 2. 在 通用测试方法上一行,添加 @parameterized.expand() 3. 给 expand() 传入 元组列表数据( 调用 自己封装的 读取 json 文件的 函数 read_json_data() ) 4. 修改 通用测试方法形参,与 json 数据文件中的 key 一致。 5. 在 通用测试方法内,使用形参 """ class TestIhrmLogin(unittest.TestCase): # 通用测试方法(实现参数化) @parameterized.expand(read_json_data()) def test_login(self, desc, req_data, stauts_code, success, code, message): # 调用自己封装的接口 resp = IhrmLoginApi.login(req_data) print(desc, ":", resp.json()) # 断言 assert_util(self, resp, stauts_code, success, code, message)
四、员工管理接口
1、普通方法实现
import requests

# 添加员工
url = "http://ihrm-test.itheima.net/api/sys/user"
header = {"Content-Type": "application/json", "Authorization": "Bearer b040daed-39c1-4302-8777-f950770c8a26"}
json_data = {
    "username": "业务猪001",
    "mobile": "13978734783",
    "workNumber": "9527"
}
resp = requests.post(url=url, headers=header, json=json_data)
print("添加员工:", resp.json())

# 查询员工
url_query = "http://ihrm-test.itheima.net/api/sys/user/1469566449784717312"
header_query = {"Content-Type": "application/json","Authorization": "Bearer b040daed-39c1-4302-8777-f950770c8a26"}
resp_query = requests.get(url=url_query, headers=header_query)
print("查询员工:", resp_query.json())

# 修改员工
url_modify = "http://ihrm-test.itheima.net/api/sys/user/1469566449784717312"
header_modify = {"Content-Type": "application/json","Authorization": "Bearer b040daed-39c1-4302-8777-f950770c8a26"}
modify_data = {"username": "齐天大圣"}
resp_modify = requests.put(url=url_modify, headers=header_modify, json=modify_data)
print("修改员工:", resp_modify.json())

# 删除员工
url_del = "http://ihrm-test.itheima.net/api/sys/user/1469566449784717312"
header_del = {"Content-Type": "application/json","Authorization": "Bearer b040daed-39c1-4302-8777-f950770c8a26"}
resp_del = requests.delete(url=url_del, headers=header_del)
print("删除员工:", resp_del.json())
2、接口对象层
"""
员工管理模块的 接口对象层
"""
import requests

class IhrmEmpCURD(object):
    # 添加员工
    @classmethod
    def add_emp(cls, header, json_data):
        url = "http://ihrm-test.itheima.net/api/sys/user"
        resp = requests.post(url=url, headers=header, json=json_data)
        return resp

    # 查询员工
    @classmethod
    def query_emp(cls, emp_id, header):
        url = "http://ihrm-test.itheima.net/api/sys/user/" + emp_id
        resp = requests.get(url=url, headers=header)
        return resp

    # 修改员工
    @classmethod
    def modify_emp(cls, emp_id, header, modify_data):
        url = "http://ihrm-test.itheima.net/api/sys/user/" + emp_id
        resp = requests.put(url=url, headers=header, json=modify_data)
        return resp

    # 删除员工
    @classmethod
    def delete_emp(cls, emp_id, header):
        url = "http://ihrm-test.itheima.net/api/sys/user/" + emp_id
        resp = requests.delete(url=url, headers=header)
        return resp

if __name__ == '__main__':
    header = {"Content-Type": "application/json",
    "Authorization": "Bearer b040daed-39c1-4302-8777-f950770c8a26"}
    data_add = {
        "username": "业务猪001",
        "mobile": "13978734786",
        "workNumber": "9527"
    }
    resp = IhrmEmpCURD.add_emp(header, data_add)
    print("添加:", resp.json())
    emp_id = "1469572901224054784"
    resp = IhrmEmpCURD.query_emp(emp_id, header)
    print("查询:", resp.json())
    data = {"username": "齐天大圣"}
    resp = IhrmEmpCURD.modify_emp(emp_id, header, data)
    print("修改:", resp.json())
    resp = IhrmEmpCURD.delete_emp(emp_id, header)
    print("删除:", resp.json())
3、接口测试用例层
import unittest
from api.ihrm_emp_curd import IhrmEmpCURD
from common.assert_util import assert_util

class TestEmpAdd(unittest.TestCase):
    # 必选参数
    def test01_add_emp(self):
        # 准备数据
        header = {"Content-Type": "application/json",
                "Authorization": "Bearer b040daed-39c1-4302-8777-f950770c8a26"}
        json_data = {
            "username": "业务猪001",
            "mobile": "13978734787",
            "workNumber": "9527"
        }

        #调用自己封装的 接口
        resp = IhrmEmpCURD.add_emp(header, json_data)
        print("添加-必选:", resp.json())

        # 断言
        assert_util(self, resp, 200, True, 10000, "操作成功")

    # 组合参数
    def test02_add_emp(self):
        # 准备数据
        header = {"Content-Type": "application/json",
                "Authorization": "Bearer b040daed-39c1-4302-8777-f950770c8a26"}
        json_data = {
            "username": "业务猪001",
            "mobile": "13978743801",
            "workNumber": "9527",
            "formOfEmployment": "2"
        }

        #调用自己封装的 接口
        resp = IhrmEmpCURD.add_emp(header, json_data)
        print("添加-组合:", resp.json())

        # 断言
        assert_util(self, resp, 200, True, 10000, "操作成功")

    # 全部参数
    def test03_add_emp(self):
        # 准备数据
        header = {"Content-Type": "application/json",
                "Authorization": "Bearer b040daed-39c1-4302-8777-f950770c8a26"}
        json_data = {"username": "大猪乔治",
            "mobile": "13899078431",
            "timeOfEntry": "2021-12-01", "formOfEmployment": 1,
            "workNumber": "777888", "departmentName": "测试",
            "departmentId": "1452603344685203456",
            "correctionTime": "2021-12-30T16:00:00.000Z"}

        # 调用自己封装的 接口
        resp = IhrmEmpCURD.add_emp(header, json_data)
        print("添加-全部:", resp.json())

        # 断言
        assert_util(self, resp, 200, True, 10000, "操作成功")
4、数据库工具类封装
1. 在 common/ 下,创建 db_util.py 文件
2. 在 文件内, 实现 数据库 工具类及常用的数据库操作方法(查、增删改)import pymysql # 封装数据库工具类 class DBUtil(object): # 添加类属性 conn = None @classmethod def __get_conn(cls): # 判断 conn 是否为空,如果是,再创建 if cls.conn is None: cls.conn = pymysql.connect(host="211.103.136.244", port=7061, user="student", password="iHRM_student_2021", database="test_db", charset="utf8") # 返回 非空连接 return cls.conn @classmethod def __close_conn(cls): # 判断,conn 不为空,需要关闭。 if cls.conn is not None: cls.conn.close() cls.conn = None # 常用方法:查询一条 @classmethod def select_one(cls, sql): cursor = None res = None try: # 获取连接 cls.conn = cls.__get_conn() # 获取游标 cursor = cls.conn.cursor() # 执行 查询语句 cursor.execute(sql) # 提取一条结果 res = cursor.fetchone() except Exception as err: print("查询sql错误:", str(err)) finally: # 关闭游标 cursor.close() # 关闭连接 cls.__close_conn() # 将查询sql执行的 结果,返回 return res # 常用方法:增删改 @classmethod def uid_db(cls, sql): cursor = None try: # 获取连接 cls.conn = cls.__get_conn() # 获取游标 cursor = cls.conn.cursor() # 执行 uid 语句 cursor.execute(sql) print("影响的行数:", cls.conn.affected_rows()) # 提交事务 cls.conn.commit() except Exception as err: # 回滚事务 cls.conn.rollback() print("增删改 SQL 执行失败:", str(err)) finally: # 关闭游标 cursor.close() # 关闭连接 cls.__close_conn() if __name__ == '__main__': res = DBUtil.select_one("select * from t_book;") print("查询结果为:", res) DBUtil.uid_db("update t_book set is_delete = 1 where id = 1111;")
5、解决反复修改手机号
解决思路:
1. 在 添加员工 接口测试 前(setUp),指定一个要使用的手机号,做 删除 delete sql 实现!
2. 测试 添加员工 接口, 使用 这个手机号。
3. 在 添加员工 接口测试 后(tearDown),再次 删除 这个手机号。delete sql 实现!
4. 将 手机号 定义成 全局手机号, 存放在 config.py 文件中。 TEL = “13900231473”class TestEmpAdd(unittest.TestCase): def setUp(self) -> None: # 删除手机号 delete_sql = f"delete from bs_user where mobile = '{TEL}'" DBUtil.uid_db(delete_sql) def tearDown(self) -> None: # 删除手机号 delete_sql = f"delete from bs_user where mobile = '{TEL}'" DBUtil.uid_db(delete_sql) # 必选参数 def test01_add_emp(self): # 准备数据 header = {"Content-Type": "application/json","Authorization": "Bearer b040daed-39c1-4302-8777-f950770c8a26"} json_data = { "username": "业务猪001", "mobile": TEL, "workNumber": "9527" } #调用自己封装的 接口 resp = IhrmEmpCURD.add_emp(header, json_data) print("添加-必选:", resp.json()) # 断言 assert_util(self, resp, 200, True, 10000, "操作成功") # 组合参数 def test02_add_emp(self): # 准备数据 header = {"Content-Type": "application/json","Authorization": "Bearer b040daed-39c1-4302-8777-f950770c8a26"} json_data = { "username": "业务猪001", "mobile": TEL, "workNumber": "9527", "formOfEmployment": "2" } #调用自己封装的 接口 resp = IhrmEmpCURD.add_emp(header, json_data) print("添加-组合:", resp.json()) # 断言 assert_util(self, resp, 200, True, 10000, "操作成功") # 全部参数 def test03_add_emp(self): # 准备数据 header = {"Content-Type": "application/json","Authorization": "Bearer b040daed-39c1-4302-8777-f950770c8a26"} json_data = { "username": "大猪乔治", "mobile": TEL, "timeOfEntry": "2021-12-01", "formOfEmployment": 1, "workNumber": "777888", "departmentName": "测试", "departmentId": "1452603344685203456", "correctionTime": "2021-12-30T16:00:00.000Z"} # 调用自己封装的 接口 resp = IhrmEmpCURD.add_emp(header, json_data) print("添加-全部:", resp.json()) # 断言 assert_util(self, resp, 200, True, 10000, "操作成功")
6、完整参数化步骤:添加员工接口参数化
完整参数化步骤:
1. 组织测试数据到 json 文件中。 格式 [{},{},{}]
2. 读取 json 数据文件中的 [{},{},{}] 数据,转换成 [(),(),()] 数据
3. 在 测试脚本中,借助 parameterized 实现参数化
1. 导包 from parameterized import parameterized
2. 在 通用测试方法上一行,添加 @parameterized.expand()
3. 给 expand() 传入 元组列表数据( 调用 自己封装的 读取 json 文件的 函数 read_json_data() )
4. 修改 通用测试方法形参,与 json 数据文件中的 key 一致。
5. 在 通用测试方法内,使用形参
json 数据文件:[ { "desc": "必选参数", "json_data": { "username": "业务猪001", "mobile": "13900043762", "workNumber": "9527" }, "stauts_code": 200, "success": true, "code": 10000, "message": "操作成功" }, { "desc": "组合参数", "json_data": { "username": "业务猪001", "mobile": "13900043762", "workNumber": "9527", "formOfEmployment": "2" }, "stauts_code": 200, "success": true, "code": 10000, "message": "操作成功" }, { "desc": "全部参数", "json_data": { "username": "大猪乔治", "mobile": "13900043762", "timeOfEntry": "2021-12-01", "formOfEmployment": 1, "workNumber": "777888", "departmentName": "测试", "departmentId": "1452603344685203456", "correctionTime": "2021-12-30T16:00:00.000Z" }, "stauts_code": 200, "success": true, "code": 10000, "message": "操作成功" } ]
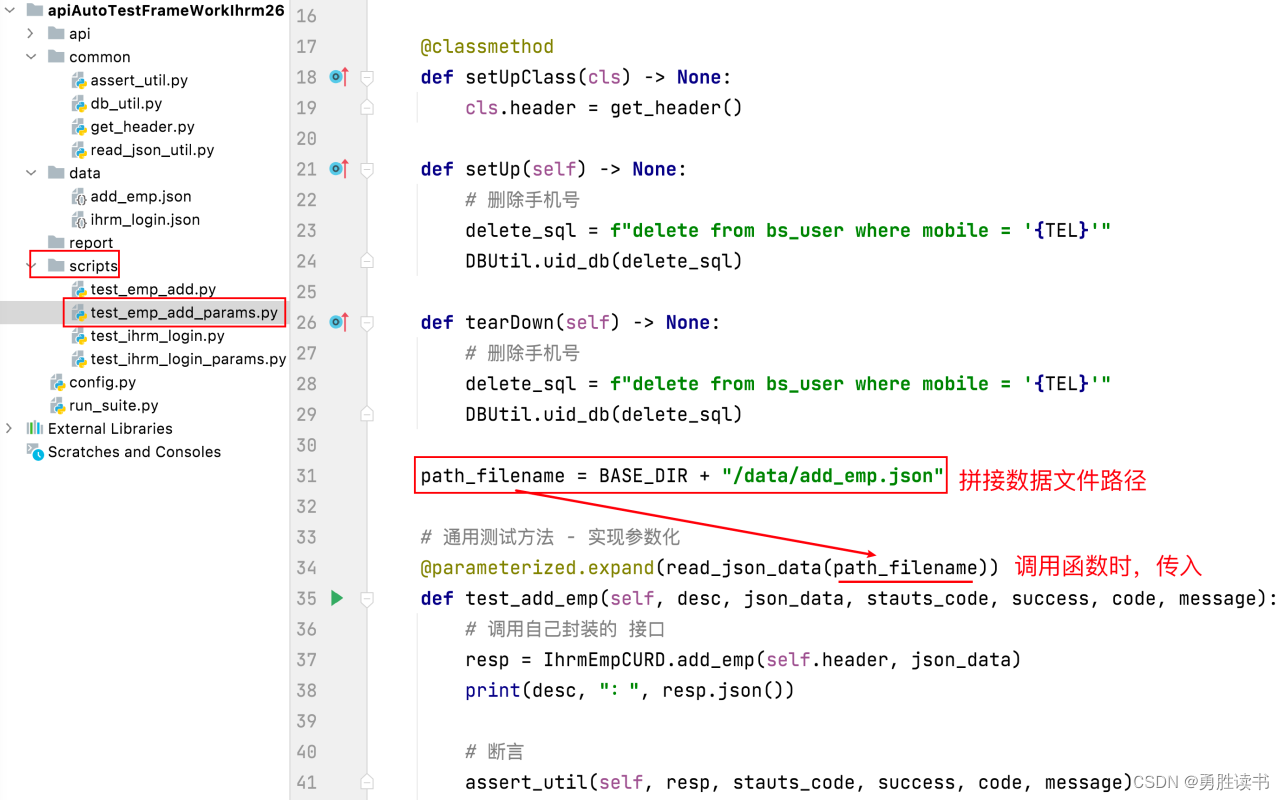
7、获取请求头
1. 在 common/ 下 创建 get_header.py 文件
2. 在 文件内 创建 get_header() 函数,实现 登录成功,获取令牌,拼接成 请求头,返回。
3. 在 scripts/ 的测试脚本文件中,添加 setUpClass 方法,调用 get_header() 函数。 将返回值 保存到 类属性上
4. 在 使用 请求头的位置,直接从类属性获取# 在 common/ 下 创建 get_header.py 文件 实现 get_header 函数 import requests def get_header(): url = "http://ihrm-test.itheima.net/api/sys/login" data = {"mobile": "13800000002", "password": "123456"} resp = requests.post(url=url, json=data) print(resp.json()) # 从 响应体中,获取 data的值 token = resp.json().get("data") header = {"Content-Type": "application/json","Authorization": "Bearer " + token} return header # 在 scripts/ 的测试脚本文件中,添加 setUpClass 方法,调用 get_header 函数。 # 将返回值 保存到 类属性上 from common.get_header import get_header class TestEmpAdd(unittest.TestCase): # 类属性 header = None @classmethod def setUpClass(cls) -> None: cls.header = get_header() # 在 使用 请求头的位置,直接从类属性获取 resp = IhrmEmpCURD.add_emp(self.header, json_data)
8、提取项目目录
相关知识:
- __file__ : 获取 当前文件的 绝对路径。
- BASE_DIR = os.path.dirname(__file__) : 获取 到 当前文件的 上一级目录。
- 此行代码,写在 config.py 中, 可以直接获取 项目目录
项目中使用:
1. 在 config.py 文件中,添加 获取项目路径 全局变量 BASE_DIR = os.path.dirname(__file__)
2. 修改 common/ 下 read_json_util.py 文件中,读取 json 文件 函数read_json_data(),添加 参数 path_filename
3. 在 使用 read_json_data()函数 时, 拼接 json 文件路径, 传入到 函数中。
9、生成测试报告
参考文章:软件测试 —— Python(七)之UnitTest框架与测试报告
步骤:
1. 创建测试套件实例。 suite
2. 添加 测试类
3. 创建 HTMLTestReport 类实例。 runner
4. runner 调用 run(), 传入 suite
实现:import unittest from config import BASE_DIR from scripts.test_emp_add_params import TestEmpAddParams from scripts.test_ihrm_login_params import TestIhrmLoginParams from htmltestreport import HTMLTestReport # 1. 创建测试套件实例。 suite suite = unittest.TestSuite() # 2. 添加 测试类, 组装测试用例 suite.addTest(unittest.makeSuite(TestIhrmLoginParams)) suite.addTest(unittest.makeSuite(TestEmpAddParams)) # 3. 创建 HTMLTestReport 类实例。 runner # runner = HTMLTestReport(BASE_DIR + "/report/ihrm.html") # 绝对路径 runner = HTMLTestReport("./report/ihrm.html", description="描述", title="标题") # 相对路径 # 4. runner 调用 run(), 传入 suite runner.run(suite)


 2203
2203


 被折叠的 条评论
为什么被折叠?
被折叠的 条评论
为什么被折叠?
 到【灌水乐园】发言


