


------- android培训、java培训、期待与您交流! ----------
一.概述
1.进程:
是一个正在执行的程序。
每一个进程都有一个执行顺序,该顺序是一个执行路径,或者叫一个控制单元。
2.线程:
就是进程中一个独立的控制单元,线程在控制者进程的执行。
一个进程中至少有一个线程。
3.多线程:
Java虚拟机在启动的时候会有一个进程java.exe,该进程中至少会有一个线程负责java程序的执行。而且这个线程运行的代码存在于main方法中。该线程称之为
主线程。除此之外,还有负责垃圾回收的线程,这种一个进程中有多个线程的方式,就叫做多线程。
4.多线程存在的意义
多线程的出现能让程序产生同时运行的效果,提高程序执行效率。
5.多线程的特性
对于单核的cpu来说,某一时刻只能执行一个程序,如果要运行多个程序,cpu会快速的切换,所以我们能够看到程序同时运行的效果,cpu执行哪个程序是没
有规律的即随机性:
多个线程都在获取cpu的执行权,哪个线程抢到了cpu的执行权,就先执行哪个线程,至于执行的时间多长,完全由cpu决定。
二.创建线程
1.方法一:将类声明为Thread类的子类,该子类中重写Thread类的run()方法。
步骤:
定义类继承Thread类。
复写run()方法,将自定义代码存放到run()方法中,让线程运行。
调用线程的start()方法:
该方法有两个作用: 启动线程 调用run()方法
为什么要覆盖run()方法?
Thread类用于描述线程,该类就定义了一个功能,用于存储线程要运行的代码,该存储功能就是run()方法,想要运行自定义的代码,就必须覆盖父类的run()方
法。
代码:
 public class ThreadDemo extends Thread {
	public void run() {
		for (int x = 0; x < 60; x++) {
			System.out.println("demo run ---" + x);
		}
	}
	public static void main(String[] args) {
		ThreadDemo d = new ThreadDemo();//创建好一个线程
		d.start();//开启线程并执行该线程run方法
//d.run();//仅仅是对象调用了方法,而线程创建了,并没有执行     此句代码使得主线程中的代码等待,run方法中的代码执行结束后,才开始运行主线程中的代码

		for (int x = 0; x < 60; x++) {
			System.out.println("Hello world ---" + x);
		}
	}
}
2.线程的运行状态
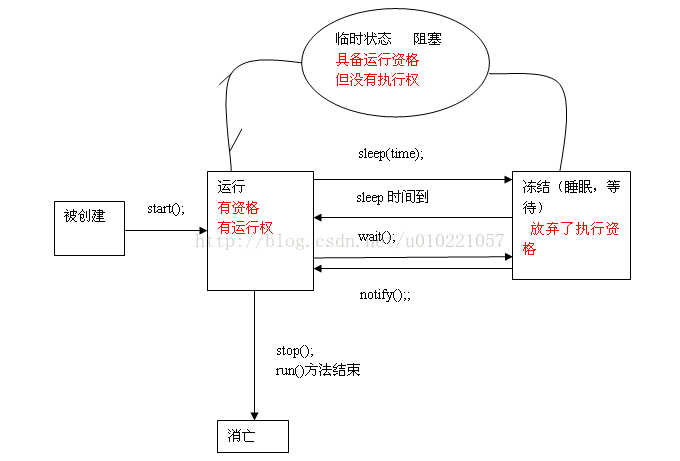
一个特殊的状态:就绪。具备了执行资格,但是还没有获取资源。
局部变量在每一个线程区域中都有独立的一份。
代码:
/*
 * 练习:
 * 创建两个线程,和主线程交替运行
 *
 * static Thread currentThread()  获取当前线程的对象     标准写法
 * getName():获取线程名称
 * */
class Test extends Thread {
	// private String name;
	Test(String name) {
		// this.name=name;
		super(name); // 父类中定义好的
	}

	public void run() {
		for (int x = 0; x < 60; x++) {
			// System.out.println((Thread.currentThread()==this)+"........"+this.getName()+" run...."+x);
			// System.out.println(this.getName()+" run...."+x); //thread--0
			System.out.println(Thread.currentThread().getName() + " run...."
					+ x);
		}
	}
}

public class ThreadTest {
	public static void main(String[] args) {
		// 开启线程
		Test t1 = new Test("one");
		Test t2 = new Test("two");
		t1.start();
		t2.start();
		// t1.run(); //run方法中的代码执行完后,才开始执行主线程中的代码
		// t2.run();

		for (int x = 0; x < 60; x++) {
			System.out.println("main....." + x);
		}
	}
}
3.方法二:实现Runnable接口
步骤:
定义类实现Runnable接口。
覆盖runnable接口中的run()方法。
通过Thread类建立线程对象。
将Runnable接口的子类对象作为实际参数传递给Thread类的构造函数。
原因:自定义的run() 方法所属的对象是Runnable接口的子类对象,所以要让线程去执行指定对象的run()方法,就必须明确该run()方法所属的对象。
调用Thread类的start() 方法开启线程并调用Runnable接口子类的run()方法。
4.两种创建线程的方式,一种实现,一种继承,有何区别?
实现方式的好处在于避免了单继承的局限性,在定义线程时,建议使用实现方式。
区别:
继承Thread类:线程代码存放在Thread子类中的run()方法中。
实现Runnable接口:线程代码存放在接口的子类的run()方法中。
代码:
 /*
 * 售票的例子
 * 有多个窗口在卖票
*/
class Ticket implements Runnable//extends Thread
{
	private static int tick = 100; // 变量的生命周期太长

	public void run() {
		while (true) {
			if (tick > 0)
				System.out.println(Thread.currentThread().getName()
						+ "....sale.." + tick--);
		}
	}
}

class ThreadTicket {
	public static void main(String[] args) {

		//创建Runnable接口子类的实例对象
		Ticket t=new Ticket();
               //创建线程
		Thread t1=new Thread(t);
		Thread t2=new Thread(t);
		Thread t3=new Thread(t);
		Thread t4=new Thread(t);
		//启动线程
		t1.start();
		t2.start();
		t3.start();
		t4.start();
	}
}
5.多线程在运行的时候会出现安全问题,原因是当多条语句在操作同一个线程的共享数据时,一个线程对多条语句执行了一部分,还没有执行完,另一个线程参
与进来执行,导致共享数据的错误。
原因:
多个线程访问出现延迟。
线程随机性 。
解决办法:
对多条操作共享数据的语句,只能让一个线程都执行完,在执行的过程中,其它线程都不可以运行。那就是同步代码块。
三.同步(synchronized)
1.同步代码块格式:
synchronized(对象)
{需要被同步的代码}
2.同步可以解决安全问题的根本原因就在那个对象上。
3.对象如同锁,持有锁的线程可以在同步中执行。如果一个线程获取了cpu的执行权,但是没有持有锁,该线程无法进去。
4.同步的前提:
必须有两个或两个以上的线程。
必须是多个线程使用同一个锁。
必须保证同步中只有一个线程在运行。
5.好处: 解决了线程的安全问题。
6.弊端:多个线程需要判断锁吗,比较消耗资源。
7.同步的两种表现: 同步代码块
同步函数
8.三个明确:
明确哪些代码是多线程运行的代码。
明确共享数据。
明确多线程运行的代码中哪些是操作共享数据的。
代码:
class Ticket implements Runnable// extends Thread
{
	private int tick = 1000;
  Object  obj=new  Object();
	public void run() {
		while (true) {
			synchronized(obj)//同步代码块
			{
				if (tick > 0) {										 System.out.println(Thread.currentThread().getName() + "....sale : " + tick--);
				}
			}
		}
	}
}
class TicketDemo2 {
	public static void main(String[] args) {

		Ticket t = new Ticket ();

		Thread t1 = new Thread(t);// 创建了一个线程;
		Thread t2 = new Thread(t);// 创建了一个线程;
		Thread t3 = new Thread(t);// 创建了一个线程;
		Thread t4 = new Thread(t);// 创建了一个线程;
		t1.start();
		t2.start();
		t3.start();
		t4.start();
	}
}
9.同步函数
代码:
 public synchronized void add(int n)   //同步函数
	{
			sum = sum + n;
			try{Thread.sleep(10);}catch(Exception e){}
			System.out.println("sum="+sum);
		}
同步函数的锁:
函数需要被对象调用,那么函数都有一个所属对象的引用,就是this,所以同步函数的锁就是this
静态同步函数的锁是Class对象。
静态在进内存时,内存中没有本类对象,但是一定有该类对象的字节码文件对象。
类名.class 该对象的类型是Class。
所以静态的同步方法,使用的锁是所在类的字节码对象,类名.class
四.死锁
同步中嵌套同步
代码:
/*死锁*/
//定义类实现Runnable接口
class Test1 implements Runnable {
	private boolean flag;

	// 构造函数
	Test1(boolean flag) {
		this.flag = flag;
	}

	// 重写run()方法
	public void run() {
		if (flag) {
			while (true) {
				// 死锁
				synchronized (MyLock.Locka) {
					System.out.println(Thread.currentThread().getName()
							+ "...if locka ");
					synchronized (MyLock.Lockb) {
						System.out.println(Thread.currentThread().getName()
								+ "...if lockb ");
					}
				}
			}
		} else {
			while (true) {
				synchronized (MyLock.Lockb) {
					System.out.println(Thread.currentThread().getName()
							+ "...if lockb");
					synchronized (MyLock.Locka) {
						System.out.println(Thread.currentThread().getName()
								+ "...if locka ");
					}
				}
			}

		}
	}
}

class MyLock {
	static Object Locka = new Object();
	static Object Lockb = new Object();
}

class DeadLockTest {
	public static void main(String[] args) {

		Thread t1 = new Thread(new Test1(true));
		Thread t2 = new Thread(new Test1(false));
		//启动线程
		t1.start();
		t2.start();
	}
}
五.线程间的通信
1.其实就是多个线程操作同一个资源。但是操作的动作不同。
2.等待唤醒机制
线程在运行的过程中,会在内存中建立一个线程池,等待的线程都在线程池中。
notify()唤醒的是线程池中的线程(通常是第一个线程被等待)。
3.wait(),sleep()有什么区别?
wait():释放cpu执行权,释放锁。
sleep():释放cpu执行权,不释放锁。
4.为什么wait(),notify(),notifyAll()这些用来操作线程的方法定义在了Object类中?
这些方法存在与同步中。
使用这些方法时必须要标识所属的同步的锁。
锁可以是任意对象,所以任意对象调用的方法一定定义在Object类中。
5.生产者和消费者的例子:
对于多个生产者和消费者,为什么要定义while判断标记。?
原因:让被唤醒的线程再一次判断标记。
为什么定义notifyAll?
原因:因为需要唤醒对方线程。 因为只用notify,容易出现只唤醒本方线程的情况。导致程序中的所有线程都等待。
代码:
/*
 * 生产者和消费者
 * */
class ProducerConsumerDemo {
	public static void main(String[] args) {
		//创建资源对象
		Resource r = new Resource();

		Producer pro = new Producer(r);
		Consumer con = new Consumer(r);
		 //创建线程
		Thread t1 = new Thread(pro);
		Thread t2 = new Thread(pro);
		Thread t3 = new Thread(con);
		Thread t4 = new Thread(con);
        //启动线程
		t1.start();
		t2.start();
		t3.start();
		t4.start();
	}
}
//资源
class Resource {
	private String name;
	private int count = 1;
	private boolean flag = false;

	// t1 t2
	public synchronized void set(String name) {
		while (flag)//每次被唤醒的时候都判断
			try {
				this.wait();
			} catch (Exception e) {
			}
		this.name = name + "--" + count++;
		System.out.println(Thread.currentThread().getName() + "...生产者.."
				+ this.name);
		flag = true;
		this.notifyAll();
	}

	// t3 t4
	public synchronized void out() {
		while (!flag)
			try {
				wait();
			} catch (Exception e) {
			}
		System.out.println(Thread.currentThread().getName() + "...消费者........."
				+ this.name);
		flag = false;
		this.notifyAll();
	}
}
//生产者
class Producer implements Runnable {
	private Resource res;
    //有参数的构造函数
	Producer(Resource res) {
		this.res = res;
	}
	//复写run()方法
	public void run() {
		while (true) {
			res.set("+商品+");
		}
	}
}
//消费者
class Consumer implements Runnable {
	private Resource res;
	//有参数的构造函数
	Consumer(Resource res) {
		this.res = res;
	}
    //复写run()方法
	public void run() {
		while (true) {
			res.out();
		}
	}
}
6.在jdk1.5中提供了多线程的升级解决方案:
将同步synchronized替换成现实Lock操作。
将Object中wait,notify,notifyAll替换成了Condition对象。
该对象可以LOCK锁,进行获取。
Lock:替代了Synchronized
lock
unlock
newCondition()
Condition:替代了Object wait notify notifyAll
await();
signal();
signalAll();
代码:
import java.util.concurrent.locks.*;

class ProducerConsumerDemo2
{
	public static void main(String[] args)
	{
		Resource r = new Resource();

		Producer pro = new Producer(r);
		Consumer con = new Consumer(r);
       //创建线程
		Thread t1 = new Thread(pro);
		Thread t2 = new Thread(pro);
		Thread t3 = new Thread(con);
		Thread t4 = new Thread(con);
        //启动线程
		t1.start();
		t2.start();
		t3.start();
		t4.start();

	}
}
class Resource
{
	private String name;
	private int count = 1;
	private boolean flag = false;

	private Lock lock = new ReentrantLock();

	//创建两个Condition对象,分别用来控制等待或唤醒和对方线程
	private Condition condition_pro = lock.newCondition();
	private Condition condition_con = lock.newCondition();
	public  void set(String name)throws InterruptedException
	{
		//获取锁
		lock.lock();
		try
		{
			while(flag)
				//本方线程等待
				condition_pro.await();
				this.name = name+"--"+count++;
			System.out.println(Thread.currentThread().getName()+"...生产者.."+this.name);
			flag = true;
			//唤醒对方线程
			condition_con.signal();
		}
		finally
		{
			lock.unlock();//释放锁的动作一定要执行。
		}
	}


	public  void out()throws InterruptedException
	{
		lock.lock();
		try
		{
			while(!flag)
				condition_con.await();
			System.out.println(Thread.currentThread().getName()+"...消费者........."+this.name);
			flag = false;
			condition_pro.signal();
		}
		finally
		{
			lock.unlock();
		}

	}
}

class Producer implements Runnable
{
	private Resource res;

	Producer(Resource res)
	{
		this.res = res;
	}
	public void run()
	{
		while(true)
		{
			try
			{
				res.set("+商品+");
			}
			catch (InterruptedException e)
			{
			}

		}
	}
}
class Consumer implements Runnable
{
	private Resource res;
	Consumer(Resource res)
	{
		this.res = res;
	}
	public void run()
	{
		while(true)
		{
			try
			{
				res.out();
			}
			catch (InterruptedException e)
			{
			}
		}
	}
}
六.停止线程
1.定义循环结束标记因为线程运行代码一般都是循环,只要控制了循环即可。
2.使用interrupt(中断)方法。该方法是结束线程的冻结状态,使线程回到运行状态 中来。
3.stop方法已经过时不再使用。
4.特殊情况:
当线程处于冻结状态,就不会读取到标记,那么线程就不会结束。当没有指定的方式让冻结的线程恢复到运行状态时,这时需要对冻结进行清除,强制让线程
恢复运行状态中来,这样就可以操作标记让线程结束。
代码:
 class StopThread implements Runnable
{
	private boolean flag =true;
	public  void run()
	{
		while(flag)
		{

			System.out.println(Thread.currentThread().getName()+"....run");
		}
	}
	public void changeFlag()
	{
		flag = false;
	}
}

class  StopThreadDemo
{
	public static void main(String[] args)
	{
		StopThread st = new StopThread();
		Thread t1 = new Thread(st);
		Thread t2 = new Thread(st);

		t1.setDaemon(true);
		t2.setDaemon(true);
		t1.start();
		t2.start();

		int num = 0;

		while(true)
		{
			if(num++ == 60)
			{
				break;
			}
			System.out.println(Thread.currentThread().getName()+"......."+num);
		}
		System.out.println("over");
	}
}


 349
349

 被折叠的 条评论
为什么被折叠?
被折叠的 条评论
为什么被折叠?
 到【灌水乐园】发言


