


前言
最近项目中需要做一个矩形框带下三角的矩形,自己首先试着用shape的xml文件去画,发现并不容易。于是想到通过自定义View画出一个带三角气泡的矩形来。
大概效果是这样子的:
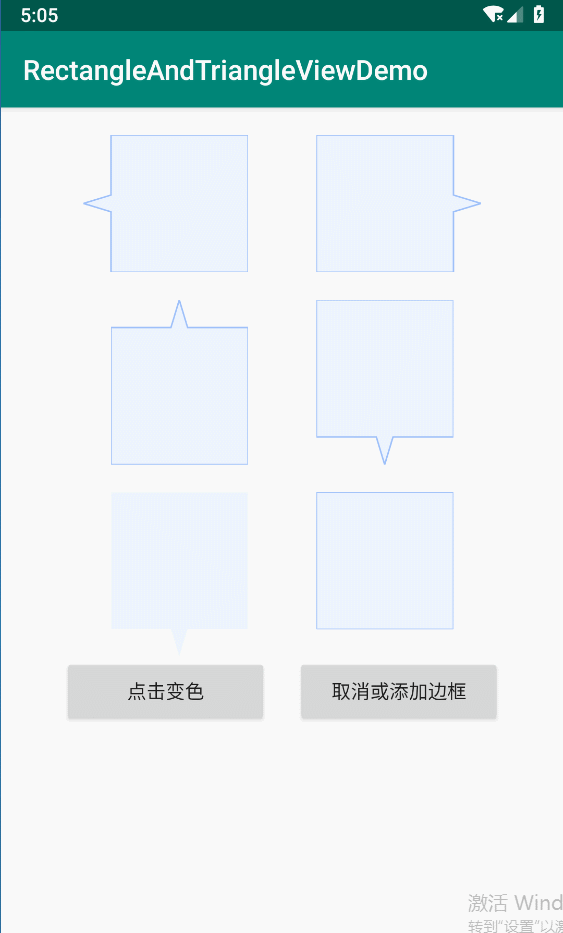
其中,还加入了设置线框的有无,以及背景色和线条颜色的更改。
一,自定义View,在构造方法中,获取style里面定义的属性的值:
public RectangleAndTriangleView(final Context context, final AttributeSet attrs, final int defStyleAttr) {
        super(context, attrs, defStyleAttr);
        this.context = context;
        TypedArray typedArray = context.getTheme().obtainStyledAttributes(attrs, R.styleable.RectangleAndTriangleView, 0, 0);
        mFillColor = typedArray.getColor(R.styleable.RectangleAndTriangleView_fill_color, ContextCompat.getColor(getContext(), DEFUALT_COLOR));
        mLineColor = typedArray.getColor(R.styleable.RectangleAndTriangleView_line_color, ContextCompat.getColor(getContext(), DEFUALT_COLOR));
        mTriHeight = typedArray.getDimensionPixelSize(R.styleable.RectangleAndTriangleView_tri_height, DEFAULT_TRI_HEIGHT);
        mTriWidth = typedArray.getDimensionPixelSize(R.styleable.RectangleAndTriangleView_tri_width, DEFAULT_TRI_WIDTH);
        mTriLineSize = typedArray.getDimensionPixelSize(R.styleable.RectangleAndTriangleView_tri_line_size, DEFAULT_TRI_LINE_SIZE);
        isHaveLine = typedArray.getBoolean(R.styleable.RectangleAndTriangleView_isHaveLine, false);
        mDirection = typedArray.getInt(R.styleable.RectangleAndTriangleView_tri_direction, mDirection);
        typedArray.recycle();

        init();
    }

private void init() {
        mPaint = new Paint();
        mPaint.setAntiAlias(true);
        mPaint.setStyle(Paint.Style.FILL);

        mLinePaint = new Paint();
        mLinePaint.setAntiAlias(true);
        mLinePaint.setStyle(Paint.Style.STROKE);
        mLinePaint.setStrokeWidth(mTriLineSize);

        mPath = new Path();
        mLinePath = new Path();

        mPaint.setColor(mFillColor);
        mLinePaint.setColor(mLineColor);
    }
二、在onMeasure中对带不同方向三角的矩形进行测量宽高,并设置宽高
@Override
    protected void onMeasure(int widthMeasureSpec, int heightMeasureSpec) {
        super.onMeasure(widthMeasureSpec, heightMeasureSpec);
        mRectWidth = MeasureSpec.getSize(widthMeasureSpec);
        mRectHeight = MeasureSpec.getSize(heightMeasureSpec);
        final int widthMode = MeasureSpec.getMode(widthMeasureSpec);
        final int heightMode = MeasureSpec.getMode(heightMeasureSpec);
        if (mRectWidth == 0 || widthMode != MeasureSpec.EXACTLY) {
            mRectWidth = AppUtils.dip2px(context, DEFAULT_RECT_WIDTH);
        }
        if (mRectHeight == 0 || heightMode != MeasureSpec.EXACTLY) {
            mRectHeight = AppUtils.dip2px(context, DEFAULT_RECT_HEIGHT);
        }
        switch (mDirection) {
            case TOP:
                setMeasuredDimension(mRectWidth, mRectHeight + mTriHeight);
                break;
            case BOTTOM:
                setMeasuredDimension(mRectWidth, mRectHeight + mTriHeight);
                break;
            case LEFT:
                setMeasuredDimension(mRectWidth+mTriHeight, mRectHeight);
                break;
            case RIGHT:
                setMeasuredDimension(mRectWidth+mTriHeight, mRectHeight);
                break;
        }

    }
三、利用onDraw方法,开始对上下左右四个方向的带三角的矩形进行绘制
@Override
    protected void onDraw(Canvas canvas) {
        super.onDraw(canvas);
        switch (mDirection) {
            case TOP:
                mPath.moveTo(0, mTriHeight);
                mPath.lineTo(mRectWidth / 2 - mTriWidth / 2, mTriHeight);
                mPath.lineTo(mRectWidth / 2, 0);
                mPath.lineTo(mRectWidth / 2 + mTriWidth / 2, mTriHeight);
                mPath.lineTo(mRectWidth, mTriHeight);
                mPath.lineTo(mRectWidth, mRectHeight + mTriHeight);
                mPath.lineTo(0, mRectHeight + mTriHeight);

                if (isHaveLine) {
                    mLinePath.moveTo(0, mTriHeight);
                    mLinePath.lineTo(mRectWidth / 2 - mTriWidth / 2, mTriHeight);
                    mLinePath.lineTo(mRectWidth / 2, 0);
                    mLinePath.lineTo(mRectWidth / 2 + mTriWidth / 2, mTriHeight);
                    mLinePath.lineTo(mRectWidth, mTriHeight);
                    mLinePath.lineTo(mRectWidth, mRectHeight + mTriHeight);
                    mLinePath.lineTo(0, mRectHeight + mTriHeight);
                }
                break;
            case BOTTOM:
                mPath.moveTo(0, 0);
                mPath.lineTo(mRectWidth, 0);
                mPath.lineTo(mRectWidth, mRectHeight);
                mPath.lineTo(mRectWidth / 2 + mTriWidth / 2, mRectHeight);
                mPath.lineTo(mRectWidth / 2, mRectHeight + mTriHeight);
                mPath.lineTo(mRectWidth / 2 - mTriWidth / 2, mRectHeight);
                mPath.lineTo(0, mRectHeight);

                if (isHaveLine) {
                    mLinePath.moveTo(0, 0);
                    mLinePath.lineTo(mRectWidth, 0);
                    mLinePath.lineTo(mRectWidth, mRectHeight);
                    mLinePath.lineTo(mRectWidth / 2 + mTriWidth / 2, mRectHeight);
                    mLinePath.lineTo(mRectWidth / 2, mRectHeight + mTriHeight);
                    mLinePath.lineTo(mRectWidth / 2 - mTriWidth / 2, mRectHeight);
                    mLinePath.lineTo(0, mRectHeight);
                }
                break;
            case RIGHT:
                mPath.moveTo(0, 0);
                mPath.lineTo(mRectWidth, 0);
                mPath.lineTo(mRectWidth, mRectHeight / 2 - mTriWidth / 2);
                mPath.lineTo(mRectWidth+mTriHeight, mRectHeight / 2);
                mPath.lineTo(mRectWidth, mRectHeight / 2 + mTriWidth / 2);
                mPath.lineTo(mRectWidth, mRectHeight);
                mPath.lineTo(0, mRectHeight);

                if (isHaveLine) {
                    mLinePath.moveTo(0, 0);
                    mLinePath.lineTo(mRectWidth, 0);
                    mLinePath.lineTo(mRectWidth, mRectHeight / 2 - mTriWidth / 2);
                    mLinePath.lineTo(mRectWidth+mTriHeight, mRectHeight / 2);
                    mLinePath.lineTo(mRectWidth, mRectHeight / 2 + mTriWidth / 2);
                    mLinePath.lineTo(mRectWidth, mRectHeight);
                    mLinePath.lineTo(0, mRectHeight);
                }
                break;
            case LEFT:
                mPath.moveTo(mTriHeight, 0);
                mPath.lineTo(mTriHeight, mRectHeight / 2 - mTriWidth / 2);
                mPath.lineTo(0, mRectHeight / 2);
                mPath.lineTo(mTriHeight, mRectHeight / 2 + mTriWidth / 2);
                mPath.lineTo(mTriHeight, mRectHeight);
                mPath.lineTo(mRectWidth+mTriHeight, mRectHeight);
                mPath.lineTo(mRectWidth+mTriHeight, 0);

                if (isHaveLine) {
                    mLinePath.moveTo(mTriHeight, 0);
                    mLinePath.lineTo(mTriHeight, mRectHeight / 2 - mTriWidth / 2);
                    mLinePath.lineTo(0, mRectHeight / 2);
                    mLinePath.lineTo(mTriHeight, mRectHeight / 2 + mTriWidth / 2);
                    mLinePath.lineTo(mTriHeight, mRectHeight);
                    mLinePath.lineTo(mRectWidth+mTriHeight, mRectHeight);
                    mLinePath.lineTo(mRectWidth+mTriHeight, 0);
                }
                break;
            default:
                break;
        }

        mPath.close();
        canvas.drawPath(mPath, mPaint);
        if (isHaveLine) {
            mLinePath.close();
            canvas.drawPath(mLinePath, mLinePaint);
        }
    }
四、定义动态设置线框颜色、矩形填充色、有无线框的方法
 /**
     * 设置实体填充颜色
     * @param mFillColor
     */
    public void setFillColor(int mFillColor){
        this.mFillColor=mFillColor;
        mPaint.setColor(mFillColor);
        invalidate();
    }

    /**
     * 设置线框的颜色
     * @param mLineColor
     */
    public void setLineColor(int mLineColor){
        this.mLineColor=mLineColor;
        mLinePaint.setColor(mLineColor);
        invalidate();
    }

    public void setIsHaveLine(boolean isHaveLine){
        this.isHaveLine=isHaveLine;
        invalidate();
    }

    public boolean isHaveLine() {
        return isHaveLine;
    }
五、控件的使用:
private Button button;
    private RectangleAndTriangleView rectangleAndTriangleView_left;
    private RectangleAndTriangleView rectangleAndTriangleView_right;
    private RectangleAndTriangleView rectangleAndTriangleView_top;
    private RectangleAndTriangleView rectangleAndTriangleView_bottom;
    private RectangleAndTriangleView rectangleAndTriangleView_no_out_line;
    private RectangleAndTriangleView rectangleAndTriangleView_no_triangle;
    private Button button_change_no_line;
    private int i=1;
    private int[] colorBg={R.color.bg_color_1,R.color.bg_color_2,R.color.bg_color_3,R.color.bg_color_4,R.color.bg_color_5,
            R.color.bg_color_6,R.color.bg_color_7,R.color.bg_color_8};
    private int[] colorLineBg={R.color.bg_line_1,R.color.bg_line_2,R.color.bg_line_3,R.color.bg_line_4,R.color.bg_line_5,
            R.color.bg_line_6,R.color.bg_line_7,R.color.bg_line_8};
    @Override
    protected void onCreate(Bundle savedInstanceState) {
        super.onCreate(savedInstanceState);
        setContentView(R.layout.activity_main);

        initView();
        initEventListener();
    }

    private void initView() {
        button = findViewById(R.id.button);
        button_change_no_line = findViewById(R.id.button_change_no_line);
        rectangleAndTriangleView_left = findViewById(R.id.rectangleAndTriangleView_left);
        rectangleAndTriangleView_right = findViewById(R.id.rectangleAndTriangleView_right);
        rectangleAndTriangleView_top = findViewById(R.id.rectangleAndTriangleView_top);
        rectangleAndTriangleView_bottom = findViewById(R.id.rectangleAndTriangleView_bottom);
        rectangleAndTriangleView_no_out_line = findViewById(R.id.rectangleAndTriangleView_no_out_line);
        rectangleAndTriangleView_no_triangle = findViewById(R.id.rectangleAndTriangleView_no_triangle);
    }

    private void initEventListener() {
        button.setOnClickListener(new View.OnClickListener() {
            @Override
            public void onClick(View v) {
                rectangleAndTriangleView_left.setFillColor(getResources().getColor(colorBg[i]));
                rectangleAndTriangleView_left.setLineColor(getResources().getColor(colorLineBg[i]));
                i++;
                if (i==8){
                    i=0;
                }
            }
        });
        button_change_no_line.setOnClickListener(new View.OnClickListener() {
            @Override
            public void onClick(View v) {
                if (rectangleAndTriangleView_left.isHaveLine()){
                    rectangleAndTriangleView_left.setIsHaveLine(false);
                }else{
                    rectangleAndTriangleView_left.setIsHaveLine(true);
                }
            }
        });
    }
六、关于RectangleAndTriangleView的一些属性:
<com.she.demo.custom.RectangleAndTriangleView
        android:id="@+id/rectangleAndTriangleView_left"
        android:layout_width="100dp"
        android:layout_height="100dp"
        app:fill_color="@color/bg_color_1"
        app:line_color="@color/bg_line_1"
        app:tri_direction="left"
        app:tri_height="20dp"
        app:tri_width="12dp"
        app:isHaveLine="true"
        app:tri_line_size="1dp"/>
其中 app:tri_direction="left" 控制三角形的方向,取值有四个:left、right、top、bottom。
app:tri_height: 控制的是三角形的高度
app:tri_width : 控制三角形的宽度
app:isHaveLine : 是否含有边框线
app: tri_ line_size: 边框线的宽度
还可以通过代码动态的设置边线的有无
rectangleAndTriangleView.setIsHaveLine(false);
通过代码设置矩形的填充色
rectangleAndTriangleView.setFillColor(getResources().getColor(R.color.red));
通过代码设置边框的颜色
rectangleAndTriangleView.setLineColor(getResources().getColor(R.color.black));
总结
到这里,这个RectangleAndTriangleView控件的使用方法以及实现过程都已经讲解完了。我已经把源码上传到GitHub上,感兴趣的朋友可以到GitHub上下载:https://github.com/xinyitiandi/RectangleAndTriangleViewDemo。欢迎大家进行star,希望阅读完本篇对你的学习起到一定的作用!


 被折叠的 条评论
为什么被折叠?
被折叠的 条评论
为什么被折叠?
 到【灌水乐园】发言


