


概念
在上一文中,我们搭建了SSM框架环境并完成了登录功能,接着本文完成用户管理功能。
需求分析
用户管理:
1.如果是系统管理员登录进网站a删除用户信息
2.如果是经理登录进网站,允许查看所有普通员工的信息
3.如果是普通员工登录进网站,用户管理功能对普通员工进行隐藏,普通员工没有权限操作用户管理功能
功能完成
管理员完成查看所有用户信息功能
根据需求分析,我们需要先判定当前登录系统的用户的身份,在根据不同的身份完成不同的功能。在主页中通过点击“用户管理”触发点击事件,在JavaScript中进行区分判断。
function yhgl() {
		//当用户点击用户管理功能的时候,需要判断当前登录的用户的身份,如果是管理员或者经理允许进入,普通员工不允许进入
		//先获得当前登录的用户的身份
		var input=document.getElementById("hidd");
		var i=input.value;
		switch (i) {
		case "1":
			//管理员身份
			//跳转一个可以操作用户的添加,修改,查询,删除等功能
		case "2":
			//经理身份
			//跳转一个只能查看普通员工的个人信息的页面
			location.href="yhgl.do";
			break;
		case "3":
			//普通员工身份
			alert("您当前没有权限使用该功能");
			break;
		}
	}
那么通过主页面的跳转进入控制器的yhgl.do地址,接着我们在UserController控制器中定义方法,
//定义方法,用于判断当前登陆的用户身份,分配操作用户管理功能的权限
    @RequestMapping("/yhgl.do")
    public ModelAndView yhgl(HttpSession session){
        ModelAndView mav=new ModelAndView();
        //先获得登录的用户的个人信息
        Map<String, Object> userInfo= (Map<String, Object>) session.getAttribute("userInfo");
        //从个人信息中获得该用户的身份,进行判断
        int userRole = (int) userInfo.get("userRole");
        if (userRole==1){
            //说明当前登录的用户是管理员,查询除了系统管理员以外的所有员工的信息
            userList = userService.getUserList(userRole);
            mav.addObject("userList",userList);
            mav.setViewName("user_3");
        }else {
            //说明当前登录的用户是经理,只能查看普通员工的信息
            List<Map<String, Object>> users = userService.getUsers(3);
            mav.addObject("userList",users);
            mav.setViewName("user_2");
        }
        return mav;
    }
通过判断登录的用户的身份进行执行不同的操作,当用户角色为1的时候,则为系统管理员身份,那么查询出所有用户信息,除系统管理员本身。因此我们在IProviderService接口中定义方法:
//查询除了系统管理员以外的所有员工的信息
    List<Map<String,Object>> getUserList(int userRole);
接着在接口的实现UserServiceImp类中实现该方法:
@Override
    public List<Map<String, Object>> getUserList(int userRole) {
        return dao.getUserList(userRole);
    }
并调用dao层的IUserDao接口中的方法执行查询操作:
//#查询除了系统管理员以外的所有员工的信息
//select * from smbms_user where userRole!=1
@Select("select * from smbms_user where userRole!=#{userRole}")
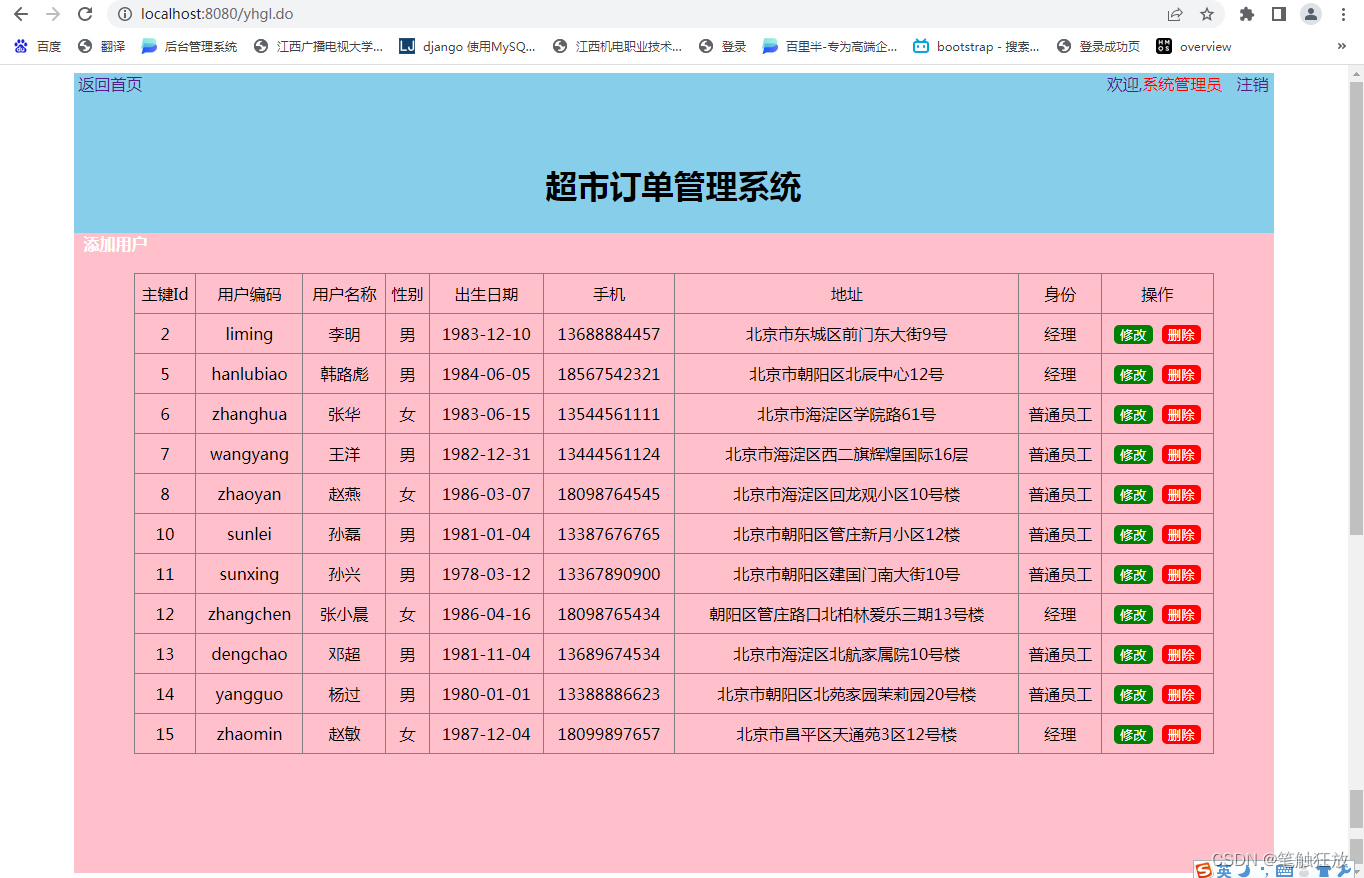
List<Map<String,Object>> getUserList(@Param("userRole")int userRole);并将最后的结果发送到user_3.jsp页面中,显示信息。其代码如下:
<%@page import="com.github.pagehelper.PageInfo"%>
<%@page import="java.util.Map"%>
<%@page import="java.util.List"%>
<%@ page language="java" contentType="text/html; charset=UTF-8"
pageEncoding="UTF-8"%>
<!DOCTYPE html>
<html>
<head>
<meta charset="UTF-8">
<title>超市订单管理系统--用户信息列表</title>
<style type="text/css">
tr {
height: 40px;
}
a{
text-decoration: none;
}
</style>
</head>
<body>
<!-- 获得分页信息对象 -->
<% //PageInfo pi=(PageInfo)request.getAttribute("pj_info"); %>
<div style="width: 1200px;height: 800px;margin: auto;">
<div style="width: 100%;height: 160px;background-color:skyblue;">
<div style="width: 100%;height: 20px;">
<div align="left" style="width: 20%;height: 100%;float: left;" >
<a href="home.do" style="text-decoration: none;">返回首页</a>
</div>
<div align="right" style="width: 80%;height: 100%;float: right;">
<a href="info.do">欢迎,<span style="color: red;">${userInfo.userName}</span></a>
<a href="index.do" style="text-decoration: none;">注销</a>
</div>
</div>
<div align="center" style="width: 100%;height: 140px;line-height: 140px;"><h1>超市订单管理系统</h1></div>
</div>
<div align="center" style="width: 100%;height: 640px;background-color: pink;">
<div align="left" style="height: 40px;" >
<a href="addUser.do" style="text-decoration: none;
text-align:center; width: 50px;
height: 20px;
color: white;font-weight: bold;
margin-top:20px;margin-left:10px;
border-radius: 5px;">添加用户</a>
</div>
<table border="1" style="width: 90%;text-align: center;border-collapse: collapse;">
<tr>
<td>主键Id</td>
<td>用户编码</td>
<td>用户名称</td>
<td>性别</td>
<td>出生日期</td>
<td>手机</td>
<td>地址</td>
<td>身份</td>
<td>操作</td>
</tr>
<% //List<Map<String,Object>> oList=pi.getList(); %>
<% List<Map<String,Object>> oList=(List<Map<String,Object>>)request.getAttribute("userList");%>
<%for(int i=0;i<oList.size();i++){ %>
<tr>
<td><%=oList.get(i).get("id") %></td>
<td><%=oList.get(i).get("userCode") %></td>
<td><%=oList.get(i).get("userName") %></td>
<% int gender=(int)oList.get(i).get("gender");
if(gender==1){%>
<td>女</td>
<%}else if(gender==2){ %>
<td>男</td>
<%} %>
<td><%=oList.get(i).get("birthday") %></td>
<td><%=oList.get(i).get("phone") %></td>
<td><%=oList.get(i).get("address") %></td>
<td><%
if((int)oList.get(i).get("userRole")==2){
%>
经理
<%
}else if((int)oList.get(i).get("userRole")==3){
%>
普通员工
<%} %>
</td>
<td><a href="GetUserInfo.do?index=<%=i %>">
<input type="button" value="修改" style="background-color: green;border: none;
border-radius: 5px;color: white;" /></a>
<a href="deleteUser.do?id=<%=oList.get(i).get("id") %>">
<input type="button" value="删除" style="background-color: red;border: none;
border-radius: 5px;color: white;"/></a></td>
</tr>
<%} %>
</table>
<!-- 分页页码导航栏 -->
<%--<br>
<div align="center">
<!-- 判断当前页是否存在上一页,不存在则不显示上一页的按钮 -->
<%if(pi.getPrePage()>0){ %>
<a href="yhgl.do?type=1&ym=<%=pi.getPrePage()%>"><input type="button" value="上一页"/></a>
<%} %>
<% for(int i:pi.getNavigatepageNums()){ %>
<a href="yhgl.do?type=1&ym=<%=i%>"><%=i %></a>
<%} %>
<!-- 判断当前页是否存在下一页,不存在则不显示下一页的按钮 -->
<% if(pi.getPageNum()<pi.getLastPage()){ %>
<a href="yhgl.do?type=1&ym=<%=pi.getNextPage()%>"><input type="button" value="下一页"/></a>
<%} %>
</div>--%>
</div>
</div>
</body>
</html>其页面效果如下:
管理员完成添加用户功能
当点击“添加用户”则触发addUser.do请求,因此我们需要在控制器中定义方法,接收该请求,完成跳转到添加用户的页面:
//定义方法,用于跳转到添加新用户的页面
    @RequestMapping("/addUser.do")
    public String add(){
        return "addUser";
    }
其添加用户的addUser.jsp页面代码如下:
<%@ page language="java" contentType="text/html; charset=UTF-8"
pageEncoding="UTF-8"%>
<!DOCTYPE html>
<html>
<head>
<meta charset="UTF-8">
<title>超市订单管理系统--添加用户</title>
<style>
a{
text-decoration: none;
}
</style>
</head>
<body>
<div style="width: 1200px;height: 800px;margin: auto;">
<div style="width: 100%;height: 160px;background-color:skyblue;">
<div style="width: 100%;height: 20px;">
<div align="left" style="width: 20%;height: 100%;float: left;" >
<a href="home.do" style="text-decoration: none;">返回首页</a>
</div>
<div align="right" style="width: 80%;height: 100%;float: right;">
<a href="info.do">欢迎,<span style="color: red;">${userInfo.userName}</span></a>
<a href="index.do" style="text-decoration: none;">注销</a>
</div>
</div>
<div align="center" style="width: 100%;height: 140px;line-height: 140px;"><h1>超市订单管理系统</h1></div>
</div>
<div align="center" style="width: 100%;height: 640px;background-color: pink;">
<form action="getAddUserInfo.do" method="post">
<div style="padding: 5px 0px">
<label for="userCode">用户名:</label>
<input id="userCode" name="userCode" type="text" placeholder="请输入用户名" />
</div>
<div style="padding: 5px 0px">
<label for="userName">姓名:</label>
<input id="userName" name="userName" type="text" placeholder="请输入用户名" />
</div>
<div style="padding: 5px 0px">
<label >性别:</label>
<input type="radio" name="gender" checked="checked" value="2">男
<input type="radio" name="gender" value="1">女
</div>
<div style="padding: 5px 0px">
<label >出生年月:</label>
<input type="date" name="birthday" >
</div>
<div style="padding: 5px 0px">
<label >手机号:</label>
<input type="number" name="phone" placeholder="请输入手机号" >
</div>
<div style="padding: 5px 0px">
<label >家庭地址:</label>
<input type="text" name="address" placeholder="请输入家庭地址" >
</div>
<div style="padding: 5px 0px">
<label >身份:</label>
<input type="radio" name="userRole" checked="checked" value="3">普通员工
<input type="radio" name="userRole" value="2">经理
</div>
<div style="padding: 5px 0px">
<input type="submit"
value="创建"
style="width: 120px;background-color: green;
border: none;padding: 5px;border-radius: 5px;
color: white;"/>
</div>
</form>
</div>
</div>
</body>
</html>其效果图如下:

当管理员在该页面上添加新用户信息时,则将数据信息通过getAddUserInfo.do虚拟地址发送请求给控制器,我们需要在控制器中定义方法,接收所有添加的信息:
//定义方法,用于接收添加新用户的页面发送过来的新用户的信息
    @RequestMapping(value = "/getAddUserInfo.do",
    params = {"userCode","userName","gender","birthday","phone","address","userRole"})
    public String getAddUserInfo(String userCode,String userName,int gender,
                                 String birthday,String phone,String address,int userRole,
                                 HttpSession session){
        //定义Map集合将所有数据进行封装,为了方便传输
        Map<String,Object> map=new HashMap<>();
        map.put("userCode",userCode);//用户名
        map.put("userName",userName);//姓名
        map.put("gender",gender);//性别
        map.put("birthday",birthday);//生日
        map.put("phone",phone);//手机号
        map.put("address",address);//地址
        map.put("userRole",userRole);//身份
        //添加当前新用户的是管理员,保存管理员的id
        //从登录成功后的个人信息中找出id
        map.put("createdBy",((Map<String,Object>)session.getAttribute("userInfo")).get("id"));
        //保存当前创建新用户的实时时间
        map.put("creationDate",
                new SimpleDateFormat("yyyy-MM-dd HH:mm:ss")
                        .format(new Date()));
        //将封装的新用户的数据发送给业务逻辑层service
        int i = userService.add(map);
        String url="";
        if (i>0)
            //添加成功,刷新列表页面
            url="redirect:yhgl.do";
        else
            System.out.println("添加失败");
        return url;
    }
接着将在IUserService中定义方法接收控制器封装好的数据
 //添加新用户
    int add(Map<String,Object> map);
UserServiceImp实现类中实现该方法
 @Override
    public int add(Map<String, Object> map) {
        return dao.add(map);
    }
在IUserDao中完成添加用户的sql语句执行:
//添加新用户
    @Insert("insert into smbms_user(userCode,userName,gender,birthday,phone,address," +
            "userRole,createdBy,creationDate)" +
            "values(#{userCode},#{userName},#{gender},#{birthday},#{phone},#{address}," +
            "#{userRole},#{createdBy},#{creationDate})")
    int add(Map<String,Object> map);
通过控制层中可以看到,当返回值大于0时,则表示添加成功,那么我们需要刷新浏览器的列表页面。
管理员修改用户信息功能
当管理员点击“修改”按钮时,将该按钮对应的列表的下标发送给GetUserInfo.do地址,因此我们在控制器定义方法进行接收该请求传递的下标参数,并根据下标从集合中找到要修改的用户信息,
//定义方法,用于接收下标,获得要修改的用户信息
    @RequestMapping("/GetUserInfo.do")
    public ModelAndView GetUserInfo(@RequestParam int index){
        ModelAndView mav=new ModelAndView();
        //根据下标从集合列表中找到要修改的用户信息
        Map<String, Object> map = userList.get(index);
        //将要修改的用户信息发送至修改页面展示
        mav.addObject("user",map);
        mav.setViewName("updateUser");
        return mav;
    }
并发送给updateUser.jsp页面中进行显示,供管理员进行修改:
<%@page import="java.util.Map"%>
<%@ page language="java" contentType="text/html; charset=UTF-8"
pageEncoding="UTF-8"%>
<!DOCTYPE html>
<html>
<head>
<meta charset="UTF-8">
<title>超市订单管理系统--修改用户</title>
<style>
a{
text-decoration: none;
}
</style>
</head>
<body>
<% Map<String,Object> map=(Map<String,Object>)request.getAttribute("user"); %>
<div style="width: 1200px;height: 800px;margin: auto;">
<div style="width: 100%;height: 160px;background-color:skyblue;">
<div style="width: 100%;height: 20px;">
<div align="left" style="width: 20%;height: 100%;float: left;" >
<a href="home.do" style="text-decoration: none;">返回首页</a>
</div>
<div align="right" style="width: 80%;height: 100%;float: right;">
<a href="info.do">欢迎,<span style="color: red;">${userInfo.userName}</span></a>
<a href="index.do" style="text-decoration: none;">注销</a>
</div>
</div>
<div align="center" style="width: 100%;height: 140px;line-height: 140px;"><h1>超市订单管理系统</h1></div>
</div>
<div align="center" style="width: 100%;height: 640px;background-color: pink;">
<form action="UpdateUser.do" method="post">
<!-- 定义一个隐藏的文本框,用于临时存储要修改的这个用户的id -->
<input type="hidden" name="id" value="<%=map.get("id") %>">
<div style="padding: 5px 0px">
<label for="userCode">用户名:</label>
<input id="userCode" name="userCode" type="text" value="<%=map.get("userCode") %>" placeholder="请输入用户名" />
</div>
<div style="padding: 5px 0px">
<label for="userName">姓名:</label>
<input id="userName" name="userName" type="text" value="<%=map.get("userName") %>" placeholder="请输入用户名" />
</div>
<div style="padding: 5px 0px">
<label >性别:</label>
<% int gender=(int)map.get("gender"); %>
<% if(gender==2){ %>
<input type="radio" name="gender" checked="checked" value="2">男
<input type="radio" name="gender" value="1">女
<%}else if(gender==1){ %>
<input type="radio" name="gender" value="2">男
<input type="radio" checked="checked" name="gender" value="1">女
<%} %>
</div>
<div style="padding: 5px 0px">
<label >出生年月:</label>
<input type="date" value="<%=map.get("birthday") %>" name="birthday" >
</div>
<div style="padding: 5px 0px">
<label >手机号:</label>
<input type="number" name="phone" value="<%=map.get("phone") %>" placeholder="请输入手机号" >
</div>
<div style="padding: 5px 0px">
<label >家庭地址:</label>
<input type="text" name="address" value="<%=map.get("address") %>" placeholder="请输入家庭地址" >
</div>
<div style="padding: 5px 0px">
<label >身份:</label>
<% int sf=(int)map.get("userRole"); %>
<% if(sf==3){ %>
<input type="radio" name="userRole" checked="checked" value="3">普通员工
<input type="radio" name="userRole" value="2">经理
<%}else if(sf==2){ %>
<input type="radio" name="userRole" value="3">普通员工
<input type="radio" name="userRole" checked="checked" value="2">经理
<%} %>
</div>
<div style="padding: 5px 0px">
<input type="submit"
value="修改"
style="width: 120px;background-color: green;
border: none;padding: 5px;border-radius: 5px;
color: white;"/>
</div>
</form>
</div>
</div>
</body>
</html>其效果如如下:


当管理员修改完成之后,点击“修改”按钮将更新的用户信息发送给UpdateUser.do地址,因此我们需要在控制器中定方法接收更新后的数据:
//定义方法,接收修改用户的数据
    @RequestMapping(value = "/UpdateUser.do",
            params = {"id","userCode","userName","gender","birthday","phone","address","userRole"})
    public String UpdateUser(long id,String userCode,String userName,int gender,
                             String birthday,String phone,String address,int userRole,
                             HttpSession session){
        //定义Map集合将所有数据进行封装,为了方便传输
        Map<String,Object> map=new HashMap<>();
        map.put("id",id);
        map.put("userCode",userCode);//用户名
        map.put("userName",userName);//姓名
        map.put("gender",gender);//性别
        map.put("birthday",birthday);//生日
        map.put("phone",phone);//手机号
        map.put("address",address);//地址
        map.put("userRole",userRole);//身份
        //修改当前用户的是管理员,保存管理员的id
        //从登录成功后的个人信息中找出id
        map.put("modifyBy",((Map<String,Object>)session.getAttribute("userInfo")).get("id"));
        //保存当前创建新用户的实时时间
        map.put("modifyDate",
                new SimpleDateFormat("yyyy-MM-dd HH:mm:ss")
                        .format(new Date()));
        int i = userService.update(map);
        if (i>0)//修改成功,刷新列表页面
            return "redirect:yhgl.do";
        else
            //修改失败
            return "redirect:errorUpdateUser.do";
    }
    @RequestMapping(value = "/errorUpdateUser.do",produces = {"text/html;charset=UTF-8"})
    @ResponseBody
    public String errorupdate(){
        return "修改失败";
    }
接着我们需要在IUserService接口中定义方法接收控制器发送过来的更新的数据:
//修改用户
    int update(Map<String,Object>map);
在UserServiceImp类中实现该方法:
@Override
    public int update(Map<String, Object> map) {
        return dao.update(map);
    }
并将数据发送给IUserDao中执行修改的sql语句对数据库中的数据进行修改:
//修改用户
    @Update("update smbms_user set userCode=#{userCode},userName=#{userName}," +
            "gender=#{gender},birthday=#{birthday},phone=#{phone}," +
            "address=#{address},userRole=#{userRole},modifyBy=#{modifyBy}," +
            "modifyDate=#{modifyDate} where id=#{id}")
    int update(Map<String,Object> map);
那如果修改成功,控制器中将刷新浏览器的用户列表的页面。
管理员删除用户功能
当管理员点击“删除”按钮时,发送用户对应的主键id作为删除用户的条件给deleteUser.do地址,因此我们需要在控制器中定义方法来接收该主键id:
//定义方法,根据id删除用户
    @RequestMapping("/deleteUser.do")
    public String deleteUser(@RequestParam long id){
        int i = userService.del(id);
        if (i>0)//删除成功,刷新列表页面
            return "redirect:yhgl.do";
        else
            //删除失败
            return "redirect:errordelUser.do";
    }

    @RequestMapping(value = "/errordelUser.do",produces = {"text/html;charset=UTF-8"})
    @ResponseBody
    public String errordel(){
        return "删除失败";
    }
    //查看登录用户的个人信息
    @RequestMapping("/info.do")
    public String info(){
        return "myInfo";
    }
并在IUserService中定义方法接收控制器发送的主键id
 //删除用户
    int del(long id);
在UserServiceImp类中实现该方法
@Override
    public int del(long id) {
        return dao.del(id);
    }
在IUserDao中根据该主键id完成删除用户的操作
//删除用户
    @Delete("delete from smbms_user where id=#{id}")
    int del(@Param("id")long id);
并在控制器中判断删除成功后,刷新浏览器上用户信息列表。
经理身份登录查看普通员工信息
那么如果登录的用户是经理身份,那么userRole的值为2,则该执行控制器中

因此我们需要在IUserService中定义方法,只能查询普通员工的信息
List<Map<String,Object>> getUsers(int userRole);接着实现类UserServiceImp中实现
 @Override
    public List<Map<String, Object>> getUsers(int userRole) {
        return dao.getUserByRole(userRole);
    }
在IUserDao中执行查询普通员工的sql语句
//经理只能查看普通员工的信息
@Select("select * from smbms_user where userRole=#{userRole}")
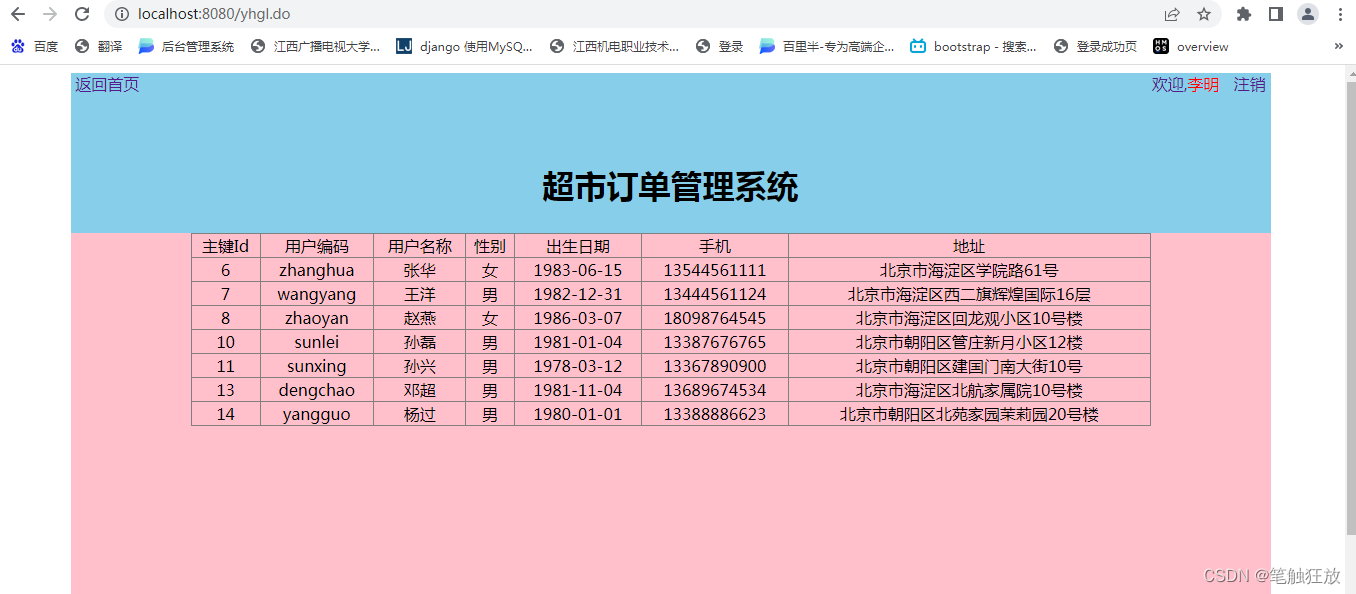
List<Map<String,Object>> getUserByRole(@Param("userRole")int userRole);并将查询出来的普通员工的信息发给user_2.jsp页面进行展示,但不能进行添加,修改,删除操作。
<%@page import="java.util.Map"%>
<%@page import="java.util.List"%>
<%@ page language="java" contentType="text/html; charset=UTF-8"
pageEncoding="UTF-8"%>
<!DOCTYPE html>
<html>
<head>
<meta charset="UTF-8">
<title>超市订单管理系统--用户信息列表</title>
<style>
a{
text-decoration: none;
}
</style>
</head>
<body>
<div style="width: 1200px;height: 800px;margin: auto;">
<div style="width: 100%;height: 160px;background-color:skyblue;">
<div style="width: 100%;height: 20px;">
<div align="left" style="width: 20%;height: 100%;float: left;" >
<a href="home.do" style="text-decoration: none;">返回首页</a>
</div>
<div align="right" style="width: 80%;height: 100%;float: right;">
<a href="info.do">欢迎,<span style="color: red;">${userInfo.userName}</span></a>
<a href="index.do" style="text-decoration: none;">注销</a>
</div>
</div>
<div align="center" style="width: 100%;height: 140px;line-height: 140px;"><h1>超市订单管理系统</h1></div>
</div>
<div align="center" style="width: 100%;height: 640px;background-color: pink;">
<table border="1" style="width: 80%;text-align: center;border-collapse: collapse;">
<tr>
<td>主键Id</td>
<td>用户编码</td>
<td>用户名称</td>
<td>性别</td>
<td>出生日期</td>
<td>手机</td>
<td>地址</td>
</tr>
<% List<Map<String,Object>> oList=(List<Map<String,Object>>)request.getAttribute("userList"); %>
<%for(int i=0;i<oList.size();i++){ %>
<tr>
<td><%=oList.get(i).get("id") %></td>
<td><%=oList.get(i).get("userCode") %></td>
<td><%=oList.get(i).get("userName") %></td>
<% int gender=(int)oList.get(i).get("gender");
if(gender==1){%>
<td>女</td>
<%}else if(gender==2){ %>
<td>男</td>
<%} %>
<td><%=oList.get(i).get("birthday") %></td>
<td><%=oList.get(i).get("phone") %></td>
<td><%=oList.get(i).get("address") %></td>
</tr>
<%} %>
</table>
</div>
</div>
</body>
</html>其效果如下:
总结
该功能是通过登录的用户的三种身份来完成不通过权限操作,读者可在该代码中完善更多的功能或者优化页面美观等等,后期文章则对供应商管理进行分析并代码完成!!!


 925
925


 被折叠的 条评论
为什么被折叠?
被折叠的 条评论
为什么被折叠?
 到【灌水乐园】发言


