


文章目录
- 一. 简介
- 二. Service 启动
- 1 startService 启动服务
- 1.1 ContextImpl # startService()
- 1.2 AMS # startService()
- 1.3 ActiveServices # startServiceLocked()
- 1.4 ActiveServices # startServiceInnerLocked()
- 1.5 ActiveServices # bringUpServiceLocked()
- 1.6 总结
- 2 bindService 绑定服务
- 三. 交流
一. 简介
服务 (Service) 是 Android 系统中 4 大应用程序组件之一,主要用途有:后台运行和跨进程访问。通过启动服务可以在不显示界面的前提下在后台执行那些不需要和用户交互且长期运行的任务,即使程序切换到后台,或者用户打开了另一个应用程序,服务仍然能够保持独立运行。通过 AIDL 服务可以实现不同进程之间的数据通信,后面详细解析。
1 服务的形式
Service 的存在形式:本地服务、远程服务和前台服务。
本地服务:是指服务和启动服务的上下文 (如:Activity) 在同一个进程,即服务依附在应用程序主进程而不是独立的进程,由于没有启动新进程因而在一定程度上节约了系统资源,但当主进程被杀掉后,依附于其的服务都会停止运行。
远程服务:是指运行在独立的进程中的服务,由于是独立的进程,因此会占用一定的系统资源,如运行于 System_Server 进程中的系统服务,它们是常驻的,不会因应用进程被杀掉而被强制停止运行。
前台服务:是指那些被认为用户知道 (用户所认可的) 且在系统内存不足的时候不允许系统杀死的服务,用来执行一些用户能注意到的操作。前台服务必须给状态栏提供一个通知,并且放到正在运行 (Ongoing) 标题之下,即与之绑定的通知只有在这个服务被终止或从前台主动移除通知后才能被解除。
2 服务的状态
Service 的状态:启动状态和绑定状态,也可以说成是服务的两种启动方式。
启动状态:通过应用组件 (如:Activity) 调用 startService() 方法启动服务时,服务即处于“启动”状态,便可在后台无限期运行,除非手动调用 stopService() 方法才能停止服务,处于启动状态的服务通常是执行单一操作,而且不会将结果返回给调用方。
绑定状态:通过应用组件 (如:Activity) 调用 bindService() 方法绑定服务时,服务即处于“绑定”状态,绑定服务提供客户端与服务器交互的接口,通过接口可以发送请求并获取结果等,多个组件可以同时绑定到同一个服务上,但只有绑定的服务全部解绑后,该服务才会被销毁。
3 总结
通过本小节的了解,对服务的概念、存在形式、启动方式和状态有了初步的掌握,下面继续来深入学下服务 (Service) 的启动过程。
二. Service 启动
Service 有两种启动方式:startService 和 bindService,两者方式的启动过程不尽相同,接下来分开讨论,首先先看一下 startService 启动 Service 的过程。
1 startService 启动服务
首先要新建 Service 子类然后再启动,Service 子类的构建很简单,不再赘述,也不是本文的重点,先来看一下 startService 的启动入口。
public class ContextWrapper extends Context {
	......
    @UnsupportedAppUsage
    Context mBase;
    ......
    @Override
    public ComponentName startService(Intent service) {
        return mBase.startService(service);
    }
    ......
}
调用 ContextWrapper # startService() 方法来启动 Service,在该方法中将 Service 的启动委托给了 mBase,这里 mBase 是 ContextImpl 实例对象,ContextImpl 是抽象类 Context 的具体实现类,即调用流程委托给 ContextImpl 并调用其 startService() 方法。具体详解参见文章 深度详解 Android 之 Context。
1.1 ContextImpl # startService()
class ContextImpl extends Context {
	......
    @Override
    public ComponentName startService(Intent service) {
        warnIfCallingFromSystemProcess();
        // 继续调用内部方法 startServiceCommon() 来启动服务
        return startServiceCommon(service, false, mUser);
    }

    private ComponentName startServiceCommon(Intent service, boolean requireForeground,
            UserHandle user) {
        try {
            validateServiceIntent(service);
            service.prepareToLeaveProcess(this);
            // 获取继承自 IActivityManager.Stub 类的客户端实现类,即获取服务端的 Binder 代理对象
            ComponentName cn = ActivityManager.getService().startService(
                    mMainThread.getApplicationThread(), service,
                    service.resolveTypeIfNeeded(getContentResolver()), requireForeground,
                    getOpPackageName(), getAttributionTag(), user.getIdentifier());
            ......
            return cn;
        }
        ......
    }
    ......
}
执行流程如下:
- 调用 ContextImpl # validateServiceIntent() 方法对参数 Intent 进行合法性检查,Android 5.0 后要求 Service 必须通过显式 Intent 启动,否则会直接抛出异常。调用 Intent # prepareToLeaveProcess() 方法对 Intent 的属性进行离开应用进程前的准备工作。
- 获取继承自 IActivityManager.Stub 类的客户端实现类,即获取服务端 AMS 在本地的代理对象 BpBinder,通过代理对象的调用将启动服务的任务跨进程传给了 AMS 中(Binder 有关的知识,读者可自行查阅,笔者暂时没写)。
1.2 AMS # startService()
public class ActivityManagerService extends IActivityManager.Stub
        implements Watchdog.Monitor, BatteryStatsImpl.BatteryCallback, ActivityManagerGlobalLock {
    ......
    final ActiveServices mServices;
    ......
    public ActivityManagerService(Context systemContext, ActivityTaskManagerService atm) {
    	......
		mServices = new ActiveServices(this); // AMS 构造方法中初始化 mServices
		......
    }
    @Override
    public ComponentName startService(IApplicationThread caller, Intent service,
            String resolvedType, boolean requireForeground, String callingPackage,
            String callingFeatureId, int userId)
            throws TransactionTooLargeException {
        enforceNotIsolatedCaller("startService");
        ......// 省略空判断、日志打印
        synchronized(this) {
        	// 获取客户端进程的 callingPid 与 callingUid
            final int callingPid = Binder.getCallingPid();
            final int callingUid = Binder.getCallingUid();
            final long origId = Binder.clearCallingIdentity();
            ComponentName res;
            try {
            	// 服务的启动交给 ActiveServices 来进一步处理
            	// mServices 实例对象在 AMS 的构造函数中初始化
                res = mServices.startServiceLocked(caller, service,
                        resolvedType, callingPid, callingUid,
                        requireForeground, callingPackage, callingFeatureId, userId);
            } finally {
                Binder.restoreCallingIdentity(origId);
            }
            return res;
        }
    }
    ......
}
在 AMS # startService() 方法中,将启动 Service 的任务委托给 ActiveServices 来执行,并调用其 startServiceLocked() 方法,ActiveServices 类是用来辅助 AMS 来管理 Service 的核心类。
1.3 ActiveServices # startServiceLocked()
public final class ActiveServices {
	......
	final SparseArray<ServiceMap> mServiceMap = new SparseArray<>();
    final ArrayList<ProcessRecord> mLruProcesses = new ArrayList<ProcessRecord>();
	......
	ComponentName startServiceLocked(IApplicationThread caller, Intent service, String resolvedType,
            int callingPid, int callingUid, boolean fgRequired, String callingPackage,
            @Nullable String callingFeatureId, final int userId)
            throws TransactionTooLargeException {
		// 注意最后一个参数是 allowBackgroundActivityStarts 默认为 false, 表示不允许后台 Activity 启动 Service
        return startServiceLocked(caller, service, resolvedType, callingPid, callingUid, fgRequired,
                callingPackage, callingFeatureId, userId, false);
    }

    ComponentName startServiceLocked(IApplicationThread caller, Intent service, String resolvedType,
            int callingPid, int callingUid, boolean fgRequired, String callingPackage,
            @Nullable String callingFeatureId, final int userId,
            boolean allowBackgroundActivityStarts) throws TransactionTooLargeException {
		......
		final boolean callerFg;
        if (caller != null) {
        	// 获取 mLruProcesses 缓存的调用进程 caller 对应的 ProcessRecord
            final ProcessRecord callerApp = mAm.getRecordForAppLocked(caller);
            ......
            // callerFg 标志位用于标记发起端进程是前台还是后台,当发起方进程不等于 SCHED_GROUP_BACKGROUND
   			// 或者发起方为空值,则 callerFg 置为 true,否则为 false
            callerFg = callerApp.setSchedGroup != ProcessList.SCHED_GROUP_BACKGROUND;
        } else {
            callerFg = true;
        }
		// 获取包含 ServiceRecord 的 ServiceLookupResult 实例
        ServiceLookupResult res =
            retrieveServiceLocked(service, null, resolvedType, callingPackage,
                    callingPid, callingUid, userId, true, callerFg, false, false);
		......
		// 获取 ServiceRecord
        ServiceRecord r = res.record;
		// 是否后台启动,Android 8.0+ 有后台启动限制
		final boolean bgLaunch = !mAm.isUidActiveLocked(r.appInfo.uid);
		boolean forcedStandby = false;
		if (bgLaunch && appRestrictedAnyInBackground(r.appInfo.uid, r.packageName)) {
            ......// 如果后台启动 Service,且 app 有后台启动限制,则 forcedStandby 设置为 true
            forcedStandby = true;
        }
        // 如果是 startForegroundService 启动前台服务,检查前台启动操作权限是否已获取
        boolean forceSilentAbort = false;
        if (fgRequired) {
            ......
        }
        // 如果是后台启动或者启动非前台服务,检查是否允许后台启动,如果不允许的话返回 null
        if (forcedStandby || (!r.startRequested && !fgRequired)) {
            final int allowed = mAm.getAppStartModeLocked(r.appInfo.uid, r.packageName,
                    r.appInfo.targetSdkVersion, callingPid, false, false, forcedStandby);
            if (allowed != ActivityManager.APP_START_MODE_NORMAL) {
				......
                if (allowed == ActivityManager.APP_START_MODE_DELAYED || forceSilentAbort) {
					......
                    return null;
                }
                if (forcedStandby) {
                    if (fgRequired) {
						......
                        return null;
                    }
                }
                UidRecord uidRec = mAm.mProcessList.getUidRecordLocked(r.appInfo.uid);
                return new ComponentName("?", "app is in background uid " + uidRec);
            }
        }
        if (r.appInfo.targetSdkVersion < Build.VERSION_CODES.O && fgRequired) {
            ......// Android 8.0 之前启动前台服务不需要调用 startForegroundService(), 即 fgRequired 为 false
            fgRequired = false;
        }
        ......
        // 设置 ServiceRecord 启动参数, pendingStarts 中添加启动项 StartItem
        r.lastActivity = SystemClock.uptimeMillis();
        // startRequested 是 ServiceRecord 类的一个 boolean 类型的成员变量,该值为 true 表示 Service
   		// 是通过 startService 方式(而不是 bindService 方式)启动的
   		r.startRequested = true;
        // 创建 ServiceRecord.StartItem 并添加到 ServiceRecord 实例的 pendingStarts 中
        // pendingStarts 是 ServiceRecord 类的一个 ArrayList<StartItem> 类型的成员变量,它保存着所有尚未
        // 处理的Service 启动参数,这些参数最终会在回调 Service 的 onStartCommand() 时传递给应用进程进行处理
        r.pendingStarts.add(new ServiceRecord.StartItem(r, false, r.makeNextStartId(),
                service, neededGrants, callingUid));
        ......
        if (fgRequired) {
        	// 如果是 Android 8.0+ 调用的 startForegroundService() 启动前台服务的话,更新 ServiceState
            ServiceState stracker = r.getTracker();
            if (stracker != null) {
                stracker.setForeground(true, mAm.mProcessStats.getMemFactorLocked(),
                        r.lastActivity);
            }
            // 如果是启动前台服务,需通过 AppOpsService # startOperation() 获取权限授予结果
            mAm.mAppOpsService.startOperation(AppOpsManager.getToken(mAm.mAppOpsService),
                    AppOpsManager.OP_START_FOREGROUND, r.appInfo.uid, r.packageName, null,
                    true, false, null, false);
        }
        // 获取 ServiceMap
        final ServiceMap smap = getServiceMapLocked(r.userId);
        boolean addToStarting = false;
        if (!callerFg && !fgRequired && r.app == null
                && mAm.mUserController.hasStartedUserState(r.userId)) {
            // 如果“ caller app 不是前台应用”、“目标 Service 不是前台服务”、“目标 Service 处于未运行状态”
    		// “发起请求的用户已经启动”,以上条件均满足则进入此分支,判断目标 Service 是否需要
    		// 延迟启动,否则,将调用 startServiceInnerLocked() 立即启动目标 Service
            ProcessRecord proc = mAm.getProcessRecordLocked(r.processName, r.appInfo.uid, false);
            // 当目标 Service 所属的进程尚未创建,或者已创建但优先级较低时(即 proc.curProcState 的值
            // 大于常量10,注意它的取值越小反而表示进程优先级越高
            if (proc == null || proc.getCurProcState() > ActivityManager.PROCESS_STATE_RECEIVER) {
				......
                if (r.delayed) {
                    ......// 如果 delayed 为 true,延迟启动
                    return r.name;
                }
                // 如果后台启动服务数超过 mMaxStartingBackground,则延迟启动
                if (smap.mStartingBackground.size() >= mMaxStartingBackground) {
                    smap.mDelayedStartList.add(r);
                    r.delayed = true;
                    return r.name;
                }
                // addToStarting 设置为 true
                addToStarting = true;
            } else if (proc.getCurProcState() >= ActivityManager.PROCESS_STATE_SERVICE) {
            	// 当目标 Service 所属的进程已经创建且优先级较高时(即 proc.curProcState 的值大于或等于常量9)
        		// 目标 Service 的启动不受 mStartingBackground 列表的容量限制,一定可以立即启动
                addToStarting = true;
                ......
            }
        }
        ......
        // 设置完参数值,启动服务
        ComponentName cmp = startServiceInnerLocked(smap, service, r, callerFg, addToStarting);
		......
        return cmp;
    }
    ......
}
参见方法中的注释,主要执行流程如下:
- 通过 ActiveServices # retrieveServiceLocked() 方法获取 ServiceRecord,其记录了 Service 的所有信息包括属于哪个进程,Service 的名称,应用包名等等,如果服务已存在则获取缓存的 ServiceRecord,否者新建然后加入到缓存中。
- 根据当前启动进程的状态值、启动条件等,设置 ServiceRecord 启动参数, 并为其 pendingStarts 中添加启动项 StartItem,然后继续调用 ActiveServices # startServiceInnerLocked() 方法来启动服务。
1.3.1 ActiveServices # retrieveServiceLocked()
public final class ActiveServices {
	......
    final SparseArray<ServiceMap> mServiceMap = new SparseArray<>();
    final ArrayList<ServiceRecord> mPendingServices = new ArrayList<>();
    ......
	private ServiceLookupResult retrieveServiceLocked(Intent service,
            String instanceName, String resolvedType, String callingPackage,
            int callingPid, int callingUid, int userId,
            boolean createIfNeeded, boolean callingFromFg, boolean isBindExternal,
            boolean allowInstant) {
        ServiceRecord r = null;
     	......
     	// 转换更新 userId 值,内部会做很多判断,不深探索
        userId = mAm.mUserController.handleIncomingUser(callingPid, callingUid, userId,
                /* allowAll= */false, getAllowMode(service, callingPackage),
                /* name= */ "service", callingPackage);
		// 根据 userId 获取 ServiceMap 实例,存在则直接返回,否则新建
		// 注意:ServiceMap 是一个 Handler
        ServiceMap smap = getServiceMapLocked(userId);
        // ComponentName 实例有两个变量,一个是启动服务的上下文 Context,一个是服务类名
        final ComponentName comp;
        if (instanceName == null) {
        	... // 由于入参 instanceName 为空,则从 Intent 中获取 ComponentName
        }
        if (comp != null) { // 如果 ComponentName 不为空则获取其对应的 ServiceRecord
            r = smap.mServicesByInstanceName.get(comp);
        }
        if (r == null && !isBindExternal && instanceName == null) {
            Intent.FilterComparison filter = new Intent.FilterComparison(service);
            // 根据 ComponentName 获取不到,则根据 Intent.FilterComparison 获取
            r = smap.mServicesByIntent.get(filter);
        }
        if (r != null && (r.serviceInfo.flags & ServiceInfo.FLAG_EXTERNAL_SERVICE) != 0
                && !callingPackage.equals(r.packageName)) {
            // 如果一个外部服务在其自己的包中运行,其他包不应该绑定到该服务
            r = null;
        }
        if (r == null) {
            try { // 如果两个缓存中都没有、则需新建 ServiceRecord
                int flags = ActivityManagerService.STOCK_PM_FLAGS
                        | PackageManager.MATCH_DEBUG_TRIAGED_MISSING;
                if (allowInstant) {
                    flags |= PackageManager.MATCH_INSTANT;
                }
                //
                // 获取 PMS 内部类 PackageManagerInternalImpl,调用其 resolveService
                // 最后调用 PMS 的 resolveServiceInternal 获取 ResolveInfo
                ResolveInfo rInfo = mAm.getPackageManagerInternalLocked().resolveService(service,
                        resolvedType, flags, userId, callingUid);
				// 获取 ResolveInfo 中生成的 ServiceInfo 信息
                ServiceInfo sInfo = rInfo != null ? rInfo.serviceInfo : null;
				......
                ComponentName className = new ComponentName(
                        sInfo.applicationInfo.packageName, sInfo.name);
                ComponentName name = comp != null ? comp : className;
                ......
                if (userId > 0) {
                	// 对于没有预定义 uid 的 App 或系统进程,检查权限
                	......
                    sInfo = new ServiceInfo(sInfo);
                    sInfo.applicationInfo = mAm.getAppInfoForUser(sInfo.applicationInfo, userId);
                }
                // 缓存集合 ArrayMap 中获取 name 对应的 ServiceRecord
                r = smap.mServicesByInstanceName.get(name);
                if (r == null && createIfNeeded) { // 不存在且需要创建
                    ......
                    // 新建 ServiceRecord,赋值后加入到缓存集合 ArrayMap 中
                    r = new ServiceRecord(mAm, ss, className, name, definingPackageName,
                            definingUid, filter, sInfo, callingFromFg, res);
                    r.mRecentCallingPackage = callingPackage;
                    res.setService(r);
                    smap.mServicesByInstanceName.put(name, r); // 添加缓存
                    smap.mServicesByIntent.put(filter, r);
                    // 遍历去重,确保 Service 不在待处理列表中,如果存在则移除掉
                    for (int i=mPendingServices.size()-1; i>=0; i--) {...}
                }
            }
            ......
        }
        if (r != null) { // ServiceRecord 不为空、则进行各种校验
            if (!mAm.validateAssociationAllowedLocked(callingPackage, callingUid, r.packageName,
                    r.appInfo.uid)) { // 服务查找失败:callingPackage和r.packageName之间不允许关联
                return new ServiceLookupResult(null, msg);
            }
            if (!mAm.mIntentFirewall.checkService(r.name, service, callingUid, callingPid,
                    resolvedType, r.appInfo)) { // 被防火墙拦截
                return new ServiceLookupResult(null, "blocked by firewall");
            }
            // 进行权限校验
            if (mAm.checkComponentPermission(r.permission,
                    callingPid, callingUid, r.appInfo.uid, r.exported) != PERMISSION_GRANTED) {
                if (!r.exported) {
					......// 根据设置的 exported 值判断是否能被其它应用隐式调用该服务,为 false 则无法打开
                    return new ServiceLookupResult(null, "not exported from uid "
                            + r.appInfo.uid);
                }
                ......
                return new ServiceLookupResult(null, r.permission);
            } else if (r.permission != null && callingPackage != null) {
            	// 通过系统内部的 AppOpsManager 权限管理来校验服务的权限
                final int opCode = AppOpsManager.permissionToOpCode(r.permission);
                ......
            }
            return new ServiceLookupResult(r, null);
        }
        return null;
    }
    ......
}
这个方法比较长,删掉一些代码,注释也写了一些,执行流程如下:
- 根据启动服务时的入参,从 mServiceMap 缓存中获取 ServiceMap 实例,然后由 ComponentName 和 Intent.FilterComparison 从 ServiceMap 实例的两个缓存集合中获取对应的 ServiceRecord 实例。
- 如果获取不到,则先获取 PMS 内部类 PackageManagerInternalImpl,并调用其 resolveService() 方法,在该方法中会继续调用 PMS 的 resolveServiceInternal() 方法来获取 ResolveInfo 实例,主要是为了获取 ResolveInfo 实例中生成的 ServiceInfo 实例来新建 ServiceRecord 实例,然后将新建的 ServiceRecord 实例加入到 ServiceMap 实例的两个缓存集合中,如果可以获取到,则复用 ServiceRecord 实例即可。
- 最后对新建或复用的 ServiceRecord 实例进行权限校验、防火墙检测等,并将其封装到 ServiceLookupResult 实例中返回。
总结:就是查询这个启动的这个 Service 是否合法,是否完成,是否可以启动,如果可以就设置信息,组装成最终结果ServiceLookupResult 实例对象返回,如果有问题里面就抛异常或者返回 null。
AppOpsManager:Google 在 Android 4.3 里面引进的应用程序操作(权限)的管理类,核心实现类为 AppOpsService。AppOpsManager 还提供了跟踪记录的功能,以方便开发者了解系统敏感操作的访问记录。
1.3.2 ServiceRecord.StartItem 类
final class ServiceRecord extends Binder implements ComponentName.WithComponentName {
	......
	static class StartItem {
        final ServiceRecord sr;
        final boolean taskRemoved;
        final int id;
        final int callingId;
        final Intent intent;
        final NeededUriGrants neededGrants;
        long deliveredTime;
        int deliveryCount;
        int doneExecutingCount;
        UriPermissionOwner uriPermissions;

        String stringName;      // caching of toString

        StartItem(ServiceRecord _sr, boolean _taskRemoved, int _id, Intent _intent,
                NeededUriGrants _neededGrants, int _callingId) {
            sr = _sr;
            taskRemoved = _taskRemoved;
            id = _id;
            intent = _intent;
            neededGrants = _neededGrants;
            callingId = _callingId;
        }
	}
	......
}
StartItem 是 ServiceRecord 的内部类,表示一次 startService 的动作,每调用 startService 一次,只生成一个 ServiceRecord 实例,但会生成多个 StartItem,并且每次 StartItem # id 自增 1。
新创建 ServiceRecord 实例后,会遍历 mPendingServices 去重,如果存在与新建的 ServiceRecord 实例一样的则移除掉,确保 ServiceRecord 实例只有一个。
1.4 ActiveServices # startServiceInnerLocked()
public final class ActiveServices {
    ......
	ComponentName startServiceInnerLocked(ServiceMap smap, Intent service, ServiceRecord r,
            boolean callerFg, boolean addToStarting) throws TransactionTooLargeException {
        ServiceState stracker = r.getTracker();
        if (stracker != null) {
        	// 更新 ServiceState 状态为 started
            stracker.setStarted(true, mAm.mProcessStats.getMemFactorLocked(), r.lastActivity);
        }
        r.callStart = false;
        FrameworkStatsLog.write(FrameworkStatsLog.SERVICE_STATE_CHANGED, r.appInfo.uid,
                r.name.getPackageName(), r.name.getClassName(),
                FrameworkStatsLog.SERVICE_STATE_CHANGED__STATE__START);
        synchronized (r.stats.getBatteryStats()) {
            r.stats.startRunningLocked();
        }
        // 继续启动服务
        String error = bringUpServiceLocked(r, service.getFlags(), callerFg, false, false);
        if (error != null) {
            return new ComponentName("!!", error);
        }
        if (r.startRequested && addToStarting) {
        	// 通过 startService() 启动并且 addToStarting 标志位为 true,说明此时是一个能够启动的后台服务
        	// 则将 ServiceRecord 添加到 mStartingBackground 中
            boolean first = smap.mStartingBackground.size() == 0;
            smap.mStartingBackground.add(r);
            r.startingBgTimeout = SystemClock.uptimeMillis() + mAm.mConstants.BG_START_TIMEOUT;
            ......
            if (first) {
            	// 如果 mStartingBackground 的数量为0,则直接调用 ServiceMap 的
            	// rescheduleDelayedStartsLocked() 启动后台服务
                smap.rescheduleDelayedStartsLocked();
            }
        } else if (callerFg || r.fgRequired) {
            smap.ensureNotStartingBackgroundLocked(r);
        }

        return r.name;
    }
    ......
}
ServiceRecord 的成员变量 callStart 是一个 boolean 类型的标志位,该值为 true 时表示(先前运行的)Service 由于内存不足被杀死后进行自动重启 (一个典型的实例是 Service # onStartCommand() 返回 START_STICKY) ,当前待启动的 Service 是通过 startService 方式来启动一个新的服务而非自动重启先前被杀掉的服务,所以此处该值被置为 false。
ActiveServices # startServiceInnerLocked() 方法中,继续调用 ActiveServices # bringUpServiceLocked() 方法启动目标 Service,如果启动失败则抛出异常。
1.5 ActiveServices # bringUpServiceLocked()
public final class ActiveServices {
	......
	private String bringUpServiceLocked(ServiceRecord r, int intentFlags, boolean execInFg,
            boolean whileRestarting, boolean permissionsReviewRequired)
            throws TransactionTooLargeException {
        if (r.app != null && r.app.thread != null) {
        	// 如果 ServiceRecord 已经保存了 App 远程端的 Binder 对象 IApplicationThread
        	// 即当前 Service 已经启动过了,真正启动 Service 时会给它赋值
        	// 发送启动服务消息
            sendServiceArgsLocked(r, execInFg, false);
            return null;
        }
        if (!whileRestarting && mRestartingServices.contains(r)) {
            // 如果服务是正在重启的服务,什么都不做,直接返回
            return null;
        }
		......
        // 已经准备启动 Service,则从 mRestartingServices 中移除掉
        if (mRestartingServices.remove(r)) {
            clearRestartingIfNeededLocked(r);
        }
        // 如果 ServiceRecord 的 delay 属性为 true,则从 mDelayedStartList 移除
        // 该 ServiceRecord,标志位 delay 置为 false,即此时开始启动该服务
        if (r.delayed) {
            getServiceMapLocked(r.userId).mDelayedStartList.remove(r);
            r.delayed = false;
        }
        // 启动服务之前,先确保这个服务所在的程序已经启动
        // 这个就是要求在启动某个服务之前,需先把程序拉起来才可以
        if (!mAm.mUserController.hasStartedUserState(r.userId)) {
            ......
            bringDownServiceLocked(r);
            return msg;
        }
        // 服务要启动起来,App 不能关闭,给 App 设置为不会被杀的状态
        try {
            AppGlobals.getPackageManager().setPackageStoppedState(
                    r.packageName, false, r.userId);
        }
        ......
        final boolean isolated = (r.serviceInfo.flags&ServiceInfo.FLAG_ISOLATED_PROCESS) != 0;
        final String procName = r.processName;
        HostingRecord hostingRecord = new HostingRecord("service", r.instanceName);
        ProcessRecord app;
        if (!isolated) {
        	// 非 isolated 进程,则从进程列表查找目标 Service 所属的进程是否存在
            app = mAm.getProcessRecordLocked(procName, r.appInfo.uid, false);
			.......
            if (app != null && app.thread != null) { // 表示目标 Service 所属的进程已经存在,不需再创建
                try {
                    app.addPackage(r.appInfo.packageName, r.appInfo.longVersionCode, mAm.mProcessStats);
                    // 真正启动服务,它首先通过 IPC 回调 Service 的 onCreate() 完成创建流程
            		// 接着调用刚才提到的 sendServiceArgsLocked() 参见[1.5.2]小节
                    realStartServiceLocked(r, app, execInFg);
                    return null;
                }
                ......
            }
        } else { // isolated 进程,即每一次启动 Service 都应该是一个新的隔离进程
            app = r.isolatedProc;
            if (WebViewZygote.isMultiprocessEnabled()
                    && r.serviceInfo.packageName.equals(WebViewZygote.getPackageName())) {
                hostingRecord = HostingRecord.byWebviewZygote(r.instanceName);
            }
            if ((r.serviceInfo.flags & ServiceInfo.FLAG_USE_APP_ZYGOTE) != 0) {
                hostingRecord = HostingRecord.byAppZygote(r.instanceName, r.definingPackageName,
                        r.definingUid);
            }
        }
		// 如果进程为空,则启动进程并将 ServiceRecord 添加到服务队列中等待执行,等新的进程创建并启动了再启动这个服务
        if (app == null && !permissionsReviewRequired) {
			// 调用 AMS 的 startProcessLocked() 创建一个新的进程
            if ((app=mAm.startProcessLocked(procName, r.appInfo, true, intentFlags,
                    hostingRecord, ZYGOTE_POLICY_FLAG_EMPTY, false, isolated, false)) == null) {
                // 稍后分析
                bringDownServiceLocked(r);
                return msg;
            }
            if (isolated) {
            	// 将新建的进程复制给 ServiceRecord
                r.isolatedProc = app;
            }
        }

        if (r.fgRequired) {
            ......
            mAm.tempWhitelistUidLocked(r.appInfo.uid,
                    SERVICE_START_FOREGROUND_TIMEOUT, "fg-service-launch");
        }
		// mPendingServices 列表中添加待启动服务
        if (!mPendingServices.contains(r)) {
            mPendingServices.add(r);
        }

        if (r.delayedStop) {
            r.delayedStop = false;
            if (r.startRequested) {
                ......// 停止服务
                stopServiceLocked(r);
            }
        }

        return null;
    }
}
方法代码很长,参见方法中的注释,主要执行流程如下:
- 如果待启动 Service 已经启动过,则直接调用 ActiveServices # sendServiceArgsLocked() 方法,之后通过跨进程通信将启动过程交给应用进程 ApplicationThread 并回调执行 Service # onStartCommand() 方法。
- 如果待启动 Service 未启动,但其所在的进程不为空,则调用 ActiveServices # realStartServiceLocked() 方法创建并启动服务。
- 如果待启动 Service 未启动且其所在的进程为空,则调用 AMS 的 startProcessLocked() 方法创建一个新的进程,并将保存待启动 Service 信息的 ServiceRecord 添加到队列中等待执行。
接下来分三个部分来分别讨论上诉三种情况,首先待启动 Service 已经启动过的情况,调用 ActiveServices # sendServiceArgsLocked() 方法来处理。
1.5.1 ActiveServices # sendServiceArgsLocked()
public final class ActiveServices {
    ......
	private final void sendServiceArgsLocked(ServiceRecord r, boolean execInFg,
            boolean oomAdjusted) throws TransactionTooLargeException {
        final int N = r.pendingStarts.size();
        if (N == 0) {
            return; // 没有待启动的 StartItem 项则直接返回
        }
        ArrayList<ServiceStartArgs> args = new ArrayList<>();
        while (r.pendingStarts.size() > 0) {
        	// 从 pendingStarts 列表移除并取出 StartItem
            ServiceRecord.StartItem si = r.pendingStarts.remove(0);
            ......
            // 当列表中只有一个空的 Intent 时,不要跳过它,这是为了支持 onStartCommand(null) 的情况
            if (si.intent == null && N > 1) {
                continue; // 当列表中有空的 Intent 且 pendingStarts 列表存在多个待启动的 Service 时,直接跳过
            }
            // 更新信息
            si.deliveredTime = SystemClock.uptimeMillis();
            // ServiceRecord.StartItem 保存到 ServiceRecord 的 deliveredStarts 中,表明数据开始分发
            r.deliveredStarts.add(si);
            si.deliveryCount++;
            if (si.neededGrants != null) {
                mAm.mUgmInternal.grantUriPermissionUncheckedFromIntent(si.neededGrants,
                        si.getUriPermissionsLocked());
            }
            mAm.grantImplicitAccess(r.userId, si.intent, si.callingId,
                    UserHandle.getAppId(r.appInfo.uid)
            );
            // 更新 ServiceRecord start 阶段各属性,埋下 ANR 的 Handler 定时消息
            bumpServiceExecutingLocked(r, execInFg, "start");
            if (!oomAdjusted) {
                oomAdjusted = true;
                mAm.updateOomAdjLocked(r.app, true, OomAdjuster.OOM_ADJ_REASON_START_SERVICE);
            }
            if (r.fgRequired && !r.fgWaiting) {
                if (!r.isForeground) {
                    ......
                    // 如果启动前台服务,在调用了 startForegroundService() 后若当前还没有调用
                	// startForeground() 则要检查 startForeground() 是否在规定时间内调用
                	// 超时时间为 10s 如果超时未调用则 stopService,同时抛出 ANR 异常
                    scheduleServiceForegroundTransitionTimeoutLocked(r);
                } else {
                    ......// 如果已经调用了 startForeground(), 则重置状态
                    r.fgRequired = false;
                }
            }
            int flags = 0;
            if (si.deliveryCount > 1) {
                flags |= Service.START_FLAG_RETRY;
            }
            if (si.doneExecutingCount > 0) {
                flags |= Service.START_FLAG_REDELIVERY;
            }
            // 新建服务启动参数 ServiceStartArgs 并加入到 args 列表
            args.add(new ServiceStartArgs(si.taskRemoved, si.id, flags, si.intent));
        }
        // 构建可序列化列表
        ParceledListSlice<ServiceStartArgs> slice = new ParceledListSlice<>(args);
        // 设置列表最大数为 4
        slice.setInlineCountLimit(4);
        Exception caughtException = null;
        try {
        	// 通过跨进程通信,调用 ApplicationThread 的 scheduleServiceArgs 方法
            r.app.thread.scheduleServiceArgs(r, slice);
        }
        ......
        if (caughtException != null) {
            // 如果启动出现异常并捕获后,遍历通知服务异常结束
            final boolean inDestroying = mDestroyingServices.contains(r);
            for (int i = 0; i < args.size(); i++) {
                serviceDoneExecutingLocked(r, inDestroying, inDestroying);
            }
            .......
        }
    }
    ......
}
参见方法中的注释,主要执行流程如下:
- 遍历保存在 ServiceRecord 的 pendingStarts 列表,将获取的 StartItem 保存到 ServiceRecord 的 deliveredStarts 中,表明数据开始分发。并由 StartItem 实例的 Intent、flag、id 等属性构建用于在应用端分发的 ServiceStartArgs 对象,并将其添加到 ArrayList<ServiceStartArgs> 类型的列表中,之后将列表保存到类型为 ParceledListSlice<ServiceStartArgs> 的可序列化对象中。
- 调用 ApplicationThread 的 scheduleServiceArgs() 方法将 ServiceRecord (其本身是 AMS 进程的 Binder 实体类) 和相关的启动参数通过 IPC 传递给应用进程,并最终回调目标 Service 的 onStartCommand() 方法对启动参数进行解析和处理。
ParceledListSlice:是 Android 系统提供的一个利用 IPC 传输 Parcelable 可序列化对象列表的工具类,当列表中元素的数量足够多时,会自动将其拆分为多个 transaction 依次处理。
1.5.1.1 ApplicationThread # scheduleServiceArgs()
public final class ActivityThread extends ClientTransactionHandler {
	......
    final H mH = new H();
	......
	class H extends Handler {
        ......
        public void handleMessage(Message msg) {
            switch (msg.what) {
            	......
                case SERVICE_ARGS:
                    ......
                    handleServiceArgs((ServiceArgsData)msg.obj);
                    Trace.traceEnd(Trace.TRACE_TAG_ACTIVITY_MANAGER);
                    break;
				......
            }
		}
	}
	......
    private class ApplicationThread extends IApplicationThread.Stub {
    	......
        public final void scheduleServiceArgs(IBinder token, ParceledListSlice args) {
            List<ServiceStartArgs> list = args.getList();
            for (int i = 0; i < list.size(); i++) {
                ServiceStartArgs ssa = list.get(i);
                ServiceArgsData s = new ServiceArgsData();
                s.token = token;
                s.taskRemoved = ssa.taskRemoved;
                s.startId = ssa.startId;
                s.flags = ssa.flags;
                s.args = ssa.args;
                sendMessage(H.SERVICE_ARGS, s);
            }
        }
        ......
    }
    ......
    void sendMessage(int what, Object obj) {
        sendMessage(what, obj, 0, 0, false);
    }
    ......
    private void sendMessage(int what, Object obj, int arg1, int arg2, boolean async) {
        ......
        Message msg = Message.obtain();
        msg.what = what;
        msg.obj = obj;
        msg.arg1 = arg1;
        msg.arg2 = arg2;
        if (async) {
            msg.setAsynchronous(true);
        }
        mH.sendMessage(msg);
    }
}
ApplicationThread # scheduleServiceArgs() 方法中,遍历保存在 ParceledListSlice 可序列化对象中的启动参数列表,由 ServiceRecord 实例及列表中的每个 ServiceStartArgs 实例来构建 ServiceArgsData 实例,最后通过 ActivityThread 的内部类 H 发送 SERVICE_ARGS 类型的 Handler 消息,进而流程将调用到 ActivityThread # handleServiceArgs() 方法处理 Service 的启动。
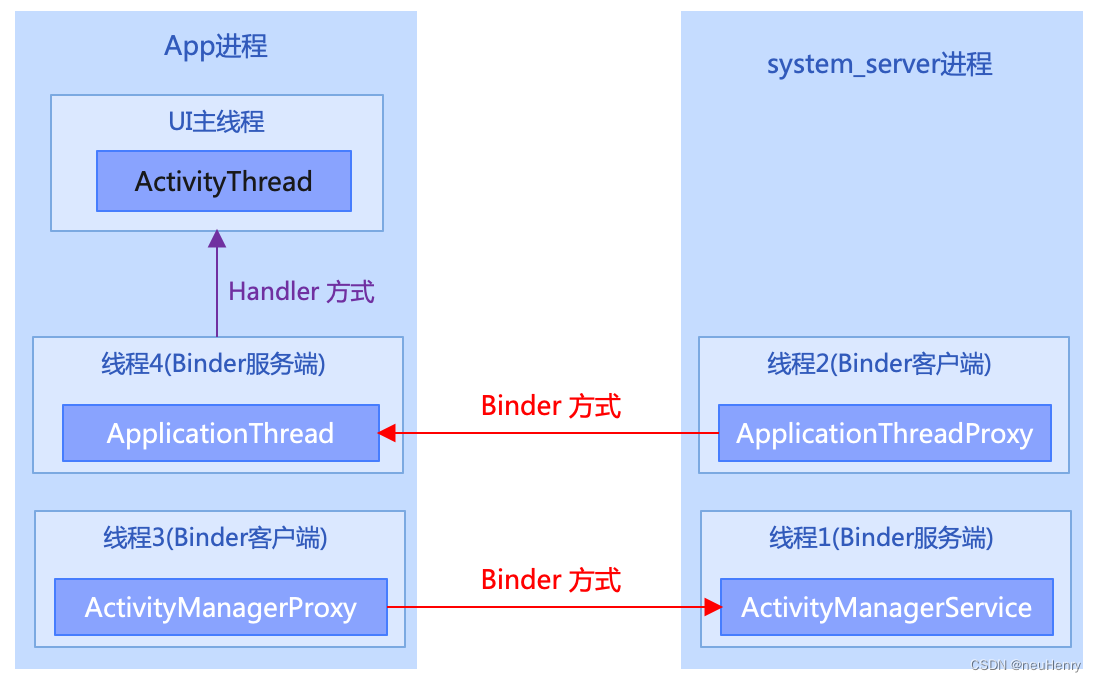
ActivityThread 的内部类 H 是一个 Handler,其主要作用是切换系统进程的 Binder 线程和 UI 主线程的,应用进程中 ActivityThread 与系统进程中的服务是通过 ActivityThread 的内部类 ApplicationThread 以 Binder 跨进程通信的方式进行交互,当 ApplicationThread 接收到系统进程的请求或回调后,通过 ActivityThread 的内部类 H 发送指定类型的 Handler 消息将流程切换到应用进程的 UI 主线程进行处理。
1.5.1.2 ActivityThread # handleServiceArgs()
public final class ActivityThread extends ClientTransactionHandler {
	......
    @UnsupportedAppUsage
    final ArrayMap<IBinder, Service> mServices = new ArrayMap<>();
	......
	private void handleServiceArgs(ServiceArgsData data) {
		// mServices 中获取 ServiceRecord 对应的已经启动的 Service 对象
		// 注意:当前流程走的是待启动 Service 已经启动过的情况
        Service s = mServices.get(data.token);
        if (s != null) {
            try {
                if (data.args != null) {
                    data.args.setExtrasClassLoader(s.getClassLoader());
                    data.args.prepareToEnterProcess();
                }
                int res;
                if (!data.taskRemoved) {
                	// 启动任务未移除销毁,则调用 Service 的 onStartCommand 方法
                    res = s.onStartCommand(data.args, data.flags, data.startId);
                } else {
                    s.onTaskRemoved(data.args);
                    res = Service.START_TASK_REMOVED_COMPLETE;
                }
				// 同步等待写入任务完成才会继续执行后续任务
                QueuedWork.waitToFinish();
                try {
                	// 通知系统进程 AMS 拆掉超时消息,onStartCommand() 方法已经回调完毕,后面分析
                    ActivityManager.getService().serviceDoneExecuting(
                            data.token, SERVICE_DONE_EXECUTING_START, data.startId, res);
                } catch (RemoteException e) {
                    throw e.rethrowFromSystemServer();
                }
            }
            ......
        }
    }
	......
}
参见方法中的注释,主要执行流程如下:
- 在 mServices 中获取 ServiceRecord 对应的已经启动的 Service 对象,如果 ServiceArgsData 的 taskRemoved 标志位为 false (都为false,除非是进程销毁时候才会出现 taskRemoved 是 true),则回调 Service 的 onStartCommand() 方法,否则则回调 Service 的 onTaskRemoved() 方法。
- 调用 QueuedWork 的 waitToFinish() 方法,同步等待写入任务完成才会继续执行后续任务。
- 调用 AMS 的 serviceDoneExecuting() 方法移除 ANR 超时消息。
QueuedWork:是 Android 中的内部工具类,用于跟踪那些未完成的或尚未结束的全局任务,新任务可通过 QueuedWork # queue() 方法加入,也可以通过 QueuedWork # addFinisher() 方法添加 finisher - runnables,并由 QueuedWork # waitToFinish() 方法保证执行,以确保任务已被处理完成。
1.5.1.3 Service # onStartCommand()
public abstract class Service extends ContextWrapper implements ComponentCallbacks2,...{
    ......
    public @StartResult int onStartCommand(Intent intent, @StartArgFlags int flags, int startId) {
        onStart(intent, startId);
        return mStartCompatibility ? START_STICKY_COMPATIBILITY : START_STICKY;
    }
    ......
}
当通过调用 startService() 方法请求启动服务时,系统将调用此方法。一旦执行此方法,服务即会启动并可在后台无限期运行。 如果自己实现此方法,则需要在服务工作完成后,通过调用 stopSelf() 或 stopService() 方法来停止服务。注意:在绑定状态下,无需实现此方法。
1.5.1.4 时序图
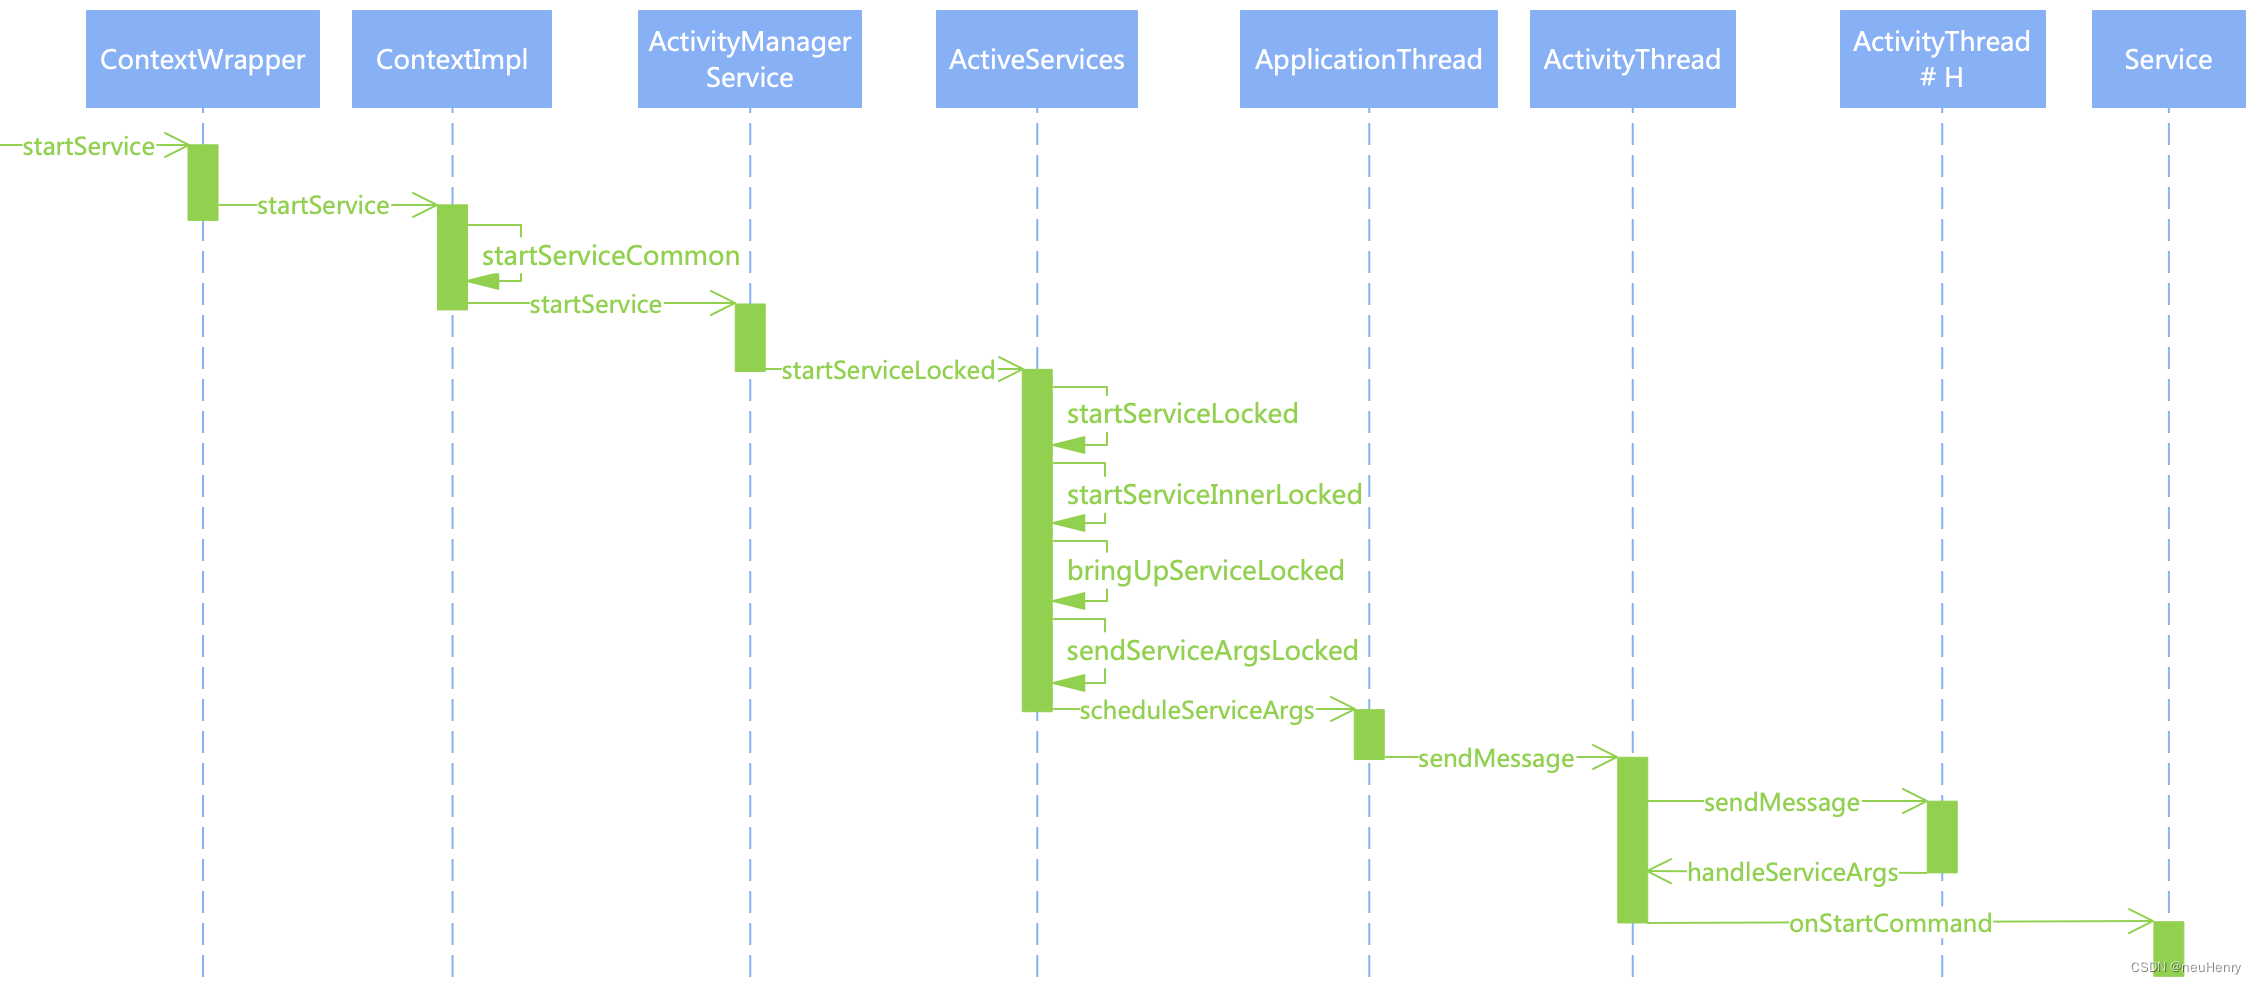
至此,待启动 Service 已启动过情况下的流程分析完毕,结合上面的时序图加深理解。
接下来分析待启动 Service 未启动,但其所在的进程不为空的情况,此时流程调用 ActiveServices # realStartServiceLocked() 方法来创建并启动服务。
1.5.2 ActiveServices # realStartServiceLocked()
public final class ActiveServices {
    ......
	private final void realStartServiceLocked(ServiceRecord r,
            ProcessRecord app, boolean execInFg) throws RemoteException {
        if (app.thread == null) { // 如果进程不存在,则抛出异常
            throw new RemoteException();
        }
        ......
        r.setProcess(app); // 设置进程,ServiceRecord 和 ProcessRecord 绑定
        r.restartTime = r.lastActivity = SystemClock.uptimeMillis();
		// mServices 集合中添加服务
        final boolean newService = app.startService(r);
        bumpServiceExecutingLocked(r, execInFg, "create"); // 设置启动超时消息
        // 更新 AMS 中 ProcessList 保存的进程信息(Lru:最近使用过要调整到列表头部)
        mAm.updateLruProcessLocked(app, false, null);
        // 更新进程中前台服务状态等信息
        updateServiceForegroundLocked(r.app, /* oomAdj= */ false);
        mAm.updateOomAdjLocked(app, OomAdjuster.OOM_ADJ_REASON_START_SERVICE);
        boolean created = false;
        try {
            ......
            FrameworkStatsLog.write(FrameworkStatsLog.SERVICE_LAUNCH_REPORTED, r.appInfo.uid,
                    r.name.getPackageName(), r.name.getClassName());
            synchronized (r.stats.getBatteryStats()) {
                r.stats.startLaunchedLocked();
            }
            mAm.notifyPackageUse(r.serviceInfo.packageName,
                                 PackageManager.NOTIFY_PACKAGE_USE_SERVICE);
			// 强制更新进程状态为 PROCESS_STATE_SERVICE
            app.forceProcessStateUpTo(ActivityManager.PROCESS_STATE_SERVICE);
            // 通过跨进程通信,调用 ApplicationThread 的 scheduleCreateService 方法创建服务
            app.thread.scheduleCreateService(r, r.serviceInfo,
                    mAm.compatibilityInfoForPackage(r.serviceInfo.applicationInfo),
                    app.getReportedProcState());
			// 如果是前台服务,则创建通知栏中的通知信息
            r.postNotification();
            created = true;
        } catch (DeadObjectException e) {
        	// 创建服务时进程已经被杀掉
            mAm.appDiedLocked(app, "Died when creating service");
            throw e;
        } finally {
            if (!created) { // 创建新服务失败,可能是 App 端被杀掉,也可能是创建过程发生了异常
                // 正在销毁的服务列表是否包含当前 ServiceRecord
                final boolean inDestroying = mDestroyingServices.contains(r);
                serviceDoneExecutingLocked(r, inDestroying, inDestroying);
                // 如果是新启的服务、则停掉并置空进程信息
                if (newService) {
                    app.stopService(r);
                    r.setProcess(null);
                }
                // 如果正在销毁的服务列表不包含当前 ServiceRecord,则会尝试重启 Service
                if (!inDestroying) {
                    scheduleServiceRestartLocked(r, false);
                }
            }
        }
        if (r.whitelistManager) { // 允许 App 管理白名单
            app.whitelistManager = true;
        }
		// bindService 绑定服务相关逻辑,等待 Service 启动并运行后,才可以绑定,参见[2.5 节]
        requestServiceBindingsLocked(r, execInFg);
        updateServiceClientActivitiesLocked(app, null, true);
        if (newService && created) {
        	// 将新创建服务的每个连接 Connection 的 Uid 保存到 WindowProcessController
            app.addBoundClientUidsOfNewService(r);
        }
        // 如果是通过 startService 方式启动的 Service,并且需要自动重启,又没有为其传入新的启动参数
        // 这些条件都满足时将构造一个缺省的 StartItem 作为启动参数并添加到对应的 pendingStarts 中
        // 以确保最终一定会回调 Service 的 onStartCommand() 方法
        if (r.startRequested && r.callStart && r.pendingStarts.size() == 0) {
            r.pendingStarts.add(new ServiceRecord.StartItem(r, false, r.makeNextStartId(),
                    null, null, 0));
        }
		// 发送启动服务消息,参见[1.5.1 节]
        sendServiceArgsLocked(r, execInFg, true);
        if (r.delayed) { // 移除 mDelayedStartList 中的 ServiceRecord
            getServiceMapLocked(r.userId).mDelayedStartList.remove(r);
            r.delayed = false;
        }
        if (r.delayedStop) {
            r.delayedStop = false;
            if (r.startRequested) {
                stopServiceLocked(r);
            }
        }
    }
    ......
}
参见方法中的注释,主要执行流程如下:
- ServiceRecord 设置进程,即 ServiceRecord 和 ProcessRecord 绑定,然后将 ServiceRecord 添加到 ProcessRecord 的 mServices 集合中,表示当前 Service 在指定进程中已经处于运行状态。
- 跨进程调用 App 端的 ApplicationThread 的 scheduleCreateService() 方法,创建 Service 对象并执行其 onCreate() 方法。注意:如果是前台服务,需创建通知栏中的通知信息。如果创建新服务失败,则根据条件判断置空进程信息,并尝试再次启动 Service。
- 调用 ActiveServices # requestServiceBindingsLocked() 方法处理 Service 的绑定过程,其最终会通过跨进程回调 Service # onBind() 方法(后面章节讲解)。事实上以 startService 方式启动 Service 时,原本并不需要处理绑定过程,但是当 Service 对应的进程尚未创建时,会将对应的 ServiceRecord 对象暂时保存在 mPendingServices 中。如果在进程创建的过程中,恰好又以 bindService 方式提交了其它启动请求,那么自然就需要额外处理 Service 的绑定过程。
- 调用 ActiveServices # sendServiceArgsLocked() 方法发送启动服务消息,具体流程参见 1.5.1 ActiveServices # sendServiceArgsLocked(),最终回调 Service 的 onStartCommand() 方法。
1.5.2.1 ApplicationThread # scheduleCreateService()
public final class ActivityThread extends ClientTransactionHandler {
	......
    final H mH = new H();
	......
	class H extends Handler {
        ......
        public void handleMessage(Message msg) {
            switch (msg.what) {
            	......
                case CREATE_SERVICE:
                    ......
                    handleCreateService((CreateServiceData)msg.obj);
                    Trace.traceEnd(Trace.TRACE_TAG_ACTIVITY_MANAGER);
                    break;
				......
            }
		}
	}
	......
    private class ApplicationThread extends IApplicationThread.Stub {
    	......
        public final void scheduleCreateService(IBinder token,
                ServiceInfo info, CompatibilityInfo compatInfo, int processState) {
            updateProcessState(processState, false);
            CreateServiceData s = new CreateServiceData();
            s.token = token;
            s.info = info;
            s.compatInfo = compatInfo;
            sendMessage(H.CREATE_SERVICE, s);
        }
        ......
    }
    ......
    void sendMessage(int what, Object obj) {
        sendMessage(what, obj, 0, 0, false);
    }
    ......
    private void sendMessage(int what, Object obj, int arg1, int arg2, boolean async) {
        ......
        Message msg = Message.obtain();
        msg.what = what;
        msg.obj = obj;
        msg.arg1 = arg1;
        msg.arg2 = arg2;
        if (async) {
            msg.setAsynchronous(true);
        }
        mH.sendMessage(msg);
    }
}
ApplicationThread # scheduleCreateService() 方法中,更新进程的状态值,并将入参 token、ServiceInfo 等封装成 CreateServiceData 实例对象,最后通过 ActivityThread 的内部类 H 发送 CREATE_SERVICE 类型的 Handler 消息,进而流程将调用到 ActivityThread # handleCreateService() 方法创建 Service。
1.5.2.2 ActivityThread # handleCreateService()
public final class ActivityThread extends ClientTransactionHandler {
	......
    @UnsupportedAppUsage
    final ArrayMap<IBinder, Service> mServices = new ArrayMap<>();
	......
	@UnsupportedAppUsage
    private void handleCreateService(CreateServiceData data) {
		// 如果在进入后台之后准备进行 gc 清理,此时又返回到活动状态,因此跳过 gc 清理
        unscheduleGcIdler();
		// 获取 LoadedApk
        LoadedApk packageInfo = getPackageInfoNoCheck(
                data.info.applicationInfo, data.compatInfo);
        Service service = null;
        try {
			......
			// 创建服务的 Context,ContextImpl 是 Context 的具体实现类
            ContextImpl context = ContextImpl.createAppContext(this, packageInfo);
            // 通过 LoadedApk 构建 Application 实例,内部通过 ClassLoader 加载并创建实例
            Application app = packageInfo.makeApplication(false, mInstrumentation);
            java.lang.ClassLoader cl = packageInfo.getClassLoader();
            // 通过 LoadedApk 获取 AppComponentFactory,然后由 ClassLoader 加载并创建 Service 实例
            service = packageInfo.getAppFactory()
                    .instantiateService(cl, data.info.name, data.intent);
            // 服务所需的资源必须使用与应用程序上下文相同的类加载器进行初始化
            context.getResources().addLoaders(
                    app.getResources().getLoaders().toArray(new ResourcesLoader[0]));
            context.setOuterContext(service);
            // Service 绑定上下文和创建服务用到的信息
            service.attach(context, this, data.info.name, data.token, app,
                    ActivityManager.getService());
			// 调用 Service 的 onCreate() 方法
            service.onCreate();
            // 将新建的 Service 缓存 Service 到 mServices 这个 Map 对象中
            mServices.put(data.token, service);
            try {
            	// 调用 AMS 的 serviceDoneExecuting() 方法发送成功启动的回执消息
                ActivityManager.getService().serviceDoneExecuting(
                        data.token, SERVICE_DONE_EXECUTING_ANON, 0, 0);
            } catch (RemoteException e) {
                throw e.rethrowFromSystemServer();
            }
        }
        ......
    }
	......
}
参见方法中的注释,主要执行流程如下:
- 获取 LoadedApk 实例,LoadedApk 是 Apk 安装文件在内存中的数据 , 可以在 LoadedApk 中得到 Apk 文件中的代码、资源文件、Activity 与 Service 等组件及 AndroidManifest 配置文件等。
- 创建服务的 Context,这里 ContextImpl 是 Context 的具体实现类,然后通过 LoadedApk 对象加载并构建 Application 和 Service 实例对象。
- 调用 Service # attach() 方法绑定上下文 Context 和创建服务用到的信息,注意:这里 data.token 即系统进程中 AMS 跨进程传递给应用进程的 ServiceRecord 实例。
- 调用 Service # onCreate() 方法,首次创建服务时,系统将调用此方法来执行一次性设置程序 ( 在调用 onStartCommand() 或onBind() 方法之前 )。如果服务已在运行,则不会调用此方法,该方法只调用一次。
- 将新建的服务 Service 缓存到 mServices 中,mServices 是 ActivityThread 类的一个 ArrayMap<IBinder, Service> 类型的成员变量,它的键是系统进程中 AMS 的 ServiceRecord 在应用进程中的 Binder 代理对象,它的值是应用进程的 Service 对象。
- 调用 AMS 的 serviceDoneExecuting() 方法,通知 AMS 新的 Service 已启动完毕,并移除掉指定条件下的缓存数据。
1.5.2.3 时序图
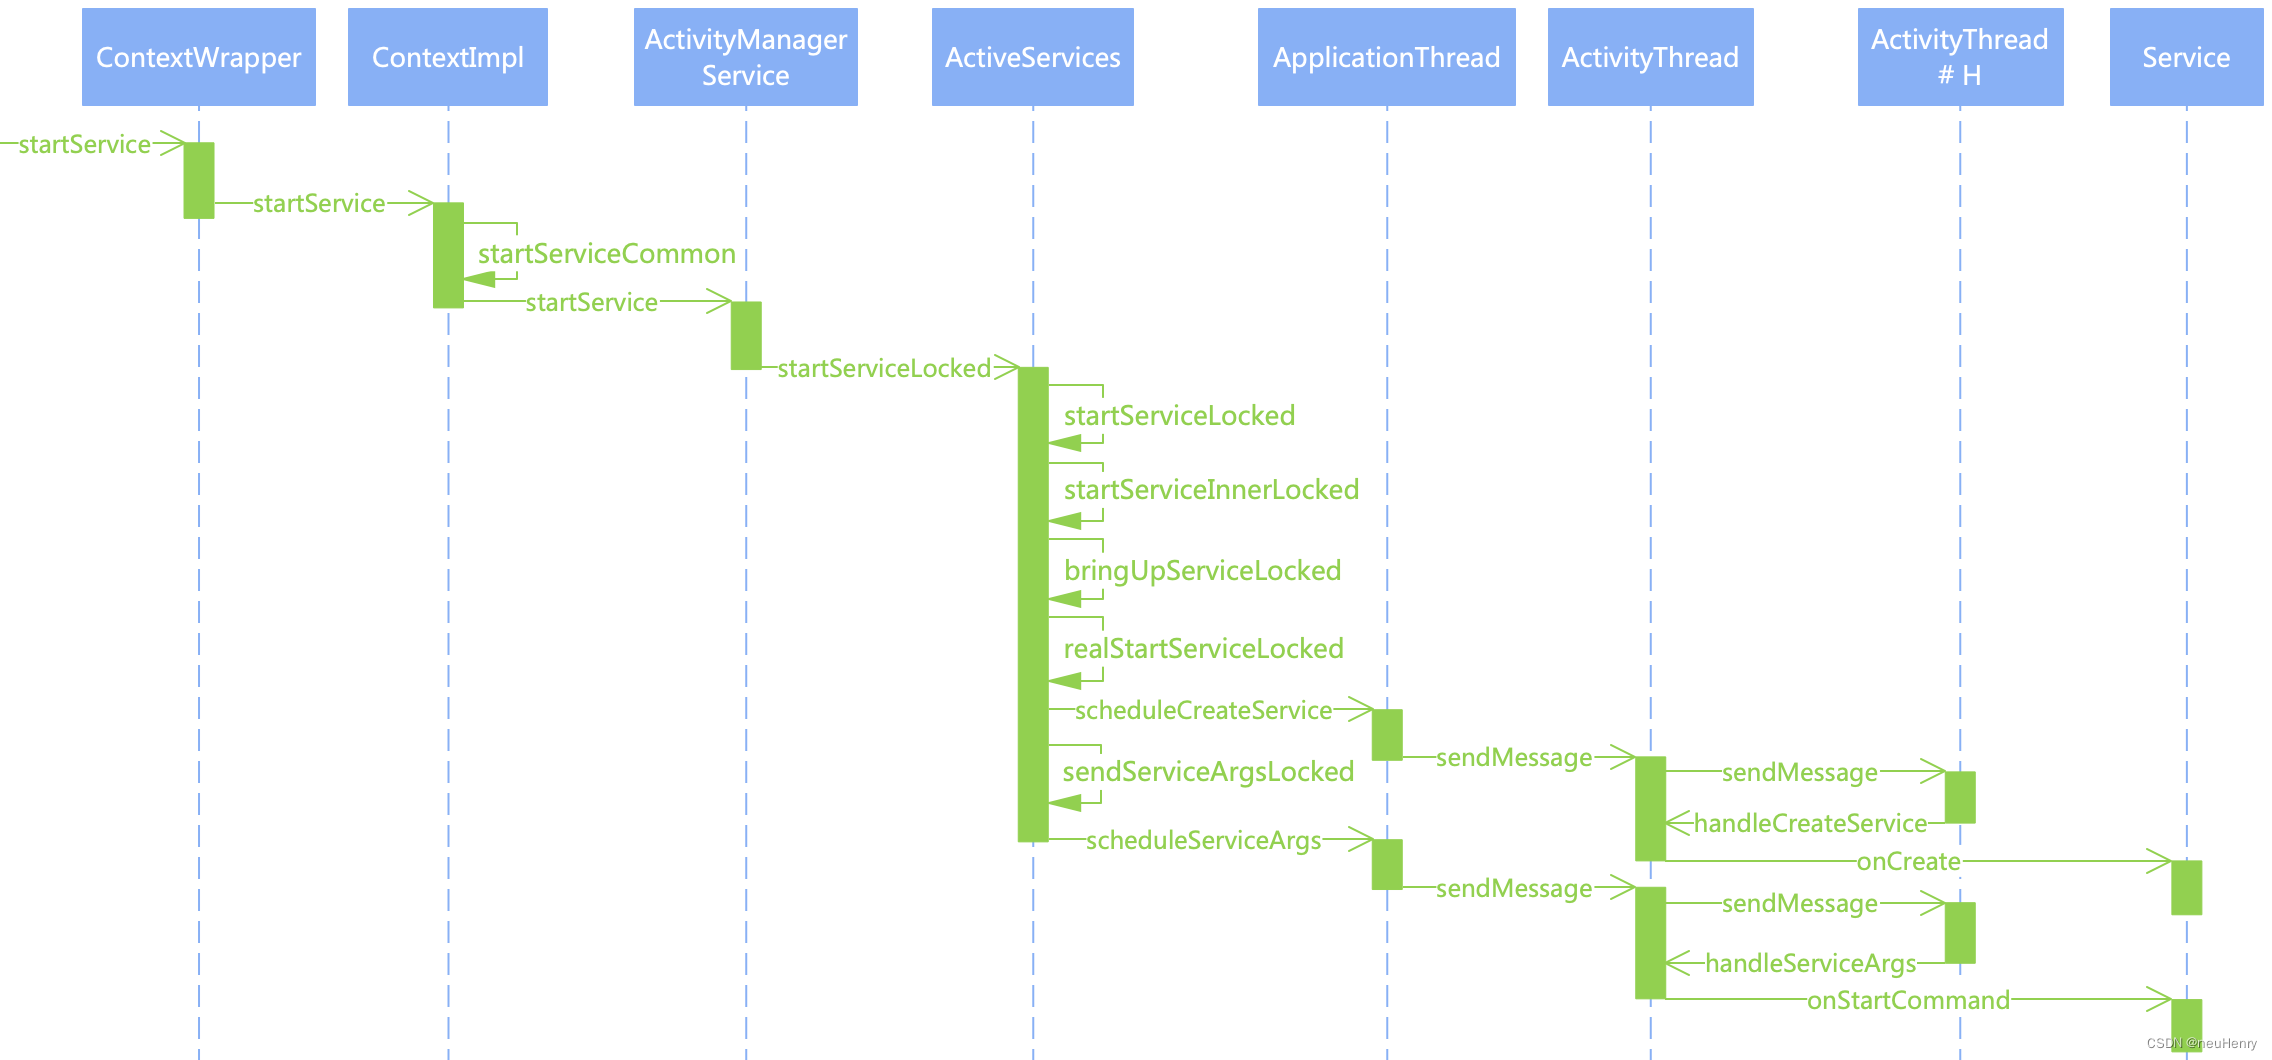
至此,待启动 Service 未启动,但其所在的进程不为空情况下的流程分析完毕,结合上面的时序图加深理解。
最后来分析待启动 Service 未启动且其所依附的进程为空的情况,此时流程调用 AMS 的 startProcessLocked() 方法创建一个新的进程,然后创建并启动需在此新进程中运行的 Service。
1.5.3 AMS # startProcessLocked()
public class ActivityManagerService extends IActivityManager.Stub
        implements Watchdog.Monitor, BatteryStatsImpl.BatteryCallback {
    ......
    @GuardedBy("this")
    final ProcessRecord startProcessLocked(String processName,
            ApplicationInfo info, boolean knownToBeDead, int intentFlags,
            HostingRecord hostingRecord, int zygotePolicyFlags, boolean allowWhileBooting,
            boolean isolated, boolean keepIfLarge) {
        return mProcessList.startProcessLocked(processName, info, knownToBeDead, intentFlags,
                hostingRecord, zygotePolicyFlags, allowWhileBooting, isolated, 0 /* isolatedUid */,
                keepIfLarge, null /* ABI override */, null /* entryPoint */,
                null /* entryPointArgs */, null /* crashHandler */);
    }
    ......
}
文章篇幅有限,有关通过 AMS 创建新进程的过程可以参考文章 深度详解 Android R(11.0)Activity 启动过程 的第三部分和第四部分的源码解析。
简述进程的创建流程:
- 调用 AMS # startProcessLocked() 方法,传入进程名、ApplicationInfo 应用信息等参数,继续调用 ProcessList # startProcessLocked() 方法获取 ProcessRecord 实例对象,然后调用重载的另一个 startProcessLocked() 方法,根据初始化好的 entryPoint、processName、uid、gids 等参数通过调用 Process 的 start() 方法,在方法内部通过 Zygote 进程 fork 出一个新的进程并启动。
- 新进程创建的过程中指定待加载的类名 entryPoint 是 “android.app.ActivityThread” 类,在启动新进程后通过 ClassLoader 加载获取类实例并通过反射调用该类的 main() 方法。在 ActivityThread # main() 方法中会开启消息循环,然后创建一个 ActivityThread 实例,并调用 ActivityThread # attach() 方法然后通过 AMS # attachApplication() 方法,将 ActivityThread 实例的内部类 ApplicationThread 和 AMS 进行绑定。
下面来具体分析如何进行 Application 的初始化和 Service 的启动,首先来看一下 AMS 绑定 Application 的过程。
1.5.3.1 AMS # attachApplication()
public class ActivityManagerService extends IActivityManager.Stub
        implements Watchdog.Monitor, BatteryStatsImpl.BatteryCallback {
	......
    final ActiveServices mServices; // AMS 构造方法中创建
	.......
    @Override
    public final void attachApplication(IApplicationThread thread, long startSeq) {
        ......
        synchronized (this) {
            int callingPid = Binder.getCallingPid();
            final int callingUid = Binder.getCallingUid();
            final long origId = Binder.clearCallingIdentity();
            attachApplicationLocked(thread, callingPid, callingUid, startSeq);
            Binder.restoreCallingIdentity(origId);
        }
    }
    @GuardedBy("this")
    private boolean attachApplicationLocked(@NonNull IApplicationThread thread,
            int pid, int callingUid, long startSeq) {
		// 找到正在被 attach 的 application 记录,如果我们运行在多个进程中
		// 可以通过 pid,如果我们用匿名线程模拟进程,可以直接取下一个 application 记录
        ProcessRecord app;
        long startTime = SystemClock.uptimeMillis();
        long bindApplicationTimeMillis;
        if (pid != MY_PID && pid >= 0) {
            synchronized (mPidsSelfLocked) {
            	// 加锁同步获取 mPidsSelfLocked 中保存的 ProcessRecord
                app = mPidsSelfLocked.get(pid);
            }
            if (app != null && (app.startUid != callingUid || app.startSeq != startSeq)) {
                ......
                // 如果已经有一个 application 占用该 pid 并且没有被清除则清除
                cleanUpApplicationRecordLocked(app, false, false, -1, true /*replacingPid*/);
                removePidLocked(app);
                app = null;
            }
        } else {
            app = null;
        }
        // 在更新内部状态之前,进程可能会调用 attachapapplication
        if (app == null && startSeq > 0) {
        	// 若上述查找 app 为空,则从 mPendingStarts 列表根据 startSeq 查找进程
            final ProcessRecord pending = mProcessList.mPendingStarts.get(startSeq);
            if (pending != null && pending.startUid == callingUid && pending.startSeq == startSeq
                    && mProcessList.handleProcessStartedLocked(pending, pid, pending
                            .isUsingWrapper(), startSeq, true)) {
                app = pending;
            }
        }
        if (app == null) {
            ......// 找不到保存的目标进程对应的 ProcessRecord,且进程 pid 不等则杀掉进程
            if (pid > 0 && pid != MY_PID) {
                killProcessQuiet(pid);
                mProcessList.noteAppKill(app, ApplicationExitInfo.REASON_INITIALIZATION_FAILURE,
                        ApplicationExitInfo.SUBREASON_UNKNOWN, "attach failed");
            }
            ......
            return false;
        }
        // 如果 application 记录仍然 attach 在以前的进程,则需清理它
        if (app.thread != null) {
            handleAppDiedLocked(app, true, true);
        }
		......
        app.curAdj = app.setAdj = app.verifiedAdj = ProcessList.INVALID_ADJ;
        mOomAdjuster.setAttachingSchedGroupLocked(app);
        app.forcingToImportant = null;
        updateProcessForegroundLocked(app, false, 0, false);
		......
		// 移除启动进程时埋下的进程启动超时处理的逻辑
        mHandler.removeMessages(PROC_START_TIMEOUT_MSG, app);
		......
        try {
            ......
            if (app.isolatedEntryPoint != null) {
                ......
            } else if (instr2 != null) {
                ......
            } else {
                thread.bindApplication(processName, appInfo, providerList, null, profilerInfo,
                        null, null, null, testMode,
                        mBinderTransactionTrackingEnabled, enableTrackAllocation,
                        isRestrictedBackupMode || !normalMode, app.isPersistent(),
                        new Configuration(app.getWindowProcessController().getConfiguration()),
                        app.compat, getCommonServicesLocked(app.isolated),
                        mCoreSettingsObserver.getCoreSettingsLocked(),
                        buildSerial, autofillOptions, contentCaptureOptions,
                        app.mDisabledCompatChanges);
            }
			......
            app.makeActive(thread, mProcessStats); // 保存 应用进程 IApplicationThread
            // 绑定成功后更新 mProcessList 保存的进程信息(Lru:最近使用过要调整到列表头部)
            mProcessList.updateLruProcessLocked(app, false, null);
            app.lastRequestedGc = app.lastLowMemory = SystemClock.uptimeMillis();
        }
        ......
        // 从启动 applications 列表中移除此记录
        mPersistentStartingProcesses.remove(app);
		......
        boolean badApp = false;
        boolean didSomething = false;
        // See if the top visible activity is waiting to run in this process...
        // 最上面可见的 Activity 是否在此进程中等待运行…
        ......
        // 启动进程中的 Service,找到应该在此进程中运行的任何服务…
        if (!badApp) {
            try {
                didSomething |= mServices.attachApplicationLocked(app, processName);
            } catch (Exception e) {
                badApp = true;
            }
        }
        // Check if a next-broadcast receiver is in this process...
        // 检查下一个广播接收器是否在在此进程中…
		......
        // Check whether the next backup agent is in this process...
        // 检查下一个备份代理是否在此进程中…
        .......
        if (badApp) { // 启动失败则清除掉与进程的所有连接
            handleAppDiedLocked(app, false, true);
            return false;
        }
        if (!didSomething) { // 进程启动,更新 Adj 即进程优先级
            updateOomAdjLocked(app, OomAdjuster.OOM_ADJ_REASON_PROCESS_BEGIN);
            checkTime(startTime, "attachApplicationLocked: after updateOomAdjLocked");
        }
        ......// Framework层记录状态日志
        return true;
    }
    ......
}
在 AMS # attachApplication() 方法中继续调用 AMS # attachApplicationLocked() 方法,参见方法中的注释,其主要执行流程如下:
- 首先获取 mPidsSelfLocked 中保存的该进程对应的 ProcessRecord 实例,如果获取不到则从 mPendingStarts 列表根据 startSeq 查找进程,此时如果 application 记录仍然依附在以前的进程,则需清理掉。
- 移除启动进程时埋下的进程启动超时处理的逻辑,调用 ApplicationThread # bindApplication() 方法创建绑定 Application 实例,然后更新 mProcessList 保存的进程信息(Lru:最近使用过要调整到列表头部)。
- 调用 ActiveServices # attachApplicationLocked() 方法筛选出应该在此进程中运行的 Service 并启动。
1.5.3.2 ApplicationThread # bindApplication()
public final class ActivityThread extends ClientTransactionHandler {
	......
    final H mH = new H();
	......
	class H extends Handler {
        ......
        public void handleMessage(Message msg) {
            switch (msg.what) {
				case BIND_APPLICATION:
                    Trace.traceBegin(Trace.TRACE_TAG_ACTIVITY_MANAGER, "bindApplication");
                    AppBindData data = (AppBindData)msg.obj;
                    handleBindApplication(data);
                    Trace.traceEnd(Trace.TRACE_TAG_ACTIVITY_MANAGER);
                    break;
				......
            }
		}
	}
	......
    private class ApplicationThread extends IApplicationThread.Stub {
    	......
        @Override
        public final void bindApplication(String processName, ApplicationInfo appInfo,...) {
            ......
            setCoreSettings(coreSettings);
            AppBindData data = new AppBindData();
            data.processName = processName;
            ......
            sendMessage(H.BIND_APPLICATION, data);
        }
        ......
    }
    ......
    void sendMessage(int what, Object obj) {
        sendMessage(what, obj, 0, 0, false);
    }
    ......
    private void sendMessage(int what, Object obj, int arg1, int arg2, boolean async) {
        ......
        Message msg = Message.obtain();
        msg.what = what;
        msg.obj = obj;
        msg.arg1 = arg1;
        msg.arg2 = arg2;
        if (async) {
            msg.setAsynchronous(true);
        }
        mH.sendMessage(msg);
    }
}
ApplicationThread # bindApplication() 方法中,首先校验以确保应用程序可以获取到传入的 Service,并将入参 processName、appInfo 等封装成 AppBindData 实例对象,最后通过 ActivityThread 的内部类 H 发送 BIND_APPLICATION 类型的 Handler 消息,进而流程将调用到 ActivityThread # handleBindApplication() 方法创建绑定 Application 实例。
1.5.3.3 ActivityThread # handleBindApplication()
public final class ActivityThread extends ClientTransactionHandler {
	......
	@UnsupportedAppUsage
    private void handleBindApplication(AppBindData data) {
        ......
        // 记录进程何时启动的
        Process.setStartTimes(SystemClock.elapsedRealtime(), SystemClock.uptimeMillis());
		......
        // 设置进程的进程名等
        Process.setArgV0(data.processName);
		......
		// 获取 InstrumentationInfo
		final InstrumentationInfo ii;
        if (data.instrumentationName != null) {
            try {
                ii = new ApplicationPackageManager(
                        null, getPackageManager(), getPermissionManager())
                        .getInstrumentationInfo(data.instrumentationName, 0);
            }
            ......
        } else {
            ii = null;
        }
		// 创建上下文对象 Context,ContextImpl 是 Context 抽象类的具体实现类
        final ContextImpl appContext = ContextImpl.createAppContext(this, data.info);
        updateLocaleListFromAppContext(appContext,
                mResourcesManager.getConfiguration().getLocales());
		......
        // 继续加载 instrumentation
        if (ii != null) {
            ApplicationInfo instrApp;
            try {
            	// 通过 PMS 获取 ApplicationInfo 信息
                instrApp = getPackageManager().getApplicationInfo(ii.packageName, 0,
                        UserHandle.myUserId());
            } catch (RemoteException e) {
                instrApp = null;
            }
            if (instrApp == null) { // 获取不到则新建 ApplicationInfo
                instrApp = new ApplicationInfo();
            }
            ii.copyTo(instrApp);
            instrApp.initForUser(UserHandle.myUserId());
            // 获取 LoadedApk 实例,LoadedApk 作用参加[1.5.2.2]
            final LoadedApk pi = getPackageInfo(instrApp, data.compatInfo,
                    appContext.getClassLoader(), false, true, false);
			......
            final ContextImpl instrContext = ContextImpl.createAppContext(this, pi,
                    appContext.getOpPackageName());
            try {
            	// 获取类加载器并加载创建 Instrumentation 对象
                final ClassLoader cl = instrContext.getClassLoader();
                mInstrumentation = (Instrumentation)
                    cl.loadClass(data.instrumentationName.getClassName()).newInstance();
            }
            ......
            final ComponentName component = new ComponentName(ii.packageName, ii.name);
            // 初始化 Instrumentation 实例对象
            mInstrumentation.init(this, instrContext, appContext, component,
                    data.instrumentationWatcher, data.instrumentationUiAutomationConnection);
			......
        } else {
            mInstrumentation = new Instrumentation();
            mInstrumentation.basicInit(this);
        }
		......
        Application app;
		......
        try {
        	// 通过 LoadedApk 创建获取 Application 实例对象[data.info 即 LoadedApk]
            app = data.info.makeApplication(data.restrictedBackupMode, null);
            app.setAutofillOptions(data.autofillOptions);
            app.setContentCaptureOptions(data.contentCaptureOptions);
            mInitialApplication = app;
			......
            try {
            	// 回调 Application 的 OnCreate() 方法
                mInstrumentation.callApplicationOnCreate(app);
            } catch (Exception e) {
				......
            }
        }
		......
    }
	......
}
参见方法中的注释,其主要执行流程如下:
- 设置进程名、时区/地区初始化、Debug Waiting、Http 代理初始化、安装 Network Security Config Provider 等等。
- 创建 Application 实例对象并通过 Instrumentation 回调 Application # OnCreate() 方法。
至此,完成新进程创建,并且每个进程的 Application 实例对象也创建完成,现在回到 Service 的启动过程,在 Service 所在的进程不存在的情况下通过 AMS 创建所需的新进程,并将保存待启动 Service 信息的 ServiceRecord 添加到队列中等待执行。
回到 1.5.3.1 AMS # attachApplication() 方法的分析,在创建绑定完 Application 实例对象后,调用 ActiveServices # attachApplicationLocked() 方法找到应该在此进程中运行的 Service 并启动。
1.5.3.4 ActiveServices # attachApplicationLocked()
public final class ActiveServices {
	......
	boolean attachApplicationLocked(ProcessRecord proc, String processName)
            throws RemoteException {
        boolean didSomething = false;
        // 进程中待启动 Service 队列不为空,则遍历获取其保存的每个 ServiceRecord
        if (mPendingServices.size() > 0) {
            ServiceRecord sr = null;
            try {
                for (int i=0; i<mPendingServices.size(); i++) {
                    sr = mPendingServices.get(i);
                    // 筛选进程 proc 中待启动的 ServiceRecord
                    if (proc != sr.isolatedProc && (proc.uid != sr.appInfo.uid
                            || !processName.equals(sr.processName))) {
                        continue;
                    }
					// 找到待启动的 ServiceRecord,则从待启动队列中移除
                    mPendingServices.remove(i);
                    i--;
                    proc.addPackage(sr.appInfo.packageName, sr.appInfo.longVersionCode,
                            mAm.mProcessStats);
					// 启动服务,流程参见[1.5.2]
                    realStartServiceLocked(sr, proc, sr.createdFromFg);
                    didSomething = true;
                    if (!isServiceNeededLocked(sr, false, false)) {
                        bringDownServiceLocked(sr);
                    }
                }
            }
            ......
        }
        // 处理等待重新启动并将在此进程中运行的 Service
        if (mRestartingServices.size() > 0) {
            ServiceRecord sr;
            for (int i=0; i<mRestartingServices.size(); i++) {
                sr = mRestartingServices.get(i);
                if (proc != sr.isolatedProc && (proc.uid != sr.appInfo.uid
                        || !processName.equals(sr.processName))) {
                    continue;
                }
                mAm.mHandler.removeCallbacks(sr.restarter);
                mAm.mHandler.post(sr.restarter);
            }
        }
        return didSomething;
    }
    ......
}
在方法中,判断进程中待启动 Service 队列 mPendingServices 中是否有挂起的 Service 需在此进程中启动并运行的,如果有则通过 ActiveServices # realStartServiceLocked() 方法来启动 Service,具体启动流程参见 1.5.2 ActiveServices # realStartServiceLocked() 的具体分析。
1.5.3.5 时序图
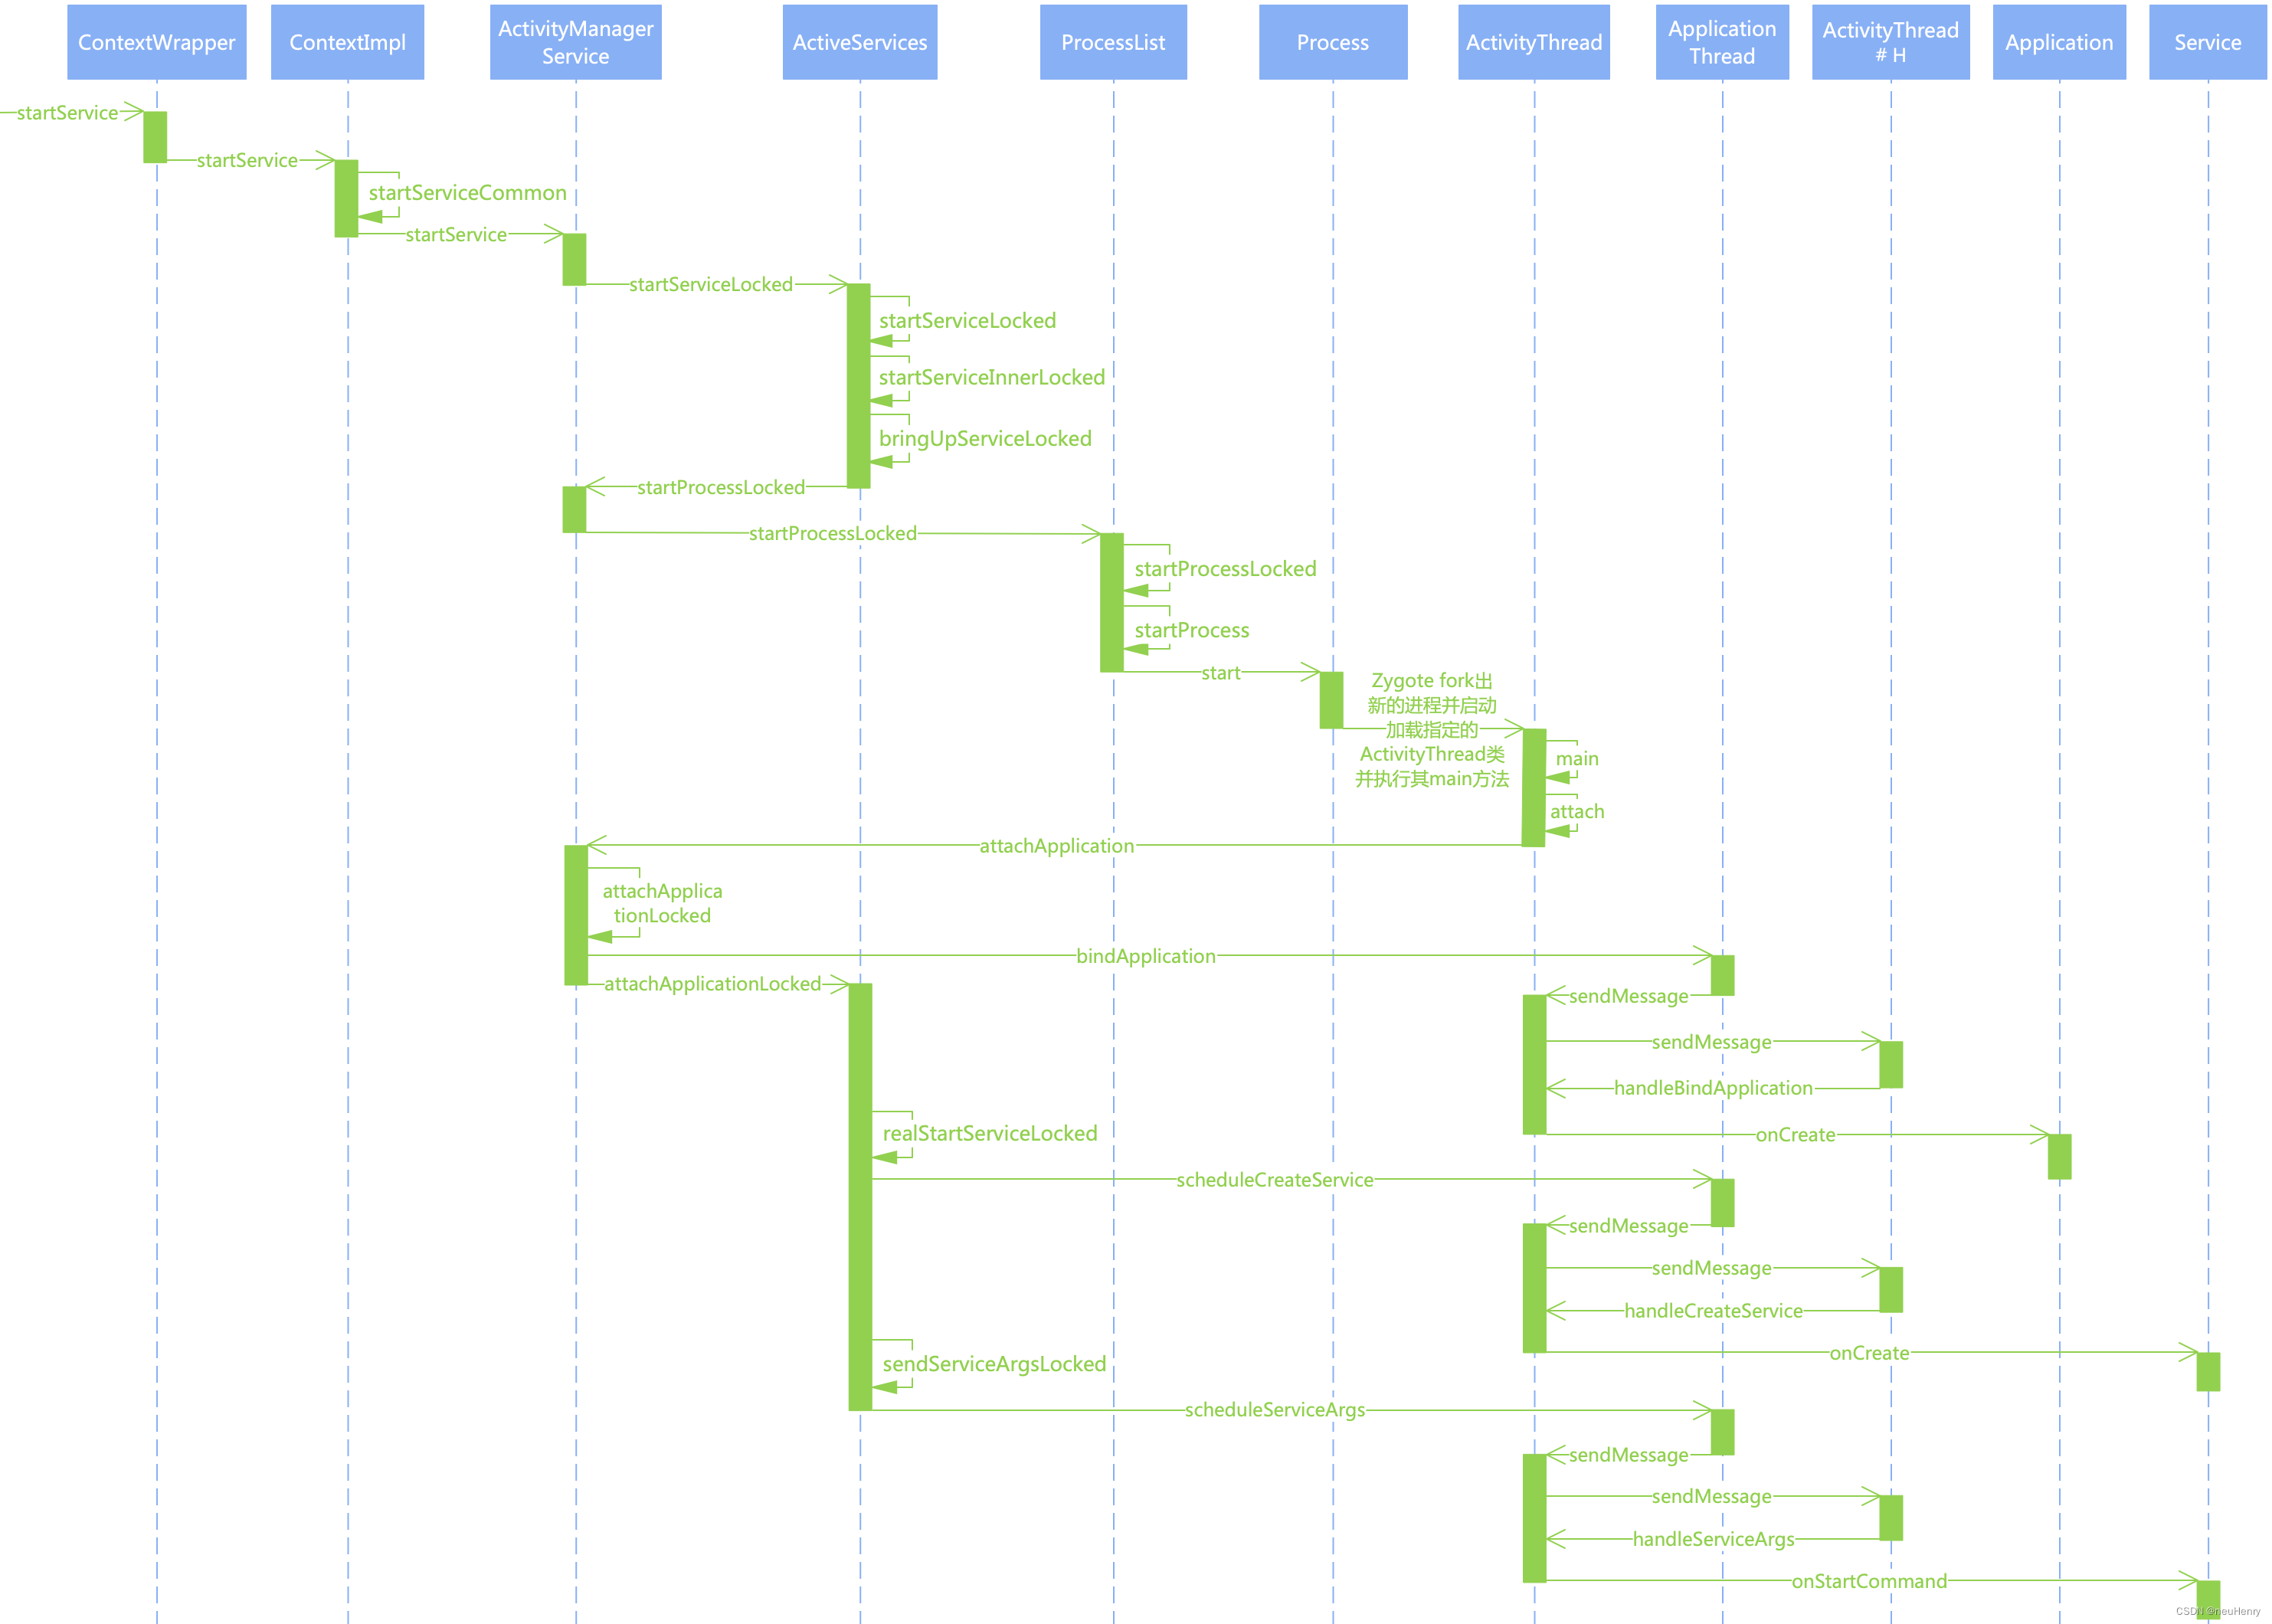
至此,待启动 Service 未启动,且依附进程为空情况下的流程分析完毕,结合上面的时序图加深理解。
1.6 总结
至此,startService 启动服务的流程已分析完毕,由简入难,步步深入。
首先分析,待启动 Service 已启动过的情况,调用 ActiveServices # sendServiceArgsLocked() 方法,后通过跨进程通信将启动过程交给应用进程 ApplicationThread 执行 Service 的 onStartCommand() 方法启动 Service。
其次分析,待启动 Service 未启动,但其依附的进程不为空的情况,调用 ActiveServices # realStartServiceLocked() 方法创建 Service 并启动。
最后分析,待启动 Service 未启动,且依附进程为空的情况,则调用 AMS 的 startProcessLocked() 方法创建一个新的进程,并将保存待启动 Service 信息的 ServiceRecord 添加到队列中,等到新进程创建完毕并启动后,遍历该队列获取需在此新进程中启动并运行的 Service。
2 bindService 绑定服务
通过 bindService 绑定服务,要先构建 Service 子类,然后调用 bindService() 方法时还需传入 ServiceConnection 接口的实现,通过 ServiceConnection # onServiceConnected() 方法,获取 Service 端的 IBinder 对象,使用该对象可以进行客户端和 Service 端的跨进程通信,代码如下所示:
class TestServiceActivity : Activity() {
    private val TAG: String = TestServiceActivity::class.java.simpleName

    private var conn = object : ServiceConnection {
        /**
         * 与服务器端交互的接口方法,绑定服务的时候被回调,方法中可以获取绑定 Service 传递
         * 过来的 IBinder 对象,通过 IBinder 对象,可以实现宿主和 Service 的跨进程交互
         */
        override fun onServiceConnected(name: ComponentName?, service: IBinder?) {
        }
        /**
         * 当取消绑定的时候被回调。但正常情况下是不被调用的,它的调用时机是当 Service 服务被意外销毁时
         * 例如内存的资源不足时这个方法才被自动调用
         */
        override fun onServiceDisconnected(name: ComponentName?) {
        }
    }

    override fun onCreate(savedInstanceState: Bundle?) {
        super.onCreate(savedInstanceState)
        setContentView(R.layout.activity_test_service)
		// 通过 bindService 来绑定服务
        btnBindService.setOnClickListener {
            val intent = Intent(this, SimpleService::class.java)
            bindService(intent, conn, 0)
        }
        // 通过 unbindService 来解绑服务
        btnUnbindService.setOnClickListener {
            unbindService(conn)
        }
    }
}
2.1 ContextWrapper # bindService()
public class ContextWrapper extends Context {
	......
    @UnsupportedAppUsage
    Context mBase;
    ......
    @Override
    public boolean bindService(Intent service, ServiceConnection conn,
            int flags) {
        return mBase.bindService(service, conn, flags);
    }
    ......
}
调用 ContextWrapper # bindService() 方法来绑定 Service,在该方法中将绑定 Service 的过程委托给了 mBase,这里 mBase 是 ContextImpl 实例对象,ContextImpl 是抽象类 Context 的具体实现类,即调用流程委托给 ContextImpl 并调用其 bindService() 方法。具体详解参见文章 深度详解 Android 之 Context。
2.2 ContextImpl # bindService()
class ContextImpl extends Context {
	......
    @Override
    public boolean bindService(Intent service, ServiceConnection conn, int flags) {
        warnIfCallingFromSystemProcess();
        // 获取主线程的 Handler,继续调用 bindServiceCommon
        return bindServiceCommon(service, conn, flags, null, mMainThread.getHandler(), null,
                getUser());
    }

    private boolean bindServiceCommon(Intent service, ServiceConnection conn, int flags,
            String instanceName, Handler handler, Executor executor, UserHandle user) {
        // IServiceConnection 是 IBinder 类型的,是 ServiceConnection 的转化
        // 通过跨进程传入到 AMS,然后被回调的
        IServiceConnection sd;
        if (conn == null) { // ServiceConnection 为空则抛异常
            throw new IllegalArgumentException("connection is null");
        }
        // mPackageInfo 即 LoadedApk,当前已经安装的 Apk 在内存中的数据
        // 在 LoadedApk 中得到 Apk 文件中的代码、资源文件、Activity 与 Service 等组件及 AndroidManifest 配置文件等
        if (mPackageInfo != null) {
            ......// 通过 ServiceConnection 获取 LoadedApk.ServiceDispatcher 保存的 IServiceConnection
            sd = mPackageInfo.getServiceDispatcher(conn, getOuterContext(), handler, flags);
        } else {// 如果为 null,说明 app 都不存在,抛出异常
            throw new RuntimeException("Not supported in system context");
        }
        validateServiceIntent(service); // 验证 Service 的 Intent
        try {
        	// 获取当前 Activity 的 token,主要是鉴别作用,AMS 要知道是哪个 Activity 发起的
        	// 然后做处理,相当于这个 token 是 Activity 的身份证
            IBinder token = getActivityToken();
            if (token == null && (flags&BIND_AUTO_CREATE) == 0 && mPackageInfo != null
                    && mPackageInfo.getApplicationInfo().targetSdkVersion
                    < android.os.Build.VERSION_CODES.ICE_CREAM_SANDWICH) {
                flags |= BIND_WAIVE_PRIORITY;
            }
            service.prepareToLeaveProcess(this);
            // 获取继承自 IActivityManager.Stub 类的客户端实现类,即获取服务端的 IBinder 代理对象
            // 即调用 AMS 的 bindIsolatedService() 方法
            int res = ActivityManager.getService().bindIsolatedService(
                mMainThread.getApplicationThread(), getActivityToken(), service,
                service.resolveTypeIfNeeded(getContentResolver()),
                sd, flags, instanceName, getOpPackageName(), user.getIdentifier());
            if (res < 0) { // 返回值小于 0 则绑定失败
                throw new SecurityException("Not allowed to bind to service " + service);
            }
            return res != 0;
        } catch (RemoteException e) {
            throw e.rethrowFromSystemServer();
        }
    }
    ......
}
执行流程如下:
- 调用 ContextImpl # validateServiceIntent() 方法对参数 Intent 进行合法性检查,Android 5.0 后要求 Service 必须通过显式 Intent 启动,否则会直接抛出异常。调用 Intent # prepareToLeaveProcess() 方法对 Intent 的属性进行离开应用进程前的准备工作。
- 获取继承自 IActivityManager.Stub 类的客户端实现类,即获取服务端 AMS 在本地的代理对象 BpBinder,通过代理对象的调用将启动服务的任务跨进程传给 AMS 并调用其 bindIsolatedService() 方法继续绑定 Service。
2.3 AMS # bindIsolatedService()
public class ActivityManagerService extends IActivityManager.Stub
        implements Watchdog.Monitor, BatteryStatsImpl.BatteryCallback, ActivityManagerGlobalLock {
    ......
    final ActiveServices mServices;
    ......
    public ActivityManagerService(Context systemContext, ActivityTaskManagerService atm) {
    	......
		mServices = new ActiveServices(this); // AMS 构造方法中初始化 mServices
		......
    }
    ......
    public int bindIsolatedService(IApplicationThread caller, IBinder token, Intent service,
            String resolvedType, IServiceConnection connection, int flags, String instanceName,
            String callingPackage, int userId) throws TransactionTooLargeException {
        enforceNotIsolatedCaller("bindService");
        // 拒绝可能泄露的文件描述符
        if (service != null && service.hasFileDescriptors() == true) {
            throw new IllegalArgumentException("File descriptors passed in Intent");
        }
        if (callingPackage == null) {
            throw new IllegalArgumentException("callingPackage cannot be null");
        }
        // 确保调用进程 IApplicationThread 提供的 instanceName 不包含异常字符
        if (instanceName != null) {
            for (int i = 0; i < instanceName.length(); ++i) {
                char c = instanceName.charAt(i);
                if (!((c >= 'a' && c <= 'z') || (c >= 'A' && c <= 'Z')
                            || (c >= '0' && c <= '9') || c == '_' || c == '.')) {
                    throw new IllegalArgumentException("Illegal instanceName");
                }
            }
        }
        synchronized(this) {
            // 服务的绑定交给 ActiveServices 来进一步处理
            // mServices 实例对象在 AMS 的构造函数中初始化
            return mServices.bindServiceLocked(caller, token, service,
                    resolvedType, connection, flags, instanceName, callingPackage, userId);
        }
    }
    ......
}
在 AMS # bindIsolatedService() 方法中,将绑定 Service 的任务委托给 ActiveServices 来执行,并调用其 bindServiceLocked() 方法,ActiveServices 类是用来辅助 AMS 来管理 Service 的核心类。
2.4 ActiveServices # bindServiceLocked()
public final class ActiveServices {
	......
	int bindServiceLocked(IApplicationThread caller, IBinder token, Intent service,
            String resolvedType, final IServiceConnection connection, int flags,
            String instanceName, String callingPackage, final int userId)
            throws TransactionTooLargeException {
        ......
        // 获取 mLruProcesses 缓存的调用进程 caller 对应的 ProcessRecord
        final ProcessRecord callerApp = mAm.getRecordForAppLocked(caller);
        if (callerApp == null) { ... // 获取不到则抛出异常}

        ActivityServiceConnectionsHolder<ConnectionRecord> activity = null;
        if (token != null) { // 获取 ServiceConnection 的宿主,即在哪里调用的 bindService
            activity = mAm.mAtmInternal.getServiceConnectionsHolder(token);
            ......// 获取不到则 return 0 即 Activity 没有在栈中就直接返回绑定不了 Service
            return 0;
        }
		......
		// 这里不细究设置的各种启动有关的 flag
        ......
        final boolean callerFg = callerApp.setSchedGroup != ProcessList.SCHED_GROUP_BACKGROUND;
        final boolean isBindExternal = (flags & Context.BIND_EXTERNAL_SERVICE) != 0;
        final boolean allowInstant = (flags & Context.BIND_ALLOW_INSTANT) != 0;
		// 获取包含 ServiceRecord 的 ServiceLookupResult 实例[参见 1.3.1 节]
        ServiceLookupResult res =
            retrieveServiceLocked(service, instanceName, resolvedType, callingPackage,
                    Binder.getCallingPid(), Binder.getCallingUid(), userId, true,
                    callerFg, isBindExternal, allowInstant);
        if (res == null) {
            return 0;
        }
        if (res.record == null) {
            return -1;
        }
        ServiceRecord s = res.record; // 获取 ServiceLookupResult 中的 ServiceRecord
        boolean permissionsReviewRequired = false;
        // 主要做的是对绑定服务的权限申请,待绑定的服务是否满足应该有的权限
        // 发个 Intent,然后弹出UI动态申请权限,如果用户同意,就在 RemoteCallback 里面继续
        // 执行 bringUpServiceLocked() 唤醒 Service 的核心函数
        if (mAm.getPackageManagerInternalLocked().isPermissionsReviewRequired(
                s.packageName, s.userId)) {
            ......
			final ServiceRecord serviceRecord = s;
            final Intent serviceIntent = service;
            RemoteCallback callback = new RemoteCallback(
                    new RemoteCallback.OnResultListener() {
                @Override
                public void onResult(Bundle result) {
                    synchronized(mAm) {
                        final long identity = Binder.clearCallingIdentity();
                        try {
                            if (!mPendingServices.contains(serviceRecord)) {
                                return;
                            }
                            if (!mAm.getPackageManagerInternalLocked()
                                    .isPermissionsReviewRequired(
                                            serviceRecord.packageName,
                                            serviceRecord.userId)) {
                                try { // 继续启动 Service 参见[1.5 节]
                                    bringUpServiceLocked(serviceRecord,
                                            serviceIntent.getFlags(),
                                            callerFg, false, false);
                                } catch (RemoteException e) {
                                    /* ignore - local call */
                                }
                            } else {
                                unbindServiceLocked(connection);
                            }
                        } finally {
                            Binder.restoreCallingIdentity(identity);
                        }
                    }
                }
            });
            ......
        }
        final long origId = Binder.clearCallingIdentity();
        try {
            ......
            // 获取 AppBindRecord 实例,ServiceRecord # retrieveAppBindingLocked() 方法内部
            // 新建 Intent.FilterComparison 实例,然后在其 bindings 集合中获取与之匹配的 IntentBindRecord 实例
            // 最后从 IntentBindRecord 的 apps 集合中获取 AppBindRecord 实例
            // 注意:上面两步都是如果获取不到就新建空的实例先添加后返回
            AppBindRecord b = s.retrieveAppBindingLocked(service, callerApp);
            // 新建服务连接记录 ConnectionRecord
            ConnectionRecord c = new ConnectionRecord(b, activity,
                    connection, flags, clientLabel, clientIntent,
                    callerApp.uid, callerApp.processName, callingPackage);

            IBinder binder = connection.asBinder();
            s.addConnection(binder, c);
            b.connections.add(c);
            if (activity != null) {
                activity.addConnection(c);
            }
            b.client.connections.add(c);
            ......
            ArrayList<ConnectionRecord> clist = mServiceConnections.get(binder);
            if (clist == null) {
                clist = new ArrayList<>();
                mServiceConnections.put(binder, clist);
            }
            // 添加绑定到服务的新建连接 ConnectionRecord
            clist.add(c);
			// BIND_AUTO_CREATE 表示服务没有开启要自动创建服务
            if ((flags&Context.BIND_AUTO_CREATE) != 0) {
                s.lastActivity = SystemClock.uptimeMillis();
                // 创建启动 Service 参见[1.5 节]
                if (bringUpServiceLocked(s, service.getFlags(), callerFg, false,
                        permissionsReviewRequired) != null) {
                    return 0;
                }
            }
            ......
            if (s.app != null) {
                ......
                // 更新 mProcessList 保存的进程信息(Lru:最近使用过要调整到列表头部)
                mAm.updateLruProcessLocked(s.app,
                        (callerApp.hasActivitiesOrRecentTasks() && s.app.hasClientActivities())
                                || (callerApp.getCurProcState() <= ActivityManager.PROCESS_STATE_TOP
                                        && (flags & Context.BIND_TREAT_LIKE_ACTIVITY) != 0),
                        b.client);
                // 更新 Adj 即进程优先级
                mAm.updateOomAdjLocked(s.app, OomAdjuster.OOM_ADJ_REASON_BIND_SERVICE);
            }
			......
            if (s.app != null && b.intent.received) {
                // 服务已经在运行,可以立即发布连接
                try {
                	// 如果 Service 已经启动运行,则直接调用 IServiceConnection # connect 方法
                	// 参见[2.5.5 节],最后回调bindService时传入的 ServiceConnection的onServiceConnected() 方法
                    c.conn.connected(s.name, b.intent.binder, false);
                } catch (Exception e) {
                    ......
                }
                if (b.intent.apps.size() == 1 && b.intent.doRebind) {
                    requestServiceBindingLocked(s, b.intent, callerFg, true);
                }
            } else if (!b.intent.requested) {
                requestServiceBindingLocked(s, b.intent, callerFg, false);
            }
            maybeLogBindCrossProfileService(userId, callingPackage, callerApp.info.uid);
            getServiceMapLocked(s.userId).ensureNotStartingBackgroundLocked(s);
        } finally {
            Binder.restoreCallingIdentity(origId);
        }
        return 1;
    }
    ......
}
方法比较长,删减部分代码,参见方法中的注释,其主要执行流程如下:
- 获取 mLruProcesses 中缓存的调用进程 caller 对应的 ProcessRecord,获取不到则抛出异常。然后获取 ServiceConnection 的宿主 Activity,即在哪里调用的 bindService,获取不到则返回 0 即 Activity 没有在栈中绑定不了 Service。
- 调用 ActiveServices # retrieveServiceLocked() 方法获取包含 ServiceRecord 的 ServiceLookupResult 实例,参见 1.3.1 ActiveServices # retrieveServiceLocked() 的解析,然后获取 ServiceLookupResult 中的 ServiceRecord 实例。
- 绑定 Service 时是否需要校验权限,如需要则构建 Intent 实例并通过主线程的 Handler 发送,弹出 UI 动态申请权限界面,如果用户同意,则在 RemoteCallback 的回调里面继续调用 ActiveServices # bringUpServiceLocked() 方法创建 Service 并启动,不同意则解除绑定。
- 绑定 Service 时如果设置 flag 为 BIND_AUTO_CREATE,其表示如果服务没有开启则调用 ActiveServices # bringUpServiceLocked() 方法自动创建并启动服务。
- 如果 Service 已经启动并运行,则直接调用 IServiceConnection 的 connect() 方法,最后回调 bindService 时传入的 ServiceConnection 的 onServiceConnected() 方法,稍后 2.5.5 节解析。
2.5 ActiveServices # requestServiceBingingsLocked()
回看 1.5 ActiveServices # bringUpServiceLocked() 的源码解析,在方法中继续调用 1.5.2 ActiveServices # realStartServiceLocked() 方法来真正的启动 Service,在 ActiveServices # realStartServiceLocked() 方法中与 bindService() 有关的逻辑还未分析,即 ActiveServices # requestServiceBingingsLocked() 方法,代码如下:
public final class ActiveServices {
	......
    private final void requestServiceBindingsLocked(ServiceRecord r, boolean execInFg)
            throws TransactionTooLargeException {
        for (int i=r.bindings.size()-1; i>=0; i--) {
        	// 获取已绑定到服务的特定 Intent
            IntentBindRecord ibr = r.bindings.valueAt(i);
            // 继续调用 requestServiceBindingLocked() 方法
            if (!requestServiceBindingLocked(r, ibr, execInFg, false)) {
                break;
            }
        }
    }
    ......
    private final boolean requestServiceBindingLocked(ServiceRecord r, IntentBindRecord i,
            boolean execInFg, boolean rebind) throws TransactionTooLargeException {
        if (r.app == null || r.app.thread == null) {
            // 如果服务还未运行,则不能绑定
            return false;
        }
        ......
        if ((!i.requested || rebind) && i.apps.size() > 0) {
            try {
                bumpServiceExecutingLocked(r, execInFg, "bind"); // 设置绑定超时消息
                // 强制更新进程状态为 PROCESS_STATE_SERVICE
                r.app.forceProcessStateUpTo(ActivityManager.PROCESS_STATE_SERVICE);
                // 通过跨进程通信,调用 ApplicationThread 的 scheduleBindService 方法绑定服务
                r.app.thread.scheduleBindService(r, i.intent.getIntent(), rebind,
                        r.app.getReportedProcState());
                if (!rebind) {
                    i.requested = true;
                }
                i.hasBound = true;
                i.doRebind = false;
            }
            ......// 绑定过程出现异常或绑定失败,则移除绑定超时消息
        }
        return true;
    }
    ......
}
方法中首先获取已绑定到服务的特定 Intent,然后继续调用 ActiveServices # requestServiceBindingLocked() 方法,在该方法中通过跨进程通信,调用 ApplicationThread 的 scheduleBindService() 方法绑定服务。
2.5.1 ApplicationThread # scheduleBindService()
public final class ActivityThread extends ClientTransactionHandler {
	......
    final H mH = new H();
	......
	class H extends Handler {
        ......
        public void handleMessage(Message msg) {
            switch (msg.what) {
            	......
                case BIND_SERVICE:
                    Trace.traceBegin(Trace.TRACE_TAG_ACTIVITY_MANAGER, "serviceBind");
                    handleBindService((BindServiceData)msg.obj);
                    Trace.traceEnd(Trace.TRACE_TAG_ACTIVITY_MANAGER);
                    break;
				......
            }
		}
	}
	......
    private class ApplicationThread extends IApplicationThread.Stub {
    	......
        @Override
        public final void scheduleBindService(IBinder token, Intent intent,
                boolean rebind, int processState) {
            updateProcessState(processState, false);
            BindServiceData s = new BindServiceData();
            s.token = token;
            s.intent = intent;
            s.rebind = rebind;
            ......// BIND_SERVICE 消息类型
            sendMessage(H.BIND_SERVICE, s);
        }
        ......
    }
    ......
    void sendMessage(int what, Object obj) {
        sendMessage(what, obj, 0, 0, false);
    }
    ......
    private void sendMessage(int what, Object obj, int arg1, int arg2, boolean async) {
        ......
        Message msg = Message.obtain();
        msg.what = what;
        msg.obj = obj;
        msg.arg1 = arg1;
        msg.arg2 = arg2;
        if (async) {
            msg.setAsynchronous(true);
        }
        mH.sendMessage(msg);
    }
}
ApplicationThread # scheduleBindService() 方法中,首先更新进程的状态值,并将入参 token、intent 等封装成 BindServiceData 实例对象,最后通过 ActivityThread 的内部类 H 发送 BIND_SERVICE 类型的 Handler 消息,进而流程将调用到 ActivityThread # handleBindService() 方法绑定到 Service。
2.5.2 ActivityThread # handleBindService()
public final class ActivityThread extends ClientTransactionHandler {
	......
    private void handleBindService(BindServiceData data) {
    	// 由 token 身份标识获取 mServices 缓存的 Service 实例
        Service s = mServices.get(data.token);
        ......
        if (s != null) {
            try {
                data.intent.setExtrasClassLoader(s.getClassLoader());
                data.intent.prepareToEnterProcess();
                try {
                    if (!data.rebind) { // 非重新绑定
                    	// 回调自定义 Service 的 onBind() 方法
                        IBinder binder = s.onBind(data.intent);
                        // 调用 AMS 的 publishService() 方法发布服务
                        ActivityManager.getService().publishService(
                                data.token, data.intent, binder);
                    } else {
                    	// 重新绑定,回调自定义 Service 的 onRebind() 方法
                        s.onRebind(data.intent);
                        ActivityManager.getService().serviceDoneExecuting(
                                data.token, SERVICE_DONE_EXECUTING_ANON, 0, 0);
                    }
                } catch (RemoteException ex) {
                    throw ex.rethrowFromSystemServer();
                }
            }
            ......
        }
    }
    ......
}
由 token 标识获取 mServices 中缓存的 Service 实例,如果不是重新绑定,则回调自定义 Service 的 onBind() 方法,然后调用 AMS 的 publishService() 方法发布服务 (重新绑定逻辑感兴趣的可以自行查阅源码)。
2.5.3 AMS # publishService()
public class ActivityManagerService extends IActivityManager.Stub
        implements Watchdog.Monitor, BatteryStatsImpl.BatteryCallback {
    ......
    final ActiveServices mServices;
    ......
    public ActivityManagerService(Context systemContext, ActivityTaskManagerService atm) {
    	......
		mServices = new ActiveServices(this); // AMS 构造方法中初始化 mServices
		......
    }
	......
    public void publishService(IBinder token, Intent intent, IBinder service) {
        // Refuse possible leaked file descriptors
        if (intent != null && intent.hasFileDescriptors() == true) {
            throw new IllegalArgumentException("File descriptors passed in Intent");
        }

        synchronized(this) {
            if (!(token instanceof ServiceRecord)) {
                throw new IllegalArgumentException("Invalid service token");
            }
            mServices.publishServiceLocked((ServiceRecord)token, intent, service);
        }
    }
    ......
}
方法中首先校验 Intent 是否为空,是否有文件描述符等,后校验要发布的 Service 的 token 标识是不是 ServiceRecord 类型的,如果都满足则调用 mServices # publishServiceLocked() 方法发布 Service。
2.5.4 ActiveServices # publishServiceLocked()
public final class ActiveServices {
	......
    // 所有绑定的服务连接,键是 IBinder 类型的客户端 IServiceConnection
    final ArrayMap<IBinder, ArrayList<ConnectionRecord>> mServiceConnections = new ArrayMap<>();
    ......
    void publishServiceLocked(ServiceRecord r, Intent intent, IBinder service) {
        final long origId = Binder.clearCallingIdentity();
        try {
            ......
            if (r != null) {
                Intent.FilterComparison filter
                        = new Intent.FilterComparison(intent);
				// 筛选获取已绑定到服务的 Intent 记录,注意:ServiceRecord.bindings 的类型
				// ArrayMap<Intent.FilterComparison, IntentBindRecord> bindings
                IntentBindRecord b = r.bindings.get(filter);
                if (b != null && !b.received) {
                    b.binder = service;
                    b.requested = true;
                    b.received = true;
                    // 获取 Service 已建立的所有服务连接
                    ArrayMap<IBinder, ArrayList<ConnectionRecord>> connections = r.getConnections();
                    for (int conni = connections.size() - 1; conni >= 0; conni--) {
                        ArrayList<ConnectionRecord> clist = connections.valueAt(conni);
                        for (int i=0; i<clist.size(); i++) {
                        	// 遍历获取保存的每个 ConnectionRecord
                            ConnectionRecord c = clist.get(i);
                            if (!filter.equals(c.binding.intent.intent)) {
                                ......
                                continue;
                            }
							......
                            try {
                            	// 如果 ConnectionRecord 匹配到指定的 Intent.FilterComparison 则异步回调连接
                            	// ConnectionRecord 的成员 IServiceConnection 的 connected() 方法
                            	// 注意:这里 IServiceConnection 的实现类是 InnerConnection
                            	// 其实现了 IServiceConnection.Stub 接口
                                c.conn.connected(r.name, service, false);
                            }
                            ......
                        }
                    }
                }
                // 移除之前设置的超时消息
                serviceDoneExecutingLocked(r, mDestroyingServices.contains(r), false);
            }
        } finally {
            Binder.restoreCallingIdentity(origId);
        }
    }
    ......
}
方法中,遍历获取保存的每个 ConnectionRecord 实例,如果该 ConnectionRecord 匹配到指定的 Intent.FilterComparison 则异步回调连接 ConnectionRecord 的成员 IServiceConnection 的 connected() 方法,注意:这里 IServiceConnection 的实现类是 InnerConnection,其实现了 IServiceConnection.Stub 接口。
2.5.5 LoadedApk # ServiceDispatcher # InnerConnection # connected()
public final class LoadedApk {
	......
	static final class ServiceDispatcher {
		......
		private final Handler mActivityThread;
	    ......
        private static class InnerConnection extends IServiceConnection.Stub {
            @UnsupportedAppUsage
            final WeakReference<LoadedApk.ServiceDispatcher> mDispatcher;
            InnerConnection(LoadedApk.ServiceDispatcher sd) {
            	// 弱引用,防止内存泄漏
                mDispatcher = new WeakReference<LoadedApk.ServiceDispatcher>(sd);
            }

            public void connected(ComponentName name, IBinder service, boolean dead)
                    throws RemoteException {
                // 获取到弱引用所持有的 LoadedApk.ServiceDispatcher
                LoadedApk.ServiceDispatcher sd = mDispatcher.get();
                if (sd != null) {
                	// 继续调用 LoadedApk.ServiceDispatcher 的 connected() 方法
                    sd.connected(name, service, dead);
                }
            }
        }
        ......
        public void connected(ComponentName name, IBinder service, boolean dead) {
            if (mActivityExecutor != null) {
                mActivityExecutor.execute(new RunConnection(name, service, 0, dead));
            } else if (mActivityThread != null) {
            	// 参见[2.2 节]调用 bindServiceCommon() 方法时传入了 mMainThread.getHandler()
            	// Executor 传入为空,因此这里通过主线程的 Handler # post 任务然后执行
            	// RunConnection 的 run() 方法,注意:构造函数中给 mCommand 传值为 0
                mActivityThread.post(new RunConnection(name, service, 0, dead));
            } else {
                doConnected(name, service, dead);
            }
        }
        ......
        private final class RunConnection implements Runnable {
            RunConnection(ComponentName name, IBinder service, int command, boolean dead) {
                mName = name;
                mService = service;
                mCommand = command; // 此时为 mCommand 赋值为 0
                mDead = dead;
            }

            public void run() {
                if (mCommand == 0) { // 由于 mCommand 被赋值为 0,因此执行 doConnected() 方法
                    doConnected(mName, mService, mDead);
                } else if (mCommand == 1) {
                    doDeath(mName, mService);
                }
            }

            final ComponentName mName;
            final IBinder mService;
            final int mCommand;
            final boolean mDead;
        }
        ......
	}
	......
}
在 InnerConnection # connected() 方法中继续调用 LoadedApk # ServiceDispatcher 的 connected() 方法,回看 2.2 ContextImpl # bindService() 的解析可知,在调用 ContextImpl # bindServiceCommon() 方法时传入了 mMainThread # getHandler() 获取到的主线程的 Handler,而 Executor 传入为空,因此这里将通过主线程的 Handler # post() 一个 Runnable 任务后续会执行其 run() 方法,在 run() 方法中由于 mCommand 被赋值为 0,因此将执行 ServiceDispatcher # doConnected() 方法。
2.5.6 LoadedApk # ServiceDispatcher # doConnected()
public final class LoadedApk {
	......
	static final class ServiceDispatcher {
		......
        public void doConnected(ComponentName name, IBinder service, boolean dead) {
            ServiceDispatcher.ConnectionInfo old;
            ServiceDispatcher.ConnectionInfo info;

            synchronized (this) {
                if (mForgotten) {
                	// 在接到连接请求前就已解绑了,此时忽略接收到的任何连接
                    return;
                }
                old = mActiveConnections.get(name);
                if (old != null && old.binder == service) {
                    // 已经绑过,所以不再重复绑定
                    return;
                }
                if (service != null) {
                    // 连接一个新的服务,设置连接信息
                    info = new ConnectionInfo();
                    info.binder = service;
                    info.deathMonitor = new DeathMonitor(name, service);
                    try {
                        service.linkToDeath(info.deathMonitor, 0);
                        mActiveConnections.put(name, info); // 保存新建服务连接
                    } catch (RemoteException e) {
                        ......// 绑定出现异常,则移除
                        mActiveConnections.remove(name);
                        return;
                    }
                } else {
                    // 服务正在断开连接,清理掉
                    mActiveConnections.remove(name);
                }
                if (old != null) { // 旧连接解除死亡监听
                    old.binder.unlinkToDeath(old.deathMonitor, 0);
                }
            }
			// 旧连接解除绑定
            if (old != null) {
                mConnection.onServiceDisconnected(name);
            }
            if (dead) {
                mConnection.onBindingDied(name);
            }
            if (service != null) {
            	// 调用 bindService 时传入的 ServiceConnection 的 onServiceConnected() 方法
                mConnection.onServiceConnected(name, service);
            } else {
                mConnection.onNullBinding(name);
            }
        }
        ......
	}
	......
}
该方法主要作用是回调 bindService 时传入的 ServiceConnection 的 onServiceConnected() 方法。
2.6 时序图
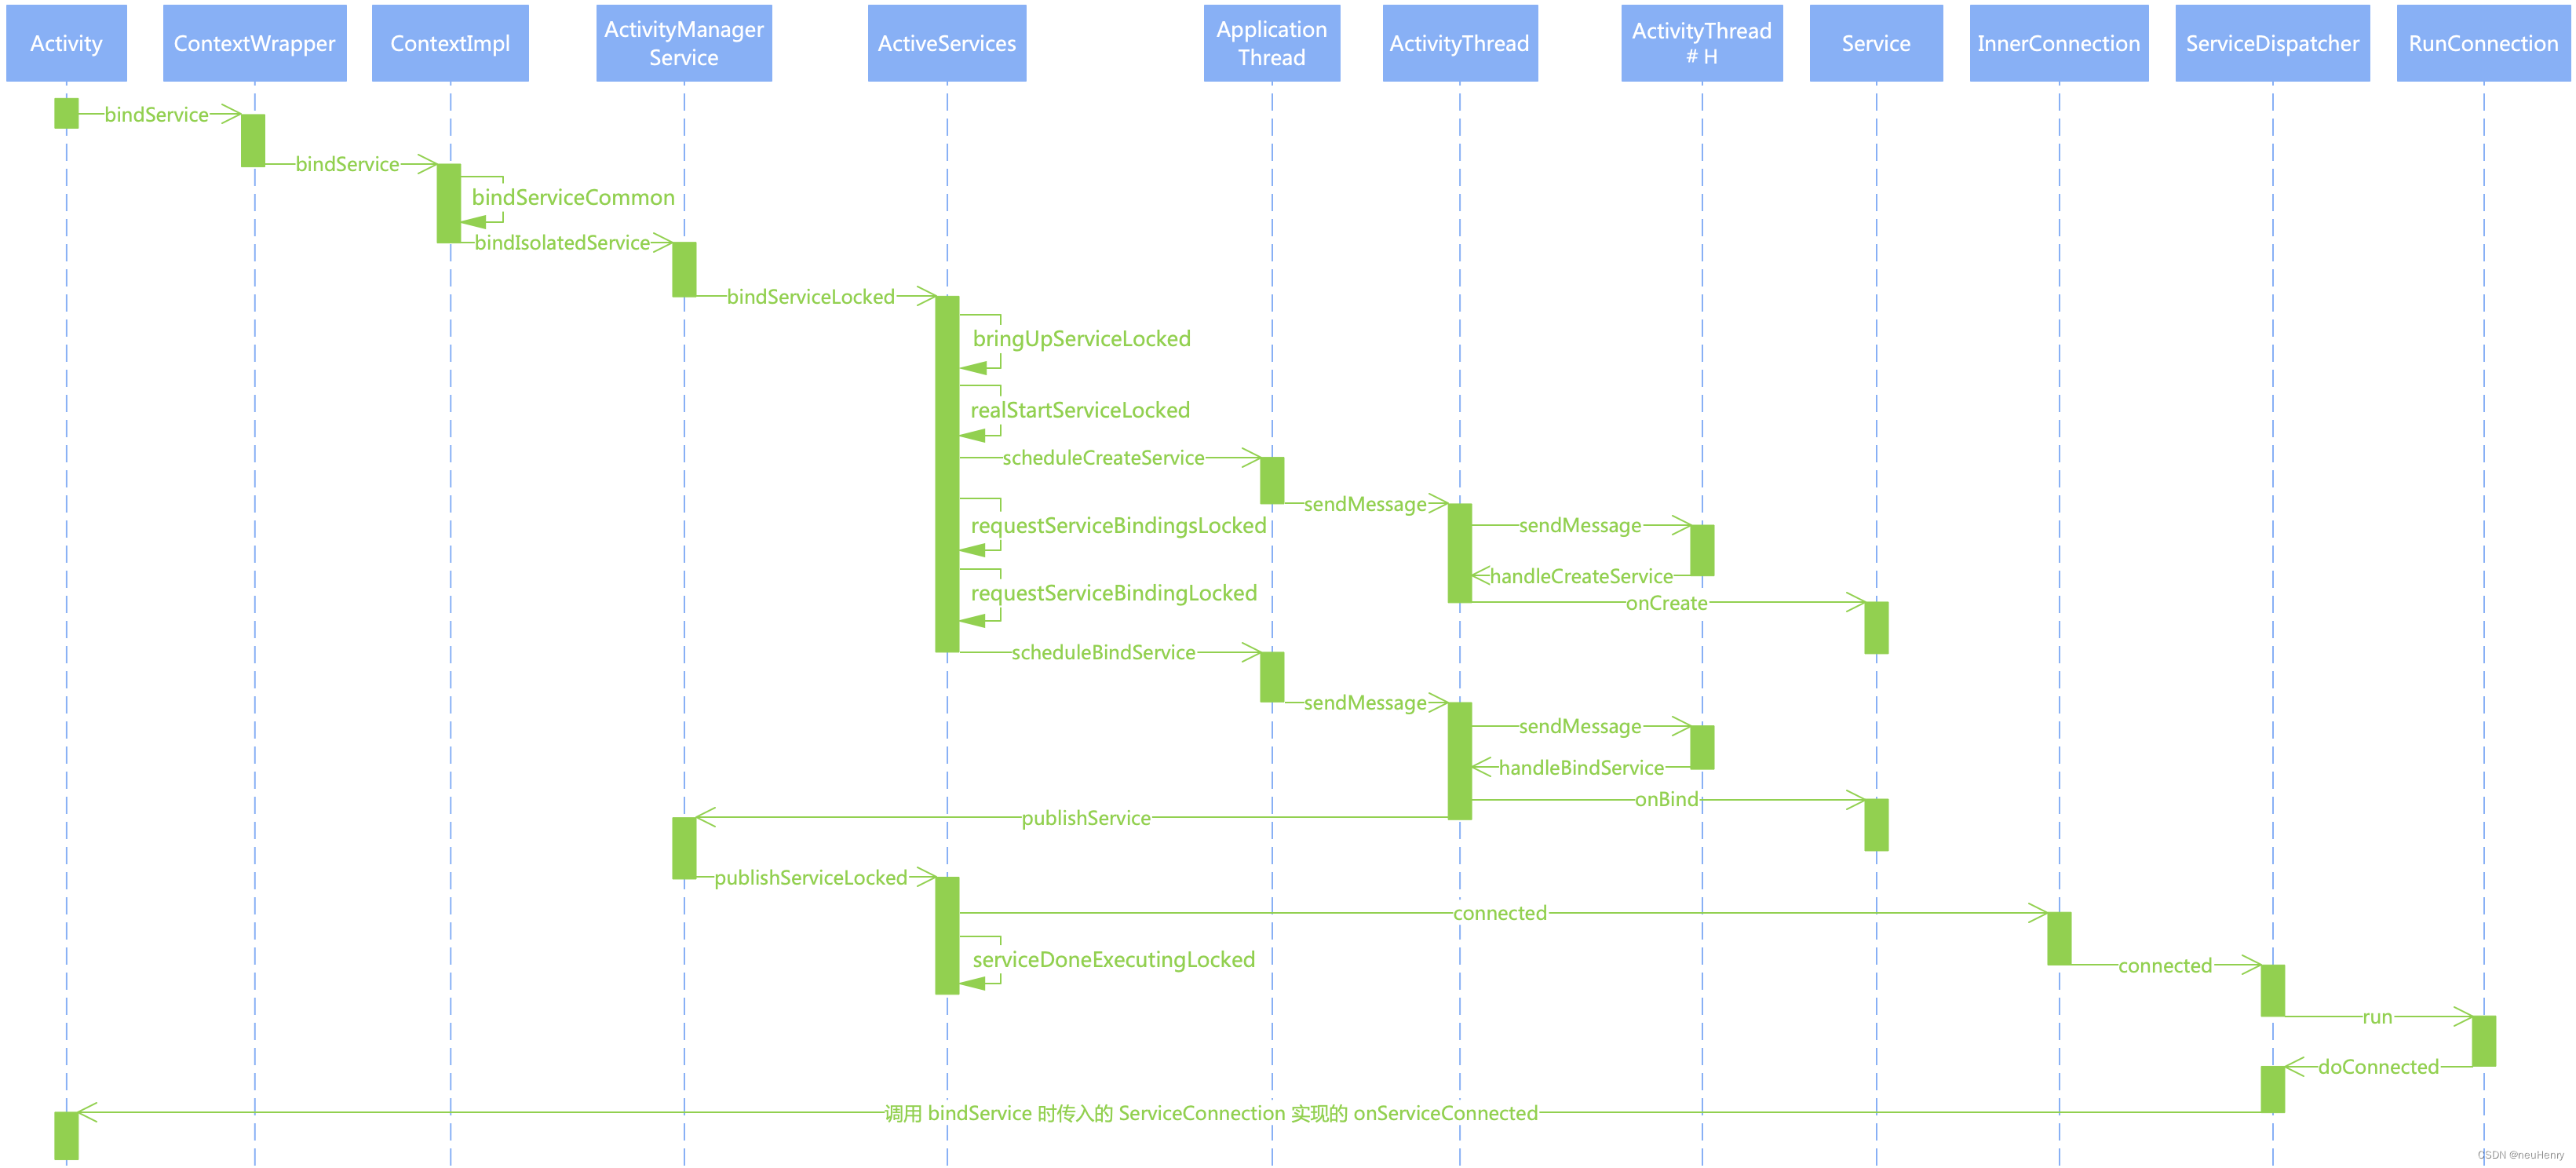
2.7 总结
至此,bindService 的启动流程分析完毕,结合上面的时序图加深理解。
三. 交流
相信本文对于理解 Service 的启动应该会有很大帮助的,另外 Service 重启有关的代码流程,这里篇幅有限下一篇文章继续分析,如有分析错误或者别的理解,还望不吝赐教–留言或者私信笔者讨论,共同学习。


 683
683


 被折叠的 条评论
为什么被折叠?
被折叠的 条评论
为什么被折叠?
 到【灌水乐园】发言


