


试验环境:
- centos7.6x64位,CentOS-7-x86_64-Minimal-1810.iso
百度网盘下载地址:https://pan.baidu.com/s/1ckjQS_DGuI-7GGvmvhLNKQ 提取码: 6gfc
linux的安装参照:centos7.6最小化安装 - redis-5.0.5.tar.gz
官网下载地址:http://download.redis.io/releases/redis-5.0.5.tar.gz
百度网盘下载地址:https://pan.baidu.com/s/1ipnB043h5Tvk7cYGKxSr8g 提取码: bdkh
一、准备环境
1.1 给linux安装gcc环境
[root@localhost redis-5.0.5]# yum -y install gcc automake autoconf libtool make
运行命令测试:
[root@localhost redis-5.0.5]# gcc --version
[root@localhost redis-5.0.5]# gcc --version
gcc (GCC) 4.8.5 20150623 (Red Hat 4.8.5-36)
Copyright © 2015 Free Software Foundation, Inc.
本程序是自由软件;请参看源代码的版权声明。本软件没有任何担保;
包括没有适销性和某一专用目的下的适用性担保。
1.2 在linux最外层新建文件夹soft,使用winscp将压缩包拷贝至soft内,解压缩安装包:
[root@localhost ~]# cd /soft/
[root@localhost soft]# tar -zxvf redis-5.0.5.tar.gz
如果没有安装tar程序,可以使用
yum install tar -y进行安装。
二、安装redis
2.1 编译
在redis的安装目录下直接输入:make MALLOC=libc
[root@localhost redis-5.0.5]# make MALLOC=libc
编译完成后显示:
正常来说的话是执行make,但是这样会报错:“jemalloc/jemalloc.h:没有那个文件或目录 ”,所以加了一个参数,参照:https://www.jianshu.com/p/e853c212993c
2.2 安装
在redis的安装包目录下执行:make install PREFIX=/usr/local/redis
[root@localhost redis-5.0.5]# make install PREFIX=/usr/local/redis
其中:prefix参数表示安装的目录,不指定的话安装到“/usr/local/bin”里
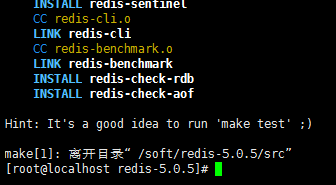
安装成功后提示:
[root@localhost redis-5.0.5]# make install PREFIX=/usr/local/redis
cd src && make install
make[1]: 进入目录“/soft/redis-5.0.5/src”
    CC Makefile.dep
make[1]: 离开目录“/soft/redis-5.0.5/src”
make[1]: 进入目录“/soft/redis-5.0.5/src”

Hint: It's a good idea to run 'make test' ;)

    INSTALL install
    INSTALL install
    INSTALL install
    INSTALL install
    INSTALL install
make[1]: 离开目录“/soft/redis-5.0.5/src”
[root@localhost redis-5.0.5]#
安装后观察/usr/local/redis中的文件结构,需要安装tree命令软件(yum install tree -y):
[root@localhost redis]# pwd
/usr/local/redis
[root@localhost redis]# tree
.
└── bin
    ├── redis-benchmark
    ├── redis-check-aof
    ├── redis-check-rdb
    ├── redis-cli
    ├── redis-sentinel -> redis-server
    └── redis-server

1 directory, 6 files
[root@localhost redis]#
三、启动redis进行测试
3.1 启动redis服务
[root@localhost bin]# /usr/local/redis/bin/redis-server
启动成功后提示:
[root@localhost bin]# /usr/local/redis/bin/redis-server
8712:C 11 Aug 2019 16:09:56.917 # oO0OoO0OoO0Oo Redis is starting oO0OoO0OoO0Oo
8712:C 11 Aug 2019 16:09:56.917 # Redis version=5.0.5, bits=64, commit=00000000, modified=0, pid=8712, just started
8712:C 11 Aug 2019 16:09:56.917 # Warning: no config file specified, using the default config. In order to specify a config file use /usr/local/redis/bin/redis-server /path/to/redis.conf
8712:M 11 Aug 2019 16:09:56.919 * Increased maximum number of open files to 10032 (it was originally set to 1024).
                _._
           _.-``__ ''-._
      _.-``    `.  `_.  ''-._           Redis 5.0.5 (00000000/0) 64 bit
  .-`` .-```.  ```\/    _.,_ ''-._
 (    '      ,       .-`  | `,    )     Running in standalone mode
 |`-._`-...-` __...-.``-._|'` _.-'|     Port: 6379
 |    `-._   `._    /     _.-'    |     PID: 8712
  `-._    `-._  `-./  _.-'    _.-'
 |`-._`-._    `-.__.-'    _.-'_.-'|
 |    `-._`-._        _.-'_.-'    |           http://redis.io
  `-._    `-._`-.__.-'_.-'    _.-'
 |`-._`-._    `-.__.-'    _.-'_.-'|
 |    `-._`-._        _.-'_.-'    |
  `-._    `-._`-.__.-'_.-'    _.-'
      `-._    `-.__.-'    _.-'
          `-._        _.-'
              `-.__.-'

8712:M 11 Aug 2019 16:09:56.926 # WARNING: The TCP backlog setting of 511 cannot be enforced because /proc/sys/net/core/somaxconn is set to the lower value of 128.
8712:M 11 Aug 2019 16:09:56.926 # Server initialized
8712:M 11 Aug 2019 16:09:56.926 # WARNING overcommit_memory is set to 0! Background save may fail under low memory condition. To fix this issue add 'vm.overcommit_memory = 1' to /etc/sysctl.conf and then reboot or run the command 'sysctl vm.overcommit_memory=1' for this to take effect.
8712:M 11 Aug 2019 16:09:56.926 # WARNING you have Transparent Huge Pages (THP) support enabled in your kernel. This will create latency and memory usage issues with Redis. To fix this issue run the command 'echo never > /sys/kernel/mm/transparent_hugepage/enabled' as root, and add it to your /etc/rc.local in order to retain the setting after a reboot. Redis must be restarted after THP is disabled.
8712:M 11 Aug 2019 16:09:56.927 * DB loaded from disk: 0.000 seconds
8712:M 11 Aug 2019 16:09:56.927 * Ready to accept connections
3.2 再打开一个窗口使用redis客户端操作
[root@localhost bin]# /usr/local/redis/bin/redis-cli
127.0.0.1:6379> set 1 2
OK
127.0.0.1:6379> get 1
"2"
127.0.0.1:6379> quit
[root@localhost bin]#
可以看到redis基本的读写已测试通过。
redis服务启动的窗口使用ctrl+c关闭redis服务
四、redis操作和配置说明
4.1 redis启动命令
上面的命令是:/usr/local/redis/bin/redis-server,这个是以默认的配置启动的,默认的配置包含下面几项:
监听端口:6379
接收命令的ip:127.0.0.1
是否以守护进程的方式运行:否!
如果不想用默认的配置启动应该怎么办呢?
答:启动的时候指定配置文件的路径,如:/usr/local/redis/bin/redis-server /soft/redis-5.0.5/redis.conf,其实默认的配置文件就在安装包下,自己可以查看一下里面的配置。
4.2 实现redis根据配置文件启动
1. 将文件“/soft/redis-5.0.5/redis.conf”拷贝一份到“/usr/local/redis/bin/redis.conf”
2. 修改里面的配置:
#修改端口为6500
port 6500
#运行模式改为后台运行
daemonize yes
#后台运行模式时用来记录进程ID的文件
pidfile /var/run/redis_6500.pid
#redis日志文件
logfile "/usr/local/redis/bin/log.txt"
#客户端连接的密码
requirepass 123456
3. 使用这个配置文件启动redis:
[root@localhost bin]# /usr/local/redis/bin/redis-server /usr/local/redis/bin/redis.conf
启动完成后显示:

4. 检查redis是否已在后台运行:

可以看到redis的进程id为16564
使用linux命令查看redis运行进程:

可以看出redis运行的进程确实是16564而且监听端口号为:6500
查看redis启动日志(cat /usr/local/redis/bin/log.txt)

4.3 redis客户端连接命令
最开始的时候是直接输入命令redis-cli进行的连接,其实是连接的本地6379端口,那么完整的连接应该如何写呢?
- 方式1:先使用redis-cli -h ip -p 端口进行连接,再使用auth 123456进行密码认证:
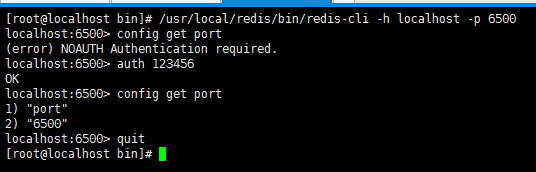
- 方式2:连接的时候指定ip、端口、密码:redis-cli -h ip -p 端口 -a 密码

4.4 redis测试是否连接
使用ping命令测试redis返回值:
- 连通情况下:
ping testlala:应该返回“testlala”
ping:应该返回“PONG” - 断开情况下:
ping:应该显示的是无法连接提示
如下图所示:

4.5 redis关闭命令
- 关闭方式1:客户端发送shutdown命令(推荐使用)
- 关闭方式2:前台运行的redis直接按ctrl+c即可
- 关闭方式3:redis服务端直接杀死redis进程(kill -9 进程id)(有数据丢失风险)
这里演示关闭方式1:
先登录redis-cli -h localhost -p 6500 -a 123456,然后执行shutdown,最后退出quit

最后去查看redis服务端进程:

由此可见,redis已经被关闭了!
4.6 开启远程连接redis
首先看以下redis的启动配置文件:
port 6500
daemonize yes
pidfile /var/run/redis_6500.pid
logfile "/usr/local/redis/bin/redis-6500.log"
dbfilename dump-6500.rdb
如果我们用这个配置文件启动redis,那么redis是不允许远程访问的,也就是说你只能用localhost/127.0.0.1去连接。为什么会不能远程连接呢?因为redis认为你既没有显示的指定监听ip地址也没有指定访问密码,这样是不安全的,于是它就启动了保护模式,启动保护模式后就只能允许localhost/127.0.0.1访问了。我们可以试一下:
[root@localhost bin]# ./redis-cli -h 192.168.0.100 -p 6500
Could not connect to Redis at 192.168.0.100:6500: No route to host
not connected> quit
[root@localhost bin]# ./redis-cli -h 192.168.0.100 -p 6500
192.168.0.100:6500> get name
(error) DENIED Redis is running in protected mode because protected mode is enabled, no bind address was specified, no authentication password is requested to clients. In this mode connections are only accepted from the loopback interface. If you want to connect from external computers to Redis you may adopt one of the following solutions: 1) Just disable protected mode sending the command 'CONFIG SET protected-mode no' from the loopback interface by connecting to Redis from the same host the server is running, however MAKE SURE Redis is not publicly accessible from internet if you do so. Use CONFIG REWRITE to make this change permanent. 2) Alternatively you can just disable the protected mode by editing the Redis configuration file, and setting the protected mode option to 'no', and then restarting the server. 3) If you started the server manually just for testing, restart it with the '--protected-mode no' option. 4) Setup a bind address or an authentication password. NOTE: You only need to do one of the above things in order for the server to start accepting connections from the outside.
192.168.0.100:6500>
注意: 上面第一个链接报错“Could not connect to Redis…”是因为linux防火墙问题,关闭防火墙后再连接,下面的才是因为redis的保护模式报的错。
那么怎么允许远程访问呢?(先把linux的防火墙关闭systemctl stop firewalld.service)
- 方法一、配置redis访问密码
port 6500 daemonize yes pidfile /var/run/redis_6500.pid logfile "/usr/local/redis/bin/redis-6500.log" dbfilename dump-6500.rdb requirepass 123456 - 方法二、指定监听的ip地址
port 6500 daemonize yes pidfile /var/run/redis_6500.pid logfile "/usr/local/redis/bin/redis-6500.log" dbfilename dump-6500.rdb bind 192.168.0.100 - 方法三、直接禁用保护模式(危险)
port 6500
daemonize yes
pidfile /var/run/redis_6500.pid
logfile "/usr/local/redis/bin/redis-6500.log"
dbfilename dump-6500.rdb
protected-mode no
虽然上面提供了三种开启远程访问的办法,但是由于安全问题,推荐使用设置密码+设置监听ip的方式:
port 6500
daemonize yes
pidfile /var/run/redis_6500.pid
logfile "/usr/local/redis/bin/redis-6500.log"
dbfilename dump-6500.rdb
bind 192.168.0.100
requirepass 123456
当然,如果你将redis部署在公网上,为了能从局域网访问,你应该将阿里云的公网ip也加入监听。
4.7 其他的redis配置
- loglevel:redis的日志记录等级,默认为 notice
redis共有四种级别(debug<verbose<notice<warning)。可以参照/soft/redis-5.0.5/redis.conf中的说明:

- databases:redis服务中数据库的数量
我们知道客户端连接后可以通过select 15这种命令格式在16个数据库中做切换,这个16就是在这配置的,参照/soft/redis-5.0.5/redis.conf中的说明:

当我们设置database为5的时候,测试如下:

- timeout:超时关闭连接时间
当连接redis服务的客户端timeout秒没有活动的时候就关闭这个连接,设置为0表示永远不关闭,参照/soft/redis-5.0.5/redis.conf中的说明:

当我们设置timeout为5的时候,测试如下:

注意:上面是在开启密码验证时的测试!本人测试没有开启密码得情况下,客户端连接一直有效(尽管timeout设置为5),不过这个设置一般我们不用。 - save : 指出在多长时间内,有多少次更新操作,就将数据同步到数据文件。
这个可以多个条件配合,比如默认配置文件中的设置,就设置了三个条件,参照/soft/redis-5.0.5/redis.conf中的说明:

我们以下面的配置文件启动redis来测试这一项配置:
这样,当我们在客户端中5秒内更新了一个key,redis就会自动将数据保存到port 6500 daemonize yes pidfile /var/run/redis_6500.pid logfile "/usr/local/redis/bin/redis-6500.log" dbfilename dump-6500.rdb bind 192.168.0.100 save 5 1dump-6500.rdb文件中。

- rdbcompression:指定存储至本地数据库时是否压缩数据,默认为 yes
Redis 采用 LZF 压缩,如果为了节省 CPU 时间,可以关闭该选项,但会导致数据库文件变的巨大 - dir: 本地数据库存放路径,默认值为 ./
- slaveof: 当本机为从服务时,设置主服务的IP及端口,如:192.168.0.100:6500
- slave-read-only: 当本机为从服务时,是否设置为只读状态
- masterauth: 当本机为从服务时,设置主服务的连接密码,如:123456
- maxclients: 最大客户端连接数,默认10000,参照
/soft/redis-5.0.5/redis.conf中的说明:

我们可以在redis客户端中查看当前的配置:192.168.0.100:6500> config get maxclients 1) "maxclients" 2) "10000" - appendonly:指定是否在每次更新操作后进行日志记录(注意是进行日志记录,而不是存储数据),默认为no
Redis 在默认情况下是异步的把数据写入磁盘,如果不开启,可能会在断电时导致一段时间内的数据丢失。因为 redis 本身同步数据文件是按上面 save 条件来同步的,所以有的数据会在一段时间内只存在于内存中。参照/soft/redis-5.0.5/redis.conf中的说明:

我们以下面的配置文件做实验:
重启redis后,客户端连接并执行:port 6500 daemonize yes pidfile /var/run/redis_6500.pid logfile "/usr/local/redis/bin/redis-6500.log" dbfilename dump-6500.rdb bind 192.168.0.100 appendonly yesset name 123命令后,redis就会把执行记录存储在aof文件中,如下图所示:
- appendfilename:指定更新日志文件名,默认为 appendonly.aof,在上面
appendonly的实验中看到,默认的就是appendonly.aof文件


 384
384


 被折叠的 条评论
为什么被折叠?
被折叠的 条评论
为什么被折叠?
 到【灌水乐园】发言


