


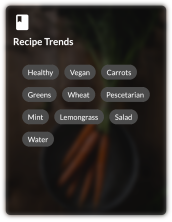
这一节我们将创建第三张卡片,在里面提供一些标签供用户来选择他们感兴趣的菜谱,如下图所示:
可以看出整个卡片有一个类似之前卡片的背景图片,然后左上角有个图标和标题,主体部分是一些列的标签文字,创建card3.dart文件,代码如下:
import 'package:flutter/cupertino.dart';
import 'package:flutter/material.dart';

class Card3 extends StatelessWidget {
  const Card3({Key? key}) : super(key: key);

  @override
  Widget build(BuildContext context) {
    return Center(
      child: Container(
        constraints: const BoxConstraints.expand(
          width: 350,
          height: 450,
        ),
        decoration: const BoxDecoration(
          image: DecorationImage(
            image: AssetImage('assets/mag2.jpg'),
            fit: BoxFit.cover,
          ),
          borderRadius: BorderRadius.all(Radius.circular(10.0)),
        ),
        child: Stack(
          children: [
            // TODO 5: add dark overlay BoxDecoration
            // TODO 6: Add Container, Column, Icon and Text
            // TODO 7: Add Center widget with Chip widget children
          ],
        ),
      ),
    );
  }
}
然后到home.dart文件中用Card3替换pages中的第三个元素,启动app,效果如下

好了,背景已经添加完毕了,接下来我们为背景添加蒙版效果,定位到 TODO 5: add dark overlay BoxDecoration,使用如下代码为背景添加一层半透明的颜色效果:
Container(
              decoration: BoxDecoration(
                  //添加黑色背景和透明度,取值越大,越不透明
                  color: Colors.black.withOpacity(0.6),
                  borderRadius: const BorderRadius.all(Radius.circular(10.0))),
            ),
接下来我们先把左上角的图标和标题添加上去。定位到 TODO 6: Add Container, Column, Icon and Text,然后添加如下代码:
 Container(
              //添加padding
              padding: const EdgeInsets.all(16),
              child: Column(
                //设置布局内的子widget从左侧开始布局
                //你可以看看CrossAxisAlignment.end的效果
                crossAxisAlignment: CrossAxisAlignment.start,
                children: [
                  //添加图标
                  const Icon(
                    Icons.book,
                    color: Colors.white,
                    size: 40,
                  ),
                  const SizedBox(height: 8),
                  //添加标题
                  Text(
                    'Recipe Trends',
                    style: FooderlichTheme.darkTextTheme.headline2,
                  ),
                  const SizedBox(height: 30),
                ],
              ),
            ),
添加后的效果如图:

最后,我们再添加上标签就完工了。定位到TODO 7: Add Center widget with Chip widget children,添加如下代码:
	Center(
              //Wrap是一个布局小部件,它试图将它的每个子元素布局到与前面的子元素相邻。
              // 如果没有足够的空间,它将子元素布局到下一行
              child: Wrap(
                //将子元素尽量靠左
                alignment: WrapAlignment.start,
                //子元素间的间隔
                spacing: 12,
                //子元素
                children: [
                  Chip(
                    label: Text('Healthy',
                        style: FooderlichTheme.darkTextTheme.bodyText1),
                    backgroundColor: Colors.black.withOpacity(0.7),
                    onDeleted: () {
                      print('delete');
                    },
                  ),
                  Chip(
                    label: Text('Vegan',
                        style: FooderlichTheme.darkTextTheme.bodyText1),
                    backgroundColor: Colors.black.withOpacity(0.7),
                    onDeleted: () {
                      print('delete');
                    },
                  ),
                  Chip(
                    label: Text('Carrots',
                        style: FooderlichTheme.darkTextTheme.bodyText1),
                    backgroundColor: Colors.black.withOpacity(0.7),
                  ),
                  Chip(
                    label: Text('Greens',
                        style: FooderlichTheme.darkTextTheme.bodyText1),
                    backgroundColor: Colors.black.withOpacity(0.7),
                  ),
                  Chip(
                    label: Text('Wheat',
                        style: FooderlichTheme.darkTextTheme.bodyText1),
                    backgroundColor: Colors.black.withOpacity(0.7),
                  ),
                  Chip(
                    label: Text('Mint',
                        style: FooderlichTheme.darkTextTheme.bodyText1),
                    backgroundColor: Colors.black.withOpacity(0.7),
                  ),
                ],
              ),
            ),
最终效果如图:

卡片完成了,我们本章的内容也结束了。在这一章里,我们初步了解了Flutter中的结构和导航,数据的展示以及组件的布局,在此过程中我们接触了一些常用的widget,学习了它们的基本使用方法,接下来我们将会深入了解widget,更好的掌握wigdet的使用。


 2852
2852


 被折叠的 条评论
为什么被折叠?
被折叠的 条评论
为什么被折叠?
 到【灌水乐园】发言


