一、什么是流
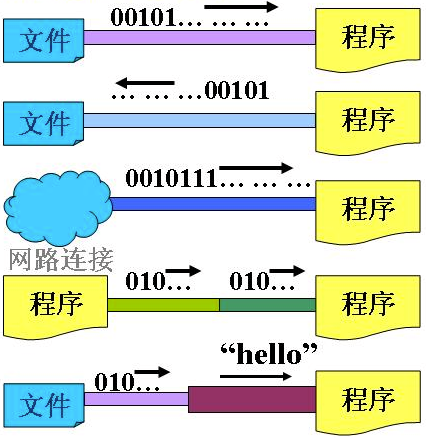
流是个抽象的概念,是对输入输出设备的抽象,Java程序中,对于数据的输入/输出操作都是以“流”的方式进行。设备可以是文件,网络,内存等。
流具有方向性,至于是输入流还是输出流则是一个相对的概念,一般以程序为参考,如果数据的流向是程序至设备,我们成为输出流,反之我们称为输入流。
可以将流想象成一个“水流管道”,水流就在这管道中形成了,自然就出现了方向的概念。
当程序需要从某个数据源读入数据的时候,就会开启一个输入流,数据源可以是文件、内存或网络等等。相反地,需要写出数据到某个数据源目的地的时候,也会开启一个输出流,这个数据源目的地也可以是文件、内存或网络等等。
二、流的分类
可以从不同的角度对流进行分类:
处理的数据单位不同,可分为:字符流,字节流
数据流方向不同,可分为:输入流,输出流
功能不同,可分为:节点流,处理流
1 和 2 都比较好理解,对于根据功能分类的,可以这么理解:
节点流:节点流从一个特定的数据源读写数据。即节点流是直接操作文件,网络等的流,例如FileInputStream和FileOutputStream,他们直接从文件中读取或往文件中写入字节流。
处理流:“连接”在已存在的流(节点流或处理流)之上通过对数据的处理为程序提供更为强大的读写功能。过滤流是使用一个已经存在的输入流或输出流连接创建的,过滤流就是对节点流进行一系列的包装。例如BufferedInputStream和BufferedOutputStream,使用已经存在的节点流来构造,提供带缓冲的读写,提高了读写的效率,以及DataInputStream和DataOutputStream,使用已经存在的节点流来构造,提供了读写Java中的基本数据类型的功能。他们都属于过滤流。
举例:
import java.io.BufferedOutputStream;
import java.io.DataInputStream;
import java.io.DataOutputStream;
import java.io.FileInputStream;
import java.io.FileOutputStream;
import java.io.IOException;
import java.io.BufferedInputStream;

public class StreamTest {
    public static void main(String[] args) throws IOException {
        // 节点流FileOutputStream直接以A.txt作为数据源操作
        FileOutputStream fileOutputStream = new FileOutputStream("A.txt");
        // 过滤流BufferedOutputStream进一步装饰节点流,提供缓冲写
        BufferedOutputStream bufferedOutputStream = new BufferedOutputStream(
                fileOutputStream);
        // 过滤流DataOutputStream进一步装饰过滤流,使其提供基本数据类型的写
        DataOutputStream out = new DataOutputStream(bufferedOutputStream);
        out.writeInt(3);
        out.writeBoolean(true);
        out.flush();
        out.close();
        // 此处输入节点流,过滤流正好跟上边输出对应,读者可举一反三
        DataInputStream in = new DataInputStream(new BufferedInputStream(
                new FileInputStream("A.txt")));
        System.out.println(in.readInt());
        System.out.println(in.readBoolean());
        in.close();
    }
}
三、流结构介绍
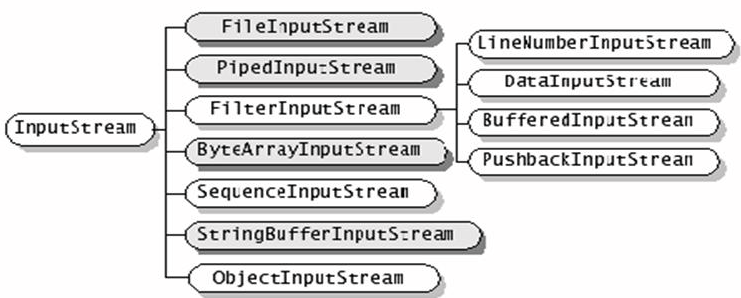
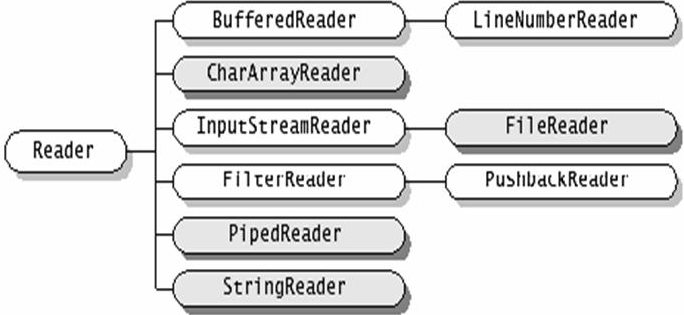
Java所有的流类位于java.io包中,都分别继承字以下四种抽象流类型。
| 字节流 | 字符流 | |
| 输入流 | InputStream | Reader |
| 输出流 | OutputStream | Writer |
1.继承自InputStream/OutputStream的流都是用于向程序中输入/输出数据,且数据的单位都是字节(byte=8bit),如图,深色的为节点流,浅色的为处理流。
2.继承自Reader/Writer的流都是用于向程序中输入/输出数据,且数据的单位都是字符(2byte=16bit),如图,深色的为节点流,浅色的为处理流。
四、常用流类介绍
节点流类型常见的有:
对文件操作的字符流有FileReader/FileWriter,字节流有FileInputStream/FileOutputStream。
处理流类型常见的有:
1.缓冲流:缓冲流要“套接”在相应的节点流之上,对读写的数据提供了缓冲的功能,提高了读写效率,同事增加了一些新的方法。
字节缓冲流有BufferedInputStream/BufferedOutputStream,字符缓冲流有BufferedReader/BufferedWriter,字符缓冲流分别提供了读取和写入一行的方法ReadLine和NewLine方法。
对于输出地缓冲流,写出的数据,会先写入到内存中,再使用flush方法将内存中的数据刷到硬盘。所以,在使用字符缓冲流的时候,一定要先flush,然后再close,避免数据丢失。
2.转换流:用于字节数据到字符数据之间的转换。
仅有字符流InputStreamReader/OutputStreamWriter。其中,InputStreamReader需要与InputStream“套接”,OutputStreamWriter需要与OutputStream“套接”。
3.数据流:提供了读写Java中的基本数据类型的功能。
DataInputStream和DataOutputStream分别继承自InputStream和OutputStream,需要“套接”在InputStream和OutputStream类型的节点流之上。
4.对象流:用于直接将对象写入写出。
流类有ObjectInputStream和ObjectOutputStream,本身这两个方法没什么,但是其要写出的对象有要求,该对象必须实现Serializable接口,来声明其是可以序列化的。否则,不能用对象流读写。
还有一个关键字比较重要,transient,由于修饰实现了Serializable接口的类内的属性,被该修饰符修饰的属性,在以对象流的方式输出的时候,该字段会被忽略。
五、Serializable
六、面试题
1.Java中如何实现序列化,有什么意义?
答:序列化就是一种用来处理对象流的机制,所谓对象流也就是将对象的内容进行流化。可以对流化后的对象进行读写操作,也可将流化后的对象传输于网络之间。序列化是为了解决对象流读写操作时可能引发的问题(如果不进行序列化可能会存在数据乱序的问题)。
要实现序列化,需要让一个类实现Serializable接口,该接口是一个标识性接口,标注该类对象是可被序列化的,然后使用一个输出流来构造一个对象输出流并通过writeObject(Object)方法就可以将实现对象写出(即保存其状态);如果需要反序列化则可以用一个输入流建立对象输入流,然后通过readObject方法从流中读取对象。序列化除了能够实现对象的持久化之外,还能够用于对象的深度克隆(可以参考《java 对象克隆》)。
2.Java中有几种类型的流?
答:字节流和字符流。字节流继承于InputStream、OutputStream,字符流继承于Reader、Writer。在java.io 包中还有许多其他的流,主要是为了提高性能和使用方便。关于Java的I/O需要注意的有两点:一是两种对称性(输入和输出的对称性,字节和字符的对称性);二是两种设计模式(适配器模式和装潢模式)。另外Java中的流不同于C#的是它只有一个维度一个方向。
3.编程实现文件拷贝。(这个题目在笔试的时候经常出现,下面的代码给出了两种实现方案)
import java.io.FileInputStream;
import java.io.FileOutputStream;
import java.io.IOException;
import java.io.InputStream;
import java.io.OutputStream;
import java.nio.ByteBuffer;
import java.nio.channels.FileChannel;

//文件拷贝工具类
public final class FileCopyUtil {
    // 工具类中的方法都是静态方式访问的因此将构造器私有不允许创建对象(绝对好习惯)
    private FileCopyUtil() {
        throw new AssertionError();
    }

    //文件拷贝
    public static void fileCopy(String source, String target) throws IOException {
        try (InputStream in = new FileInputStream(source)) {
            try (OutputStream out = new FileOutputStream(target)) {
                byte[] buffer = new byte[4096];
                int bytesToRead;
                while((bytesToRead = in.read(buffer)) != -1) {
                    out.write(buffer, 0, bytesToRead);
                }
            }
        }
    }

    //使用NIO实现的文件拷贝
    public static void fileCopyNIO(String source, String target) throws IOException {
        try (FileInputStream in = new FileInputStream(source)) {
            try (FileOutputStream out = new FileOutputStream(target)) {
                FileChannel inChannel = in.getChannel();
                FileChannel outChannel = out.getChannel();
                ByteBuffer buffer = ByteBuffer.allocate(4096);
                while(inChannel.read(buffer) != -1) {
                    buffer.flip();
                    outChannel.write(buffer);
                    buffer.clear();
                }
            }
        }
    }
}
关于第二篇文章,参考我文章类表中有关java NIO或Buffer.flips()的有关内容。
注意:上面用到Java 7的TWR(try-with-resources AutoCloseable),使用TWR后可以不用在finally中释放外部资源 ,从而让代码更加优雅。
4.写一个方法,输入一个文件名和一个字符串,统计这个字符串在这个文件中出现的次数。
答:代码如下:
import java.io.BufferedReader;
import java.io.FileReader;

//文件中单词计数工具类
public class CountWordInFileUtil {

    // 工具类中的方法都是静态方式访问的因此将构造器私有不允许创建对象(绝对好习惯)
     private CountWordInFileUtil() {
         throw new AssertionError();
     }

     public static int countWordInFile(String filename, String word) {
         int counter = 0;
         try (FileReader fr = new FileReader(filename)) {
             try (BufferedReader br = new BufferedReader(fr)) {
                 String line = null;
                 while ((line = br.readLine()) != null) {
                     int index = -1;
                     while (line.length() >= word.length() && (index = line.indexOf(word)) >= 0) {
                         counter++;
                         line = line.substring(index + word.length());
                     }
                 }
             }
         } catch (Exception ex) {
            ex.printStackTrace();
        }
         return counter;
     }
}
5.如何用Java代码列出一个目录下所有的文件?
答:
如果只要求列出当前文件夹下的文件,代码如下所示:
import java.io.File;

public class FilesInDirectoryTest {

    public static void main (String[] args) {
        File file = new File("/Users");
        for (File temp : file.listFiles()) {
            if (temp.isFile()) {
                System.out.println(temp.getName());
            }
        }
    }
}
如果需要对文件夹继续展开,代码如下所示:
import java.io.File;

public class FilesInDirectoryTest1 {

    public static void main(String[] args) {
        showDirectory(new File("/Users"));
    }

    public static void showDirectory(File f) {
        _walkDirectory(f, 0);
    }

    private static void _walkDirectory(File f, int level) {
        if(f.isDirectory()) {
            for(File temp : f.listFiles()) {
                _walkDirectory(temp, level + 1);
            }
        }
        else {
            for(int i = 0; i < level - 1; i++) {
                System.out.print("\t");
            }
            System.out.println(f.getName());
        }
    }
}
在Java 7中可以使用NIO.2的API来做同样的事情,代码如下所示:
import java.io.IOException;
import java.nio.file.attribute.BasicFileAttributes;
import java.nio.file.FileVisitResult;
import java.nio.file.Files;
import java.nio.file.Path;
import java.nio.file.Paths;
import java.nio.file.SimpleFileVisitor;

public class FilesInDirectoryTest3 {

    public static void main(String[] args) throws IOException {
        Path initPath = Paths.get("/Users/xudong/Documents/books");
        Files.walkFileTree(initPath, new SimpleFileVisitor<Path>() {

            @Override
            public FileVisitResult visitFile(Path file, BasicFileAttributes attrs)
                    throws IOException {
                System.out.println(file.getFileName().toString());
                return FileVisitResult.CONTINUE;
            }
        });
    }
}
6.用Java的套接字编程实现一个多线程的回显(echo)服务器。
答:
import java.io.BufferedReader;
import java.io.IOException;
import java.io.InputStreamReader;
import java.io.PrintWriter;
import java.net.ServerSocket;
import java.net.Socket;

public class EchoServer {

    private static final int ECHO_SERVER_PORT = 6789;

    public static void main(String[] args) {
        try(ServerSocket server = new ServerSocket(ECHO_SERVER_PORT)) {
            System.out.println("服务器已经启动...");
            while(true) {
                Socket client = server.accept();
                new Thread(new ClientHandler(client)).start();
            }
        } catch (IOException e) {
            e.printStackTrace();
        }
    }

    private static class ClientHandler implements Runnable {
        private Socket client;

        public ClientHandler(Socket client) {
            this.client = client;
        }

        @Override
        public void run() {
            try(BufferedReader br = new BufferedReader(new InputStreamReader(client.getInputStream()));
                    PrintWriter pw = new PrintWriter(client.getOutputStream())) {
                String msg = br.readLine();
                System.out.println("收到" + client.getInetAddress() + "发送的: " + msg);
                pw.println(msg);
                pw.flush();
            } catch(Exception ex) {
                ex.printStackTrace();
            } finally {
                try {
                    client.close();
                } catch (IOException e) {
                    e.printStackTrace();
                }
            }
        }
    }
}
注意:上面的代码使用了Java 7的TWR语法,由于很多外部资源类都间接的实现了AutoCloseable接口(单方法回调接口),因此可以利用TWR语法在try结束的时候通过回调的方式自动调用外部资源类的close()方法,避免书写冗长的finally代码块。此外,上面的代码用一个静态内部类实现线程的功能,使用多线程可以避免一个用户I/O操作所产生的中断影响其他用户对服务器的访问,简单的说就是一个用户的输入操作不会造成其他用户的阻塞。当然,上面的代码使用线程池可以获得更好的性能,因为频繁的创建和销毁线程所造成的开销也是不可忽视的。
下面是一段回显客户端测试代码:
import java.io.BufferedReader;
import java.io.InputStreamReader;
import java.io.PrintWriter;
import java.net.Socket;
import java.util.Scanner;

public class EchoClient {

    public static void main(String[] args) throws Exception {
        Socket client = new Socket("localhost", 6789);
        Scanner sc = new Scanner(System.in);
        System.out.print("请输入内容: ");
        String msg = sc.nextLine();
        sc.close();
        PrintWriter pw = new PrintWriter(client.getOutputStream());
        pw.println(msg);
        pw.flush();
        BufferedReader br = new BufferedReader(new InputStreamReader(client.getInputStream()));
        System.out.println(br.readLine());
        client.close();
    }
}
如果希望用NIO的多路复用套接字实现服务器,代码如下所示。NIO的操作虽然带来了更好的性能,但是有些操作是比较底层的,对于初学者来说还是有些难于理解。
import java.io.IOException;
import java.net.InetSocketAddress;
import java.nio.ByteBuffer;
import java.nio.CharBuffer;
import java.nio.channels.SelectionKey;
import java.nio.channels.Selector;
import java.nio.channels.ServerSocketChannel;
import java.nio.channels.SocketChannel;
import java.util.Iterator;

public class EchoServerNIO {

    private static final int ECHO_SERVER_PORT = 6789;
    private static final int ECHO_SERVER_TIMEOUT = 5000;
    private static final int BUFFER_SIZE = 1024;

    private static ServerSocketChannel serverChannel = null;
    private static Selector selector = null;    // 多路复用选择器
    private static ByteBuffer buffer = null;    // 缓冲区

    public static void main(String[] args) {
        init();
        listen();
    }

    private static void init() {
        try {
            serverChannel = ServerSocketChannel.open();
            buffer = ByteBuffer.allocate(BUFFER_SIZE);
            serverChannel.socket().bind(new InetSocketAddress(ECHO_SERVER_PORT));
            serverChannel.configureBlocking(false);
            selector = Selector.open();
            serverChannel.register(selector, SelectionKey.OP_ACCEPT);
        } catch (Exception e) {
            throw new RuntimeException(e);
        }
    }

    private static void listen() {
        while (true) {
            try {
                if (selector.select(ECHO_SERVER_TIMEOUT) != 0) {
                    Iterator<SelectionKey> it = selector.selectedKeys().iterator();
                    while (it.hasNext()) {
                        SelectionKey key = it.next();
                        it.remove();
                        handleKey(key);
                    }
                }
            } catch (Exception e) {
                e.printStackTrace();
            }
        }
    }

    private static void handleKey(SelectionKey key) throws IOException {
        SocketChannel channel = null;

        try {
            if (key.isAcceptable()) {
                ServerSocketChannel serverChannel = (ServerSocketChannel) key.channel();
                channel = serverChannel.accept();
                channel.configureBlocking(false);
                channel.register(selector, SelectionKey.OP_READ);
            } else if (key.isReadable()) {
                channel = (SocketChannel) key.channel();
                buffer.clear();
                if (channel.read(buffer) > 0) {
                    buffer.flip();
                    CharBuffer charBuffer = CharsetHelper.decode(buffer);
                    String msg = charBuffer.toString();
                    System.out.println("收到" + channel.getRemoteAddress() + "的消息:" + msg);
                    channel.write(CharsetHelper.encode(CharBuffer.wrap(msg)));
                } else {
                    channel.close();
                }
            }
        } catch (Exception e) {
            e.printStackTrace();
            if (channel != null) {
                channel.close();
            }
        }
    }
}
import java.nio.ByteBuffer;
import java.nio.CharBuffer;
import java.nio.charset.CharacterCodingException;
import java.nio.charset.Charset;
import java.nio.charset.CharsetDecoder;
import java.nio.charset.CharsetEncoder;
public final class CharsetHelper {
private static final String UTF_8 = "UTF-8";
private static CharsetEncoder encoder = Charset.forName(UTF_8).newEncoder();
private static CharsetDecoder decoder = Charset.forName(UTF_8).newDecoder();
private CharsetHelper() {
}
public static ByteBuffer encode(CharBuffer in) throws CharacterCodingException{
return encoder.encode(in);
}
public static CharBuffer decode(ByteBuffer in) throws CharacterCodingException{
return decoder.decode(in);
}
}


 1505
1505


 被折叠的 条评论
为什么被折叠?


