


今天要跟大家分享的是两种自定义UITableViewCell方法。
一、首先看看效果
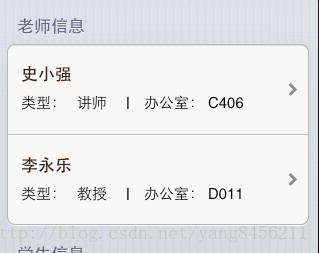
1)第一种是通过nib文件加载的方式,在UITableView里面添加自定义的Cell。
2)第二种是代码里面自定义Cell的形式。
两种方式各有各的优点,根据不同的情况进行选择即可。
二、建立项目
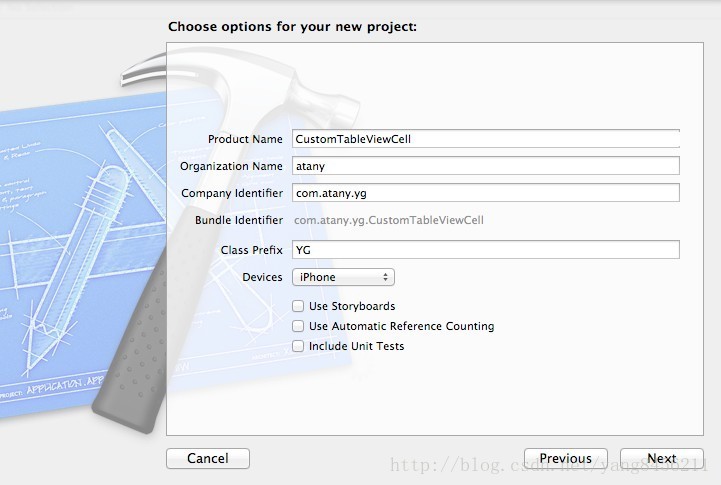
1)建立SingleView项目,命名为CustomTableViewCell。
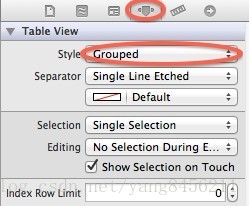
2)完成nib文件配置,View中只有一个UITableView控件,就是我们将要显示的表视图了。
设置style为Grouped,因为我们要把两种自定义Cell的方法用不同的分区显示。

别忘记配置表的代理,在此就不赘述了,有疑问的看看demo就懂了。
三、使用nib文件自定义Cell
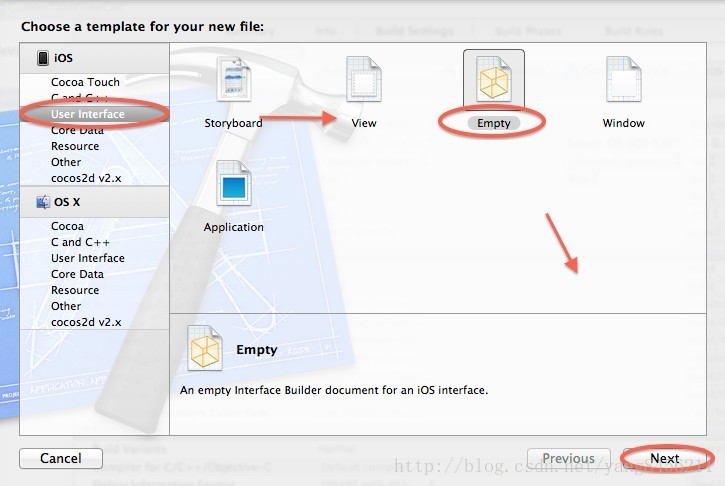
1)建立自定义Cell的nib文件,在New File里面选择UserInterface中的Empty,取名为CustomCell。
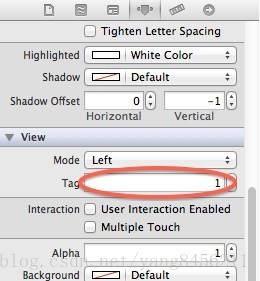
2)接着,拉出6个label,摆出如下图所示(当然你可以自由发挥),注意中间的”|”也是一个label。为了能够在代码中找到Cell里面的控件,我们还需要设置label的Tag标记。(写死的label就不用了,例如“类型:”)。

设置Tag:
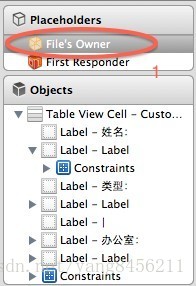
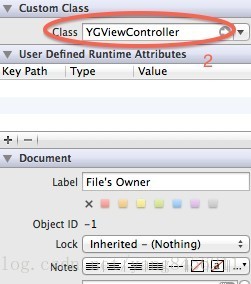
3)拖完控件之后,我们需要设置nib文件的控制器,修改File’s Owner的Class为YGViewController(对应自己程序中的表视图控制器),点击File’s Owner,然后在身份检查器中输入YGViewController。
注:一个控制器是可以加载多个nib文件的,这里我们的YGViewController就加载了YGViewController.nib和CustomCell.nib两个文件。
只要配置好输出口和操作的链接,我们就能有条不紊的对多个nib进行操作了。下面设定CustomCell.nib的输出口,取名teaCell。
- @property (retain, nonatomic) IBOutlet UITableViewCell *teaCell;
4)关键代码讲解
YGAViewController.h
- #import <UIKit/UIKit.h>
- #import <QuartzCore/QuartzCore.h>
- //学生
- #define nameTag 1
- #define classTag 2
- #define stuNumberTag 3
- #define imageTag 4
- #define nameFontSize 15
- #define fontSize 12
- //老师,对应的nib文件里面label的tag
- #define teaNameTag 1
- #define teaTypeTag 2
- #define teaOfficeTag 3
- @interface YGViewController : UIViewController <UITableViewDelegate,UITableViewDataSource>
- @property (retain,nonatomic) NSArray *stuArray;//学生资料
- @property (retain,nonatomic) NSArray *teaArray;//老师资料
- @property (retain, nonatomic) IBOutlet UITableViewCell *teaCell;
- @end
YGAViewController.m
初始化数据:
- //初始化老师数据
- NSDictionary *tDic1 = [[NSDictionary alloc]initWithObjectsAndKeys:@"史小强",@"name",@"讲师",@"type", @"C406", @"office",nil];
- NSDictionary *tDic2 = [[NSDictionary alloc]initWithObjectsAndKeys:@"李永乐",@"name",@"教授",@"type", @"D011", @"office",nil];
- _teaArray = [[NSArray alloc]initWithObjects:tDic1,tDic2, nil];
Cell的生成方法,此时section等于2,调用customCellByXib方法:
- - (UITableViewCell *)tableView:(UITableView *)tableView cellForRowAtIndexPath:(NSIndexPath *)indexPath{
- UITableViewCell *cell;
- if([indexPath section] == 1){
- //通过代码自定义cell
- cell = [self customCellWithOutXib:tableView withIndexPath:indexPath];
- }
- else{
- //通过nib自定义cell
- cell = [self customCellByXib:tableView withIndexPath:indexPath];
- }
- assert(cell != nil);
- return cell;
- }
- //通过nib文件自定义cell
- -(UITableViewCell *)customCellByXib:(UITableView *)tableView withIndexPath:(NSIndexPath *)indexPath{
- static NSString *customXibCellIdentifier = @"CustomXibCellIdentifier";//建立标志符
- UITableViewCell *cell = [tableView dequeueReusableCellWithIdentifier:customXibCellIdentifier];
- if(cell == nil){
- NSArray *nib = [[NSBundle mainBundle]loadNibNamed:@"CustomCell" owner:self options:nil];//加载nib文件
- if([nib count]>0){
- cell = _teaCell;
- }
- else{
- assert(NO);//读取文件失败
- }
- }
- NSUInteger row = [indexPath row];//获得当前行
- NSDictionary *dic = [_teaArray objectAtIndex:row];//对应行的数据
- //姓名
- ((UILabel *)[cell.contentView viewWithTag:teaNameTag]).text = [dic objectForKey:@"name"];
- //类型
- ((UILabel *)[cell.contentView viewWithTag:teaTypeTag]).text = [dic objectForKey:@"type"];
- //办公室
- ((UILabel *)[cell.contentView viewWithTag:teaOfficeTag]).text = [dic objectForKey:@"office"];
- return cell;
- }
四、在代码里面自定义cell
配置的步骤和上面一样,主要区别在于需要自己自定义控件来是实现cell。
YGAViewController.m
数据:
- //初始化学生数据(class,name,stuNumber,image)
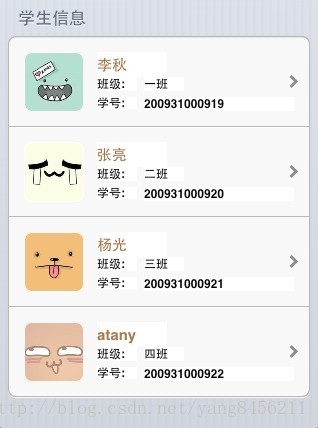
- NSDictionary *dic1 = [[NSDictionary alloc]initWithObjectsAndKeys:@"一班",@"class",@"李秋",@"name",@"200931000919",@"stuNumber",@"1.jpg",@"image",nil];
- NSDictionary *dic2 = [[NSDictionary alloc]initWithObjectsAndKeys:@"二班",@"class",@"张亮",@"name",@"200931000920",@"stuNumber",@"2.jpg",@"image",nil];
- NSDictionary *dic3 = [[NSDictionary alloc]initWithObjectsAndKeys:@"三班",@"class",@"杨光",@"name",@"200931000921",@"stuNumber",@"3.jpg",@"image",nil];
- NSDictionary *dic4 = [[NSDictionary alloc]initWithObjectsAndKeys:@"四班",@"class",@"atany",@"name",@"200931000922",@"stuNumber",@"4.jpg",@"image",nil];
- _stuArray = [[NSArray alloc]initWithObjects:dic1, dic2, dic3, dic4, nil];
自定义Cell:
- -(UITableViewCell *)customCellWithOutXib:(UITableView *)tableView withIndexPath:(NSIndexPath *)indexPath{
- //定义标识符
- static NSString *customCellIndentifier = @"CustomCellIndentifier";
- UITableViewCell *cell = [tableView dequeueReusableCellWithIdentifier:customCellIndentifier];
- //定义新的cell
- if(cell == nil){
- //使用默认的UITableViewCell,但是不使用默认的image与text,改为添加自定义的控件
- cell = [[UITableViewCell alloc]initWithStyle:UITableViewCellStyleDefault reuseIdentifier:customCellIndentifier];
- //姓名
- CGRect nameRect = CGRectMake(88, 15, 70, 25);
- UILabel *nameLabel = [[UILabel alloc]initWithFrame:nameRect];
- nameLabel.font = [UIFont boldSystemFontOfSize:nameFontSize];
- nameLabel.tag = nameTag;//设置tag,以便后面的定位
- nameLabel.textColor = [UIColor brownColor];
- [cell.contentView addSubview:nameLabel];
- //班级
- CGRect classTipRect = CGRectMake(88, 40, 40, 14);
- UILabel *classTipLabel = [[UILabel alloc]initWithFrame:classTipRect];
- classTipLabel.text = @"班级:";
- classTipLabel.font = [UIFont boldSystemFontOfSize:fontSize];
- [cell.contentView addSubview:classTipLabel];
- CGRect classRect = CGRectMake(135, 40, 40, 14);
- UILabel *classLabel = [[UILabel alloc]initWithFrame:classRect];
- classLabel.tag = classTag;
- classLabel.font = [UIFont boldSystemFontOfSize:fontSize];
- [cell.contentView addSubview:classLabel];
- //学号
- CGRect stuNameTipRect = CGRectMake(88, 60, 40, 12);
- UILabel *stuNameTipLabel = [[UILabel alloc]initWithFrame:stuNameTipRect];
- stuNameTipLabel.text = @"学号:";
- stuNameTipLabel.font = [UIFont boldSystemFontOfSize:fontSize];
- [cell.contentView addSubview:stuNameTipLabel];
- CGRect stuNameRect = CGRectMake(135, 60, 150, 14);
- UILabel *stuNameLabel = [[UILabel alloc]initWithFrame:stuNameRect];
- stuNameLabel.tag = stuNumberTag;
- stuNameLabel.font = [UIFont boldSystemFontOfSize:fontSize];
- [cell.contentView addSubview:stuNameLabel];
- //图片
- CGRect imageRect = CGRectMake(15, 15, 60, 60);
- UIImageView *imageView = [[UIImageView alloc]initWithFrame:imageRect];
- imageView.tag = imageTag;
- //为图片添加边框
- CALayer *layer = [imageView layer];
- layer.cornerRadius = 8;//角的弧度
- layer.borderColor = [[UIColor whiteColor]CGColor];
- layer.borderWidth = 1;//边框宽度
- layer.masksToBounds = YES;//图片填充边框
- [cell.contentView addSubview:imageView];
- }
- //获得行数
- NSUInteger row = [indexPath row];
- //取得相应行数的数据(NSDictionary类型,包括姓名、班级、学号、图片名称)
- NSDictionary *dic = [_stuArray objectAtIndex:row];
- //设置图片
- UIImageView *imageV = (UIImageView *)[cell.contentView viewWithTag:imageTag];
- imageV.image = [UIImage imageNamed:[dic objectForKey:@"image"]];
- //设置姓名
- UILabel *name = (UILabel *)[cell.contentView viewWithTag:nameTag];
- name.text = [dic objectForKey:@"name"];
- //设置班级
- UILabel *class = (UILabel *)[cell.contentView viewWithTag:classTag];
- class.text = [dic objectForKey:@"class"];
- //设置学号
- UILabel *stuNumber = (UILabel *)[cell.contentView viewWithTag:stuNumberTag];
- stuNumber.text = [dic objectForKey:@"stuNumber"];
- //设置右侧箭头
- cell.accessoryType = UITableViewCellAccessoryDisclosureIndicator;
- return cell;
- }
1、在cell=nil里面摆好控件的位置,设置好相应的tag,然后在设置数据时,通过cell.contentViewviewWithTag:Tag 的形式定位到对应的Cell里面的tag。
2、通过NSUInteger row = [indexPath row]的到当前是哪一行,NSDictionary *dic = [_stuArrayobjectAtIndex:row];得到那一行的数据。
demo下载地址:http://download.csdn.net/detail/yang8456211/6409667
【传送门】想系统学习UITableView SDK代理方法可以看这篇文章:UITableView SDK委托方法详解
http://blog.csdn.net/yang8456211/article/details/12908429
杨光(atany)原创,转载请注明博主与博文链接,未经博主允许,禁止任何商业用途。
博文地址:http://blog.csdn.net/yang8456211/article/details/12790487
博客地址:http://blog.csdn.net/yang8456211
—— by atany
本文遵循“ 署名-非商业用途-保持一致”创作公用协议


 1680
1680

 被折叠的 条评论
为什么被折叠?
被折叠的 条评论
为什么被折叠?
 到【灌水乐园】发言


