


 本文记录了在Linux环境下搭建Redis主从和哨兵系统的详细步骤,包括环境准备、Redis安装、主从配置、哨兵配置以及故障转移和数据恢复的测试。通过实践,作者强调了使用桥接网卡模式、避免单一哨兵和设置合理的故障转移策略的重要性。
1.先准备环境
家里的万年老爷机(120G的SSD,300G硬盘 ),手机热点下载,所以只能少利用空间资源,用virtualBox装centos7纯净版
其中要点:
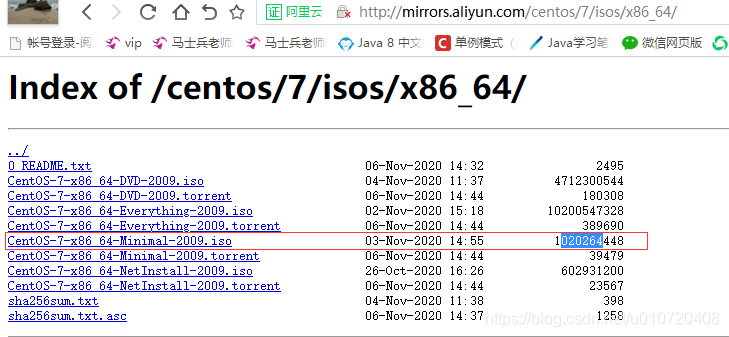
1.virtualbox创建新机要用动态分配的虚拟磁盘(我选的默认8G),virtual就300M并没有自带的linux,需要去下载centos7的镜像文件,最小版的大概1G,
个人用阿里云镜像站点更快:http://mirrors.aliyun.com/centos/7/isos/x86_64/
附官网的:http://isoredirect.centos.org/centos/7.4.1708/isos/x86_64/
(可以根据网址,改写url,一个个找自己的版本)
我是受够了公司低配外网老爷机机(4G内存+100G硬盘)centos可视化界面老崩,(吐槽公司外网机window无权限,linux只装centos居然还卡权限)
真心建议不要在centos完可视化,老老实实window/mac os工具生态丰富,linux上就命令行就行了。我在公司外网是要浏览器查资料+需要适当自住权限装软件测试代码(传统金融卡太严了:),太痛苦了。
2. 然后一路点点记得设置root账户密码,安全考虑应当封闭root账户远程登录,开启另外的账户远程登录权限,安全考虑ssh应当更改port,当然了学习阶段设置密码就行,被当作肉鸡了,“大侠再来一遍”就行。
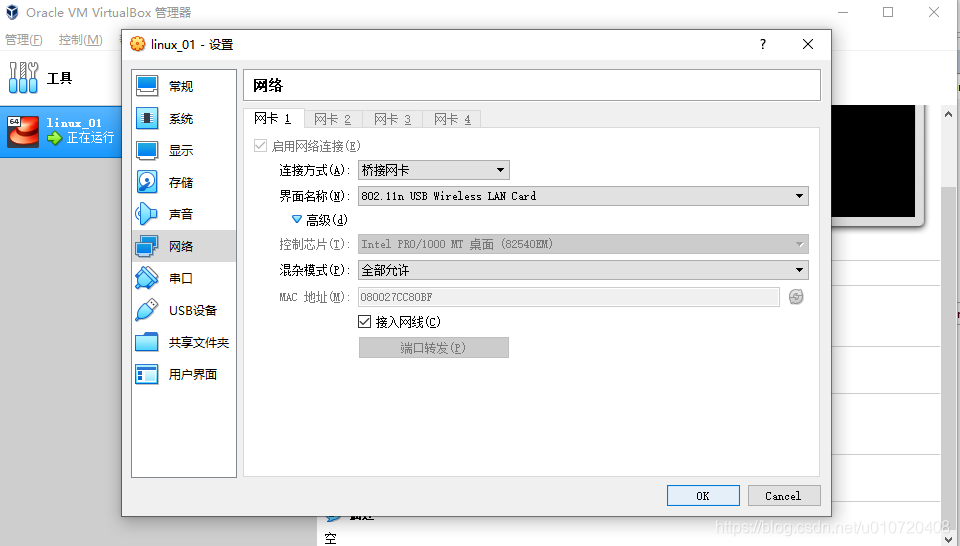
3. 最后网络建议简单点就是使用 桥接网卡Adapter,就是跟台机/笔记本是同一个网段 共用的一个路由器,直接访问外网;
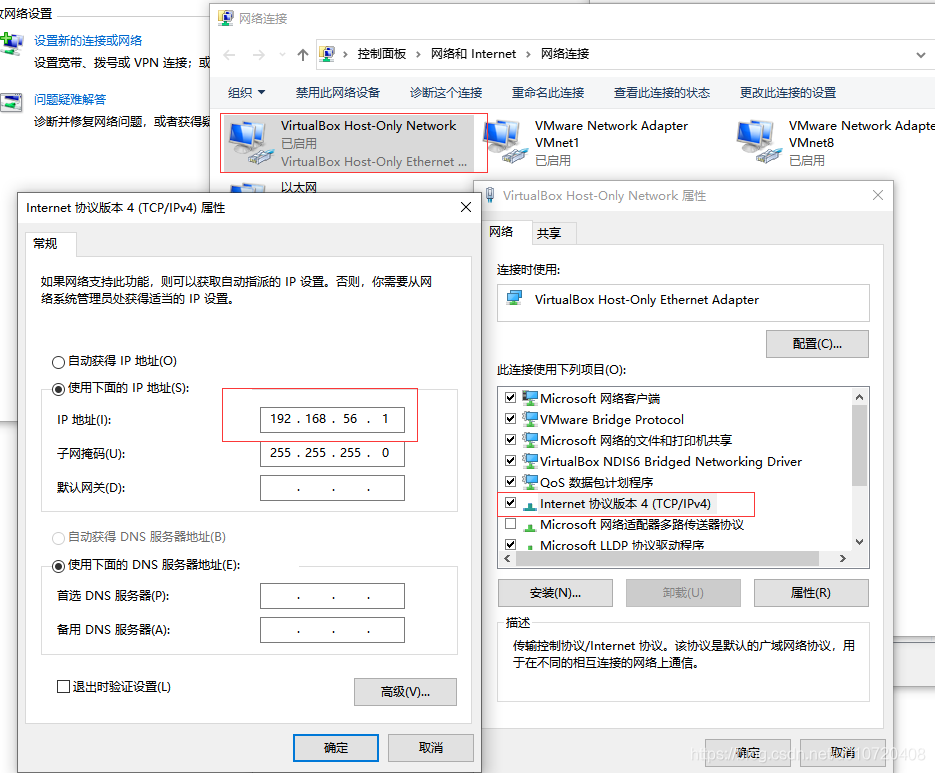
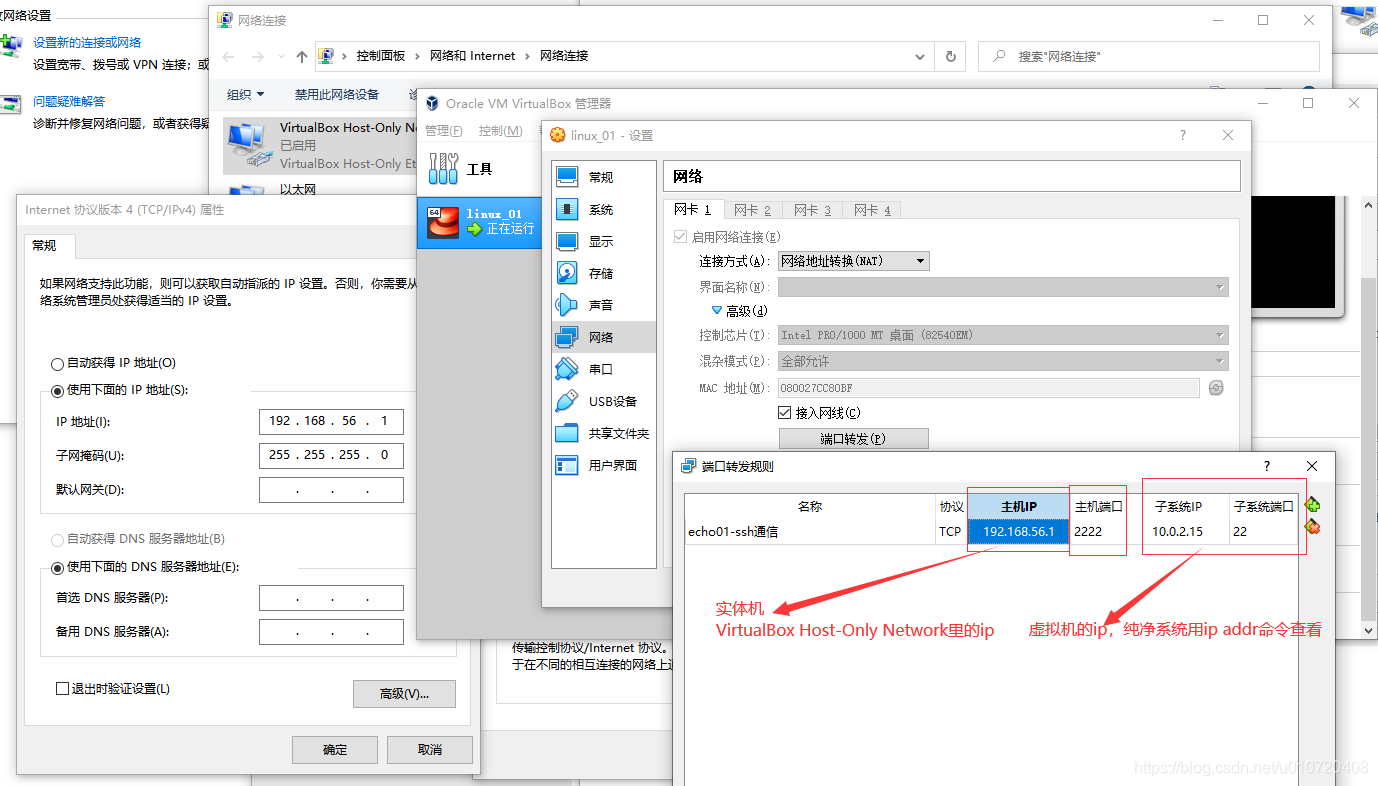
如果是NAT转发接口,那么就是通过虚拟出来的,是VirtulaBox Host-Only Network虚拟网卡下的局域网电脑,与主机无法直接互相ping通。需要通过这个VirtulaBox Host-Only Network来进行转发,才能互通有无,虚拟机中的电脑才能访问外网,配置很麻烦,但是会更安全,因为黑客要进来要层层剥开
非要配置NAT,比如实体机怎么ssh到虚拟机呢?
配置virtualBox网络转发:
(下面这张图,是我桥接网卡模式下的ip,不一样了,我懒得停了重启搞了麻烦)

最后,“NAT网卡转发”,下用 ssh user@主机IP -p 主机端口, 就会根据配置单端口转发规则,转到子系统Ip 和子系统端口去;
这个样子实在是麻烦,我要是访问外网,还得配80 443 脑壳疼,还是桥接模式吧,垃圾个人电脑,爱黑黑,大不了“大侠请重新来过”
2. 开始搭建redis
直接参考官网搭建:https://redis.io/download
也可以看中文网站:http://www.redis.cn/download.html 好几个不同域名的中文网站
详细参考:https://www.cnblogs.com/heqiuyong/p/10463334.html
就是,下载,解压,make编译,
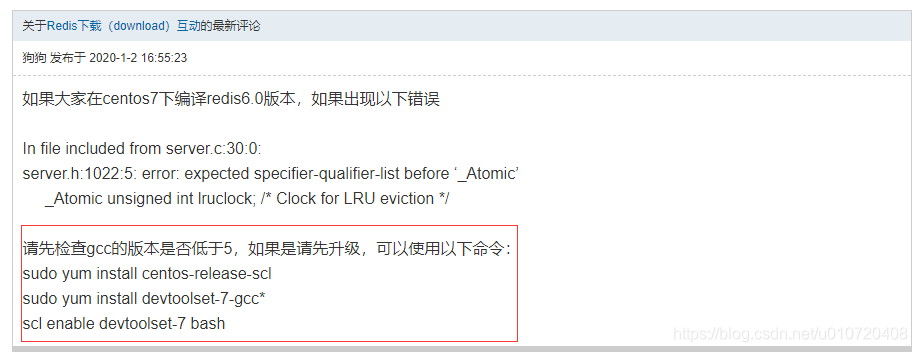
听我的,网络不好,千万不要安装6.0以上,因为需要gcc 5.3 以上,centos7的是4.8需要装devtools 7以上,用该工具升级,yum升级不了,,我手机热点,翻墙,怎么也找不到官方的devtools离线包,索性放弃了。用redis5了
安装后记得 配置环境变量 vi /etc/profile 具体要看安装目录: export PATH=/usr/local/redis/bin/:$PATH
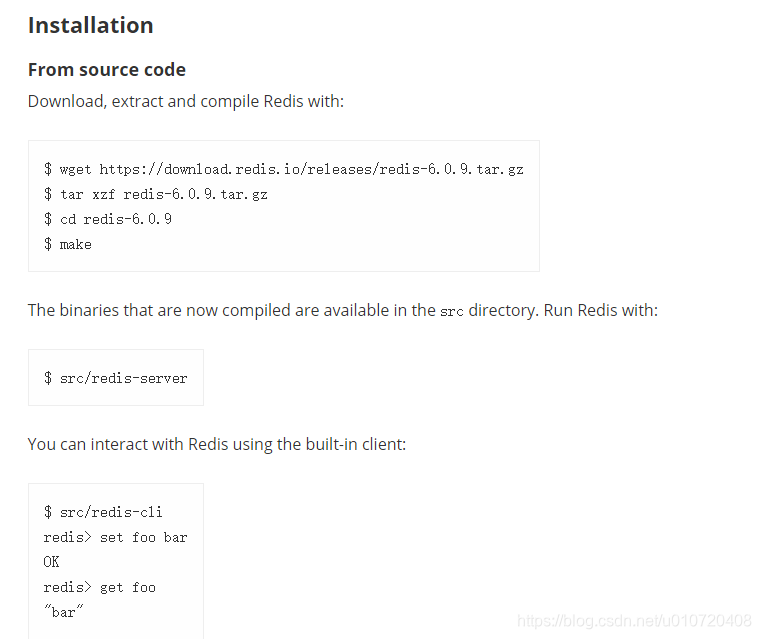
这个6.0及以上redis版本,怎么都搞不定,我就换成5.0版本了
配置文件 参考:https://www.redis.com.cn/linux-install-redis.html
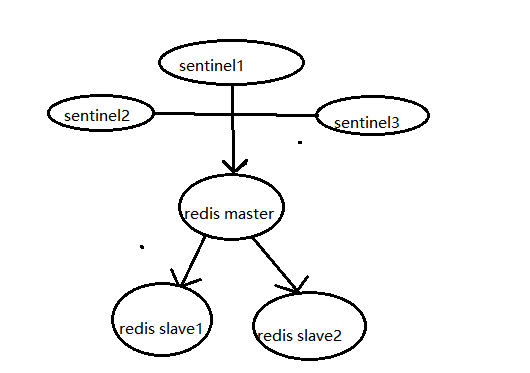
3 redis主从+哨兵
参考:https://www.cnblogs.com/qinxu/p/9633418.html
https://www.cnblogs.com/leeSmall/p/8398401.html
大概就是如下模式:(这个也不是很对但是配置上形象一点,多个sentinel监控的是整个集群,master挂了,sentinel投票选一个sentinel来负责故障转移,然后选出来sentinel来决定那个slave升级为master)
简要流程:复制redis.conf文件 redis_master_7001.conf
修改端口port 7001,修改log文件,修改工作目录dir,修改持久化save,修改持久化rdb的文件名,修改持久化aof的文件名,修改redis读写密码authpass 修改redis主从复制的验证密码requirepass【两个密码最好一致免得混乱,sentinel哨兵中也有说需要两个密码一致】,修改优先级 slave-priority 【故障转移中哨兵优先选择优先级小的作为新master主节点】
然后复制 redis_master_7001.conf 为redis_slave_7002.conf文件
修改port 7002,【修改replicaof 原来的可能叫slaveof,可能因为国外防种族歧视,改为replica了】修改log文件,修改工作目录dir,修改持久化save,修改持久化rdb的文件名,修改持久化aof的文件名,修改redis读写密码authpass 修改redis主从复制的验证密码requirepass,修改优先级 slave-priority
然后有复制修改为 redis_slave_7003.conf文件
再来复制修改sentinel.conf文件,
先修改一份port 71001,
修改监听主节点:sentinel monitor mymaster 127.0.0.1 7001 2 #表示大于等于两个slave觉得它挂了就是挂了
修改通讯密码: sentinel auth-pass mymaster 12345678 //连接主节点时的密码
其它的也是修改 log文件,还有一个是故障转移启动脚本、通知客户端的配置。
然后复制刚才的conf文件,修改port、修改log等相关设置文件名
master_conf样例:(slave就是多一个replicaof 或者slaveof 找谁复制,然后是否开启只读)
# Redis configuration file example.
#
# Note that in order to read the configuration file, Redis must be
# started with the file path as first argument:
#
# ./redis-server /path/to/redis.conf

# Note on units: when memory size is needed, it is possible to specify
# it in the usual form of 1k 5GB 4M and so forth:
#
# 1k => 1000 bytes
# 1kb => 1024 bytes
# 1m => 1000000 bytes
# 1mb => 1024*1024 bytes
# 1g => 1000000000 bytes
# 1gb => 1024*1024*1024 bytes
#
# units are case insensitive so 1GB 1Gb 1gB are all the same.

################################## INCLUDES ###################################

# Include one or more other config files here.  This is useful if you
# have a standard template that goes to all Redis servers but also need
# to customize a few per-server settings.  Include files can include
# other files, so use this wisely.
#
# Notice option "include" won't be rewritten by command "CONFIG REWRITE"
# from admin or Redis Sentinel. Since Redis always uses the last processed
# line as value of a configuration directive, you'd better put includes
# at the beginning of this file to avoid overwriting config change at runtime.
#
# If instead you are interested in using includes to override configuration
# options, it is better to use include as the last line.
#
# include /path/to/local.conf
# include /path/to/other.conf

################################## MODULES #####################################

# Load modules at startup. If the server is not able to load modules
# it will abort. It is possible to use multiple loadmodule directives.
#
# loadmodule /path/to/my_module.so
# loadmodule /path/to/other_module.so

################################## NETWORK #####################################

# By default, if no "bind" configuration directive is specified, Redis listens
# for connections from all the network interfaces available on the server.
# It is possible to listen to just one or multiple selected interfaces using
# the "bind" configuration directive, followed by one or more IP addresses.
#
# Examples:
#
# bind 192.168.1.100 10.0.0.1
# bind 127.0.0.1 ::1
#
# ~~~ WARNING ~~~ If the computer running Redis is directly exposed to the
# internet, binding to all the interfaces is dangerous and will expose the
# instance to everybody on the internet. So by default we uncomment the
# following bind directive, that will force Redis to listen only into
# the IPv4 loopback interface address (this means Redis will be able to
# accept connections only from clients running into the same computer it
# is running).
#
# IF YOU ARE SURE YOU WANT YOUR INSTANCE TO LISTEN TO ALL THE INTERFACES
# JUST COMMENT THE FOLLOWING LINE.
# ~~~~~~~~~~~~~~~~~~~~~~~~~~~~~~~~~~~~~~~~~~~~~~~~~~~~~~~~~~~~~~~~~~~~~~~~
bind 127.0.0.1

# Protected mode is a layer of security protection, in order to avoid that
# Redis instances left open on the internet are accessed and exploited.
#
# When protected mode is on and if:
#
# 1) The server is not binding explicitly to a set of addresses using the
#    "bind" directive.
# 2) No password is configured.OF文件时,如果启用下面的选项,则文件每生成32M数据会被同步
#
# The server only accepts connections from clients connecting from the
# IPv4 and IPv6 loopback addresses 127.0.0.1 and ::1, and from Unix domain
# sockets.
#
# By default protected mode is enabled. You should disable it only if
# you are sure you want clients from other hosts to connect to Redis
# even if no authentication is configured, nor a specific set of interfaces
# are explicitly listed using the "bind" directive.
protected-mode yes

# Accept connections on the specified port, default is 6379 (IANA #815344).
# If port 0 is specified Redis will not listen on a TCP socket.
# 监听端口 default 6379
port 7001#

# TCP listen() backlog.
#
# In high requests-per-second environments you need an high backlog in order
# to avoid slow clients connections issues. Note that the Linux kernel
# will silently truncate it to the value of /proc/sys/net/core/somaxconn so
# make sure to raise both the value of somaxconn and tcp_max_syn_backlog
# in order to get the desired effect.
# TCP接收队列长度,受/proc/sys/net/core/somaxconn和tcp_max_syn_backlog这两个内核参数影响 default 511
tcp-backlog 511

# Unix socket.
#
# Specify the path for the Unix socket that will be used to listen for
# incoming connections. There is no default, so Redis will not listen
# on a unix socket when not specified.
#
# unixsocket /tmp/redis.sock
# unixsocketperm 700

# Close the connection after a client is idle for N seconds (0 to disable)
# 一个客户端空闲多少秒后关闭连接(0代表禁用,永不关闭) default 0禁用永不关闭
timeout 0

# TCP keepalive.
#
# If non-zero, use SO_KEEPALIVE to send TCP ACKs to clients in absence
# of communication. This is useful for two reasons:
#
# 1) Detect dead peers.
# 2) Take the connection alive from the point of view of network
#    equipment in the middle.
#
# On Linux, the specified value (in seconds) is the period used to send ACKs.
# Note that to close the connection the double of the time is needed.
# On other kernels the period depends on the kernel configuration.
#
# A reasonable value for this option is 300 seconds, which is the new
# Redis default starting with Redis 3.2.1.
# 如果非零,则设置SO_KEEPALIVE选项来向空闲连接的客户端发送ACk
tcp-keepalive 300

################################# GENERAL #####################################

# By default Redis does not run as a daemon. Use 'yes' if you need it.
# Note that Redis will write a pid file in /var/run/redis.pid when daemonized.
# 守护进程 default no
daemonize yes

# If you run Redis from upstart or systemd, Redis can interact with your
# supervision trpidfile /var/run/redis_6379.pidee. Options:
#   supervised no      - no supervision interaction
#   supervised upstart - signal upstart by putting Redis into SIGSTOP mode
#   supervised systemd - signal systemd by writing READY=1 to $NOTIFY_SOCKET
#   supervised auto    - detect upstart or systemd method based on
#                        UPSTART_JOB or NOTIFY_SOCKET environment variables
# Note: these supervision methods only signal "process is ready."
#       They do not enable continuous liveness pings back to your supervisor.
supervised no

# If a pid file is specified, Redis writes it where specified at startup
# and removes it at exit.
#
# When the server runs non daemonized, no pid file is created if none is
# specified in the configuration. When the server is daemonized, the pid file
# is used even if not specified, defaulting to "/var/run/redis.pid".
#
# Creating a pid file is best effort: if Redis is not able to create it
# nothing bad happens, the server will start and run normally.
#pidfile /var/run/redis_6379.pid
pidfile /var/run/redis_master_7001.pid

# Specify the server verbosity level. 指定服务器调试等级
# This can be one of: 可能值:
# debug (a lot of information, useful for development/testing) (大量信息,对开发/测试有用)
# verbose (many rarely useful info, but not a mess like the debug level) (很多精简的有用信息,但是不像debug等级那么多)
# notice (moderately verbose, what you want in production probably) (适量的信息,基本上是你生产环境中需要的)
# warning (only very important / critical messages are logged) (只有很重要/很严重的信息会记录下来)
loglevel notice

# Specify the log file name. Also the empty string can be used to force
# Redis to log on the standard output. Note that if you use standard
# output for logging but daemonize, logs will be sent to /dev/null
# 指明日志文件名
logfile "/var/log/redis/redis_master_7001.log"

# To enable logging to the system logger, just set 'syslog-enabled' to yes,
# and optionally update the other syslog parameters to suit your needs.
# syslog-enabled no

# Specify the syslog identity.
# syslog-ident redis

# Specify the syslog facility. Must be USER or between LOCAL0-LOCAL7.
# syslog-facility local0

# Set the number of databases. The default database is DB 0, you can select
# a different one on a per-connection basis using SELECT <dbid> where
# dbid is a number between 0 and 'databases'-1
# 设置数据库个数的上限 默认16个,但是建议生产中都是使用多个实例,而不是多个数据库,都是对key进行命名管理,不会去弄多个数据库的
databases 16

# By default Redis shows an ASCII art logo only when started to log to the
# standard output and if the standard output is a TTY. Basically this means
# that normally a logo is displayed only in interactive sessions.
#
# However it is possible to force the pre-4.0 behavior and always show a
# ASCII art logo in startup logs by setting the following option to yes.
always-show-logo yes

################################ SNAPSHOTTING  ################################
#
# Save the DB on disk:
#
#   save <seconds> <changes>
#
#   Will save the DB if both the given number of seconds and the given
#   number of write operations against the DB occurred.
#
#   In the example below the behaviour will be to save:
#   after 900 sec (15 min) if at least 1 key changed
#   after 300 sec (5 min) if at least 10 keys changed
#   after 60 sec if at least 10000 keys changed
#
#   Note: you can disable saving completely by commenting out all "save" lines.
#
#   It is also possible to remove all the previously configured save
#   points by adding a save directive with a single empty string argument
#   like in the following example:
#
#   save ""
# 会在指定秒数和数据变化次数之后把数据库写到磁盘上
# 900秒后,至少一次变更
save 900 1
# 300秒 至少10次变更
save 300 10
# 60秒 至少1000次变更
save 60 10000

# By default Redis will stop accepting writes if RDB snapshots are enabled
# (at least one save point) and the latest background save failed.
# This will make the user aware (in a hard way) that data is not persisting
# on disk properly, otherwise chances are that no one will notice and some
# disaster will happen.
#
# If the background saving process will start working again Redis will
# automatically allow writes again.
#
# However if you have setup your proper monitoring of the Redis server
# and persistence, you may want to disable this feature so that Redis will
# continue to work as usual even if there are problems with disk,
# permissions, and so forth.
# 默认如果开启RDB快照(至少一条save指令)并且最新的后台保存失败,Redis将会停止接受写操作
# 这将使用户知道数据没有正确的持久化到硬盘,否则可能没人注意到并且造成一些灾难
stop-writes-on-bgsave-error yes

# Compress string objects using LZF when dump .rdb databases?
# For default that's set to 'yes' as it's almost always a win.
# If you want to save some CPU in the saving child set it to 'no' but
# the dataset will likely be bigger if you have compressible values or keys.
# 当导出.rdb数据库时是否用LZF压缩字符串对象
rdbcompression yes

# Since version 5 of RDB a CRC64 checksum is placed at the end of the file.
# This makes the format more resistant to corruption but there is a performance
# hit to pay (around 10%) when saving and loading RDB files, so you can disable it
# for maximum performances.
#
# RDB files created with checksum disabled have a checksum of zero that will
# tell the loading code to skip the check.
# 版本5的RDB有一个CRC64算法的校验和放在了文件的最后,这将使文件格式更加可靠
rdbchecksum yes

# The filename where to dump the DB
# 持久化数据库的文件名 default dump.rdb
dbfilename "dump_master_7001.rdb"

# The working directory.
#
# The DB will be written inside this directory, with the filename specified
# above using the 'dbfilename' configuration directive.
#
# The Append Only File will also be created inside this directory.
#
# Note that you must specify a directory here, not a file name.
#dir ./
#工作目录
dir /opt/redis-5.0.10/conf/redis_master

################################# REPLICATION #################################

# Master-Replica replication. Use replicaof to make a Redis instance a copy of
# another Redis server. A few things to understand ASAP about Redis replication.
#
#   +------------------+      +---------------+
#   |      Master      | ---> |    Replica    |
#   | (receive writes) |      |  (exact copy) |
#   +------------------+      +---------------+
#
# 1) Redis replication is asynchronous, but you can configure a master to
#    stop accepting writes if it appears to be not connected with at least
#    a given number of replicas.
# 2) Redis replicas are able to perform a partial resynchronization with the
#    master if the replication link is lost for a relatively small amount of
#    time. You may want to configure the replication backlog size (see the next
#    sections of this file) with a sensible value depending on your needs.
# 3) Replication is automatic and does not need user intervention. After a
#    network partition replicas automatically try to reconnect to masters
#    and resynchronize with them.
#
# replicaof <masterip> <masterport>

# If the master is password protected (using the "requirepass" configuration
# directive below) it is possible to tell the replica to authenticate before
# starting the replication synchronization process, otherwise the master will
# refuse the replica request.
#
# 当master服务设置了密码保护时,slaver服务连接master的密码
# masterauth <master-password>
masterauth password@qq.com

# When a replica loses its connection with the master, or when the replication
# is still in progress, the replica can act in two different ways:
# 当一个slave失去和mater的连接,或者同步正在进行中,slave的行为可以有两种:
#
# 1) if replica-serve-stale-data is set to 'yes' (the default) the replica will
#    still reply to client requests, possibly with out of date data, or the
#    data set may just be empty if this is the first synchronization.
#    如果slave-serve-stale-data 设置为 "yes"(默认值),slave会继续响应客户端请求,
#    可能是正常数据,或者是过时了的数据,也可能是还没活得值的空数据

#
# 2) if replica-serve-stale-data is set to 'no' the replica will reply with
#    an error "SYNC with master in progress" to all the kind of commands
#    but to INFO, replicaOF, AUTH, PING, SHUTDOWN, REPLCONF, ROLE, CONFIG,
#    SUBSCRIBE, UNSUBSCRI
最低0.47元/天 解锁文章


 2578
2578

 被折叠的 条评论
为什么被折叠?
被折叠的 条评论
为什么被折叠?
 到【灌水乐园】发言


