


复习了一下spring, 接下来学习SpringMVC.
SpringMVC 是现在常用的MVC框架。
MVC框架的话,目前觉得是在探讨如何接受请求,如何根据请求找到控制器,在控制器中完成了核心业务后,怎么跳转到对应的地方…………总之就是使模型,视图,控制器和谐地工作。
之前毕设所使用的是struts2,配置一堆的action和result name等等,很繁杂。
SpringMVC 大量用注解,配置相对简单。
接下来以最经典的helloworld例子说明springMVC 的工作方式:
1.建动态web工程:springMVC1。
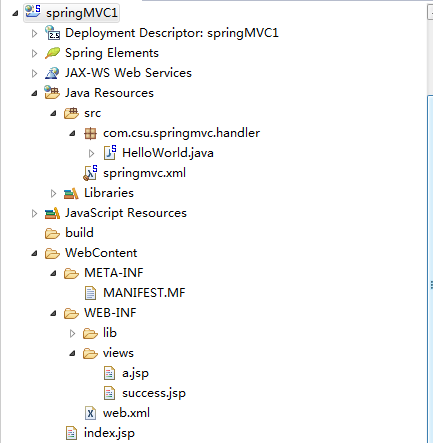
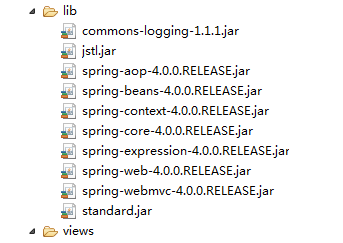
2.加jar包,如图。
3.建webcontent/web.xml配置springDispatcherServlet。
<?xml version="1.0" encoding="UTF-8"?>
<web-app xmlns:xsi="http://www.w3.org/2001/XMLSchema-instance"
    xmlns="http://java.sun.com/xml/ns/javaee"
    xsi:schemaLocation="http://java.sun.com/xml/ns/javaee http://java.sun.com/xml/ns/javaee/web-app_2_5.xsd"
    id="WebApp_ID" version="2.5">

<!-- 接受和分发请求,alt+/弹出 dispatcherServlet,选中回车即可-->

<!-- The front controller of this Spring Web application, responsible for handling all application requests -->
    <servlet>
        <servlet-name>springDispatcherServlet</servlet-name>
        <servlet-class>org.springframework.web.servlet.DispatcherServlet</servlet-class>
        <!-- 指明springmvc配置文件的名字和路径 -->
        <init-param>
            <param-name>contextConfigLocation</param-name>
            <param-value>classpath:springmvc.xml</param-value>
        </init-param>
        <load-on-startup>1</load-on-startup>
    </servlet>

    <!-- Map all requests to the DispatcherServlet for handling -->
    <servlet-mapping>
        <servlet-name>springDispatcherServlet</servlet-name>
        <!-- 拦截所有的请求 -->
        <url-pattern>/</url-pattern>
    </servlet-mapping>


</web-app>
4.建处理器处理请求。
HelloWorld.java:
package com.csu.springmvc.handler;

import org.springframework.stereotype.Controller;
import org.springframework.web.bind.annotation.RequestMapping;

//spring的注解配置,加入此注解,并配置好扫描包,即可将该bean纳入IOC容器管辖范围
@Controller
public class HelloWorld {
    //与发出请的地方对应:index.jsp中<a href="helloworld">Hello World</a>
    @RequestMapping("/helloworld")
    public String hello() {
        System.out.println("hello world!");
        //配合解析器:springmvc.xml中  prefix+resultVal+surfix
        /*<bean class="org.springframework.web.servlet.view.InternalResourceViewResolver">
        <property name="prefix" value="/WEB-INF/views/"></property>
        <property name="suffix" value=".jsp"></property>
        </bean>*/
        return "a";
    }

}
5.建webcontent/index.jsp用来发请求。
<%@ page language="java" contentType="text/html; charset=ISO-8859-1"
    pageEncoding="ISO-8859-1"%>
<!DOCTYPE html PUBLIC "-//W3C//DTD HTML 4.01 Transitional//EN" "http://www.w3.org/TR/html4/loose.dtd">
<html>
<head>
<meta http-equiv="Content-Type" content="text/html; charset=ISO-8859-1">
<title>Insert title here</title>
</head>
<body>
<!--对应handler:@RequestMapping("/helloworld") -->
    <a href="helloworld">Hello World</a>
</body>
</html>
6.建springmvc.xml配置扫描包,视图解析器。
<?xml version="1.0" encoding="UTF-8"?>
<beans xmlns="http://www.springframework.org/schema/beans"
    xmlns:xsi="http://www.w3.org/2001/XMLSchema-instance"
    xmlns:context="http://www.springframework.org/schema/context"
    xmlns:mvc="http://www.springframework.org/schema/mvc"
    xsi:schemaLocation="http://www.springframework.org/schema/beans http://www.springframework.org/schema/beans/spring-beans.xsd
        http://www.springframework.org/schema/context http://www.springframework.org/schema/context/spring-context-4.0.xsd
        http://www.springframework.org/schema/mvc http://www.springframework.org/schema/mvc/spring-mvc-4.0.xsd">

    <context:component-scan base-package="com.csu.springmvc">
    </context:component-scan>

    <!-- 视图解析器
    prefix+resultVal+surfix
    /WEB-INF/views/a.jsp
     -->
    <bean class="org.springframework.web.servlet.view.InternalResourceViewResolver">
    注意:WEB-INF  而不是    WEB_INF
        <property name="prefix" value="/WEB-INF/views/"></property>
        <property name="suffix" value=".jsp"></property>
    </bean>
</beans>
8.建立 WebContent/WEB-INF/views/a.jsp作为跳转页面
8.发布
eclipse和myeclipse不一样,myeclipse有自己集成的tomcat,但是eclipse没有,必须使用外部安装的。
所以现在本地安装好,此处会有版本问题,tom6版本hold不住JEE1.8,必须7.0版本以上的tomcat才能将项目发不上去。
在window-preference-搜server-runtime environment-add libraries-选tomcat安装目录-apply
另外,如果建立jsp文件时,报错:
The superclass javax.servlet.http.HttpServlet was not found on the Java Build Path。
解决方式:[百度经验](http://jingyan.baidu.com/article/f79b7cb34f40569144023ef9.html)
9.运行


 1万+
1万+

 被折叠的 条评论
为什么被折叠?
被折叠的 条评论
为什么被折叠?
 到【灌水乐园】发言


