


一、eclipse安装TestNG插件
1.在线安装
点击eclipse顶部菜单栏Help-->Install New SoftWare,再点击Add按钮,Name:testNG,Location:http://beust.com/eclipse,等几分钟后出现testNG复选框,勾选安装即可。
2.离线安装
a.下载testNG安装包:http://download.csdn.NET/detail/u012100968/9623613
b.将解压后的文件..\eclipse-testng离线包\features\目录下的文件夹org.testng.eclipse_6.9.8.201510130443放到eclipse安装路径下的features目录下
c.将解压后的文件..\eclipse-testng离线包\plugins\目录下的文件夹org.testng.eclipse_6.9.8.201510130443放到eclipse安装路径下的plugins目录下
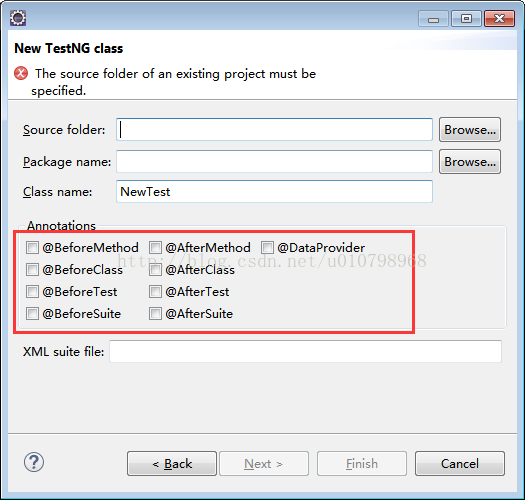
d.重启eclipse,验证是否安装成功,new-->other-->TestNG-->TestNG class
二、常见注解及xml配置项
1.注解:新建TestNG class的时候,可以看到有这些注解,百度了一下,发现解释都非常拗口难懂,我们用代码测试下:
a.单个TestNG class中,各个被注解方法的执行顺序:
package com.etyero.testcase;

import org.testng.annotations.Test;
import org.testng.annotations.BeforeMethod;
import org.testng.annotations.BeforeSuite;
import org.testng.annotations.AfterClass;
import org.testng.annotations.AfterMethod;
import org.testng.annotations.AfterSuite;
import org.testng.annotations.BeforeTest;
import org.testng.annotations.AfterTest;
import org.testng.annotations.BeforeClass;

/**
 * 各注解方法执行顺序
 *
 * */
public class NewTest01 {
	@Test
	public void f01() {
		System.out.println("this is NewTest01 f01...");
	}
	@Test
	public void f02() {
		System.out.println("this is NewTest01 f02...");
	}

	@BeforeMethod
	public void beforeMethod() {
		System.out.println("this is NewTest01 beforeMethod...");
	}

	@AfterMethod
	public void afterMethod() {
		System.out.println("this is NewTest01 afterMethod...");
	}

	@BeforeTest
	public void beforeTest() {
		System.out.println("this is NewTest01 beforeTest...");
	}

	@AfterTest
	public void afterTest() {
		System.out.println("this is NewTest01 afterTest...");
	}
	@BeforeClass
	public void beforeClass(){
		System.out.println("this is NewTest01 beforeClass...");
	}
	@AfterClass
	public void afterClass(){
		System.out.println("this is NewTest01 afterClass...");
	}
	@AfterSuite
	public void afterSuite(){
		System.out.println("this is NewTest01 afterSuite...");
	}
	@BeforeSuite
	public void beforeSuite(){
		System.out.println("this is NewTest01 beforeSuite...");
	}
}
控制台输出:

测试结论:
单个TestNG class中,各注解方法的执行顺序为:
beforeSuite->beforeTest->beforeClass->beforeMethod->测试方法->afterMethod->beforeMethod->下一个测试方法->afterMethod->afterClass->afterTest->afterSuite
从此我们大概可以看出各注解方法的作用域:beforeSuite和afterSuite是作用于测试套件 suite;beforeTest和afterTest是作用于test;beforeClass和afterClass是作用于测试类class;beforeMethod和afterMethod是作用于测试类中单个方法;
但是,除了beforeMethod和afterMehtod我们可以确定,是作用于单个class中的被@Test注解的测试方法外,其他的几个注解,我们并不清楚在多个测试suite,test,class批量执行是什么样的顺序。
b.多个测试suite,test,class批量执行,各个被注解方法的执行顺序
准备四个测试类:
package com.etyero.testcase;

import org.testng.annotations.Test;
import org.testng.annotations.BeforeMethod;
import org.testng.annotations.BeforeSuite;
import org.testng.annotations.AfterClass;
import org.testng.annotations.AfterMethod;
import org.testng.annotations.AfterSuite;
import org.testng.annotations.BeforeTest;
import org.testng.annotations.AfterTest;
import org.testng.annotations.BeforeClass;

public class NewTest01 {
	@Test
	public void f01() {
		System.out.println("this is NewTest01 f01...");
	}
	@Test
	public void f02() {
		System.out.println("this is NewTest01 f02...");
	}

	@BeforeMethod
	public void beforeMethod() {
		System.out.println("this is NewTest01 beforeMethod...");
	}

	@AfterMethod
	public void afterMethod() {
		System.out.println("this is NewTest01 afterMethod...");
	}

	@BeforeTest
	public void beforeTest() {
		System.out.println("this is NewTest01 beforeTest...");
	}

	@AfterTest
	public void afterTest() {
		System.out.println("this is NewTest01 afterTest...");
	}
	@BeforeClass
	public void beforeClass(){
		System.out.println("this is NewTest01 beforeClass...");
	}
	@AfterClass
	public void afterClass(){
		System.out.println("this is NewTest01 afterClass...");
	}
	@AfterSuite
	public void afterSuite(){
		System.out.println("this is NewTest01 afterSuite...");
	}
	@BeforeSuite
	public void beforeSuite(){
		System.out.println("this is NewTest01 beforeSuite...");
	}
}
package com.etyero.testcase;

import org.testng.annotations.AfterClass;
import org.testng.annotations.AfterGroups;
import org.testng.annotations.AfterMethod;
import org.testng.annotations.AfterSuite;
import org.testng.annotations.AfterTest;
import org.testng.annotations.BeforeClass;
import org.testng.annotations.BeforeGroups;
import org.testng.annotations.BeforeMethod;
import org.testng.annotations.BeforeSuite;
import org.testng.annotations.BeforeTest;
import org.testng.annotations.Test;

public class NewTest02 {
	@Test
	public void f01() {
		System.out.println("this is NewTest02 f01...");
	}

	@Test
	public void f02() {
		System.out.println("this is NewTest02 f02...");
	}

	@Test
	public void f03() {
		System.out.println("this is NewTest02 f03...");
	}

	@Test
	public void f04() {
		System.out.println("this is NewTest02 f04...");
	}
	@Test
	public void f05() {
		System.out.println("this is NewTest02 f05...");
	}
	@Test
	public void f06() {
		System.out.println("this is NewTest02 f06...");
	}
	public void f07() {
		System.out.println("this is NewTest02 f07...");
	}

	@BeforeMethod
	public void beforeMethod() {
		 System.out.println("this is NewTest02 beforeMethod...");
	}

	@AfterMethod
	public void afterMethod() {
		 System.out.println("this is NewTest02 afterMethod...");
	}

	@BeforeTest
	public void beforeTest() {
		 System.out.println("this is NewTest02 beforeTest...");
	}

	@AfterTest
	public void afterTest() {
		 System.out.println("this is NewTest02 afterTest...");
	}

	@BeforeClass
	public void beforeClass() {
		 System.out.println("this is NewTest02 beforeClass...");
	}

	@AfterClass
	public void afterClass() {
		 System.out.println("this is NewTest02 afterClass...");
	}
	@AfterSuite
	public void afterSuite(){
		System.out.println("this is NewTest02 afterSuite...");
	}
	@BeforeSuite
	public void beforeSuite(){
		System.out.println("this is NewTest02 beforeSuite...");
	}
}
package com.etyero.testcase;

import org.testng.annotations.Test;
import org.testng.annotations.BeforeMethod;
import org.testng.annotations.BeforeSuite;
import org.testng.annotations.AfterClass;
import org.testng.annotations.AfterMethod;
import org.testng.annotations.AfterSuite;
import org.testng.annotations.BeforeTest;
import org.testng.annotations.AfterTest;
import org.testng.annotations.BeforeClass;

public class NewTest03 {
	@Test
	public void f01() {
		System.out.println("this is NewTest03 f01...");
	}
	@Test
	public void f02() {
		System.out.println("this is NewTest03 f02...");
	}

	@Test
	public void f03() {
		System.out.println("this is NewTest03 f03...");
	}


	@BeforeMethod
	public void beforeMethod() {
		 System.out.println("this is NewTest03 beforeMethod...");
	}

	@AfterMethod
	public void afterMethod() {
		 System.out.println("this is NewTest03 afterMethod...");
	}

	@BeforeTest
	public void beforeTest() {
		 System.out.println("this is NewTest03 beforeTest...");
	}

	@AfterTest
	public void afterTest() {
		 System.out.println("this is NewTest03 afterTest...");
	}

	@BeforeClass
	public void beforeClass() {
		 System.out.println("this is NewTest03 beforeClass...");
	}

	@AfterClass
	public void afterClass() {
		 System.out.println("this is NewTest03 afterClass...");
	}
	@AfterSuite
	public void afterSuite(){
		System.out.println("this is NewTest03 afterSuite...");
	}
	@BeforeSuite
	public void beforeSuite(){
		System.out.println("this is NewTest03 beforeSuite...");
	}
}
package com.etyero.testcase;

import org.testng.annotations.Test;
import org.testng.annotations.BeforeMethod;
import org.testng.annotations.BeforeSuite;
import org.testng.annotations.AfterClass;
import org.testng.annotations.AfterMethod;
import org.testng.annotations.AfterSuite;
import org.testng.annotations.BeforeTest;
import org.testng.annotations.AfterTest;
import org.testng.annotations.BeforeClass;

public class NewTest04 {
	@Test
	public void f01() {
		System.out.println("this is NewTest04 f01...");
	}
	@Test
	public void f02() {
		System.out.println("this is NewTest04 f02...");
	}

	@Test
	public void f03() {
		System.out.println("this is NewTest04 f03...");
	}


	@BeforeMethod
	public void beforeMethod() {
		 System.out.println("this is NewTest04 beforeMethod...");
	}

	@AfterMethod
	public void afterMethod() {
		 System.out.println("this is NewTest04 afterMethod...");
	}

	@BeforeTest
	public void beforeTest() {
		 System.out.println("this is NewTest04 beforeTest...");
	}

	@AfterTest
	public void afterTest() {
		 System.out.println("this is NewTest04 afterTest...");
	}

	@BeforeClass
	public void beforeClass() {
		 System.out.println("this is NewTest04 beforeClass...");
	}

	@AfterClass
	public void afterClass() {
		 System.out.println("this is NewTest04 afterClass...");
	}
	@AfterSuite
	public void afterSuite(){
		System.out.println("this is NewTest04 afterSuite...");
	}
	@BeforeSuite
	public void beforeSuite(){
		System.out.println("this is NewTest04 beforeSuite...");
	}
}
准备第一个xml文件,suite1.xml,该xml文件中,NewTest01和NewTest02属于同一个test节点;NewTest03为另一个test节点:
<?xml version="1.0" encoding="UTF-8"?>
<suite name="Suite1">
	 <test name="test01">
        <classes>
            <class name="com.etyero.testcase.NewTest01"/>
            <class name="com.etyero.testcase.NewTest02"/>
        </classes>
    </test>
	<test name="test02">
        <classes>
            <class name="com.etyero.testcase.NewTest03"/>
        </classes>
    </test>
</suite>
第二个xml文件,suite2.xml,这样,就有两个suite了:
<?xml version="1.0" encoding="UTF-8"?>
<suite name="Suite2">
	<test name="test03">
        <classes>
            <class name="com.etyero.testcase.NewTest04"/>
        </classes>
    </test>
</suite>
批量执行suite的xml文件,allSuite.xml,该xml文件执行suite1及suite2两个xml文件:
<?xml version="1.0" encoding="UTF-8"?>
<suite name="allSuites" allow-return-values="true">
  <suite-files>
    <suite-file path="suite1.xml" />
    <suite-file path="suite2.xml" />
  </suite-files>
</suite>
执行结果:


测试结论:
beforeSuite和afterSuite被suite节点分割,单个suite节点内的所有beforeSuite方法先于其他所有方法执行,afterSuite后于其他所有方法执行;
beforeTest和afterTest被test节点分割,单个test节点内所有beforeTest方法先于其他方法执行,afterTest方法后于其他方法执行;
beforeClass和afterClass被class节点分割,以此形成闭环。
以上,是按我个人理解总结概述的,可能有点难理解,有时间的童鞋可以自己测试下,就很明白了。
c.忽略(禁用)测试,不想被执行的用例,可用@Test(enabled = false)来禁用该用例
package com.etyero.testcase;

import org.testng.annotations.AfterClass;
import org.testng.annotations.AfterGroups;
import org.testng.annotations.AfterMethod;
import org.testng.annotations.AfterSuite;
import org.testng.annotations.AfterTest;
import org.testng.annotations.BeforeClass;
import org.testng.annotations.BeforeGroups;
import org.testng.annotations.BeforeMethod;
import org.testng.annotations.BeforeSuite;
import org.testng.annotations.BeforeTest;
import org.testng.annotations.Test;

public class NewTest02 {

	/**
	 * enabled = false 表示用例尚未准备好,不会被执行
	 *
	 * */
	 @Test(groups = {"systemTest"},enabled = false)
	public void f01() {
		System.out.println("this is NewTest02 f01...");
	}

	@BeforeMethod
	public void beforeMethod() {
		 System.out.println("this is NewTest02 beforeMethod...");
	}

	@AfterMethod
	public void afterMethod() {
		 System.out.println("this is NewTest02 afterMethod...");
	}

	@BeforeTest
	public void beforeTest() {
		 System.out.println("this is NewTest02 beforeTest...");
	}

	@AfterTest
	public void afterTest() {
		 System.out.println("this is NewTest02 afterTest...");
	}

	@BeforeClass
	public void beforeClass() {
		 System.out.println("this is NewTest02 beforeClass...");
	}

	@AfterClass
	public void afterClass() {
		 System.out.println("this is NewTest02 afterClass...");
	}
	@AfterSuite
	public void afterSuite(){
		System.out.println("this is NewTest02 afterSuite...");
	}
	@BeforeSuite
	public void beforeSuite(){
		System.out.println("this is NewTest02 beforeSuite...");
	}
}
package com.etyero.testcase;

import org.testng.annotations.AfterClass;
import org.testng.annotations.AfterGroups;
import org.testng.annotations.AfterMethod;
import org.testng.annotations.AfterSuite;
import org.testng.annotations.AfterTest;
import org.testng.annotations.BeforeClass;
import org.testng.annotations.BeforeGroups;
import org.testng.annotations.BeforeMethod;
import org.testng.annotations.BeforeSuite;
import org.testng.annotations.BeforeTest;
import org.testng.annotations.Test;

public class NewTest02 {


	@Test(groups = {"systemTest"})
	public void f02() {
		System.out.println("this is NewTest02 f02...");
	}

	@Test(groups = {"systemTest"},dependsOnMethods="f02")
	/**
	 * dependsOnMethods 测试用例之间存在依赖关系,f03执行之前,会先执行所依赖的f02测试方法
	 *
	 * */
	public void f03() {
		System.out.println("this is NewTest02 f03...");
	}


	@BeforeMethod
	public void beforeMethod() {
		 System.out.println("this is NewTest02 beforeMethod...");
	}

	@AfterMethod
	public void afterMethod() {
		 System.out.println("this is NewTest02 afterMethod...");
	}

	@BeforeTest
	public void beforeTest() {
		 System.out.println("this is NewTest02 beforeTest...");
	}

	@AfterTest
	public void afterTest() {
		 System.out.println("this is NewTest02 afterTest...");
	}

	@BeforeClass
	public void beforeClass() {
		 System.out.println("this is NewTest02 beforeClass...");
	}

	@AfterClass
	public void afterClass() {
		 System.out.println("this is NewTest02 afterClass...");
	}
	@AfterSuite
	public void afterSuite(){
		System.out.println("this is NewTest02 afterSuite...");
	}
	@BeforeSuite
	public void beforeSuite(){
		System.out.println("this is NewTest02 beforeSuite...");
	}
}
2.配置文件
上面已经粗略的涉及到xml配置文件的使用,这里再细化一点,列举一些常用的测试配置项,某些xml配置是要结合代码注解来使用的
a.通过methods标签指定要执行的测试方法
<?xml version="1.0" encoding="UTF-8"?>
<suite name="Suite1">

  <test name="test01">
        <classes>
		    <!--不指定执行方法,默认执行该测试类下所有@Test注解方法-->
            <class name="com.etyero.testcase.NewTest01"/>

			<!--通过methods标签指定要执行该测试类中的@Test注解方法-->
            <class name="com.etyero.testcase.NewTest02">
                <methods>
                    <include name="f01" />
                    <include name="f02" />
                    <include name="f03" />
                    <include name="f04" />
                    <include name="f05" />
                </methods>
            </class>
        </classes>
    </test>
</suite>
b.按组测试,测试中可能会将用例分组,这样,我们就需要按组来测试
在测试类中注解@Test(groups = {"systemTest03"})
NewTest02:
package com.etyero.testcase;

import org.testng.annotations.AfterClass;
import org.testng.annotations.AfterGroups;
import org.testng.annotations.AfterMethod;
import org.testng.annotations.AfterSuite;
import org.testng.annotations.AfterTest;
import org.testng.annotations.BeforeClass;
import org.testng.annotations.BeforeGroups;
import org.testng.annotations.BeforeMethod;
import org.testng.annotations.BeforeSuite;
import org.testng.annotations.BeforeTest;
import org.testng.annotations.Test;

public class NewTest02 {
	@Test(groups = {"systemTest"})
	public void f01() {
		System.out.println("this is NewTest02 f01...");
	}

	@Test(groups = {"systemTest"})
	public void f02() {
		System.out.println("this is NewTest02 f02...");
	}

	@Test(groups = {"systemTest"})
	public void f03() {
		System.out.println("this is NewTest02 f03...");
	}

	@Test(groups = {"systemTest01"})
	public void f04() {
		System.out.println("this is NewTest02 f04...");
	}
	@Test(groups = {"systemTest01"})
	public void f05() {
		System.out.println("this is NewTest02 f05...");
	}
	@Test(groups = {"systemTest01"})
	public void f06() {
		System.out.println("this is NewTest02 f06...");
	}
	public void f07() {
		System.out.println("this is NewTest02 f07...");
	}

	@BeforeMethod
	public void beforeMethod() {
		 System.out.println("this is NewTest02 beforeMethod...");
	}

	@AfterMethod
	public void afterMethod() {
		 System.out.println("this is NewTest02 afterMethod...");
	}

	@BeforeTest
	public void beforeTest() {
		 System.out.println("this is NewTest02 beforeTest...");
	}

	@AfterTest
	public void afterTest() {
		 System.out.println("this is NewTest02 afterTest...");
	}

	@BeforeClass
	public void beforeClass() {
		 System.out.println("this is NewTest02 beforeClass...");
	}

	@AfterClass
	public void afterClass() {
		 System.out.println("this is NewTest02 afterClass...");
	}
	@AfterSuite
	public void afterSuite(){
		System.out.println("this is NewTest02 afterSuite...");
	}
	@BeforeSuite
	public void beforeSuite(){
		System.out.println("this is NewTest02 beforeSuite...");
	}
}
NewTest03:
package com.etyero.testcase;

import org.testng.annotations.Test;
import org.testng.annotations.BeforeMethod;
import org.testng.annotations.BeforeSuite;
import org.testng.annotations.AfterClass;
import org.testng.annotations.AfterMethod;
import org.testng.annotations.AfterSuite;
import org.testng.annotations.BeforeTest;
import org.testng.annotations.AfterTest;
import org.testng.annotations.BeforeClass;

public class NewTest03 {
	@Test(groups = {"systemTest03"})
	public void f01() {
		System.out.println("this is NewTest03 f01...");
	}
	@Test(groups = {"systemTest03"})
	public void f02() {
		System.out.println("this is NewTest03 f02...");
	}

	@Test
	public void f03() {
		System.out.println("this is NewTest03 f03...");
	}


	@BeforeMethod
	public void beforeMethod() {
		 System.out.println("this is NewTest03 beforeMethod...");
	}

	@AfterMethod
	public void afterMethod() {
		 System.out.println("this is NewTest03 afterMethod...");
	}

	@BeforeTest
	public void beforeTest() {
		 System.out.println("this is NewTest03 beforeTest...");
	}

	@AfterTest
	public void afterTest() {
		 System.out.println("this is NewTest03 afterTest...");
	}

	@BeforeClass
	public void beforeClass() {
		 System.out.println("this is NewTest03 beforeClass...");
	}

	@AfterClass
	public void afterClass() {
		 System.out.println("this is NewTest03 afterClass...");
	}
	@AfterSuite
	public void afterSuite(){
		System.out.println("this is NewTest03 afterSuite...");
	}
	@BeforeSuite
	public void beforeSuite(){
		System.out.println("this is NewTest03 beforeSuite...");
	}
}
xml文件:以下配置会执行NewTest02,NewTest03中的@Test(groups = {"systemTest03"})及@Test(groups = {"systemTest"})的所有测试方法。
<?xml version="1.0" encoding="UTF-8"?>
<suite name="Suite1">
	<test name="test01">
	    <!--配置分组所在类-->
	    <classes>
		  <class name="com.etyero.testcase.NewTest02"/>
		  <class name="com.etyero.testcase.NewTest03"/>
		</classes>
		<!--配置要执行的测试类中的groups-->
        <groups>
            <run>
              <include name="systemTest" />
	      <include name="systemTest03"/>
            </run>
        </groups>

	</test>
</suite>
c.XML实现参数化
package com.etyero.testcase;

import org.testng.annotations.Parameters;
import org.testng.annotations.Test;

public class TestNGDataFromXMl {
	@Test
	@Parameters({"param01","param02"})
	public void xmlDataTest01(String param01,String param02) {
		System.out.println("param01=" + param01 + "----param02=" + param02);
	}

	@Test
	@Parameters({"param03","param04"})
	public void xmlDataTest02(String param03,String param04) {
		System.out.println("param03=" + param03 + "----param04=" + param04);
	}
}
<?xml version="1.0" encoding="UTF-8"?>
<suite name="Suite2">
    <!--name对应@Paramsters中定义的参数名-->
    <parameter name="param01" value="1" />
	<parameter name="param02" value="2" />
	<parameter name="param03" value="3"/>
	<parameter name="param04" value="4"/>
	<test name="test">
		<classes>
		  <class name="com.etyero.testcase.TestNGDataFromXMl"/>
		</classes>
	</test>
</suite>
另外,xml参数化的优势在于代码和测试数据分离,方便维护,但是缺点是难以定义较复杂的参数,此时我们可能需要另一种参数化的方式:@ DataProvider
package com.etyero.testcase;

import org.testng.annotations.DataProvider;
import org.testng.annotations.Test;

public class TestNGDataFromDataProvider {
	@DataProvider(name = "data1")
	// 通过dataProvider参数化测试数据,必须返回Object[][],name用作引用
	public Object[][] createData01() {
		return new Object[][] { { "A", "a1", "a2" }, { "B", "b1", "b2" }, { "C", "c1", "c2" } };
	}

	@DataProvider(name = "data2")
	//可以定义多组参数化数据
	public Object[][] createData02() {
		return new Object[][] { { "D", "d1", "d2" }, { "E", "e1", "e2" }, { "F", "f1", "f2" } };
	}

	@Test(dataProvider = "data1")
	public void dataProviderTest01(String name, String name1, String name2) {
		// 会自动循环取出data1所有的参数
		System.out.println("name=" + name + "----name1=" + name1 + "----name2=" + name2);
	}

	@Test(dataProvider = "data1")
	//同一组参数化数据可以被多个测试方法引用
	public void dataProviderTest02(String name, String name1, String name2) {
		System.out.println("name=" + name + "----name1=" + name1 + "----name2=" + name2);
	}

	@Test(dataProvider = "data2")
	public void dataProviderTest03(String name, String name1, String name2) {
		System.out.println("name=" + name + "----name1=" + name1 + "----name2=" + name2);
	}
}
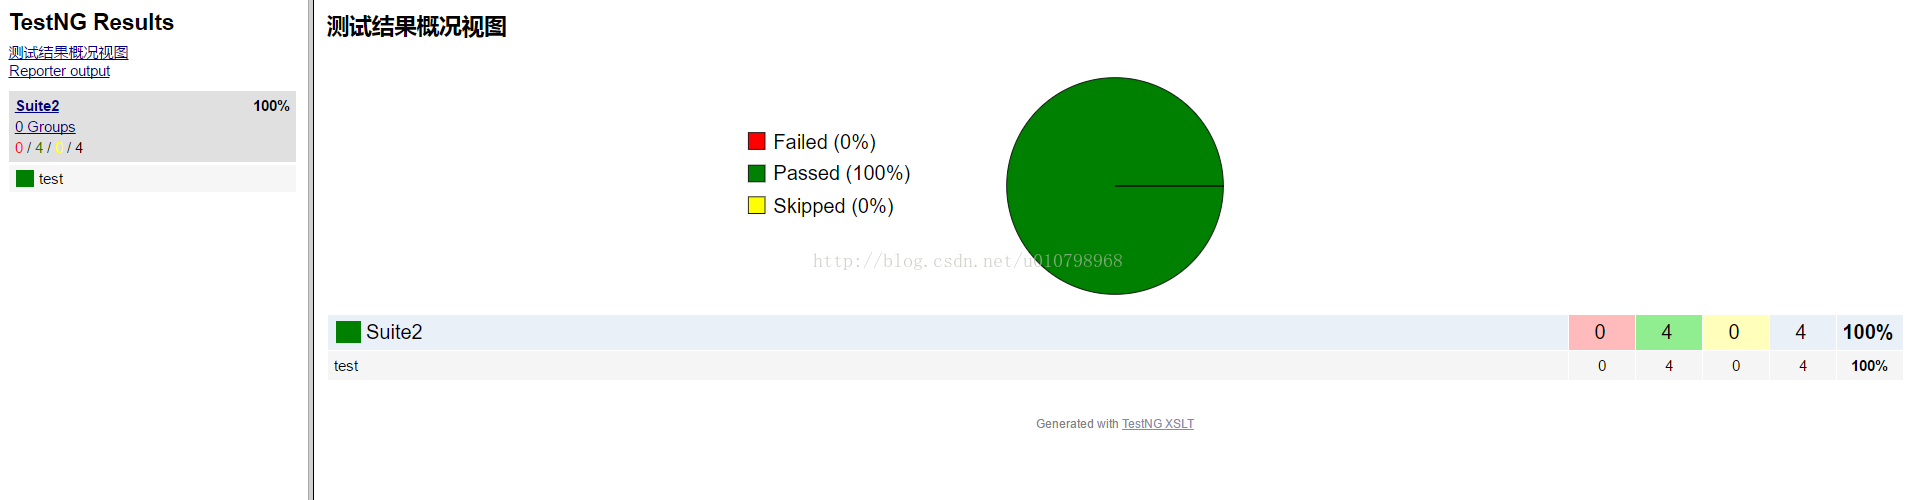
三、测试报告
执行完TestNG用例后,会默认在工程的test-output(默认目录)下生成测试报告,没有的童鞋执行完刷新一下就好了。
默认的测试报告如下,样式较为简陋,但基本信息都有,可以自己点吧点吧,看看报告的各种信息,在此不做赘述

2、复制testng-results.xsl(testng-xslt-1.1\src\main\resources)文件到test-output目录下
3、复制saxon-8.7.jar(testng-xslt-1.1\lib)文件到project的lib目录下(没有的话,自己新建,一般是用来放project所需的各种jar包)
4、安装ant并配置好环境变量
5、在project目录下,新建build.xml文件,内容如下:
<project name="testNG" basedir="." >
    <property name="lib.dir" value="lib" />
    <path id="test.classpath" >
        <!-- saxon.jar包位置-->
        <fileset dir="${lib.dir}" includes="*.jar" />
    </path>
    <target name="transform" >
    <!--自定义project目录-->
    <property name="project.dir" value="E:\eclipseWorkSpace\webUITest\test-output" />
      <!--定义测试结果写入文件,样式,样式转换之后的文件-->
    <xslt in="${project.dir}\testng-results.xml" style="${project.dir}\testng-results.xsl" out="${project.dir}/indexAnt.html" >
          <param name="testNgXslt.outputDir" expression="${project.dir}" />
          <classpath refid="test.classpath" />
    </xslt>
    </target>
</project>


 1281
1281

 被折叠的 条评论
为什么被折叠?
被折叠的 条评论
为什么被折叠?
 到【灌水乐园】发言


