


本篇来讲解自定义ViewGroup的案例CornerLayout的实现,该ViewGroup的效果是在4个角包含4个子view。
如下图示可以帮我们理解该ViewGroup的效果。

我们来分析下要实现这个ViewGroup的思路:
1,onMeasure() 测量流程
①,如果CornerLayout是wrap_content的,那么其宽度是 Math.max(A.width,C.width) + Math.max(B.width,D.width),其高度是Math.max(A.height , B.height) + Math.max(C.height , D.height)
②,如果CornerLayout是math_parent的或者具体数值,那就不用计算了,直接使用onMeasure中传入的数值了。
2,onLayout() 布局思路
CornerLayout的子view具有明显的特征,排列在四个角落,我们要判断当前子view是应该是属于哪个角落的,比如chille(0) 是左上角的;child(1)是右上角的;child(2)是左下角的;child(3)是右小角的。只要确定子view属于哪个角落,就能方便的给子view定位了
③,onDraw绘制容器
CornerLayout没有特别的边框什么的要求,无需重写onDraw绘制
我们按照上面的步骤给出CornerLayout的第一版代码(后面我们还会继续优化)
@Override
protected void onMeasure(int widthMeasureSpec, int heightMeasureSpec) {

    measureChildren(widthMeasureSpec, heightMeasureSpec);
    setMeasuredDimension(measureWidth(widthMeasureSpec),measureHeight(heightMeasureSpec));

}

private int measureWidth(int widthMeasureSpec){
    int width = 0;
    int size = MeasureSpec.getSize(widthMeasureSpec);
    int mode = MeasureSpec.getMode(widthMeasureSpec);
    Log.e("cyy","size:"+size+"  mode:"+mode);
    if(mode == MeasureSpec.EXACTLY){
        width = size;
    }else if(mode == MeasureSpec.AT_MOST){
        int aWidth = 0, bWidth = 0, cWidth = 0, dWidth = 0;
        int aMargin = 0, bMargin = 0, cMargin = 0, dMargin = 0;
        for(int i = 0; i<getChildCount(); i++){
            if(i == 0){
                aWidth = getChildAt(i).getMeasuredWidth();
            }else if(i == 1){
                bWidth = getChildAt(i).getMeasuredWidth();
            }else if(i == 2){
                cWidth = getChildAt(i).getMeasuredWidth();
            }else if(i == 3){
                dWidth = getChildAt(i).getMeasuredWidth();
            }
        }
        width = Math.max(aWidth,cWidth)+Math.max(bWidth,dWidth)
    }
    return width;
}
private int measureHeight(int heightMeasureSpec){

   int height = 0;
   int size = MeasureSpec.getSize(heightMeasureSpec);
   int mode = MeasureSpec.getMode(heightMeasureSpec);

   if(mode == MeasureSpec.EXACTLY){
       height = size;
   }else if(mode == MeasureSpec.AT_MOST){
       int aHeight = 0, bHeight = 0, cHeight = 0, dHeight = 0;
       int aMargin = 0, bMargin = 0, cMargin = 0, dMargin = 0;
       for(int i = 0; i<getChildCount(); i++){
           if(i == 0){
               aHeight = getChildAt(i).getMeasuredHeight();
           }else if(i == 1){
               bHeight = getChildAt(i).getMeasuredHeight();
           }else if(i == 2){
               cHeight = getChildAt(i).getMeasuredHeight();
           }else if(i == 3){
               dHeight = getChildAt(i).getMeasuredHeight();
           }
       }
       height = Math.max(aHeight,bHeight)+Math.max(cHeight,dHeight);
   }
   return height;
}

@Override
protected void onLayout(boolean changed, int l, int t, int r, int b) {
    for(int i = 0 ; i< getChildCount() ; i++){
        View child = getChildAt(i);
        //注意padding,margin的处理
        MarginLayoutParams marginLayoutParams = (MarginLayoutParams) getChildAt(i).getLayoutParams();
        int leftMargin = marginLayoutParams.leftMargin;
        int rightMargin = marginLayoutParams.rightMargin;
        int topMargin = marginLayoutParams.topMargin;
        int bottomMargin = marginLayoutParams.bottomMargin;

        if(i == 0){
            //定位到左上角
            child.layout(0,0,child.getMeasuredWidth(),child.getMeasuredHeight());
        }else if(i == 1){
            //定位到右上角
            child.layout(getMeasuredWidth() - child.getMeasuredWidth() ,0, getMeasuredWidth(), child.getMeasuredHeight());
        }else if(i == 2){
            //定位到左下角
            child.layout(0,getMeasuredHeight() - child.getMeasuredHeight(),child.getMeasuredWidth(),getMeasuredHeight());
        }else if(i == 3){
            //定位到右下角
            child.layout(getMeasuredWidth() - child.getMeasuredWidth() ,getMeasuredHeight() - child.getMeasuredHeight(),getMeasuredWidth(), getMeasuredHeight());
        }
    }
}
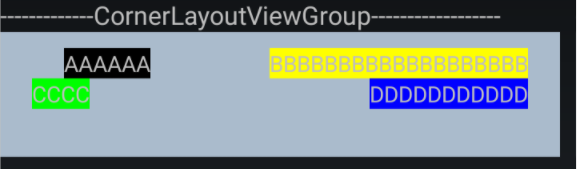
上面给出了CornerLayout的measure和layout的代码,在layout.xml中加载CornerLayout并未其添加4个子view,运行起来效果如下:
<com.example.cyy.customerview.view.CornerLayoutViewGroup
        android:layout_width="350dp"
        android:layout_height="wrap_content"
        android:background="#abc">
        <TextView
            android:layout_width="wrap_content"
            android:layout_height="wrap_content"
            android:text="AAAAAA"
           android:background="#000000"
            android:layout_marginStart="20dp"/>

        <TextView
            android:layout_width="wrap_content"
            android:layout_height="wrap_content"
            android:text="BBBBBBBBBBBBBBBBBBB"
            android:background="#ffff00"/>
        <TextView
            android:layout_width="wrap_content"
            android:layout_height="wrap_content"
            android:text="CCCC"
            android:background="#00ff00"/>
        <TextView
            android:layout_width="wrap_content"
            android:layout_height="wrap_content"
            android:text="DDDDDDDDDDD"
            android:background="#0000ff"/>

可以看到ABCD四个view分散在CornerLayout的四个角落。
看似完美了~~~~~
然而,如果我们尝试去给CornerLayout添加padding值就会发现问题了,padding不生效。。。。
为什么padding不生效了,回头去看看我看的onMeasure和OnLayout方法就知道了,因为我们并没有处理padding啊,在测量CornerLayout时,我们只是根据子view的宽高来设置CornerLayout的宽高,并没有处理padding值,在给子view定位时,也是只根据子view的宽高来定位,如图左上角的子view:
child.layout(0,0,child.getMeasuredWidth(),child.getMeasuredHeight());我们并没有将CornerLayout的padding考虑进去,子view当然就是紧紧贴着CornerLayout的边缘显示了。
所以现在我们要把CornerLayout的padding值的控制添加进去,我们给出添加padding控制后ConerLayout变动的部分:
private int measureWidth(int widthMeasureSpec){
	width = Math.max(aWidth,cWidth)+Math.max(bWidth,dWidth)
                    + getPaddingStart() + getPaddingEnd();
}

private int measureHeight(int heightMeasureSpec){
	height = Math.max(aHeight,bHeight)+Math.max(cHeight,dHeight)
                    + getPaddingTop() + getPaddingBottom()
}

@Override
protected void onLayout(boolean changed, int l, int t, int r, int b) {
    for(int i = 0 ; i< getChildCount() ; i++){
        View child = getChildAt(i);
        if(i == 0){
            //定位到左上角
            child.layout(getPaddingStart(),getPaddingTop(), getPaddingStart()+child.getMeasuredWidth(), child.getMeasuredHeight()+getPaddingTop());
        }else if(i == 1){
            //定位到右上角
            child.layout(getMeasuredWidth() - child.getMeasuredWidth() - getPaddingEnd() ,getPaddingTop(),getMeasuredWidth() - getPaddingEnd(),child.getMeasuredHeight()+getPaddingTop());
        }else if(i == 2){
            //定位到左下角
            child.layout(getPaddingStart(), getMeasuredHeight() - child.getMeasuredHeight() - getPaddingBottom(),child.getMeasuredWidth() + getPaddingStart(),getMeasuredHeight() - getPaddingBottom());
        }else if(i == 3){
            //定位到右下角
            child.layout(getMeasuredWidth() - child.getMeasuredWidth() - getPaddingEnd(),getMeasuredHeight() - child.getMeasuredHeight() - getPaddingBottom(), getMeasuredWidth() - getPaddingEnd(),getMeasuredHeight() - getPaddingBottom());
        }
    }
}
现在在尝试给CornerLayout添加padding属性,就会生效了。
<com.example.cyy.customerview.view.CornerLayoutViewGroup
        android:layout_width="350dp"
        android:layout_height="wrap_content"
        android:paddingStart="20dp"
        android:paddingRight="20dp"
        android:paddingTop="10dp"
        android:paddingBottom="30dp"
        android:background="#abc">
        <TextView
            android:layout_width="wrap_content"
            android:layout_height="wrap_content"
            android:text="AAAAAA"
           android:background="#000000"
            />

        <TextView
            android:layout_width="wrap_content"
            android:layout_height="wrap_content"
            android:text="BBBBBBBBBBBBBBBBBBB"
            android:background="#ffff00"/>
        <TextView
            android:layout_width="wrap_content"
            android:layout_height="wrap_content"
            android:text="CCCC"
            android:background="#00ff00"/>
        <TextView
            android:layout_width="wrap_content"
            android:layout_height="wrap_content"
            android:text="DDDDDDDDDDD"
            android:background="#0000ff"/>


    </com.example.cyy.customerview.view.CornerLayoutViewGroup>

完美支持了padding属性。
但是到这里我们的CornerLayout还不是最完美的,尽管已经支持了padding属性,但是对于子组件的margin属性还是不支持的,我们可以尝试给A控件添加一个margin_start,我们期待A控件会向左移动一段距离,但是运行后发现并不是这样的,子view的margin属性没有生效。
发现了问题,下面就是解决问题。
我们在上篇说过,在向viewGroup中addView时有3个重载的方法:
public void addView(View child)
public void addView(View child, int index)
public void addView(View child, int index, LayoutParams params)
我们去查看这三个方法的源码可知,其最终都是调用了有3个参数的addView方法,当我们调用前两个方法时,ViewGroup会通过 generateDefaultLayoutParams方法来生成一个默认的LayoutParams。

我们来看下ViewGroup的generateDefaultLayoutParams方法:
protected LayoutParams generateDefaultLayoutParams() {
  return new LayoutParams(LayoutParams.WRAP_CONTENT, LayoutParams.WRAP_CONTENT);
 }
ViewGroup的generateDefaultLayoutParams是创建了ViewGroup.LayoutParams的参数对象,该对象是不支持获取子View的margin属性的,而继承ViewGroup.LayoutParams的MarginLayoutParams 这个对象是支持子view的margin属性获取的。
public static class MarginLayoutParams extends ViewGroup.LayoutParams
所以如果我们想要CornerLayout的子组件支持marign属性的读取,那就需要重写CornerLayout的generateDefaultLayoutParams()了,另外还需要重新另两个方法:
1,创建 LayoutParams(或子类)对象,通过 attrs 可以读取到布局文件中的自定义属性值, 该方法必须重写;
public LayoutParams generateLayoutParams(AttributeSet attrs)
2,创建 LayoutParams(或子类)对象,可以重用参数 p,该方法建议重写。
protected LayoutParams generateLayoutParams(LayoutParams p)
ConrnerLayout支持margin属性的相关代码如下:
//为了支持margin属性,添加如下内容
@Override
 protected LayoutParams generateLayoutParams(LayoutParams p) {
     return new MarginLayoutParams(p);
 }

 @Override
 public LayoutParams generateLayoutParams(AttributeSet attrs) {
     return new MarginLayoutParams(getContext(),attrs);
 }

 @Override
 protected LayoutParams generateDefaultLayoutParams() {
     return new MarginLayoutParams(LayoutParams.WRAP_CONTENT,LayoutParams.WRAP_CONTENT);
 }
现在CornerLayout的默认LayoutParams就是MarginLayoutParams,而这个参数对象支持获取子view的margin,我们在CornerLayout中就能得到子view的margin值,然后要将子view的margin加入到ViewGroup的测量和布局流程中。那必然这个margin值会影响最终CornerLayout的测量的大小和子view的位置。
如果要考虑 margin,则将影响以下几个方面:
- 影响 onMeasure()方法测量的容器尺寸;
- 影响 onLayout()方法对子组件的定位;
- 必须为子组件供默认的 MarginLayoutParams(或其子类)
我们在上一次添加支持padding属性的基础上在次在添加CornerLayout支持子view的margin属性,至此CornerLayout的最终版就产生了,现在给出CornerLayout最终版本的代码。
public class CornerLayoutViewGroup extends ViewGroup {
    public CornerLayoutViewGroup(Context context) {
        super(context);
    }

    public CornerLayoutViewGroup(Context context, AttributeSet attrs) {
        super(context, attrs);
    }

    public CornerLayoutViewGroup(Context context, AttributeSet attrs, int defStyleAttr) {
        super(context, attrs, defStyleAttr);
    }

    @Override
    protected void onLayout(boolean changed, int l, int t, int r, int b) {
        for(int i = 0 ; i< getChildCount() ; i++){
            View child = getChildAt(i);
            //注意padding,margin的处理
            MarginLayoutParams marginLayoutParams = (MarginLayoutParams) getChildAt(i).getLayoutParams();
            int leftMargin = marginLayoutParams.leftMargin;
            int rightMargin = marginLayoutParams.rightMargin;
            int topMargin = marginLayoutParams.topMargin;
            int bottomMargin = marginLayoutParams.bottomMargin;

            if(i == 0){
                //定位到左上角
                child.layout(getPaddingStart()+leftMargin,
                             getPaddingTop()+topMargin,
                          getPaddingStart()+child.getMeasuredWidth()+leftMargin,
                          child.getMeasuredHeight()+getPaddingTop()+topMargin);

            }else if(i == 1){
                //定位到右上角
                child.layout(getMeasuredWidth() - child.getMeasuredWidth() - getPaddingEnd() - rightMargin,
                                getPaddingTop()+topMargin,
                             getMeasuredWidth() - getPaddingEnd() - rightMargin,
                             child.getMeasuredHeight()+getPaddingTop()+topMargin);
            }else if(i == 2){
                //定位到左下角
                child.layout(getPaddingStart() + leftMargin,
                        getMeasuredHeight() - child.getMeasuredHeight() - getPaddingBottom() - bottomMargin,
                        child.getMeasuredWidth() + getPaddingStart() + leftMargin,
                        getMeasuredHeight() - getPaddingBottom() - bottomMargin);
            }else if(i == 3){
                //定位到右下角
                child.layout(getMeasuredWidth() - child.getMeasuredWidth() - getPaddingEnd() - rightMargin,
                        getMeasuredHeight() - child.getMeasuredHeight() - getPaddingBottom() - bottomMargin,
                        getMeasuredWidth() - getPaddingEnd() - rightMargin,
                        getMeasuredHeight() - getPaddingBottom() - bottomMargin);
            }
        }
    }

    @Override
    protected void onMeasure(int widthMeasureSpec, int heightMeasureSpec) {

        measureChildren(widthMeasureSpec, heightMeasureSpec);
        setMeasuredDimension(measureWidth(widthMeasureSpec),measureHeight(heightMeasureSpec));

    }

    private int measureWidth(int widthMeasureSpec){
        int width = 0;
        int size = MeasureSpec.getSize(widthMeasureSpec);
        int mode = MeasureSpec.getMode(widthMeasureSpec);
        Log.e("cyy","size:"+size+"  mode:"+mode);
        if(mode == MeasureSpec.EXACTLY){
            width = size;
        }else if(mode == MeasureSpec.AT_MOST){
            int aWidth = 0, bWidth = 0, cWidth = 0, dWidth = 0;
            int aMargin = 0, bMargin = 0, cMargin = 0, dMargin = 0;
            for(int i = 0; i<getChildCount(); i++){
                MarginLayoutParams layoutParams = (MarginLayoutParams) getChildAt(i).getLayoutParams();

                if(i == 0){
                    aWidth = getChildAt(i).getMeasuredWidth();
                    aMargin = layoutParams.leftMargin + layoutParams.rightMargin;
                }else if(i == 1){
                    bWidth = getChildAt(i).getMeasuredWidth();
                    bMargin = layoutParams.leftMargin + layoutParams.rightMargin;
                }else if(i == 2){
                    cWidth = getChildAt(i).getMeasuredWidth();
                    cMargin = layoutParams.leftMargin + layoutParams.rightMargin;
                }else if(i == 3){
                    dWidth = getChildAt(i).getMeasuredWidth();
                    dMargin = layoutParams.leftMargin + layoutParams.rightMargin;
                }
            }
            width = Math.max(aWidth,cWidth)+Math.max(bWidth,dWidth)
                    + getPaddingStart() + getPaddingEnd()
                    + Math.max(aMargin,cMargin)+Math.max(bMargin,dMargin);

        }

        return width;

    }


    private int measureHeight(int heightMeasureSpec){

        int height = 0;
        int size = MeasureSpec.getSize(heightMeasureSpec);
        int mode = MeasureSpec.getMode(heightMeasureSpec);

        if(mode == MeasureSpec.EXACTLY){
            height = size;
        }else if(mode == MeasureSpec.AT_MOST){
            int aHeight = 0, bHeight = 0, cHeight = 0, dHeight = 0;
            int aMargin = 0, bMargin = 0, cMargin = 0, dMargin = 0;
            for(int i = 0; i<getChildCount(); i++){
                MarginLayoutParams layoutParams = (MarginLayoutParams) getChildAt(i).getLayoutParams();

                if(i == 0){
                    aHeight = getChildAt(i).getMeasuredHeight();
                    aMargin = layoutParams.topMargin + layoutParams.bottomMargin;
                }else if(i == 1){
                    bHeight = getChildAt(i).getMeasuredHeight();
                    bMargin = layoutParams.topMargin + layoutParams.bottomMargin;
                }else if(i == 2){
                    cHeight = getChildAt(i).getMeasuredHeight();
                    cMargin = layoutParams.topMargin + layoutParams.bottomMargin;
                }else if(i == 3){
                    dHeight = getChildAt(i).getMeasuredHeight();
                    dMargin = layoutParams.topMargin + layoutParams.bottomMargin;
                }
            }
            height = Math.max(aHeight,bHeight)+Math.max(cHeight,dHeight)
                    + getPaddingTop() + getPaddingBottom()
                    +Math.max(aMargin,bMargin)+Math.max(cMargin,dMargin);
        }

        return height;

    }

    //为了支持margin属性,添加如下内容
    @Override
    protected LayoutParams generateLayoutParams(LayoutParams p) {
        return new MarginLayoutParams(p);
    }

    @Override
    public LayoutParams generateLayoutParams(AttributeSet attrs) {
        return new MarginLayoutParams(getContext(),attrs);
    }

    @Override
    protected LayoutParams generateDefaultLayoutParams() {
        return new MarginLayoutParams(LayoutParams.WRAP_CONTENT,LayoutParams.WRAP_CONTENT);
    }
}
现在我们可以给A组件添加一个magin,在次运行看下效果
<com.example.cyy.customerview.view.CornerLayoutViewGroup
        android:layout_width="350dp"
        android:layout_height="wrap_content"
        android:paddingStart="20dp"
        android:paddingRight="20dp"
        android:paddingTop="10dp"
        android:paddingBottom="30dp"
        android:background="#abc">
        <TextView
            android:layout_width="wrap_content"
            android:layout_height="wrap_content"
            android:text="AAAAAA"
           android:background="#000000"
            android:layout_marginStart="20dp"/>

        <TextView
            android:layout_width="wrap_content"
            android:layout_height="wrap_content"
            android:text="BBBBBBBBBBBBBBBBBBB"
            android:background="#ffff00"/>
        <TextView
            android:layout_width="wrap_content"
            android:layout_height="wrap_content"
            android:text="CCCC"
            android:background="#00ff00"/>
        <TextView
            android:layout_width="wrap_content"
            android:layout_height="wrap_content"
            android:text="DDDDDDDDDDD"
            android:background="#0000ff"/>


    </com.example.cyy.customerview.view.CornerLayoutViewGroup>
完美~~~~
DONE
此系列后续持续更新。


 1936
1936


 被折叠的 条评论
为什么被折叠?
被折叠的 条评论
为什么被折叠?
 到【灌水乐园】发言


