


最近说项目可能会用到一个电子签名,不需要识别的那种,只是一个单纯手写签名,然后以base64的格式提供给前端web页面。其实挺简单的,自定义一个手写view就上线了。Android 电子签名,手写签名案列实现方法!
先上图:
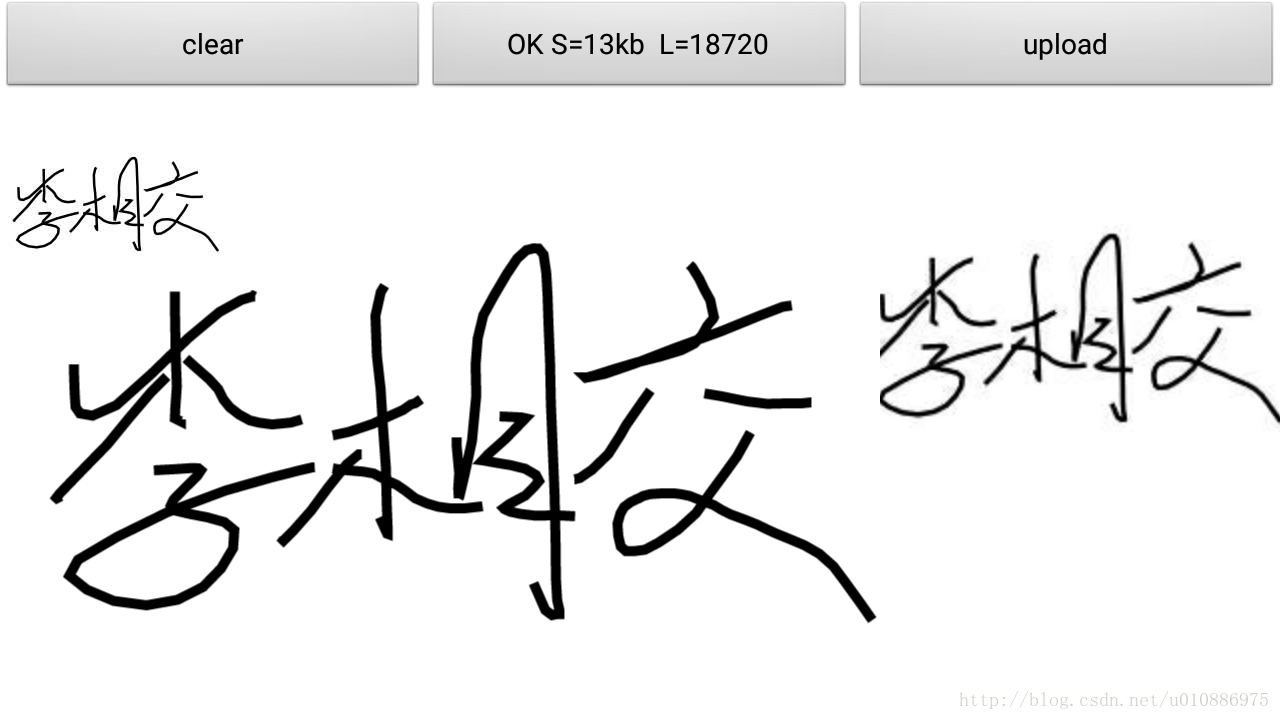
按钮说明:第一个按钮是清除手写板,第二个是将手写板的内容生成图片并压缩,第三个按钮是触发JS方法,在web页面中显。
布局说明:中间区域是手写屈,左上角是经过大小和质量压缩后的图片,右边是以base64格式上传web页面还原出来的图片。
代码说明:其实很简单,自定义CanvasView继承View
第一步:构造方法里面初始化画布背景、画笔、和路径
 public CanvasView(Context context, AttributeSet attrs) {
        super(context, attrs);
        setBackgroundColor(Color.WHITE);
        paint = new Paint();
        paint.setColor(Color.BLACK);
        paint.setStrokeWidth(TypedValue.applyDimension(TypedValue.COMPLEX_UNIT_DIP, STROKE_WIDTH, getResources().getDisplayMetrics()));
        paint.setStyle(Paint.Style.STROKE);//设置画笔空心
        paint.setAntiAlias(true);//消除锯齿
        path = new Path();
    }
第二部:画笔归为
   @Override
    protected void onDraw(Canvas canvas) {
        super.onDraw(canvas);
        canvas.drawPath(path, paint);
    }
第三步:处理手势,触发画笔
    @Override
    public boolean onTouchEvent(MotionEvent event) {
        float x = event.getX();
        float y = event.getY();
        switch (event.getAction()) {
            case MotionEvent.ACTION_DOWN:
                path.moveTo(x, y);
                break;
            case MotionEvent.ACTION_MOVE:
                path.lineTo(x, y);
                break;
        }
        invalidate();
        return true;
    }
到这里,手写功能就已经能使用了,接下来是做一些处理
1、将view生成图片
    //将view生生图片
    public Bitmap createBitmap (View v) {

        int w = v.getWidth();
        int h = v.getHeight();
        //生成图片
        Bitmap bmp = Bitmap.createBitmap(w, h, Bitmap.Config.ARGB_8888);
        Canvas c = new Canvas(bmp);
        c.drawColor(Color.WHITE);
        v.layout(0, 0, w, h);
        v.draw(c);
        return bmp;

    }
2、图片是否要旋转
    /**
     * 图片旋转
     * @param tmpBitmap
     * @param degrees
     * @return
     */
    public static Bitmap rotateToDegrees(Bitmap tmpBitmap, float degrees) {
        Matrix matrix = new Matrix();
        matrix.reset();
        matrix.setRotate(degrees);
        Bitmap rBitmap = Bitmap.createBitmap(tmpBitmap, 0, 0, tmpBitmap.getWidth(), tmpBitmap.getHeight(), matrix,
                true);
        return rBitmap;
    }
3、图片按比例压缩
    /**
     * 图片按比例大小压缩方法
     *
     * @param image (根据Bitmap图片压缩)
     * @return
     */
    public static Bitmap compressScale(Bitmap image) {

        ByteArrayOutputStream baos = new ByteArrayOutputStream();
        image.compress(Bitmap.CompressFormat.JPEG, 100, baos);

        // 判断如果图片大于1M,进行压缩避免在生成图片(BitmapFactory.decodeStream)时溢出
        if (baos.toByteArray().length / 1024 > 1024) {
            baos.reset();// 重置baos即清空baos
            image.compress(Bitmap.CompressFormat.JPEG, 80, baos);// 这里压缩50%,把压缩后的数据存放到baos中
        }
        ByteArrayInputStream isBm = new ByteArrayInputStream(baos.toByteArray());
        BitmapFactory.Options newOpts = new BitmapFactory.Options();
        // 开始读入图片,此时把options.inJustDecodeBounds 设回true了
        newOpts.inJustDecodeBounds = true;
        Bitmap bitmap = BitmapFactory.decodeStream(isBm, null, newOpts);
        newOpts.inJustDecodeBounds = false;
        int w = newOpts.outWidth;//原始宽高
        int h = newOpts.outHeight;

        // 缩放比。由于是固定比例缩放,只用高或者宽其中一个数据进行计算即可  (可根据原始高度计算)
        int be = 4;// be=1表示不缩放 ,缩放比为1/be ,这里缩小为原来的四分之一
        newOpts.inSampleSize = be; // 设置缩放比例
        // newOpts.inPreferredConfig = Config.RGB_565;//降低图片从ARGB888到RGB565

        // 重新读入图片,注意此时已经把options.inJustDecodeBounds 设回false了
        isBm = new ByteArrayInputStream(baos.toByteArray());
        bitmap = BitmapFactory.decodeStream(isBm, null, newOpts);

        return compressImage(bitmap,5);// 压缩好比例大小后再进行质量压缩

//        return bitmap;
    }
4、图片按照质量压缩
    /**
     * 质量压缩方法
     *
     * @param image  size(kb)
     * @return
     */
    public static Bitmap compressImage(Bitmap image,int size) {

        ByteArrayOutputStream baos = new ByteArrayOutputStream();
        image.compress(Bitmap.CompressFormat.JPEG, 100, baos);// 质量压缩方法,这里100表示不压缩,把压缩后的数据存放到baos中
        int options = 80;

        while (baos.toByteArray().length / 1024 > size) { // 循环判断如果压缩后图片是否大于size,大于继续压缩

            if(options<10) {
                options = 10;
            }

            baos.reset(); // 重置baos即清空baos
            image.compress(Bitmap.CompressFormat.JPEG, options, baos);// 这里压缩options%,把压缩后的数据存放到baos中
            options -= 10;// 每次都减少10
        }
        ByteArrayInputStream isBm = new ByteArrayInputStream(baos.toByteArray());// 把压缩后的数据baos存放到ByteArrayInputStream中
        Bitmap bitmap = BitmapFactory.decodeStream(isBm, null, null);// 把ByteArrayInputStream数据生成图片  (PS,这一步操作后,图片质量会变大,没有搞懂为什么,知道的大神可以给我解释下549908016@qq.com)
        return bitmap;
    }
5、将图片处理成base64的字符串
 /**
    *
    * 图片转化成base64字符串
    * 创建人:lxj
    * 创建时间:2018年3月6日 上午10:14:02
    * @version
    *
    */
    public  String imageToBase64() {//将图片文件转化为字节数组字符串,并对其进行Base64编码处理
        String imgFile = Environment.getExternalStorageDirectory()+ "/" + imageName + ".jpg";//待处理的图片
        InputStream in = null;
        byte[] data = null;
        //读取图片字节数组
        try
        {
            in = new FileInputStream(imgFile);
            data = new byte[in.available()];
            in.read(data);
            in.close();
        }
        catch (IOException e)
        {
            e.printStackTrace();
        }
        return Base64.encodeToString(data, Base64.DEFAULT); //返回Base64编码过的字节数组字符串
    }
    /**
     * 将Bitmap转换成Base64字符串
     * @param bit
     * @return
     */
    public String Bitmap2StrByBase64(Bitmap bit){
       ByteArrayOutputStream bos=new ByteArrayOutputStream();
       bit.compress(CompressFormat.JPEG, 100, bos);//参数100表示不压缩
       byte[] bytes=bos.toByteArray();
       return Base64.encodeToString(bytes, Base64.DEFAULT);
} demo下载地址,希望对大家有所帮助:http://download.csdn.net/download/u010886975/10271229


 8686
8686


 被折叠的 条评论
为什么被折叠?
被折叠的 条评论
为什么被折叠?
 到【灌水乐园】发言


