


在前几篇文章中都是讲的基础,大家应该会觉得非常熟悉,但往往我们可能对于基础某些细节认识不够彻底或贯穿不全,我一直认为基础都是比较难的,那么本章节终于到进阶啦,主要讲的是View 的相关知识,在前面《Android 面试题总结之Android 基础 (六)》
中已经对View有了一定的了解,由于内容较多且也是面试必考题,所以将分两篇继续深入的理解View。在阅读过程中有任何问题,请及时联系。如需转载请注明 fuchenxuan de Blog
本章系《Android 之美 从0到1 – 高手之路》Android进阶(一)自定义View的过程
掌握
- 什么是View?
- View 坐标的基本概念
- View的生命周期
- 如何自定义View
什么是View?
android.app.View 就是手机的UI,View 负责绘制UI,处理事件(evnet),Android 利用 View 打造出所 Widgets,利用 Widget 可打造出互动式的使用者介面,每个View 负责一定区域的绘制。
一张图理解常用控件层级关系

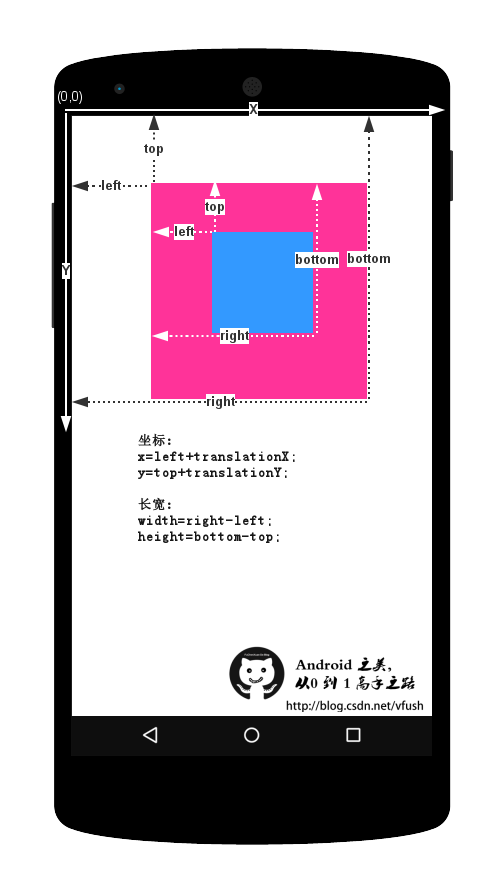
View 坐标的基本概念
View的宽高是有top、left、right、bottom参数决定的 而X,Y和translationX,和translationY则负责View位置的改变。
从Android3.0开始,加入了translation的概念,即相对于父容器的偏移量以及X,Y坐标的概念,X,Y代表左上顶点的横纵坐标。当View在发生平移时,getX,getY,setX,setY
get/setTranslationX/Y来获得当前左上点的坐标。
X=left+translationX Y同理。
注意:在View发生改变的过程中,top,left等值代表原始位置,是不会改变的。改变的只有X,Y,translationX/Y。
一张图理解View的坐标概念
View的生命周期
| Category | Methods | Description |
|---|---|---|
| Creation | Constructors | 几个View的构造函数 |
| onFinishInflate() | 当系统解析完View之后调用onFinishInflate方法 | |
| Layout | onMeasure(int, int) | 确定所有子View的大小 |
| onLayout(boolean, int, int, int, int) | 当ViewGroup分配所有的子View的大小和位置时触发 | |
| onSizeChanged(int, int, int, int) | 当view的大小发生变化时触发 | |
| Drawing | onDraw(android.graphics.Canvas) | view渲染内容的细节 |
| Event processing | onKeyDown(int, KeyEvent) | 有按键按下后触发 |
| onKeyUp(int, KeyEvent) | 有按键按下后弹起时触发 | |
| onTrackballEvent(MotionEvent) | 轨迹球事件 | |
| onTouchEvent(MotionEvent) | 触屏事件 | |
| Focus | onFocusChanged(boolean, int, android.graphics.Rect) | 当View获取或失去焦点时触发 |
| onWindowFocusChanged(boolean) | 当窗口包含的view获取或失去焦点时触发 | |
| Attaching | onAttachedToWindow() | 当view被附着到一个窗口时触发 |
| onDetachedFromWindow() | 当view离开附着的窗口时触发,该方法和 onAttachedToWindow() 是相反 | |
| onWindowVisibilityChanged(int) | 当窗口中包含的可见的view发生变化时触发 |
对实现自定义View,不需要重写所有这些方法。事实上,你可以只onDraw(android.graphics.Canvas)
View 的几个构造函数
-
public MyView(Context context)
java代码直接new一个Custom View实例的时候,会调用第一个构造函数 -
public MyView(Context context, AttributeSet attrs)
在xml创建但是没有指定style的时候被调用.多了一个AttributeSet类型的参数,自定义属性,在通过布局文件xml创建一个view时,会把XML内的参数通过AttributeSet带入到View内。 -
public MyView(Context context, AttributeSet attrs, int defStyleAttr)
构造函数中第三个参数是默认的Style,这里的默认的Style是指它在当前Application或Activity所用的Theme中的默认Style,且只有在明确调用的时候才会调用 -
@TargetApi(Build.VERSION_CODES.LOLLIPOP)
 public MyView(Context context, AttributeSet attrs, int defStyleAttr, int defStyleRes)
该构造函数是在api21的时候才添加上的
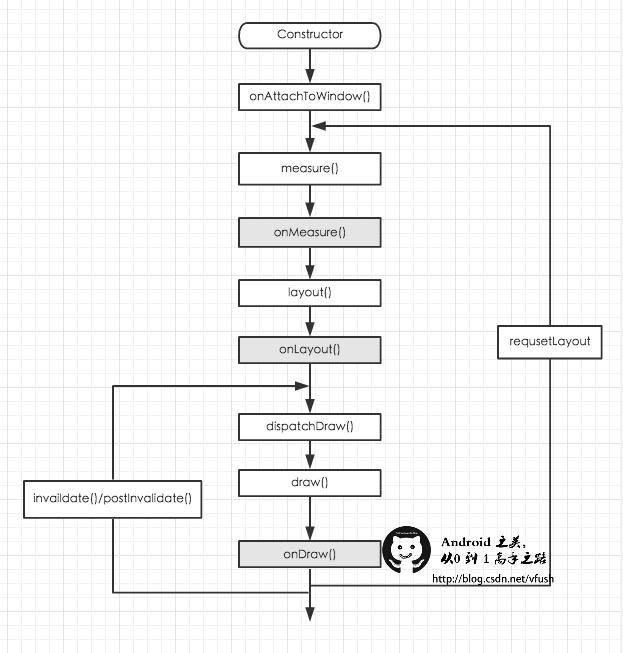
View 的几个重要方法
-
requestLayout
View重新调用一次layout过程 -
invalidate
View重新调用一次draw过程 -
forceLayout
标识View在下一次重绘,需要重新调用layout过程。 -
postInvalidate
这个方法与invalidate方法的作用是一样的,都是使View树重绘,但两者的使用条件不同,postInvalidate是在非UI线程中调用,invalidate则是在UI线程中调用。
自定义View
简单理解View的绘制
这里我们先简单理解View 的绘制,后续文章我们会深入理解。
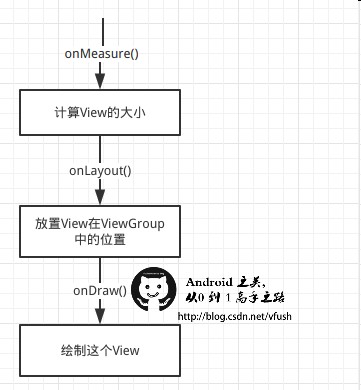
1.测量——onMeasure():决定View的大小
2.布局——onLayout():决定View在ViewGroup中的位置
3.绘制——onDraw():如何绘制这个View。
自定义View的分类
- 继承View
- 继承ViewGroup
- 继承系统控件(Button,LinearLayout…)
自定义View的过程
-
自定义 View 首先要实现一个继承自 View 的类
-
添加类的构造方法,通常是三个构造方法,不过从 Android5.0 开始构造方法已经添加到 4 个了
-
override父类的方法,如onDraw,(onMeasure)等 -
自定义属性,需要在 values 下建立
attrs.xml文件,在其中定义属性通过context.obtainStyledAttributes将构造函数中的attrs进行解析出来,就可以拿到相对应的属性.
TypedArray typedArray = context.obtainStyledAttributes(attrs, R.styleable.MyView);
mColor = typedArray.getColor(R.styleable.MyView_myColor, 0XFF00FF00);【注意】三个函数获取尺寸的区别:
getDimension()是基于当前DisplayMetrics进行转换,获取指定资源id对应的尺寸
getDimensionPixelSize()与getDimension()功能类似,不同的是将结果转换为int,并且小数部分四舍五入
getDimensionPixelOffset()与getDimension()功能类似,不同的是将结果转换为int,取整去除小数。举个例子
列如getDimension()返回结果是20.5f,那么getDimensionPixelSize()返回结果就是 21,getDimensionPixelOffset()返回结果就是20。 -
打开布局文件我们可以看到有很多的以xmlns开头的字段。其实这个就是XML name space 的缩写。我们可以使用
res-atuo命名空间,就不用在添加自定义View全类名。
xmlns:app="http://schemas.android.com/apk/res-auto"
- 1
- 2
- 3
- 4
- 5
- 6
- 7
- 8
- 9
- 10
- 11
- 12
- 13
- 14
- 15
- 16
- 17
- 18
- 19
- 20
- 21
- 22
- 23
- 24
- 25
- 26
- 27
- 28
- 29
- 30
- 31
- 32
- 33
- 34
- 35
- 36
- 37
- 38
- 39
- 40
- 41
- 42
- 43
- 44
- 45
- 46
- 47
- 48
- 49
- 50
- 51
- 52
- 53
这里是一个普通的自定义View,里面画了圆,根据不同的模式设置了父View的大小。
关于View重写onMeasure()时机:
如果用了wrap_content。那么在onMeasure()中就要调用setMeasuredDimension(),
来指定view的宽高。如果使用的是match_parent或者一个具体的dp值。那么直接使用super.onMeasure()即可。
自定义ViewGroup
自定义ViewGroup的过程
- 自定义 ViewGroup 和自定义View 一样,只是继承自 ViewGroup 的类,和必须实现
onLayout()函数
- 1
- 2
- 3
- 4
- 5
- 6
- 7
- 8
- 9
- 10
- 11
- 12
- 13
- 14
- 15
- 16
- 17
- 18
- 19
- 20
- 21
- 22
- 23
- 24
- 25
- 26
- 27
- 28
- 29
- 30
- 31
- 32
- 33
- 34
- 35
- 36
这里是一个简单的自定义ViewGroup,实现类似LinearLayout 横向排放子View位置。这就是一个简单的ViewGroup过程。
彻底理解MeasureSpec三种模式
View的大小不仅由自身所决定,同时也会受到父控件的影响,为了我们的控件能更好的适应各种情况,一般会自己进行测量。他们是由 mode+size两部分组成的。widthMeasureSpec和heightMeasureSpec转化成二进制数字表示,他们都是30位的。前两位代表mode(测量模 式),后面28位才是他们的实际数值(size);MeasureSpec.getMode()获取模式,MeasureSpec.getSize()获取尺寸
测量View大小使用的是onMeasure函数,所以我们需要了解三种测量模式:
EXACTLY:一般是设置了明确的值(100dp)或者是MATCH_PARENTAT_MOST:表示子布局限制在一个最大值内,一般为WARP_CONTENTUNSPECIFIED:表示子布局想要多大就多大,很少使用
关于ViewGroup重写onMeasure()时机:
-
首先要先测量子View的宽高:
getChildAt(int index)可以拿到index上的子view。
getChildCount()得到子view的个数,再循环遍历出子view。 -
使用子view自身的测量方法
childView.measure(int wSpec, int hSpec);或使用viewGroup的测量子view的方法:
-
measureChild(subView, int wSpec, int hSpec);
测量某一个子view,多宽,多高, 内部加上了viewGroup的padding值 -
measureChildren(int wSpec, int hSpec);
测量所有子view 都是 多宽,多高, 内部调用了measureChild方法 measureChildWithMargins(subView, intwSpec, int wUsed, int hSpec, int hUsed);测量某一个子view,多宽,多高, 内部加上了viewGroup的padding值、margin值和传入的宽高wUsed、hUsed
-
问题总结
-
getWidth()和getMeasuredWidth()的区别?
getMeasuredWidth():只要一执行完 setMeasuredDimension() 方法,就有值了,并且不再改变。
getWidth():必须执行完 onMeasure() 才有值,可能发生改变。
如果 onLayout 没有对子 View 实际显示的宽高进行修改,那么 getWidth() 的值 == getMeasuredWidth() 的值。 -
onLayout() 和Layout()的区别?
onLayout() ViewGroup中子View的布局方法,layout()是子View布局的方法 -
View 里面的 onSavedInstanceState和onRestoreInstanceState的作用?
View和Activity一样的,每个View都有onSavedInstanceState和onRestoreInstanceState这两个方法,可用于保存和恢复view的状态。在本章节中我们知道什么是View?,View 坐标的基本概念,理解了View的生命周期,学习了如何自定义View?虽然全是理论知识总结,在后续我们会一起来自定义View的实战学习。不管有没有任何疑问,欢迎在下方留言吧。


 612
612


 被折叠的 条评论
为什么被折叠?
被折叠的 条评论
为什么被折叠?
 到【灌水乐园】发言


