


1、下载ndk并解压即可
2、下载cygwin并安装。环境搭建:点击打开链接下载cygwin的作用主要是模拟linux环境。工程名是:MyFirstJniDemo
public class Main extends Activity {

	@Override
	protected void onCreate(Bundle savedInstanceState) {
		super.onCreate(savedInstanceState);

		setContentView(R.layout.activity_main);
		TextView textView=(TextView)this.findViewById(R.id.textview);
		textView.setText(show()+"");
	}

	public native String show();

	static{
		System.loadLibrary("firstso");//创建动态库
	}

}
3、项目编译后(一定要编译后:build-project)生成.h文件(.h文件可剪切到bin下)。
/* DO NOT EDIT THIS FILE - it is machine generated */
#include <jni.h>
/* Header for class com_example_myfirstjnidemo_Main */

#ifndef _Included_com_example_myfirstjnidemo_Main
#define _Included_com_example_myfirstjnidemo_Main
#ifdef __cplusplus
extern "C" {
#endif
/*
 * Class:     com_example_myfirstjnidemo_Main
 * Method:    show
 * Signature: ()Ljava/lang/String;
 */
JNIEXPORT jstring JNICALL Java_com_example_myfirstjnidemo_Main_show
  (JNIEnv *, jobject);

#ifdef __cplusplus
}
#endif
#endif
4、根据生成的.h文件编写firstso.c文件,如下
#include<string.h>
#include<jni.h>
jstring
JNICALL Java_com_example_myfirstjnidemo_Main_show
(JNIEnv* env,jobject thiz){
 return (*env)->NewStringUTF(env,"你好");
}
5、编写Android.mk文件,我是将ndk下samples下hello-jni中Android.mk文件修改了一下。
主要是修改两个地方
LOCAL_MODULE : 组件
LOCAL_SRC_FILES :文件,如果有多个,要用“,”隔开
# Copyright (C) 2009 The Android Open Source Project
#
# Licensed under the Apache License, Version 2.0 (the "License");
# you may not use this file except in compliance with the License.
# You may obtain a copy of the License at
#
#      http://www.apache.org/licenses/LICENSE-2.0
#
# Unless required by applicable law or agreed to in writing, software
# distributed under the License is distributed on an "AS IS" BASIS,
# WITHOUT WARRANTIES OR CONDITIONS OF ANY KIND, either express or implied.
# See the License for the specific language governing permissions and
# limitations under the License.
#
LOCAL_PATH := $(call my-dir)

include $(CLEAR_VARS)

LOCAL_MODULE    := firstso
LOCAL_SRC_FILES := firstso.c

include $(BUILD_SHARED_LIBRARY)然后作如下操作:
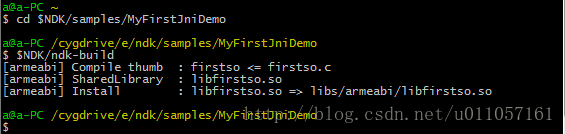
之后会生成.so文件。
7、将该项目导入eclipse既可以运行,例子很简单,只是显示一句”你好“,就不截图了。


 1712
1712


 被折叠的 条评论
为什么被折叠?
被折叠的 条评论
为什么被折叠?
 到【灌水乐园】发言


