1.新建RootViewController类
- //
- // RootViewController.swift
- // UITableViewDemo
- //
- // Created by 赵超 on 14-6-21.
- // Copyright (c) 2014年 赵超. All rights reserved.
- //
- import UIKit
- class RootViewController: UIViewController,UITableViewDelegate, UITableViewDataSource {
- var tableView : UITableView?
- var items = ["武汉","上海","北京","深圳","广州","重庆","香港","台海","天津"]
- var leftBtn:UIButton?
- var rightButtonItem:UIBarButtonItem?
- override func viewDidLoad() {
- super.viewDidLoad()
- initView()
- setupRightBarButtonItem()
- setupLeftBarButtonItem()
- self.leftBtn!.userInteractionEnabled = true
- // Do any additional setup after loading the view.
- }
- func initView(){
- // 初始化tableView的数据
- self.tableView=UITableView(frame:self.view.frame,style:UITableViewStyle.Plain)
- // 设置tableView的数据源
- self.tableView!.dataSource=self
- // 设置tableView的委托
- self.tableView!.delegate = self
- //
- self.tableView!.registerClass(UITableViewCell.self, forCellReuseIdentifier: "cell")
- self.view.addSubview(self.tableView!)
- }
- //加左边按钮
- func setupLeftBarButtonItem()
- {
- self.leftBtn = UIButton.buttonWithType(UIButtonType.Custom) as? UIButton
- self.leftBtn!.frame = CGRectMake(0,0,50,40)
- self.leftBtn?.setTitleColor(UIColor.redColor(), forState: UIControlState.Normal)
- self.leftBtn?.setTitle("Edit", forState: UIControlState.Normal)
- self.leftBtn!.tag = 100
- self.leftBtn!.userInteractionEnabled = false
- self.leftBtn?.addTarget(self, action: "leftBarButtonItemClicked", forControlEvents: UIControlEvents.TouchUpInside)
- var barButtonItem = UIBarButtonItem(customView: self.leftBtn)
- self.navigationItem!.leftBarButtonItem = barButtonItem
- }
- //左边按钮事件
- func leftBarButtonItemClicked()
- {
- println("leftBarButton")
- if (self.leftBtn!.tag == 100)
- {
- self.tableView?.setEditing(true, animated: true)
- self.leftBtn!.tag = 200
- self.leftBtn?.setTitle("Done", forState: UIControlState.Normal)
- //将增加按钮设置不能用
- self.rightButtonItem!.enabled=false
- }
- else
- {
- //恢复增加按钮
- self.rightButtonItem!.enabled=true
- self.tableView?.setEditing(false, animated: true)
- self.leftBtn!.tag = 100
- self.leftBtn?.setTitle("Edit", forState: UIControlState.Normal)
- }
- }
- //加右边按钮
- func setupRightBarButtonItem()
- {
- self.rightButtonItem = UIBarButtonItem(title: "Add", style: UIBarButtonItemStyle.Plain, target: self,action: "rightBarButtonItemClicked")
- self.navigationItem!.rightBarButtonItem = self.rightButtonItem
- }
- //增加事件
- func rightBarButtonItemClicked()
- {
- var row = self.items.count
- var indexPath = NSIndexPath(forRow:row,inSection:0)
- self.items.append("杭州")
- self.tableView?.insertRowsAtIndexPaths([indexPath], withRowAnimation: UITableViewRowAnimation.Left)
- }
- override func didReceiveMemoryWarning() {
- super.didReceiveMemoryWarning()
- // Dispose of any resources that can be recreated.
- }
- //总行数
- func tableView(tableView: UITableView!, numberOfRowsInSection section: Int) -> Int{
- return self.items.count
- }
- //加载数据
- func tableView(tableView: UITableView!, cellForRowAtIndexPath indexPath: NSIndexPath!) -> UITableViewCell!{
- let cell = tableView .dequeueReusableCellWithIdentifier("cell", forIndexPath: indexPath) as UITableViewCell
- var row=indexPath.row as Int
- cell.textLabel.text=self.items[row]
- cell.imageView.image = UIImage(named:"green.png")
- return cell;
- }
- //删除一行
- func tableView(tableView: UITableView!, commitEditingStyle editingStyle: UITableViewCellEditingStyle, forRowAtIndexPath indexPath: NSIndexPath!){
- var index=indexPath.row as Int
- self.items.removeAtIndex(index)
- self.tableView?.deleteRowsAtIndexPaths([indexPath], withRowAnimation: UITableViewRowAnimation.Top)
- NSLog("删除\(indexPath.row)")
- }
- //选择一行
- func tableView(tableView: UITableView!, didSelectRowAtIndexPath indexPath: NSIndexPath!){
- let alert = UIAlertView()
- alert.title = "提示"
- alert.message = "你选择的是\(self.items[indexPath.row])"
- alert.addButtonWithTitle("Ok")
- alert.show()
- }
- }
2.APPDelegate.swift调用
- //
- // AppDelegate.swift
- // UITableViewDemo
- //
- // Created by 赵超 on 14-6-21.
- // Copyright (c) 2014年 赵超. All rights reserved.
- //
- import UIKit
- @UIApplicationMain
- class AppDelegate: UIResponder, UIApplicationDelegate {
- var window: UIWindow?
- func application(application: UIApplication, didFinishLaunchingWithOptions launchOptions: NSDictionary?) -> Bool {
- self.window = UIWindow(frame: UIScreen.mainScreen().bounds)
- // Override point for customization after application launch.
- var rootView=RootViewController()
- var nav=UINavigationController(rootViewController:rootView)
- self.window!.rootViewController = nav;
- self.window!.backgroundColor = UIColor.whiteColor()
- self.window!.makeKeyAndVisible()
- return true
- }
- func applicationWillResignActive(application: UIApplication) {
- // Sent when the application is about to move from active to inactive state. This can occur for certain types of temporary interruptions (such as an incoming phone call or SMS message) or when the user quits the application and it begins the transition to the background state.
- // Use this method to pause ongoing tasks, disable timers, and throttle down OpenGL ES frame rates. Games should use this method to pause the game.
- }
- func applicationDidEnterBackground(application: UIApplication) {
- // Use this method to release shared resources, save user data, invalidate timers, and store enough application state information to restore your application to its current state in case it is terminated later.
- // If your application supports background execution, this method is called instead of applicationWillTerminate: when the user quits.
- }
- func applicationWillEnterForeground(application: UIApplication) {
- // Called as part of the transition from the background to the inactive state; here you can undo many of the changes made on entering the background.
- }
- func applicationDidBecomeActive(application: UIApplication) {
- // Restart any tasks that were paused (or not yet started) while the application was inactive. If the application was previously in the background, optionally refresh the user interface.
- }
- func applicationWillTerminate(application: UIApplication) {
- // Called when the application is about to terminate. Save data if appropriate. See also applicationDidEnterBackground:.
- }
- }
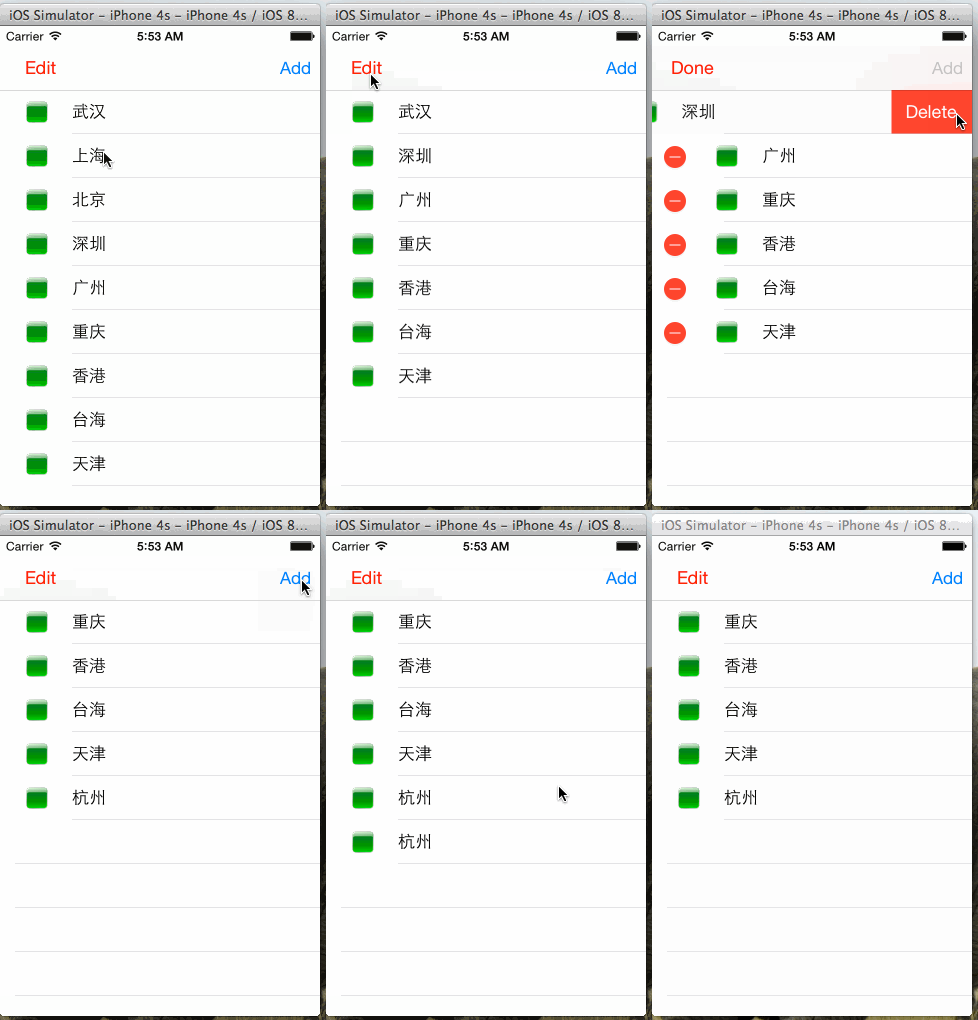
3.效果


 4598
4598

 被折叠的 条评论
为什么被折叠?


