1. Sheet 工作表单视图的使用
1.1 实现
// 工作表单视图
struct SheetsBootcamp: View {
@State var showSheet: Bool = false;
var body: some View {
ZStack{
// 背景
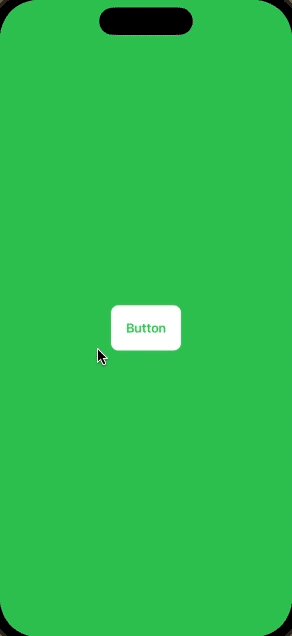
Color.green
.ignoresSafeArea()
Button {
showSheet.toggle()
} label: {
Text("Button")
.foregroundColor(.green)
.font(.headline)
.padding(20)
.background(Color.white.cornerRadius(10))
}
//弹出视图,设置全屏,只能设置一个全屏
//.fullScreenCover(isPresented: $showSheet, content: {
// SecondScreen()
//})
// 视图结构层次中,只能有一个工作表视图,将 SecondScreen 绑定到 工作表单中
.sheet(isPresented: $showSheet) {
// Text("Hello there!")
// 在这不能用 if else 进入不同的视图,不要添加任何条件语句
SecondScreen()
}
}
}
}
/// 第二个视图
struct SecondScreen: View{
// 新的环境 关键路径,.presentationMode : 表示模式 添加到屏幕
@Environment(\.presentationMode) var presentationMode
var body: some View {
ZStack(alignment: .topLeading){
// 背景
Color.red
.ignoresSafeArea()
Button {
// 关闭当前整个屏幕
presentationMode.wrappedValue.dismiss()
} label: {
Image(systemName: "xmark")
.foregroundColor(.white)
.font(.largeTitle)
.padding(20)
}
}
}
}
1.2 效果图:
2. Popover 弹出视图三种方式,效果一样,实现方式不同
2.1 实现
/// 弹出视图
struct PopoverBootcamp: View {
@State var showNewScreen: Bool = false
var body: some View {
ZStack{
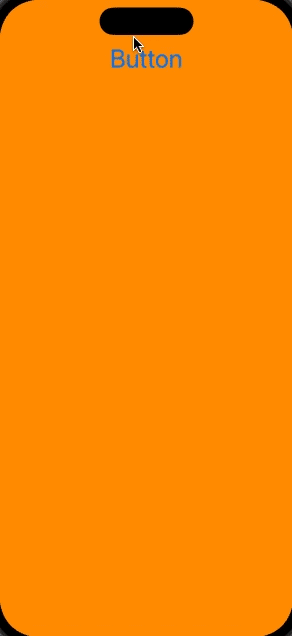
Color.orange
.ignoresSafeArea()
VStack {
Button("Button") {
showNewScreen.toggle()
}
.font(.largeTitle)
Spacer()
}
// Method 1 - sheet
// .sheet(isPresented: $showNewScreen) {
// NewScreen()
// }
// Method 2 - transition
// ZStack{
// if showNewScreen {
// NewScreen(showNewScreen: $showNewScreen)
// .padding(.top, 100)
// .transition(.move(edge: .bottom))
// .animation(.spring())
// }
// }
// .zIndex(2.0)
// Method 3 - ANIMATION OFFSET
NewScreen(showNewScreen: $showNewScreen)
.padding(.top, 100)
.offset(y: showNewScreen ? 0 : UIScreen.main.bounds.height)
.animation(.spring()) // spring: 具有弹性的
}
}
}
struct NewScreen: View{
// 定义模态视图
@Environment(\.presentationMode) var presentationMode
@Binding var showNewScreen: Bool
var body: some View{
ZStack(alignment: .topLeading){
Color.purple
.ignoresSafeArea()
Button {
// 关闭页面
//presentationMode.wrappedValue.dismiss()
showNewScreen.toggle()
} label: {
Image(systemName: "xmark")
.foregroundColor(Color.white)
.font(.largeTitle)
.padding(20)
}
}
}
}
2.2 效果图:
3. NavigationView 导航控制器的使用
3.1 实现
// 导航控制器
struct NavigationViewBootcamp: View {
var body: some View {
// 添加了导航视图,就不需要再次向里面添加导航视图
NavigationView {
ScrollView{
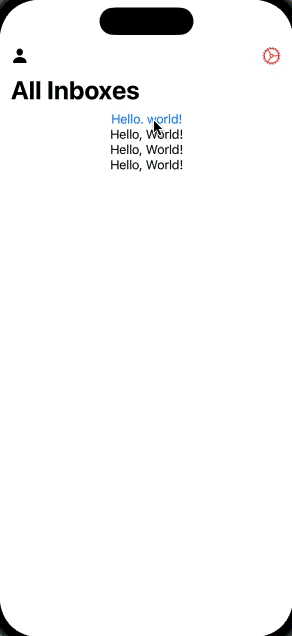
NavigationLink("Hello. world!"){
MyOtherScreen()
}
Text("Hello, World!")
Text("Hello, World!")
Text("Hello, World!")
}
.navigationBarHidden(false)
.navigationTitle("All Inboxes")
//.navigationBarTitleDisplayMode(.automatic)
.navigationBarItems(
leading:
HStack{
Image(systemName: "person.fill")
//Image(systemName: "flame.fill")
},
//Image(systemName: "gear")
trailing: NavigationLink(
destination: MyOtherScreen(),
label: {
Image(systemName: "gear")
})
.accentColor(.red)
)
}
}
}
struct MyOtherScreen: View{
@Environment(\.presentationMode) var presentationMode
var body: some View{
ZStack(){
Color.green.ignoresSafeArea()
.navigationTitle("Green Screen!")
//.navigationBarHidden(true)
VStack{
Button("Back Button") {
presentationMode.wrappedValue.dismiss()
}
.padding(20)
NavigationLink("Click here", destination: Text("3rd screen!"))
}
}
}
}
3.2 效果图:


 1万+
1万+


 被折叠的 条评论
为什么被折叠?
被折叠的 条评论
为什么被折叠?
 到【灌水乐园】发言


