


相关论文
《A Survey on Neural Speech Synthesis2021》综述
《MuLanTTS-TheMicrosoftSpeechSynthesisSystemfor Blizzard Challenge 2023》
SpeechT5:《SpeechT5 Unified Modal Encoder Decoder Pre Training for Spoken Language Processing》
VALL-E:《VALL-E Neural Codec Language Models are Zero-Shot Text to Speech Synthesizers》
VALL-E-X :《VALL-E-X Speak Foreign Languages with Your Own Voice Cross Lingual Neural Codec Language Modeling》
vits《vits Conditional Variational Autoencoder with Adversaria Learning for End to End Text to Speech》
模型比较
fastspeach:
输入:音素/音频,没speakerid
fastspeach2:
输入:音素/音频pair对;增加energy和pitch,这俩是物理计算
vits:质量要求高
VALL-E-X
简介
微软VALL-E-X:夸克在用
可以预训练模型
端到端
code
code:https://github.com/Plachtaa/VALL-E-X/tree/master
报错1:
File "/mnt/TTS/VALL-E-X/test.py", line 6, in <module>
    preload_models()
  File "/mnt/TTS/VALL-E-X/utils/generation.py", line 89, in preload_models
    vocos = Vocos.from_pretrained('charactr/vocos-encodec-24khz').to(device)
  File "/mnt/envs/tts_env/lib/python3.10/site-packages/vocos/pretrained.py", line 67, in from_pretrained
    config_path = hf_hub_download(repo_id=repo_id, filename="config.yaml", revision=revision)
  File "/mnt/envs/tts_env/lib/python3.10/site-packages/huggingface_hub/utils/_validators.py", line 118, in _inner_fn
报错原因:没有网,无法load远程资料。需要手动下载,放在指定的位置。
下载链接:https://huggingface.co/charactr/vocos-encodec-24khz 页面files and versions
下载的文件:config.yaml / pytorch_model.bin
linux系统放在:ls models–charactr–vocos-encodec-24khz/
注释掉下载的代码:/mnt/envs/tts_env/lib/python3.10/site-packages/vocos/pretrained.py
# config_path = hf_hub_download(repo_id=repo_id, filename="config.yaml", revision=revision)
# model_path = hf_hub_download(repo_id=repo_id, filename="pytorch_model.bin", revision=revision)
config_path = '/root/.cache/huggingface/hub/models--charactr--vocos-encodec-24khz/config.yaml'
model_path = '/root/.cache/huggingface/hub/models--charactr--vocos-encodec-24khz/pytorch_model.bin'
参考解决方案:https://github.com/Plachtaa/VALL-E-X/issues/89
vist
论文
Conditional Variational Autoencoder with Adversarial Learning for End-to-End Text-to-Speech
解读
代码解读
模型结构:gan+flow+vae模型
大框架是vae,训练时用gan,建模的时候用到了flow。
后验分布就是高斯分布;先验分布是高斯分布*flow
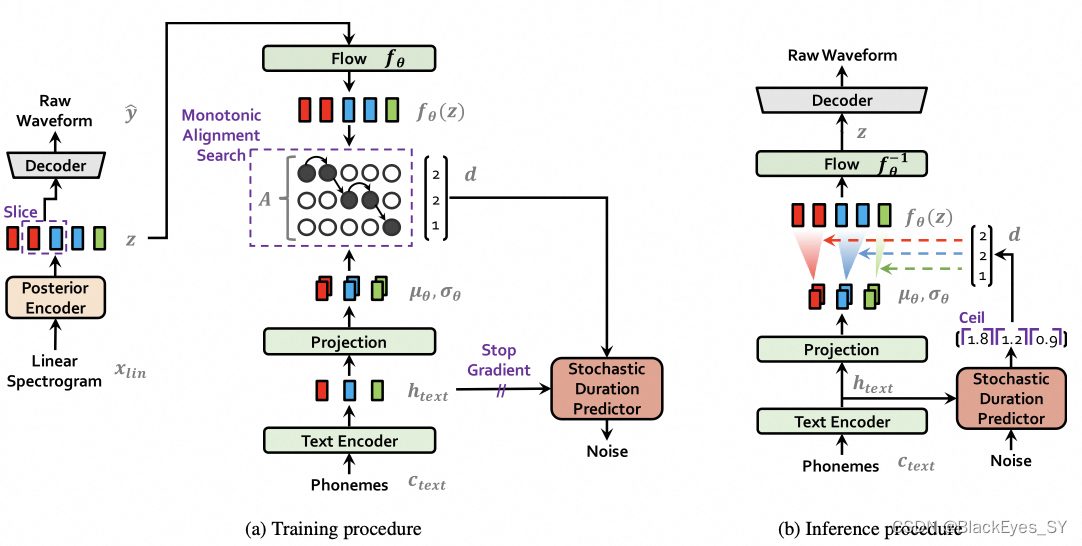
模块
Text Encoder:先验的文本的编码器模块,将独立的字表征成上下文相关的特征,得到一个以文字和说话者为条件的先验的分布:text->phonemet->先验分布。
Linear Spectorgram:输入wav,无参数训练的一种傅立叶变换,得到频谱。
posterior encoder:输入频谱,经过编码,得到后验分布。
loss
1、重构loss,输入的wav的梅尔频谱和生成的wav的梅尔频谱计算loss。
2、KL loss:text的先验分布和audio的后验分布要对齐。audio的后验分布是频谱的长度,text的先验分布显然比audio的后验要短,需要将先验扩充一下。
怎么对齐:通过动态规划的方式,找到每个因素持续的时长。先验分布根据时长进行扩展,和后验就在同一个维度了。
3、时长预测器:是一个flow模型,为什么需要时长预测器?infer的时候没有频谱可以来对齐text,需要预测。预测每个因素时长的分布,而不是预测因素时长的期望。有一个kl loss。
4、 gan的loss。
模型不是一个确定性的模型,即,每次预测的结果可能都不一样。采样的时候,是one to many的。
代码
train.py
class TextAudioSpeakerLoader(torch.utils.data.Dataset):
	def _filter(self)#如果文本太短做过滤。
	#dataset被调用的时候,会走getitem函数。
	text = self.get_text(text) #对phoneme进行离散化,将字符变成索引。
DistributedBucketSampler:#text的长度变化很大,不做桶排序的话,反向梯度的效率会很低。提升训练效率。为什么效率不高,因为text短的话,需要pad较多的无效数据。
	def __init__(self, dataset, batch_size, boundaries, num_replicas=None, rank=None, shuffle=True):
	boundaries:#分桶的边界。边界是帧。
	num_replicas:#gpu卡数。
	 def _create_buckets(self):返回桶,及每个桶的样本量。
	 indices.append(torch.randperm(len(bucket), generator=g).tolist()):shuffle
TextAudioSpeakerCollate
	_, ids_sorted_decreasing = torch.sort( #根据梅尔频谱的长度进行排序
            torch.LongTensor([x[1].size(1) for x in batch]),
            dim=0, descending=True)
net_g = SynthesizerTrn( # 是生成器,从text到wav
      len(symbols),
      hps.data.filter_length // 2 + 1,
      hps.train.segment_size // hps.data.hop_length,
      n_speakers=hps.data.n_speakers,
      **hps.model).cuda(rank)
net_d = MultiPeriodDiscriminator(hps.model.use_spectral_norm).cuda(rank) # 多周期的判别器
optim_g = torch.optim.AdamW( # 生成器的优化函数
      net_g.parameters(),
      hps.train.learning_rate,
      betas=hps.train.betas,
      eps=hps.train.eps)
 optim_d = torch.optim.AdamW(# 判别器的优化函数
      net_d.parameters(),
      hps.train.learning_rate,
      betas=hps.train.betas,
      eps=hps.train.eps)
net_g = DDP(net_g, device_ids=[rank]) # 分布式训练
scheduler_g = torch.optim.lr_scheduler.ExponentialLR(optim_g, gamma=hps.train.lr_decay, last_epoch=epoch_str-2) # 学习率的衰减方案

from torch.cuda.amp import autocast, GradScaler
scaler = GradScaler(enabled=hps.train.fp16_run) # 混合训练 fp16进行训练,在效率和性能上进行平衡
x, x_lengths = x.cuda(rank, non_blocking=True), x_lengths.cuda(rank, non_blocking=True) # 把数据copy到gpu上面
y_hat, l_length, attn, ids_slice, x_mask, z_mask,\
      (z, z_p, m_p, logs_p, m_q, logs_q) = net_g(x, x_lengths, spec, spec_lengths, speakers)
# y_hat 预估波形;l_length 预估波形的长度;并不是所有的波形都参与训练,而是对波形进行了采样,减少内存的消耗。ids_slice:采样后的频谱的id。
spec:线性普
spec_to_mel_torch()线性普转梅尔普
mel_spectrogram_torch() 波形到梅尔普
y_mel = commons.slice_segments(mel, ids_slice, hps.train.segment_size // hps.data.hop_length) # 对梅尔普也进行采样。
y = commons.slice_segments(y, ids_slice * hps.data.hop_length, hps.train.segment_size) # 一个梅尔普对应256个波形点

y_d_hat_r, y_d_hat_g, _, _ = net_d(y, y_hat.detach()) # y_d_hat_r真实的判别器的输出,生成的判别器判别器的输出,判别器
with autocast(enabled=False): # 不走fp16
       loss_disc, losses_disc_r, losses_disc_g = discriminator_loss(y_d_hat_r, y_d_hat_g)
       loss_disc_all = loss_disc
optim_d.zero_grad()  #判别器梯度置0
model.py
self.dec = Generator(inter_channels, resblock, resblock_kernel_sizes, resblock_dilation_sizes, upsample_rates, upsample_initial_channel, upsample_kernel_sizes, gin_channels=gin_channels) # 波形生成器

self.enc_q = PosteriorEncoder(spec_channels, inter_channels, hidden_channels, 5, 1, 16, gin_channels=gin_channels) # 后验编码器
PosteriorEncoder:
	def forward(self, x, x_lengths, g=None):#g是一个条件,以说话人为条件
    x_mask = torch.unsqueeze(commons.sequence_mask(x_lengths, x.size(2)), 1).to(x.dtype)
    x = self.pre(x) * x_mask
    x = self.enc(x, x_mask, g=g)
    stats = self.proj(x) * x_mask
    m, logs = torch.split(stats, self.out_channels, dim=1) # m分布的方差 # logs分布的标准差取log
    z = (m + torch.randn_like(m) * torch.exp(logs)) * x_mask
    return z, m, logs, x_mask

self.flow = ResidualCouplingBlock(inter_channels, hidden_channels, 5, 1, 4, gin_channels=gin_channels)# 提高先验分布的表达能力的,加flow效果会更好,是先验的flow

if use_sdp: #随机时长预测器,(说话的韵律节奏)
  self.dp = StochasticDurationPredictor(hidden_channels, 192, 3, 0.5, 4, gin_channels=gin_channels)

x, m_p, logs_p, x_mask = self.enc_p(x, x_lengths) # x 文本的encode,m_p分布的方差,logs_p分布的标准差,是fseitaz分布的u sigma
z_p = self.flow(z, y_mask, g=g) # 后验经常一个逆flow;或者先验经过一个flow

# 动态规划 单调对齐搜索
with torch.no_grad():
      # negative cross-entropy
      s_p_sq_r = torch.exp(-2 * logs_p) # [b, d, t]
      neg_cent1 = torch.sum(-0.5 * math.log(2 * math.pi) - logs_p, [1], keepdim=True) # [b, 1, t_s]
      neg_cent2 = torch.matmul(-0.5 * (z_p ** 2).transpose(1, 2), s_p_sq_r) # [b, t_t, d] x [b, d, t_s] = [b, t_t, t_s]
      neg_cent3 = torch.matmul(z_p.transpose(1, 2), (m_p * s_p_sq_r)) # [b, t_t, d] x [b, d, t_s] = [b, t_t, t_s]
      neg_cent4 = torch.sum(-0.5 * (m_p ** 2) * s_p_sq_r, [1], keepdim=True) # [b, 1, t_s]
      neg_cent = neg_cent1 + neg_cent2 + neg_cent3 + neg_cent4
      l_length = l_length / torch.sum(x_mask) # l_length是似然

      attn_mask = torch.unsqueeze(x_mask, 2) * torch.unsqueeze(y_mask, -1)
      attn = monotonic_align.maximum_path(neg_cent, attn_mask.squeeze(1)).unsqueeze(1).detach() # attn是01矩阵,因为是硬对齐,attn shape[b,1,T_s,T_t] 文本长度,频谱长度
w = attn.sum(2) #w的shape [b, 1,T_t] 每个文本有多少帧 T_t是文字
# 对齐之前 m_p 的shape [b,feat_dim,T_t]
# 对齐之前 logs_p 的shape [b,feat_dim,T_t]
m_p = torch.matmul(attn.squeeze(1), m_p.transpose(1, 2)).transpose(1, 2)# expand prior
# 对齐后扩展后 m_p 的shape [b,feat_dim,T_s]
# 对齐后扩展后 logs_p 的shape [b,feat_dim,T_s]

z_slice, ids_slice = commons.rand_slice_segments(z, y_lengths, self.segment_size) # 为了减少内存,进入解码器之前,需要进行采样,segment_size决定了采样的频率;一个帧频谱对应256个波形点
o = self.dec(z_slice, g=g) # 反卷积和参差网络,一个帧频谱对应256个波形点,如果想从频谱产出波形,需要上采样256,需要4个上采样 8 8 2 2

if use_sdp: # 随机时长预测器
      self.dp = StochasticDurationPredictor(hidden_channels, 192, 3, 0.5, 4, gin_channels=gin_channels)
    else:
      self.dp = DurationPredictor(hidden_channels, 256, 3, 0.5, gin_channels=gin_channels)
      # x输入 经过神经网络或者transfrom 和 w计算f1 loss

class StochasticDurationPredictor(nn.Module): # 随机 事表现力更强,预测每个因素饿时长分布,从分布中采样就是随机 通过重参数化 基于flow来设计的。
valle
名词解释
VITS: VITS(Variational Inference with adversarial learning for end-to-end Text-to-Speech)是一种结合变分推理(variational inference)、标准化流(normalizing flows)和对抗训练的高表现力语音合成模型
b站 bert+vits2:
https://www.bilibili.com/video/BV1oC4y1D7VX/?spm_id_from=333.337.search-card.all.click
Zero-Shot Learning简称ZSL
TTS:Text-to-Speech
飞桨 PaddlePaddle:百度旗下产品


 3万+
3万+

 被折叠的 条评论
为什么被折叠?
被折叠的 条评论
为什么被折叠?
 到【灌水乐园】发言


