


1、使用Fragment必须继承FragmentActivity。还要获取FragmentTransaction 实例
FragmentTransaction ft = getSupportFragmentManager().beginTransaction();//
WeiFragment second = new WeiFragment();
ft.replace(R.id.id_content, second);//向容器内加入Fragment
ft.commit(); //提交
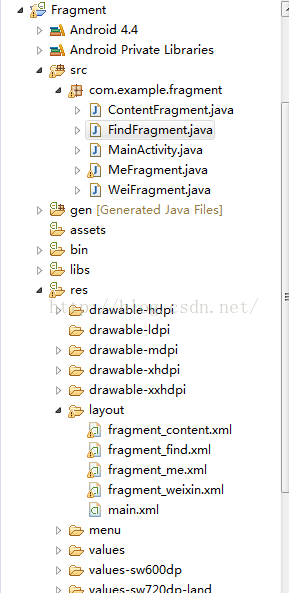
MainActivity.java 主要在主线程显示一个Fragment 然后添加了四个控件,点击每个控件都可以跳转到一个fragment.
package com.example.fragment;

import android.os.Bundle;
import android.support.v4.app.FragmentActivity;
import android.support.v4.app.FragmentTransaction;
import android.view.View;
import android.view.View.OnClickListener;
import android.widget.Button;

public class MainActivity extends FragmentActivity implements OnClickListener{

	FragmentTransaction ft;
	private Button weixin;
	private Button content;
	private Button find;
	private Button me;
	static String msg = ":msg";
	public void onCreate(Bundle savedInstanceState) {
		super.onCreate(savedInstanceState);
		setContentView(R.layout.main);
		ft = getSupportFragmentManager().beginTransaction();//获取FragmentTransaction 实例
		WeiFragment first = new WeiFragment();
		ft.add(R.id.id_content, first);
		ft.commit();

		initUI();

	}
	private void initUI() {
		// TODO Auto-generated method stub
		weixin = (Button)findViewById(R.id.weixin);
		weixin.setOnClickListener(this);
		content = (Button)findViewById(R.id.content);
		content.setOnClickListener(this);
		find = (Button)findViewById(R.id.find);
		find.setOnClickListener(this);
		me = (Button)findViewById(R.id.me);
		me.setOnClickListener(this);
	}

	@Override
	public void onClick(View v) {
		// TODO Auto-generated method stub
		switch(v.getId()){
			case R.id.weixin://微信fragment
				//getPhoneNumber();
				//获取FragmentTransaction 实例
				FragmentTransaction ft1 = getSupportFragmentManager().beginTransaction();
				WeiFragment second = new WeiFragment();
				ft1.replace(R.id.id_content, second);//向容器内加入Fragment
				ft1.commit();	//提交
				break;
			case R.id.content://通讯录
				FragmentTransaction ft2 = getSupportFragmentManager().beginTransaction();
				ContentFragment sd = new ContentFragment();
				ft2.replace(R.id.id_content, sd);
				ft2.commit();
				break;
			case R.id.find://发现
				FragmentTransaction ft3 = getSupportFragmentManager().beginTransaction();
				FindFragment fd = new FindFragment();
				ft3.replace(R.id.id_content, fd);
				ft3.commit();
				break;
			case R.id.me: //我
				FragmentTransaction ft4 = getSupportFragmentManager().beginTransaction();
				MeFragment m = new MeFragment();
				ft4.replace(R.id.id_content, m);//向容器内加入Fragment
				ft4.commit();
				break;
		}
	}


	public String getPhoneNumber(){

        return msg;
	}

}
<LinearLayout xmlns:android="http://schemas.android.com/apk/res/android"
    xmlns:tools="http://schemas.android.com/tools"
    android:layout_width="match_parent"
    android:orientation="vertical"
    android:layout_height="match_parent" >

    <LinearLayout
        android:layout_width="fill_parent"
        android:layout_height="wrap_content"
        android:orientation="horizontal">
        <Button
            android:id="@+id/weixin"
            android:layout_weight="1"
            android:layout_width="wrap_content"
            android:layout_height="wrap_content"
            android:text="@string/one"/>
        <Button
            android:id="@+id/content"
            android:layout_weight="1"
            android:layout_width="wrap_content"
            android:layout_height="wrap_content"
            android:text="@string/two"/>
        <Button
            android:id="@+id/find"
            android:layout_weight="1"
            android:layout_width="wrap_content"
            android:layout_height="wrap_content"
            android:text="@string/three"/>
        <Button
            android:id="@+id/me"
            android:layout_weight="1"
            android:layout_width="wrap_content"
            android:layout_height="wrap_content"
            android:text="@string/four"/>
    </LinearLayout>
    <FrameLayout
        android:id="@+id/id_content"
        android:layout_width="fill_parent"
        android:layout_height="fill_parent" >
    </FrameLayout>


</LinearLayout>MeFragment.java
package com.example.fragment;

import java.util.ArrayList;
import java.util.List;
import java.util.Map;

import android.os.Bundle;
import android.support.v4.app.Fragment;
import android.view.LayoutInflater;
import android.view.View;
import android.view.View.OnClickListener;
import android.view.ViewGroup;
import android.widget.ArrayAdapter;
import android.widget.Button;
import android.widget.ListView;
import android.widget.Toast;


public class MeFragment extends Fragment {

	private ListView list;
	public View onCreateView(LayoutInflater inflater, ViewGroup container,
			Bundle savedInstanceState) {
		View view = inflater
				.inflate(R.layout.fragment_me, container, false);

		Button button = (Button)view.findViewById(R.id.me);
		button.setOnClickListener(new OnClickListener() {

			@Override
			public void onClick(View arg0) {
				// TODO Auto-generated method stub
				Toast.makeText(getActivity(), "me", Toast.LENGTH_SHORT).show();
			}
		});

		list = (ListView)view.findViewById(R.id.list);
		list.setAdapter(new ArrayAdapter<String>(getActivity(),
					android.R.layout.simple_expandable_list_item_1,getData()));


		return view;
	}

	private List<String> getData(){
        List<String> data = new ArrayList<String>();
        for(int i=0;i<10;i++){
            data.add("测试时"+i);
        }
        return data;
    }
}<?xml version="1.0" encoding="utf-8"?>
<LinearLayout xmlns:android="http://schemas.android.com/apk/res/android"
android:layout_width="fill_parent"
android:layout_height="match_parent"
android:orientation="vertical"
android:background="#cba" >
<TextView
android:id="@+id/tv_first"
android:layout_width="wrap_content"
android:layout_height="wrap_content"
android:layout_gravity="center_horizontal"
android:text="me"
android:textAppearance="?android:attr/textAppearanceLarge" />
<Button
android:id="@+id/me"
android:layout_width="wrap_content"
android:layout_height="wrap_content"
android:layout_gravity="center_horizontal"
android:text="" />
<ListView
android:id="@+id/list"
android:layout_width="wrap_content"
android:layout_height="wrap_content">
</ListView>
</LinearLayout>
package com.example.fragment;

import android.os.Bundle;
import android.support.v4.app.Fragment;
import android.view.LayoutInflater;
import android.view.View;
import android.view.View.OnClickListener;
import android.view.ViewGroup;
import android.widget.Button;
import android.widget.Toast;


public class ContentFragment extends Fragment {

	public View onCreateView(LayoutInflater inflater, ViewGroup container,
			Bundle savedInstanceState) {
		View view = inflater
				.inflate(R.layout.fragment_content, container, false);

		Button button = (Button)view.findViewById(R.id.content);
		button.setOnClickListener(new OnClickListener() {

			@Override
			public void onClick(View arg0) {
				// TODO Auto-generated method stub
				Toast.makeText(getActivity(), "content", Toast.LENGTH_SHORT).show();
			}
		});


		return view;
	}
}<?xml version="1.0" encoding="utf-8"?>
<LinearLayout xmlns:android="http://schemas.android.com/apk/res/android"
android:layout_width="fill_parent"
android:layout_height="match_parent"
android:background="#abc"
android:orientation="vertical" >
<TextView
android:id="@+id/tv_second"
android:layout_width="wrap_content"
android:layout_height="wrap_content"
android:layout_gravity="center_horizontal"
android:text="content"
android:textAppearance="?android:attr/textAppearanceLarge" />
<Button
android:id="@+id/content"
android:layout_width="wrap_content"
android:layout_height="wrap_content"
android:layout_gravity="center_horizontal"
android:text="" />
</LinearLayout>
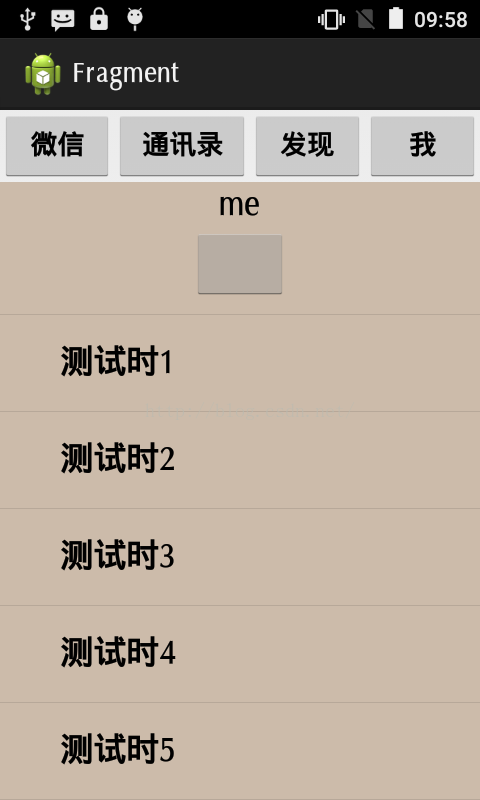
实现效果图:
2、使用回退栈,要先将当前fragment添加到回退栈中,然后使用
 private void addFragment(Fragment fragment,String tag){
        //获取事物
        FragmentTransaction beginTransaction = fragmentManager.beginTransaction();

        //第一个参数:要添加fragment容器
        beginTransaction.add(R.id.framelayout, fragment, tag);

        //将当前fragment添加到回退栈
        beginTransaction.addToBackStack(tag);

        //提交
        beginTransaction.commit();
} fragmentManager.popBackStack("fragment2",FragmentManager.POP_BACK_STACK_INCLUSIVE);fragmentManager.popBackStackImmediate();ragmentManager.popBackStack("fragment2",0);
代码下载地址:点击打开链接


 738
738

 被折叠的 条评论
为什么被折叠?
被折叠的 条评论
为什么被折叠?
 到【灌水乐园】发言


