


开发cxf的web项目:
1、在MyEclipse中建立一个JavaWebProject,选择使用Jdk1.6.0_24。
2、将cxf2.4中的lib目录中的jar全部copy到WEB-INF/lib目录下。
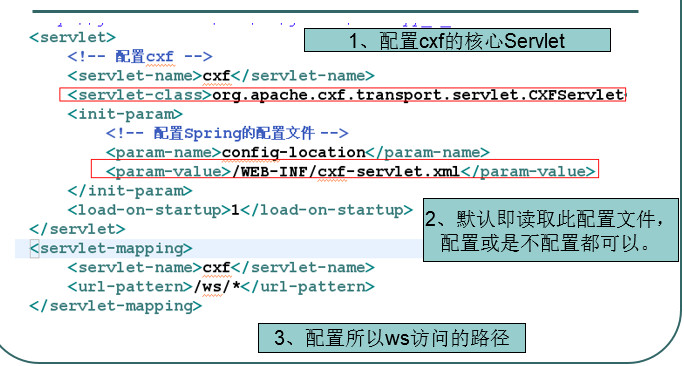
web.xml的配置如下:
<?xml version="1.0" encoding="UTF-8"?>

	<servlet>
		<!-- 配置cxf -->
		<servlet-name>cxf</servlet-name>
		<servlet-class>org.apache.cxf.transport.servlet.CXFServlet</servlet-class>
		<init-param>
			<!-- 配置Spring的配置文件 -->
			<param-name>config-location</param-name>
			<param-value>/WEB-INF/cxf-servlet.xml</param-value>
		</init-param>
		<load-on-startup>1</load-on-startup>
	</servlet>
	<servlet-mapping>
		<servlet-name>cxf</servlet-name>
		<url-pattern>/ws/*</url-pattern>
	</servlet-mapping>
	<welcome-file-list>
		<welcome-file>index.jsp</welcome-file>
	</welcome-file-list>
</web-app>
Cxf-servlet.xml文件说明: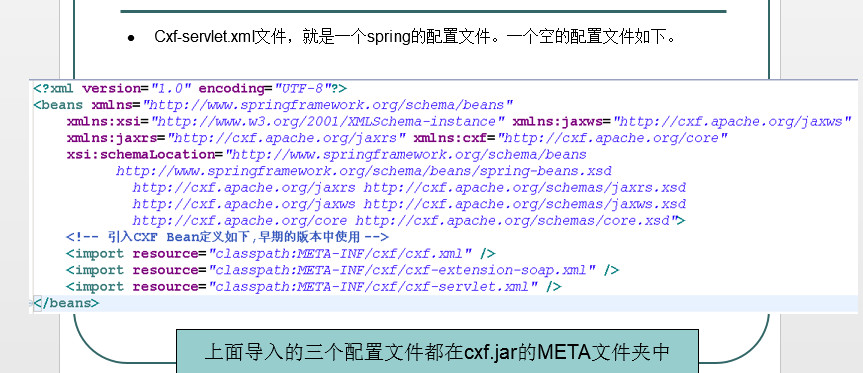
<?xml version="1.0" encoding="UTF-8"?>
<beans xmlns="http://www.springframework.org/schema/beans"
	xmlns:xsi="http://www.w3.org/2001/XMLSchema-instance" xmlns:jaxws="http://cxf.apache.org/jaxws"
	xmlns:jaxrs="http://cxf.apache.org/jaxrs" xmlns:cxf="http://cxf.apache.org/core"
	xsi:schemaLocation="http://www.springframework.org/schema/beans
          http://www.springframework.org/schema/beans/spring-beans.xsd
            http://cxf.apache.org/jaxrs http://cxf.apache.org/schemas/jaxrs.xsd
            http://cxf.apache.org/jaxws http://cxf.apache.org/schemas/jaxws.xsd
            http://cxf.apache.org/core http://cxf.apache.org/schemas/core.xsd">
	<!-- 引入CXF Bean定义如下,早期的版本中使用 -->
	<import resource="classpath:META-INF/cxf/cxf.xml" />
	<import resource="classpath:META-INF/cxf/cxf-extension-soap.xml" />
	<import resource="classpath:META-INF/cxf/cxf-servlet.xml" />

	<!-- 直接发布一个类,无接口 -->
	<jaxws:endpoint id="one" implementor="cn.itcast.ws1.OneService"
		address="/one">
	</jaxws:endpoint>
	<!-- 发布一个服务,没有指定接口 -->
	<jaxws:server id="two" address="/two" serviceClass="cn.itcast.ws2.ITwoService">
		<jaxws:serviceBean>
			<!-- 指定发布类,下面类必须添加@WebService注解 -->
			<bean class="cn.itcast.ws2.TwoServiceImpl"></bean>
		</jaxws:serviceBean>
	</jaxws:server>
</beans>

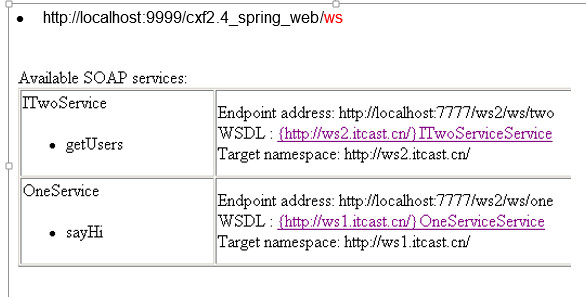
1、通过MyEclipse发布我们的项目。并在地址栏访问http://localhost:9999/cxf2.4_spring_web/ws.应该出现以上的界面。
2、上面的程序是说,没有发现任何已经发布的WebService,确实如此。请同学们重复上面的过程,看能否搭建一个cxf+spring环境出来。
3、接下来,我们将开始在此环境下,发布我们的WebService.
配置发布第一个ws : (jaxb)
<?xml version="1.0" encoding="UTF-8"?>
<beans xmlns="http://www.springframework.org/schema/beans"
xmlns:xsi="http://www.w3.org/2001/XMLSchema-instance"
xmlns:jaxws="http://cxf.apache.org/jaxws"
xmlns:jaxrs="http://cxf.apache.org/jaxrs"
xmlns:cxf="http://cxf.apache.org/core"
xsi:schemaLocation="http://www.springframework.org/schema/beans
http://www.springframework.org/schema/beans/spring-beans.xsd
http://cxf.apache.org/jaxrs http://cxf.apache.org/schemas/jaxrs.xsd
http://cxf.apache.org/jaxws http://cxf.apache.org/schemas/jaxws.xsd
http://cxf.apache.org/core http://cxf.apache.org/schemas/core.xsd">
<import resource="classpath:META-INF/cxf/cxf.xml"/>
<import resource="classpath:META-INF/cxf/cxf-extension-soap.xml"/>
<import resource="classpath:META-INF/cxf/cxf-servlet.xml"/>
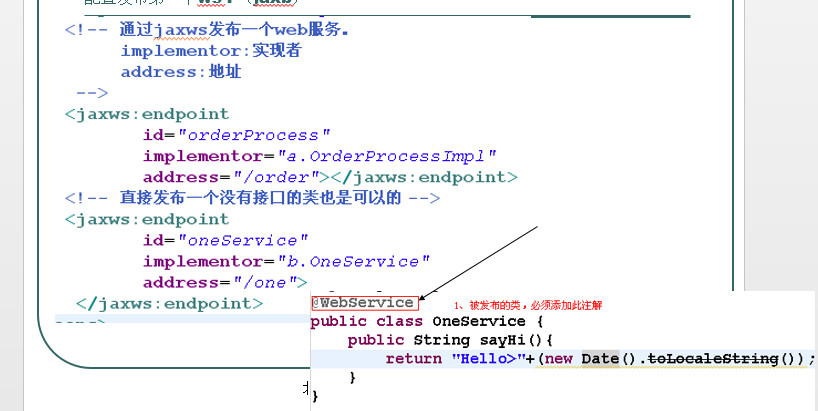
<!-- 通过jaxws发布一个web服务。
implementor:实现者
address:地址
-->
<jaxws:endpoint
id="orderProcess"
implementor="a.OrderProcessImpl"
address="/order"></jaxws:endpoint>
<!-- 直接发布一个没有接口的类也是可以的 -->
<jaxws:endpoint
id="oneService"
implementor="b.OneService"
address="/one">
</jaxws:endpoint>
</beans>
发布带有接口的配置: (jax-ws)

<?xml version="1.0" encoding="UTF-8"?>
<beans xmlns="http://www.springframework.org/schema/beans"
       xmlns:xsi="http://www.w3.org/2001/XMLSchema-instance"
       xmlns:jaxws="http://cxf.apache.org/jaxws"
       xmlns:jaxrs="http://cxf.apache.org/jaxrs"
       xmlns:cxf="http://cxf.apache.org/core"
       xsi:schemaLocation="http://www.springframework.org/schema/beans
          http://www.springframework.org/schema/beans/spring-beans.xsd
            http://cxf.apache.org/jaxrs http://cxf.apache.org/schemas/jaxrs.xsd
            http://cxf.apache.org/jaxws http://cxf.apache.org/schemas/jaxws.xsd
            http://cxf.apache.org/core http://cxf.apache.org/schemas/core.xsd">
   <!-- 声明方式说明:
        serviceClass:必须为一个接口,
        		           并在接口上必须使用@WebService注解否则调用时会抛出异常
   	    serviceBean:是实际服务的类,必须是serviceClass的子类
   	    		       此类上面即可以使用@WebService注解,也可以不使用
   	    address:访问地址,省去前面的ip:port.
   	        注意在此注册的类,必须要添加@WebService的注解
    -->
   <jaxws:server id="one"
   		         serviceClass="cn.one.IOneService"
   		         address="/one">
   		<jaxws:serviceBean>
   			<bean class="cn.one.OneService"></bean>
   		</jaxws:serviceBean>
   </jaxws:server>
</beans>
配置说明:

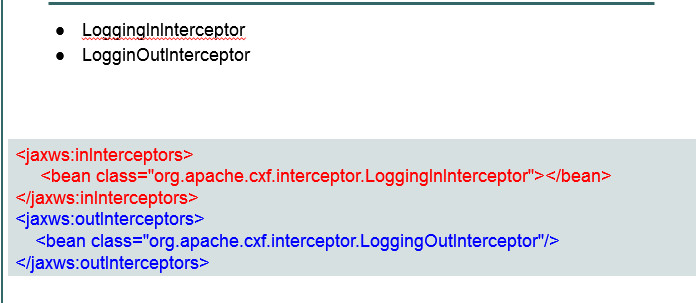
通过配置给服务添加消息拦截器:
 <!-- 声明方式说明:
        serviceClass:必须为一个接口,
                   并在接口上必须使用@WebService注解否则调用时会抛出异常
       serviceBean:是实际服务的类,必须是serviceClass的子类
              此类上面即可以使用@WebService注解,也可以不使用
       address:访问地址,省去前面的ip:port.
           注意在此注册的类,必须要添加@WebService的注解
    -->
   <jaxws:server id="one"
            serviceClass="cn.one.IOneService"
            address="/one">
   <jaxws:inInterceptors>
   <bean class="org.apache.cxf.interceptor.LoggingInInterceptor"></bean>
   </jaxws:inInterceptors>
   <jaxws:outInterceptors>
   <bean class="org.apache.cxf.interceptor.LoggingOutInterceptor"></bean>
   </jaxws:outInterceptors>
   <jaxws:serviceBean>
   <bean class="cn.one.OneService"></bean>
   </jaxws:serviceBean>
   </jaxws:server>
在地址栏访问:
1、点击上面的超连接,将会看到发布的wsdl文件。
2、至此,cxf和Spring的整合就算是完成了,是不是很简单。下面我们将学习,如何在Spring的环境中访问它。
Java项目代码调用服务:

1、注意,此处所说的是在Java项目中调用Spring的服务,并不是在JavaEE项目中调用。后期将会讲到如何在JavaEE项目中调用。
2、建议从wsdl地址获取接口文件,也仅需要接口文件。
JaxWsProxyFactoryBeanclient =
new JaxWsProxyFactoryBean();
client.setAddress("http://localhost:7777/xcxf2_web/ws/one");
client.setServiceClass(IOneService.class);
IOneServiceone = client.create(IOneService.class);
Stringss= one.sayHi("OK你好");
System.err.println(ss);
在Spring项目中,通过配置文件调用:
建立好以后Java项目如下图
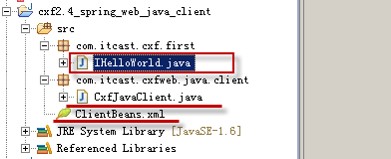
1、说明:IHelloWorld.java是通过wsimport生成的接口,我们只需要这个接口。
2、CxfJavaClient.java包含main方法,用于通过ClientBeans.xml文件,调用WebService。
3、源代码:
packagecom.itcast.cxf.first;
importjavax.jws.WebService;
/**
* 如果没有改变包名的情况下,可以只使用@WebService注解。
* 如果修改了包名则应该使用
* @WebService(name="IHelloWorld",targetNamespace="http://wj.com")
* 所以,对于此类,仍然建议使用wsimport或wsdl2java生成。
* (仅需要此接口,其他类,不需要)
* @authorwangjianme
*
*/
@WebService
publicinterface IHelloWorld{
public String sayHello(Stringname);
}
ClientBeans.xml文件的内容:
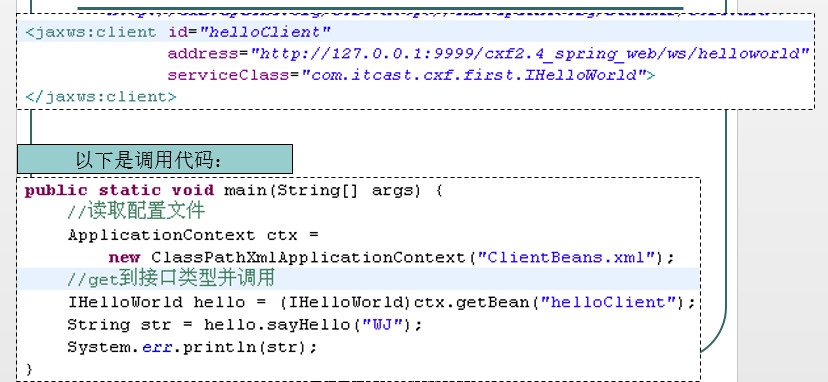
说明:
通过<jaxws:client/>来获取WebService,id就不用说了吧。
address是不包含?wsdl的服务地址。
serviceClass是本地的接口名,与服务接口名保持相同才可以。
1、以下是ClientBeans.xml的文件的源代码:
<?xmlversion="1.0" encoding="UTF-8"?>
<beansxmlns="http://www.springframework.org/schema/beans"
xmlns:xsi="http://www.w3.org/2001/XMLSchema-instance"
xmlns:jaxws="http://cxf.apache.org/jaxws"
xmlns:jaxrs="http://cxf.apache.org/jaxrs"
xmlns:cxf="http://cxf.apache.org/core"
xsi:schemaLocation="http://www.springframework.org/schema/beans
http://www.springframework.org/schema/beans/spring-beans.xsd
http://cxf.apache.org/jaxrshttp://cxf.apache.org/schemas/jaxrs.xsd
http://cxf.apache.org/jaxwshttp://cxf.apache.org/schemas/jaxws.xsd
http://cxf.apache.org/corehttp://cxf.apache.org/schemas/core.xsd">
<jaxws:clientid="helloClient"
address="http://127.0.0.1:9999/cxf2.4_spring_web/ws/helloworld"
serviceClass="com.itcast.cxf.first.IHelloWorld">
</jaxws:client>
</beans>
1、以下是CxfJavaClient.java的源代码:
packagecom.itcast.cxfweb.java.client;
importorg.springframework.context.ApplicationContext;
importorg.springframework.context.support.ClassPathXmlApplicationContext;
importcom.itcast.cxf.first.IHelloWorld;
/**
* Java项目的客户端
* @authorwangjianme
*/
publicclass CxfJavaClient{
public static void main(String[] args){
//读取配置文件
ApplicationContextctx=
new ClassPathXmlApplicationContext("ClientBeans.xml");
//get到接口类型并调用
IHelloWorldhello = (IHelloWorld)ctx.getBean("helloClient");
String str= hello.sayHello("WJ");
System.err.println(str);
}
}
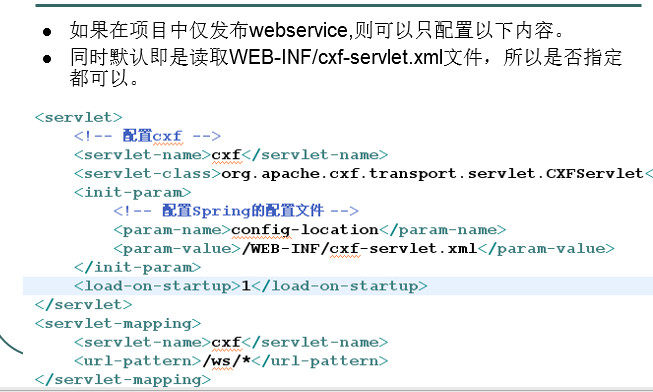
关于web项目配置的说明1:
你好
<servlet>
<!--配置cxf-->
<servlet-name>cxf</servlet-name>
<servlet-class>org.apache.cxf.transport.servlet.CXFServlet</servlet-class>
<init-param>
<!--配置Spring的配置文件-->
<param-name>config-location</param-name>
<param-value>/WEB-INF/cxf-servlet.xml</param-value>
</init-param>
<load-on-startup>1</load-on-startup>
</servlet>
<servlet-mapping>
<servlet-name>cxf</servlet-name>
<url-pattern>/ws/*</url-pattern>
</servlet-mapping>
关于web项目配置的说明2:

<?xml version="1.0" encoding="UTF-8"?>

  <context-param>
  	<param-name>contextConfigLocation</param-name>
  	<param-value>
  		/WEB-INF/cxf-itcast.xml
  	</param-value>
  </context-param>
  <listener>
  	<listener-class>org.springframework.web.context.ContextLoaderListener</listener-class>
  </listener>
  <servlet>
  	<servlet-name>cxf</servlet-name>
  	<servlet-class>org.apache.cxf.transport.servlet.CXFServlet</servlet-class>
  	<load-on-startup>1</load-on-startup>
  </servlet>
  <servlet-mapping>
  	<servlet-name>cxf</servlet-name>
  	<url-pattern>/ws/*</url-pattern>
  </servlet-mapping>
  <welcome-file-list>
    <welcome-file>index.jsp</welcome-file>
  </welcome-file-list>
</web-app>
关于web项目配置的说明3:
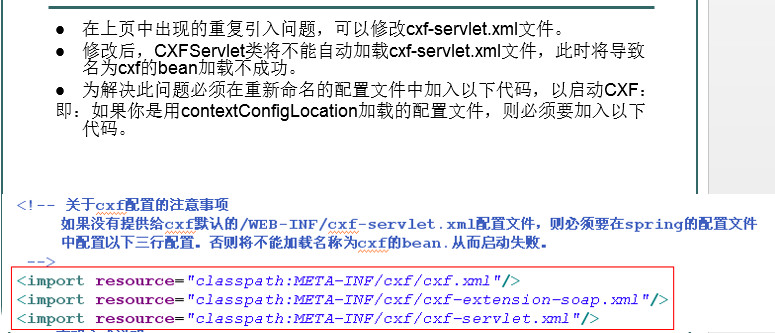
<!--关于cxf配置的注意事项
如果没有提供给cxf默认的/WEB-INF/cxf-servlet.xml配置文件,则必须要在spring的配置文件
中配置以下三行配置。否则将不能加载名称为cxf的bean.从而启动失败。
-->
<import resource="classpath:META-INF/cxf/cxf.xml"/>
<importresource="classpath:META-INF/cxf/cxf-extension-soap.xml"/>
<importresource="classpath:META-INF/cxf/cxf-servlet.xml"/>
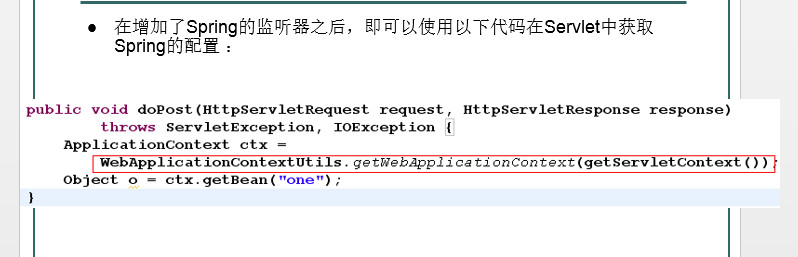
关于web项目配置的说明4:
import java.io.IOException;
import javax.servlet.ServletException;
import javax.servlet.http.HttpServlet;
import javax.servlet.http.HttpServletRequest;
import javax.servlet.http.HttpServletResponse;
import org.springframework.context.ApplicationContext;
import org.springframework.web.context.support.WebApplicationContextUtils;
/**
 * 获取Spring的配置
 */
public class TT extends HttpServlet {
	public void doGet(HttpServletRequest request, HttpServletResponse response)
			throws ServletException, IOException {
		doPost(request, response);
	}
	public void doPost(HttpServletRequest request, HttpServletResponse response)
			throws ServletException, IOException {
		ApplicationContext ctx =
			WebApplicationContextUtils.getWebApplicationContext(getServletContext());
		Object o = ctx.getBean("one");
	}
}


 592
592


 被折叠的 条评论
为什么被折叠?
被折叠的 条评论
为什么被折叠?
 到【灌水乐园】发言


