-
- abstract class InputStage {
- private final InputStage mNext;
-
- protected static final int FORWARD = 0;
- protected static final int FINISH_HANDLED = 1;
- protected static final int FINISH_NOT_HANDLED = 2;
-
-
-
-
-
- public InputStage(InputStage next) {
- mNext = next;
- }
-
-
-
-
- public final void deliver(QueuedInputEvent q) {
-
- if ((q.mFlags & QueuedInputEvent.FLAG_FINISHED) != 0) {
- forward(q);
- } else if (shouldDropInputEvent(q)) {
- finish(q, false);
- } else {
- apply(q, onProcess(q));
- }
- }
-
-
-
-
- protected void finish(QueuedInputEvent q, boolean handled) {
- q.mFlags |= QueuedInputEvent.FLAG_FINISHED;
- if (handled) {
- q.mFlags |= QueuedInputEvent.FLAG_FINISHED_HANDLED;
- }
- forward(q);
- }
-
-
-
-
- protected void forward(QueuedInputEvent q) {
- onDeliverToNext(q);
- }
-
-
-
-
-
- protected void apply(QueuedInputEvent q, int result) {
- if (result == FORWARD) {
- forward(q);
- } else if (result == FINISH_HANDLED) {
- finish(q, true);
- } else if (result == FINISH_NOT_HANDLED) {
- finish(q, false);
- } else {
- throw new IllegalArgumentException("Invalid result: " + result);
- }
- }
-
-
-
-
-
-
- protected int onProcess(QueuedInputEvent q) {
- return FORWARD;
- }
-
-
-
-
- protected void onDeliverToNext(QueuedInputEvent q) {
- if (DEBUG_INPUT_STAGES) {
- Log.v(TAG, "Done with " + getClass().getSimpleName() + ". " + q);
- }
- if (mNext != null) {
- mNext.deliver(q);
- } else {
-
- finishInputEvent(q);
- }
- }
-
-
- protected boolean shouldDropInputEvent(QueuedInputEvent q) {
- if (mView == null || !mAdded) {
- Slog.w(TAG, "Dropping event due to root view being removed: " + q.mEvent);
- return true;
- } else if ((!mAttachInfo.mHasWindowFocus || mStopped)
- && !q.mEvent.isFromSource(InputDevice.SOURCE_CLASS_POINTER)) {
-
-
- if (isTerminalInputEvent(q.mEvent)) {
-
- q.mEvent.cancel();
- Slog.w(TAG, "Cancelling event due to no window focus: " + q.mEvent);
- return false;
- }
-
-
- Slog.w(TAG, "Dropping event due to no window focus: " + q.mEvent);
- return true;
- }
- return false;
- }
-
- void dump(String prefix, PrintWriter writer) {
- if (mNext != null) {
- mNext.dump(prefix, writer);
- }
- }
- }
来重点看一下其继承类ViewPostInmInputStage:
2、ViewPostImeInputStage
1)ViewPostImeInputStage#onProgress:
-
- @Override
- protected int onProcess(QueuedInputEvent q) {
- if (q.mEvent instanceof KeyEvent) {
- return processKeyEvent(q);
- } else {
-
-
- handleDispatchDoneAnimating();
- final int source = q.mEvent.getSource();
-
- if ((source & InputDevice.SOURCE_CLASS_POINTER) != 0) {
- return processPointerEvent(q);
- } else if ((source & InputDevice.SOURCE_CLASS_TRACKBALL) != 0) {
- return processTrackballEvent(q);
- } else {
- return processGenericMotionEvent(q);
- }
- }
- }
当判断是 SOURCE_CLASS_POINTER类型的事件后,会调用processPointerEvent方法进行处理。
2)ViewPostImeInputStage#processPointEvent:
-
- private int processPointerEvent(QueuedInputEvent q) {
- final MotionEvent event = (MotionEvent)q.mEvent;
-
- mAttachInfo.mUnbufferedDispatchRequested = false;
-
- boolean handled = mView.dispatchPointerEvent(event);
- if (mAttachInfo.mUnbufferedDispatchRequested && !mUnbufferedInputDispatch) {
- mUnbufferedInputDispatch = true;
- if (mConsumeBatchedInputScheduled) {
- scheduleConsumeBatchedInputImmediately();
- }
- }
- return handled ? FINISH_HANDLED : FORWARD;
- }
ViewRootImpl负责将Event事件传递进来,并根据source的不同进行分类处理;进而将事件的控制权与处理权移交给View树的根View进行dispatchPointerEvent进行处理。
3)View#dispatchPointerEvent:
-
- public final boolean dispatchPointerEvent(MotionEvent event) {
-
- if (event.isTouchEvent()) {
- return dispatchTouchEvent(event);
- } else {
- return dispatchGenericMotionEvent(event);
- }
- }
对于TouchEvent,显然是会调用dispatchTouchEvent进行处理的:
4)View#dispatchTouchEvent:
-
- public boolean dispatchTouchEvent(MotionEvent event) {
- ......
-
- if (onFilterTouchEventForSecurity(event)) {
-
-
- ListenerInfo li = mListenerInfo;
- if (li != null && li.mOnTouchListener != null
- && (mViewFlags & ENABLED_MASK) == ENABLED
- && li.mOnTouchListener.onTouch(this, event)) {
-
- result = true;
- }
-
-
- if (!result && onTouchEvent(event)) {
- result = true;
- }
- }
- ......
- return result;
- }
从上面可以看到onTouch与onTouchEvent之间的区别:
1>onTouch方法:
onTouch方法是View的 OnTouchListener借口中定义的方法。
当一个View绑定了OnTouchLister后,当有touch事件触发时,就会调用onTouch方法。
(当把手放到View上后,onTouch方法被一遍一遍地被调用)
2>onTouchEvent方法:
onTouchEvent方法是override 的Activity的方法。
重新了Activity的onTouchEvent方法后,当屏幕有touch事件时,此方法就会别调用。
(当把手放到Activity上时,onTouchEvent方法就会一遍一遍地被调用)
View 中存在onTouchEvent方法,在定义View的时候重写onTouchEvent可以进行事件处理。
3>touch事件的传递:
在一个Activity里面放一个TextView的实例tv,并且这个tv的属性设定为 fill_parent
在这种情况下,当手放到屏幕上的时候,首先会是tv响应touch事件,执行onTouch方法。
如果onTouch返回值为true,
表示这个touch事件被onTouch方法处理完毕,不会把touch事件再传递给Activity,
也就是说onTouchEvent方法不会被调用。
(当把手放到屏幕上后,onTouch方法被一遍一遍地被调用)
如果onTouch的返回值是false,
表示这个touch事件没有被tv完全处理,onTouch返回以后,touch事件被传递给Activity,
onTouchEvent方法被调用。
来看一下上面涉及到的几个简单的类:
1>Listener的综合管理类:
-
- static class ListenerInfo {
-
-
-
-
-
- protected OnFocusChangeListener mOnFocusChangeListener;
-
-
-
-
- private ArrayList<OnLayoutChangeListener> mOnLayoutChangeListeners;
-
- protected OnScrollChangeListener mOnScrollChangeListener;
-
-
-
-
- private CopyOnWriteArrayList<OnAttachStateChangeListener> mOnAttachStateChangeListeners;
-
-
-
-
-
-
- public OnClickListener mOnClickListener;
-
-
-
-
-
-
- protected OnLongClickListener mOnLongClickListener;
-
-
-
-
-
-
- protected OnCreateContextMenuListener mOnCreateContextMenuListener;
-
- private OnKeyListener mOnKeyListener;
-
- private OnTouchListener mOnTouchListener;
-
- private OnHoverListener mOnHoverListener;
-
- private OnGenericMotionListener mOnGenericMotionListener;
-
- private OnDragListener mOnDragListener;
-
- private OnSystemUiVisibilityChangeListener mOnSystemUiVisibilityChangeListener;
-
- OnApplyWindowInsetsListener mOnApplyWindowInsetsListener;
- }
可以设想到平时所用到的setOnClickListener等设置Listener的方法,就是将ListenerInfo中管理的相关Listener进行初始化。
-
- public void setOnClickListener(OnClickListener l) {
- if (!isClickable()) {
- setClickable(true);
- }
- getListenerInfo().mOnClickListener = l;
- }
-
- ListenerInfo getListenerInfo() {
- if (mListenerInfo != null) {
- return mListenerInfo;
- }
- mListenerInfo = new ListenerInfo();
- return mListenerInfo;
- }
验证了前面的设想。
2>View#onTouchListener:
-
-
-
-
-
-
- public interface OnTouchListener {
-
-
-
-
-
-
-
-
-
- boolean onTouch(View v, MotionEvent event);
- }
当Acitivity implements OnTouchListner接口时,应当重写该方法;当有Touch Event事件传递进来时,该函数会被首先调用;如果重写的方法返回值为true,onTouchEvent方法将不会被调用;
5)继续来看重要的事件处理方法View#onTouchEvent:
-
- public boolean onTouchEvent(MotionEvent event) {
-
- final float x = event.getX();
- final float y = event.getY();
- final int viewFlags = mViewFlags;
-
- if ((viewFlags & ENABLED_MASK) == DISABLED) {
- if (event.getAction() == MotionEvent.ACTION_UP && (mPrivateFlags & PFLAG_PRESSED) != 0) {
- setPressed(false);
- }
-
- return (((viewFlags & CLICKABLE) == CLICKABLE ||
- (viewFlags & LONG_CLICKABLE) == LONG_CLICKABLE));
- }
-
- if (mTouchDelegate != null) {
- if (mTouchDelegate.onTouchEvent(event)) {
- return true;
- }
- }
-
- if (((viewFlags & CLICKABLE) == CLICKABLE ||
- (viewFlags & LONG_CLICKABLE) == LONG_CLICKABLE)) {
-
-
- switch (event.getAction()) {
- case MotionEvent.ACTION_UP:
- ......
- break;
-
- case MotionEvent.ACTION_DOWN:
- ......
- break;
-
- case MotionEvent.ACTION_CANCEL:
- ......
- break;
-
- case MotionEvent.ACTION_MOVE:
- ......
- break;
- }
-
- return true;
- }
-
- return false;
- }
下面分别对其进行分析:
1>ACTION_DOWN:
一般触摸事件的顺序为ACTION_DOWN->ACTION_UP,或者ACTION_DOWN->ACTION_MOVE->ACTION_UP;可以看到ACTION_DOWN是后续事件的起点。
I、事件具体处理函数:
-
-
- case MotionEvent.ACTION_DOWN:
-
- mHasPerformedLongPress = false;
-
- if (performButtonActionOnTouchDown(event)) {
- break;
- }
-
-
- boolean isInScrollingContainer = isInScrollingContainer();
-
-
-
- if (isInScrollingContainer) {
- mPrivateFlags |= PFLAG_PREPRESSED;
- if (mPendingCheckForTap == null) {
- mPendingCheckForTap = new CheckForTap();
- }
- mPendingCheckForTap.x = event.getX();
- mPendingCheckForTap.y = event.getY();
- postDelayed(mPendingCheckForTap, ViewConfiguration.getTapTimeout());
- } else {
-
-
- setPressed(true, x, y);
-
- checkForLongClick(0);
- }
- break;
监听到ACTION_DOWN事件,首先后判断是否是在一个Scroller中进行分别处理;如果是普通的Touch事件,会调用serPressed来设置Press状态,同时会根据需要对Touch区域进行重新绘制(比如Button按下的效果);checkForLongClick用来判断是否是长按事件。
II.View#setPressed:
-
- private void setPressed(boolean pressed, float x, float y) {
- if (pressed) {
- drawableHotspotChanged(x, y);
- }
-
- setPressed(pressed);
- }
-
- public void setPressed(boolean pressed) {
- final boolean needsRefresh = pressed != ((mPrivateFlags & PFLAG_PRESSED) == PFLAG_PRESSED);
-
- if (pressed) {
- mPrivateFlags |= PFLAG_PRESSED;
- } else {
- mPrivateFlags &= ~PFLAG_PRESSED;
- }
-
-
- if (needsRefresh) {
- refreshDrawableState();
- }
- dispatchSetPressed(pressed);
- }
setPressed方法主要是设置相关的Pressed标志,并在如果需要重新绘制界面时调用refreshDrawableState进行界面绘制。
III.View#checkForLongClick:
-
-
- private void checkForLongClick(int delayOffset) {
- if ((mViewFlags & LONG_CLICKABLE) == LONG_CLICKABLE) {
- mHasPerformedLongPress = false;
-
- if (mPendingCheckForLongPress == null) {
- mPendingCheckForLongPress = new CheckForLongPress();
- }
- mPendingCheckForLongPress.rememberWindowAttachCount();
-
-
-
- postDelayed(mPendingCheckForLongPress,
- ViewConfiguration.getLongPressTimeout() - delayOffset);
- }
- }
-
- private CheckForLongPress mPendingCheckForLongPress;
-
-
- private final class CheckForLongPress implements Runnable {
- private intmOriginalWindowAttachCount;
-
- @Override
- public void run() {
-
- if (isPressed() && (mParent != null)
- && mOriginalWindowAttachCount == mWindowAttachCount) {
-
- if (performLongClick()) {
- mHasPerformedLongPress = true;
- }
- }
- }
-
- public void rememberWindowAttachCount() {
- mOriginalWindowAttachCount = mWindowAttachCount;
- }
- }
-
-
- public boolean performLongClick() {
- sendAccessibilityEvent(AccessibilityEvent.TYPE_VIEW_LONG_CLICKED);
-
-
- boolean handled = false;
- ListenerInfo li = mListenerInfo;
- if (li != null && li.mOnLongClickListener != null) {
- handled = li.mOnLongClickListener.onLongClick(View.this);
- }
- if (!handled) {
- handled = showContextMenu();
- }
- if (handled) {
- performHapticFeedback(HapticFeedbackConstants.LONG_PRESS);
- }
- return handled;
- }
2>ACTION_MOVE:
ACTION_MOVE事件是由于用户按下并拖动的结果,知道产生ACTION_UP或者ACTION_CANCEL事件结束;
- case MotionEvent.ACTION_MOVE:
-
-
-
- drawableHotspotChanged(x, y);
-
-
- if (!pointInView(x, y, mTouchSlop)) {
-
- removeTapCallback();
- if ((mPrivateFlags & PFLAG_PRESSED) != 0) {
-
- removeLongPressCallback();
-
- setPressed(false);
- }
- }
- break;
3>ACTION_UP:
ACTION_UP是手势的结束点。其处理函数最重要的就是判断是否会产生Click;
- case MotionEvent.ACTION_UP:
-
- boolean prepressed = (mPrivateFlags & PFLAG_PREPRESSED) != 0;
- if ((mPrivateFlags & PFLAG_PRESSED) != 0 || prepressed) {
-
-
- boolean focusTaken = false;
- if (isFocusable() && isFocusableInTouchMode() && !isFocused()) {
- focusTaken = requestFocus();
- }
-
- if (prepressed) {
- setPressed(true, x, y);
- }
-
-
- if (!mHasPerformedLongPress) {
-
- removeLongPressCallback();
-
-
- if (!focusTaken) {
-
-
-
-
- if (mPerformClick == null) {
- mPerformClick = new PerformClick();
- }
-
-
- if (!post(mPerformClick)) {
- performClick();
- }
- }
- }
-
-
- if (mUnsetPressedState == null) {
- mUnsetPressedState = new UnsetPressedState();
- }
-
- if (prepressed) {
- postDelayed(mUnsetPressedState,
- ViewConfiguration.getPressedStateDuration());
- } elseif (!post(mUnsetPressedState)) {
-
- mUnsetPressedState.run();
- }
-
- removeTapCallback();
- }
- break;
4>ACTION_CANCEL:
ACTION_CANCEL事件并不是由用户主动产生的,而是系统谨慎判断之后的结果,说明当前手势已经被废弃,则接下来执行清理操作。
- case MotionEvent.ACTION_CANCEL:
- setPressed(false);
- removeTapCallback();
- removeLongPressCallback();
- break;
二、InputManagerService:
前面提到了ViewRootImpl对TouchEvent事件的处理流程,那这些事件又是怎么来的。事件的来源可以分为“软件”,“硬件”两种;
主要的事件包含有:
案件事件(KeyEvent) :即物理按键按下产生的事件,相关的常用物理按键一般有HOME,BACK等
触摸事件(TouchEvent):
鼠标事件(MouseEvent)、轨迹球事件(TrackBallEvent)(这两个已经不常见);
针对所有事件的共性抽象出了InputEvent接口;其有两个子类:KeyEvent,MotionEvent;
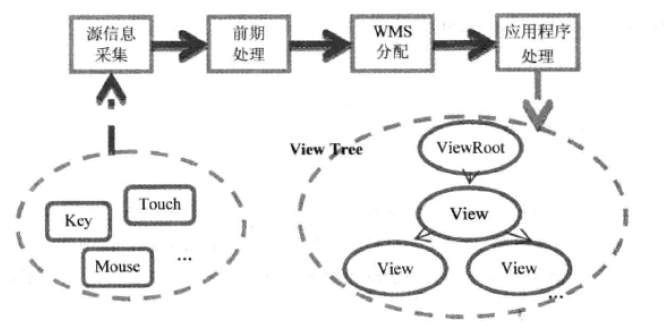
1、事件的投递流程:
1>源信息采集
对“硬件源”产生的原始信息进行收集;它需要Linux内核驱动的支持,Android系统通过/dev/input下的节点来访问当前发生的事件。
2>前期处理
对收集到信息进行筛选以及格式转化
3>WMS分配
WMS是窗口的Manager,同时也是InputEvent的派发者。
4>应用程序处理
2、InputManagerService启动:
InputManagerService同样也是有SystemServer进程启动,这个在Android启动过程——init.rc,Zygote,SystemServer中已经提到过:
-
- class ServerThread extends Thread {
- @Override
- public void run() {
-
- ......
-
- inputManager = new InputManagerService(context, wmHandler);
-
- Slog.i(TAG, "Window Manager");
-
- wm = WindowManagerService.main(context, power, display, inputManager,
- uiHandler, wmHandler,
- factoryTest != SystemServer.FACTORY_TEST_LOW_LEVEL,
- !firstBoot, onlyCore);
- ServiceManager.addService(Context.WINDOW_SERVICE, wm);
- ServiceManager.addService(Context.INPUT_SERVICE, inputManager);
-
- ActivityManagerService.self().setWindowManager(wm);
-
- inputManager.setWindowManagerCallbacks(wm.getInputMonitor());
- inputManager.start();
- .....
- }
- }
4、InputMangerService:
-
- public class InputManagerService extends IInputManager.Stub implements Watchdog.Monitor {
-
- private final long mPtr;
-
- public InputManagerService(Context context) {
- this.mContext = context;
- this.mHandler = new InputManagerHandler(DisplayThread.get().getLooper());
-
- mUseDevInputEventForAudioJack = context.getResources().getBoolean(R.bool.config_useDevInputEventForAudioJack);
-
-
- mPtr = nativeInit(this, mContext, mHandler.getLooper().getQueue());
-
- LocalServices.addService(InputManagerInternal.class, new LocalService());
- }
- }
可以看到Java层的IMS实际上只是对Native层的InputManager的一层包装;其创建主要是native层进行创建。
5、native层的InputManagerService——NativeInputManager类:
-
- class NativeInputManager : public virtual RefBase,
- public virtual InputReaderPolicyInterface,
- public virtual InputDispatcherPolicyInterface,
- public virtual PointerControllerPolicyInterface
-
- static jlong nativeInit(JNIEnv* env, jclass clazz,
- jobject serviceObj, jobject contextObj, jobject messageQueueObj) {
-
- sp<MessageQueue> messageQueue = android_os_MessageQueue_getMessageQueue(env, messageQueueObj);
- if (messageQueue == NULL) {
- jniThrowRuntimeException(env, "MessageQueue is not initialized.");
- return 0;
- }
-
-
- NativeInputManager* im = new NativeInputManager(contextObj, serviceObj,
- messageQueue->getLooper());
- im->incStrong(0);
-
- return reinterpret_cast<jlong>(im);
- }
创建完实例后,进一步调用start函数,来看一下start函数所完成的功用。
3、InputManagerService#start:
-
- public void start() {
- ......
- nativeStart(mPtr);
- ......
- }
- private static native void nativeStart(long ptr);
可以看到start仅是对nativeStart本地方法进行封装。
4、NativeInputManager#nativeStart:
-
- static void nativeStart(JNIEnv* env, jclass clazz, jlong ptr) {
-
- NativeInputManager* im = reinterpret_cast<NativeInputManager*>(ptr);
-
-
- status_t result = im->getInputManager()->start();
- if (result) {
- jniThrowRuntimeException(env, "Input manager could not be started.");
- }
- }
-
- inline sp<InputManager> getInputManager() const { return mInputManager; }
可以看到这里进一步调用了InputManager的start方法;IMS在Native层的主要实现实体其实是InputManager。
5、InputManager#start:
-
- class InputManagerInterface : public virtual RefBase {
- private:
- sp<InputReaderInterface> mReader;
- sp<InputReaderThread> mReaderThread;
-
- sp<InputDispatcherInterface> mDispatcher;
- sp<InputDispatcherThread> mDispatcherThread;
-
-
- InputManager::InputManager(
- const sp<EventHubInterface>& eventHub,
- const sp<InputReaderPolicyInterface>& readerPolicy,
- const sp<InputDispatcherPolicyInterface>& dispatcherPolicy) {
- mDispatcher = new InputDispatcher(dispatcherPolicy);
- mReader = new InputReader(eventHub, readerPolicy, mDispatcher);
- initialize();
- }
-
-
- void InputManager::initialize() {
-
- mReaderThread = new InputReaderThread(mReader);
- mDispatcherThread = new InputDispatcherThread(mDispatcher);
- }
-
-
- status_t InputManager::start() {
-
-
- status_t result = mDispatcherThread->run("InputDispatcher", PRIORITY_URGENT_DISPLAY);
- ......
- result = mReaderThread->run("InputReader", PRIORITY_URGENT_DISPLAY);
- if (result) {
- mDispatcherThread->requestExit();
- return result;
- }
- return OK;
- }
- };
可以看到 start函数中开启了两个native端的线程:InputReaderThread和InputDispatcherThread;从名称可以简单推断出前者用以读取Input事件,后者用以对事件进行处理分发。
<一> InputReaderThread:
1、InputReaderThread类:
-
-
- class InputReaderThread : public Thread {
- public:
- InputReaderThread(const sp<InputReaderInterface>& reader);
- virtual ~InputReaderThread();
-
- private:
- sp<InputReaderInterface> mReader;
-
-
-
-
-
-
- virtual bool threadLoop();
- };
2、InputReaderThread类的具体实现:
-
- InputReaderThread::InputReaderThread(const sp<InputReaderInterface>& reader) :
- Thread(true), mReader(reader) {
-
- }
-
- bool InputReaderThread::threadLoop() {
-
- mReader->loopOnce();
- return true;
- }
可以看到InputReaderThread类的最重要实现在于InputReaderInterface,该类为核心(其运行时类型为InputReader);
3、InputReaderInterface:
-
- class InputReaderInterface : public virtual RefBase
- class InputReader : public InputReaderInterface
-
-
-
- void InputReader::loopOnce() {
- ......
-
-
- size_t count = mEventHub->getEvents(timeoutMillis, mEventBuffer, EVENT_BUFFER_SIZE);
- ......
-
- mQueuedListener->flush();
- }
EventHubInterface定义在EventHub.h中,其getEvents是通过读取/dev/input/下的相关文件来判断是否有新事件,进而通给值InputReader
<二>InputDispatcherThread:
同理该线程的实现核心为InputDispatcher类,进行事件的派发和处理。
1、InputDispatcherThread定义:
-
- class InputDispatcherThread : public Thread {
- public:
- explicit InputDispatcherThread(const sp<InputDispatcherInterface>& dispatcher);
- ~InputDispatcherThread();
-
- private:
- virtual boolthreadLoop();
-
- sp<InputDispatcherInterface> mDispatcher;
- };
-
- bool InputDispatcherThread::threadLoop() {
- mDispatcher->dispatchOnce();
- return true;
- }
2、InputDispatcher定义:
-
- class InputDispatcher : public InputDispatcherInterface
-
- class InputDispatcherInterface : public virtual RefBase, public InputListenerInterface
可以看到
InputDispatcherInterface
最终继承一个
InputListenerInterface
类;该类明显是一个Listener
3、InputManager构造函数:
回到前面Native层的IMS(InputManager)构造函数:
-
- InputManager::InputManager(
- const sp<EventHubInterface>& eventHub,
- const sp<InputReaderPolicyInterface>& readerPolicy,
- const sp<InputDispatcherPolicyInterface>& dispatcherPolicy) {
- mDispatcher = new InputDispatcher(dispatcherPolicy);
-
- mReader = new InputReader(eventHub, readerPolicy, mDispatcher);
- initialize();
- }
可以看到这里最开始就将InputDispatcher与InputReader建立起关联;接下来看InputReader的构造函数,看两者是怎样建立起关联的:
4、InputReader构造函数:
-
- InputReader::InputReader(const sp<EventHubInterface>& eventHub,
- const sp<InputReaderPolicyInterface>& policy,
- const sp<InputListenerInterface>& listener) :
- mContext(this), mEventHub(eventHub), mPolicy(policy),
- mGlobalMetaState(0), mGeneration(1),
- mDisableVirtualKeysTimeout(LLONG_MIN), mNextTimeout(LLONG_MAX),
- mConfigurationChangesToRefresh(0) {
-
- mQueuedListener = new QueuedInputListener(listener);
-
- {
- AutoMutex _l(mLock);
-
- refreshConfigurationLocked(0);
- updateGlobalMetaStateLocked();
- }
- }
而上面2中提到InputDispatcher继承了InputListenerInterface,这里可以看到InputReader使用mDispatcher来初始化mQueueListener(QueueInputListener类);
这个mQueueListener前面就见到过,在InputReader::loopOnce()事件获取函数中,通过Event Hub获取到event事件,然后调用mQueuedListener->flush();
5、QueueInputListener#flush:
1)先看QueueInputListener的定义:
-
- class QueuedInputListener : public InputListenerInterface {
- protected:
- virtual ~QueuedInputListener();
-
- public:
- QueuedInputListener(const sp<InputListenerInterface>& innerListener);
-
- virtual void notifyConfigurationChanged(const NotifyConfigurationChangedArgs* args);
- virtual void notifyKey(const NotifyKeyArgs* args);
- virtual void notifyMotion(const NotifyMotionArgs* args);
- virtual void notifySwitch(const NotifySwitchArgs* args);
- virtual void notifyDeviceReset(const NotifyDeviceResetArgs* args);
-
- void flush();
-
- private:
- sp<InputListenerInterface> mInnerListener;
- Vector<NotifyArgs*> mArgsQueue;
- };
可以看到这里可以向InputReader注册监听很多事件。
2)flush函数:
-
- void QueuedInputListener::flush() {
- size_t count = mArgsQueue.size();
- for (size_t i = 0; i < count; i++) {
- NotifyArgs* args = mArgsQueue[i];
-
- args->notify(mInnerListener);
- delete args;
- }
- mArgsQueue.clear();
- }
-
- void NotifyKeyArgs::notify(const sp<InputListenerInterface>& listener) const {
- listener->notifyKey(this);
- }
最终调用InputListenerInterface(即InputDispatcher)的notifyKey回调函数;
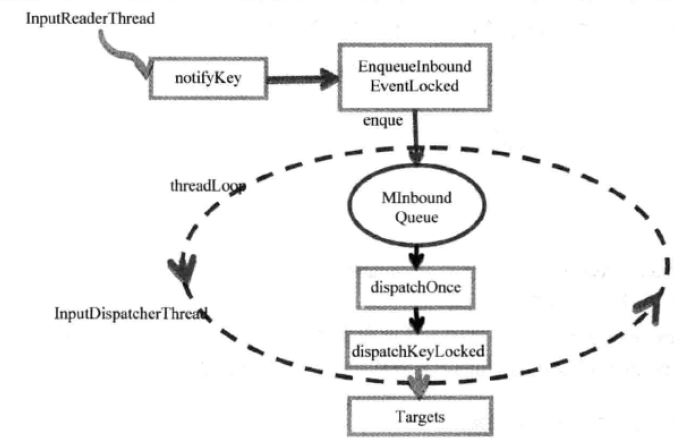
总结前面的流程即InputReaderThread通过EventHub不断读取获取event信息,获得事件后,调用InputDispather的notifyKey函数来通知InputDispathcer进行处理。
其具体的流程:
<三>事件处理流程:
1、InputDispatcher::notifyKey:
-
- void InputDispatcher::notifyKey(const NotifyKeyArgs* args) {
- if (!validateKeyEvent(args->action)) {
- return;
- }
- ......
-
- KeyEvent event;
- event.initialize(args->deviceId, args->source, args->action,
- flags, keyCode, args->scanCode, metaState, 0,
- args->downTime, args->eventTime);
-
- {
- mLock.lock();
- ......
- KeyEntry* newEntry = new KeyEntry(args->eventTime,
- args->deviceId, args->source, policyFlags,
- args->action, flags, keyCode, args->scanCode,
- metaState, repeatCount, args->downTime);
-
- needWake = enqueueInboundEventLocked(newEntry);
- mLock.unlock();
- }
- }
2、InputDispatcher::enqueueInboundEventLocked:
-
- bool InputDispatcher::enqueueInboundEventLocked(EventEntry* entry) {
-
- bool needWake = mInboundQueue.isEmpty();
-
- mInboundQueue.enqueueAtTail(entry);
-
- switch (entry->type) {
- case EventEntry::TYPE_KEY: ......
-
- case EventEntry::TYPE_MOTION: .....
- }
-
- return needWake;
- }
当InputReader读取到一个event之后,最终enqueue进mInboundQueue消息队列中;接下来看怎么处理;
前面InputDispatcherThread的运行函数threadLoop,其主体是调用InputDispatcher中的dispatchOnce进行处理,可想而知,消息处理函数自然在dispatchOnce中;
3、InputDispatcher::dispatchOnce:
-
- void InputDispatcher::dispatchOnce() {
- nsecs_t nextWakeupTime = LONG_LONG_MAX;
- {
- AutoMutex _l(mLock);
- mDispatcherIsAliveCondition.broadcast();
-
-
- if (!haveCommandsLocked()) {
- dispatchOnceInnerLocked(&nextWakeupTime);
- }
-
-
-
- if (runCommandsLockedInterruptible()) {
- nextWakeupTime = LONG_LONG_MIN;
- }
- }
-
-
- nsecs_t currentTime = now();
- int timeoutMillis = toMillisecondTimeoutDelay(currentTime, nextWakeupTime);
- mLooper->pollOnce(timeoutMillis);
- }
继续来看dispatchOnceInnerLocked函数;
4、InputDispathcer#dispatchOnceInnerLocked:
-
- void InputDispatcher::dispatchOnceInnerLocked(nsecs_t* nextWakeupTime) {
- .......
-
- switch (mPendingEvent->type) {
- case EventEntry::TYPE_CONFIGURATION_CHANGED: {
- ......
- done = dispatchConfigurationChangedLocked(currentTime, typedEntry);
- dropReason = DROP_REASON_NOT_DROPPED;
- break;
- }
-
- case EventEntry::TYPE_DEVICE_RESET: {
- ......
- done = dispatchDeviceResetLocked(currentTime, typedEntry);
- dropReason = DROP_REASON_NOT_DROPPED;
- break;
- }
-
-
- case EventEntry::TYPE_KEY: {
- KeyEntry* typedEntry = static_cast<KeyEntry*>(mPendingEvent);
- ......
- done = dispatchKeyLocked(currentTime, typedEntry, &dropReason, nextWakeupTime);
- break;
- }
-
-
- case EventEntry::TYPE_MOTION: {
- ......
- done = dispatchMotionLocked(currentTime, typedEntry,
- &dropReason, nextWakeupTime);
- break;
- }
-
- default:
- ALOG_ASSERT(false);
- break;
- }
- }
针对Event的type的不同进行不同的处理,KeyEvent采用dispatchKeyLocked进行处理,MotionEvent采用dispatchMotionLocked进行处理;下面以KeyEvent为例进行分析,下面忽略对event的具体处理细节,具体来看事件是如何传递的;
5、InputDispatcher::dispatchKeyLocked:
-
- bool InputDispatcher::dispatchKeyLocked(nsecs_t currentTime, KeyEntry* entry,
- DropReason* dropReason, nsecs_t* nextWakeupTime) {
- ......
-
- Vector<InputTarget> inputTargets;
- int32_t injectionResult = findFocusedWindowTargetsLocked(currentTime,
- entry, inputTargets, nextWakeupTime);
-
- setInjectionResultLocked(entry, injectionResult);
- addMonitoringTargetsLocked(inputTargets);
-
-
- dispatchEventLocked(currentTime, entry, inputTargets);
- return true;
- }
前面对event的处理忽略掉,重点来看系统是如何查找event对应的接收方(Target)的,接下来分析函数findFocusedWindowTargetsLocked;
6、InputDispatcher::findFocusedWindowTargetsLocked:
-
- int32_t InputDispatcher::findFocusedWindowTargetsLocked(nsecs_t currentTime,
- const EventEntry* entry, Vector<InputTarget>& inputTargets, nsecs_t* nextWakeupTime) {
- int32_t injectionResult;
- String8 reason;
-
-
-
- if (mFocusedWindowHandle == NULL) {
- if (mFocusedApplicationHandle != NULL) {
-
- injectionResult = handleTargetsNotReadyLocked(currentTime, entry,
- mFocusedApplicationHandle, NULL, nextWakeupTime,
- "Waiting because no window has focus but there is a "
- "focused application that may eventually add a window "
- "when it finishes starting up.");
- goto Unresponsive;
- }
-
- injectionResult = INPUT_EVENT_INJECTION_FAILED;
- goto Failed;
- }
-
-
-
- if (! checkInjectionPermission(mFocusedWindowHandle, entry->injectionState)) {
- injectionResult = INPUT_EVENT_INJECTION_PERMISSION_DENIED;
- goto Failed;
- }
-
-
- reason = checkWindowReadyForMoreInputLocked(currentTime,
- mFocusedWindowHandle, entry, "focused");
- if (!reason.isEmpty()) {
- injectionResult = handleTargetsNotReadyLocked(currentTime, entry,
- mFocusedApplicationHandle, mFocusedWindowHandle, nextWakeupTime, reason.string());
- goto Unresponsive;
- }
-
-
- injectionResult = INPUT_EVENT_INJECTION_SUCCEEDED;
- addWindowTargetLocked(mFocusedWindowHandle,
- InputTarget::FLAG_FOREGROUND | InputTarget::FLAG_DISPATCH_AS_IS, BitSet32(0),
- inputTargets);
-
- Failed:
- Unresponsive:
- nsecs_t timeSpentWaitingForApplication = getTimeSpentWaitingForApplicationLocked(currentTime);
- updateDispatchStatisticsLocked(currentTime, entry,
- injectionResult, timeSpentWaitingForApplication);
- return injectionResult;
- }
上面获取到目标窗口的流程较为清晰简单,其主要的变量是mFocusedWindowHandle,它表示焦点窗口的句柄,而InputDispatcher又是如何获取到它的。
这里先引出InputMonitor的概念,它是WMS与InputDispatcher的中介;WMS通过InputMonitor的updateInputWindowsLw来告知InputDispatcher中的当前焦点窗口了;其具体的代码调动流程如下:
-
-
- public void updateInputWindowsLw(boolean force) {
- ......
-
-
-
- mService.mInputManager.setInputWindows(mInputWindowHandles);
- ......
- }
-
-
- public void setInputWindows(InputWindowHandle[] windowHandles) {
- nativeSetInputWindows(mPtr, windowHandles);
- }
- private static native void nativeSetInputWindows(long ptr, InputWindowHandle[] windowHandles);
-
-
-
- static void nativeSetInputWindows(JNIEnv* env, jclass clazz,
- jlong ptr, jobjectArray windowHandleObjArray) {
- NativeInputManager* im = reinterpret_cast<NativeInputManager*>(ptr);
-
- im->setInputWindows(env, windowHandleObjArray);
- }
-
-
- void NativeInputManager::setInputWindows(JNIEnv* env, jobjectArray windowHandleObjArray) {
- Vector<sp<InputWindowHandle> > windowHandles;
- ......
-
- mInputManager->getDispatcher()->setInputWindows(windowHandles);
- ......
- }
-
-
-
- sp<InputDispatcherInterface> InputManager::getDispatcher() {
- return mDispatcher;
- }
-
-
- void InputDispatcher::setInputWindows(const Vector<sp<InputWindowHandle> >& inputWindowHandles) {
- {
- AutoMutex _l(mLock);
-
- Vector<sp<InputWindowHandle> > oldWindowHandles = mWindowHandles;
- mWindowHandles = inputWindowHandles;
-
- sp<InputWindowHandle> newFocusedWindowHandle;
- ......
-
- mFocusedWindowHandle = newFocusedWindowHandle;
- .....
- }
-
-
- mLooper->wake();
- }
可以看到这里涉及到了InputMonitor、WMS与IMS之间的交互;
找到了InputTarget,InputDispatcher又是如何与之通信的?
7、InputTarget:
-
-
-
-
-
-
-
- structInputTarget {
- enum {
-
- FLAG_FOREGROUND = 1 << 0,
- ......
- }
-
- sp<InputChannel> inputChannel;
- };
这里引出了重要的类InputChannel,InputDispatcher与WMS也是跨进程通信的,其通过InputChannel进行通信。
<四>InputChannel:
1、InputChannel:
-
-
-
-
-
-
-
-
-
-
- class InputChannel : public RefBase {
- protected:
- virtual~InputChannel();
-
-
- public:
- InputChannel(const String8& name, int fd);
-
- static status_t openInputChannelPair(const String8& name,
- sp<InputChannel>& outServerChannel, sp<InputChannel>& outClientChannel);
-
- inline String8 getName() const { returnmName; }
- inlineint getFd() const { returnmFd; }
-
-
- status_t sendMessage(const InputMessage* msg);
- status_t receiveMessage(InputMessage* msg);
-
-
- sp<InputChannel> dup() const;
-
- private:
- String8 mName;
- int mFd;
- };
上面提到InputChannel是使用UDS进行通信的,Android系统中最为常用的进程间通信时Binder通信,其次便是UDS进行单机内的进程间通信,也称IPC Socket。下面进行验证。
2、从源头开看InputChannel的创建初始化:
-
- public int addWindow(Session session, IWindow client, int seq,
- WindowManager.LayoutParams attrs, int viewVisibility, int displayId,
- Rect outContentInsets, Rect outStableInsets, InputChannel outInputChannel) {
- ......
- if (outInputChannel != null && (attrs.inputFeatures
- & WindowManager.LayoutParams.INPUT_FEATURE_NO_INPUT_CHANNEL) == 0) {
-
- String name = win.makeInputChannelName();
-
- InputChannel[] inputChannels = InputChannel.openInputChannelPair(name);
- win.setInputChannel(inputChannels[0]);
- inputChannels[1].transferTo(outInputChannel);
-
- mInputManager.registerInputChannel(win.mInputChannel, win.mInputWindowHandle);
- }
- ......
- }
3、InputChannel#openInputChannelPair:
-
- public static InputChannel[] openInputChannelPair(String name) {
- if (name == null) {
- throw new IllegalArgumentException("name must not be null");
- }
- return nativeOpenInputChannelPair(name);
- }
-
- private static native InputChannel[] nativeOpenInputChannelPair(String name);
4、InputChannel::openInputChannelPair:
-
- status_t InputChannel::openInputChannelPair(const String8& name,
- sp<InputChannel>& outServerChannel, sp<InputChannel>& outClientChannel) {
-
- int sockets[2];
- if (socketpair(AF_UNIX, SOCK_SEQPACKET, 0, sockets)) {
- status_t result = -errno;
- outServerChannel.clear();
- outClientChannel.clear();
- return result;
- }
-
-
- int bufferSize = SOCKET_BUFFER_SIZE;
- setsockopt(sockets[0], SOL_SOCKET, SO_SNDBUF, &bufferSize, sizeof(bufferSize));
- setsockopt(sockets[0], SOL_SOCKET, SO_RCVBUF, &bufferSize, sizeof(bufferSize));
- setsockopt(sockets[1], SOL_SOCKET, SO_SNDBUF, &bufferSize, sizeof(bufferSize));
- setsockopt(sockets[1], SOL_SOCKET, SO_RCVBUF, &bufferSize, sizeof(bufferSize));
-
-
- String8 serverChannelName = name;
- serverChannelName.append(" (server)");
- outServerChannel = new InputChannel(serverChannelName, sockets[0]);
-
- String8 clientChannelName = name;
- clientChannelName.append(" (client)");
- outClientChannel = new InputChannel(clientChannelName, sockets[1]);
- return OK;
- }
这里可以看到IMS与WMS之间是通过InputChannel,使用UDS进行进程间通信的;
上面整理的流程可以简单概括为IMS中有两个event时间相关的线程InputReaderThread和InputDispatcherThread;
InputReaderThread通过EventHub读取/dev/input/下是否有新事件产生,然后传递给InputDispatcherThread,该Thread通过InputMonitor与WMS建立关联,确定当前焦点窗口,来选择匹配的InputTarget,进而将该event通过InputChannel传递给对应Target进行处理


 1778
1778

 被折叠的 条评论
为什么被折叠?
被折叠的 条评论
为什么被折叠?
 到【灌水乐园】发言


