


前言
苦逼的加班啊 一如既往的点开百度外卖 突然发现有个有趣的界面效果

what 百度这么浪啊 怎么大风越狠我心越浪~(跑调了)
一般人看到这个界面的反应是:哎哟 不错哦;程序猿看到反应是:这他喵的怎么实现的 没错 这就是我的第一反应
实现
首先 想到的是网上一大搜 看到一个不错的 可惜是OC写的 不过思路有了 不知道大家还记不记得高中学的正余弦曲线表达式 对的 就是这么简单
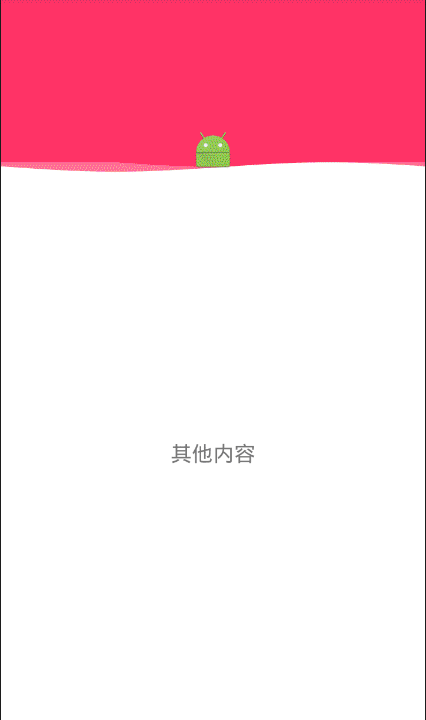
下面是我实现的效果
代码(很少,全部贴上)
public class WaveView3 extends View {

    private Path  mAbovePath,mBelowWavePath;
    private Paint mAboveWavePaint,mBelowWavePaint;

    private DrawFilter mDrawFilter;

    private float φ;

    private OnWaveAnimationListener mWaveAnimationListener;

    public WaveView3(Context context, AttributeSet attrs) {
        super(context, attrs);
        //初始化路径
        mAbovePath = new Path();
        mBelowWavePath = new Path();
        //初始化画笔
        mAboveWavePaint = new Paint(Paint.ANTI_ALIAS_FLAG);
        mAboveWavePaint.setAntiAlias(true);
        mAboveWavePaint.setStyle(Paint.Style.FILL);
        mAboveWavePaint.setColor(Color.WHITE);

        mBelowWavePaint = new Paint(Paint.ANTI_ALIAS_FLAG);
        mBelowWavePaint.setAntiAlias(true);
        mBelowWavePaint.setStyle(Paint.Style.FILL);
        mBelowWavePaint.setColor(Color.WHITE);
        mBelowWavePaint.setAlpha(80);
        //画布抗锯齿
        mDrawFilter = new PaintFlagsDrawFilter(0, Paint.ANTI_ALIAS_FLAG | Paint.FILTER_BITMAP_FLAG);
    }

    @Override
    protected void onDraw(Canvas canvas) {

        canvas.setDrawFilter(mDrawFilter);

        mAbovePath.reset();
        mBelowWavePath.reset();

        φ-=0.1f;

        float y,y2;

        double ω = 2*Math.PI / getWidth();

        mAbovePath.moveTo(getLeft(),getBottom());
        mBelowWavePath.moveTo(getLeft(),getBottom());
        for (float x = 0; x <= getWidth(); x += 20) {
            /**
             *  y=Asin(ωx+φ)+k
             *  A—振幅越大,波形在y轴上最大与最小值的差值越大
             *  ω—角速度, 控制正弦周期(单位角度内震动的次数)
             *  φ—初相,反映在坐标系上则为图像的左右移动。这里通过不断改变φ,达到波浪移动效果
             *  k—偏距,反映在坐标系上则为图像的上移或下移。
             */
            y = (float) (8 * Math.cos(ω * x + φ) +8);
            y2 = (float) (8 * Math.sin(ω * x + φ));
            mAbovePath.lineTo(x, y);
            mBelowWavePath.lineTo(x, y2);
            //回调 把y坐标的值传出去(在activity里面接收让小机器人随波浪一起摇摆)
            mWaveAnimationListener.OnWaveAnimation(y);
        }
        mAbovePath.lineTo(getRight(),getBottom());
        mBelowWavePath.lineTo(getRight(),getBottom());

        canvas.drawPath(mAbovePath,mAboveWavePaint);
        canvas.drawPath(mBelowWavePath,mBelowWavePaint);

        postInvalidateDelayed(20);

    }

    public void setOnWaveAnimationListener(OnWaveAnimationListener l){
        this.mWaveAnimationListener = l;
    }

    public interface OnWaveAnimationListener{
        void OnWaveAnimation(float y);
    }

}
布局文件(activity_wave.xml)
<?xml version="1.0" encoding="utf-8"?>
<LinearLayout xmlns:android="http://schemas.android.com/apk/res/android"
    android:layout_width="match_parent"
    android:layout_height="match_parent"
    android:background="#ffffff"
    android:orientation="vertical">

    <FrameLayout
        android:layout_width="match_parent"
        android:layout_height="200dp"
        android:background="#FF3366">

        <me.happy.demo.view.wave.WaveView3
            android:id="@+id/wave_view"
            android:layout_width="match_parent"
            android:layout_height="15dp"
            android:layout_gravity="bottom" />

        <ImageView
            android:id="@+id/image"
            android:layout_width="wrap_content"
            android:layout_height="wrap_content"
            android:layout_gravity="bottom|center"
            android:background="@mipmap/ic_launcher" />

    </FrameLayout>

    <LinearLayout
        android:layout_width="match_parent"
        android:layout_height="match_parent"
        android:gravity="center"
        android:orientation="vertical">

        <TextView
            android:layout_width="wrap_content"
            android:layout_height="wrap_content"
            android:text="其他内容"
            android:textSize="24sp" />

    </LinearLayout>

</LinearLayout>
WaveActivity
public class WaveActivity extends AppCompatActivity {

    private ImageView imageView;
    private WaveView3 waveView3;

    @Override
    protected void onCreate(Bundle savedInstanceState) {
        super.onCreate(savedInstanceState);
        setContentView(R.layout.activity_wave);
        imageView = (ImageView) findViewById(R.id.image);
        waveView3 = (WaveView3) findViewById(R.id.wave_view);

        final FrameLayout.LayoutParams lp = new FrameLayout.LayoutParams(-2,-2);
        lp.gravity = Gravity.BOTTOM|Gravity.CENTER;
        waveView3.setOnWaveAnimationListener(new WaveView3.OnWaveAnimationListener() {
            @Override
            public void OnWaveAnimation(float y) {
                lp.setMargins(0,0,0,(int)y+2);
                imageView.setLayoutParams(lp);
            }
        });
    }
}
github
还有很多可以改进的地方 欢迎大家指正和完善 关注下博客 分类合集持续更新^_^


 2888
2888

 被折叠的 条评论
为什么被折叠?
被折叠的 条评论
为什么被折叠?
 到【灌水乐园】发言


