


1,单例模式
1.1什么是单例模式
保证在整个应用程序的生命周期中,任何一个时刻,单例类的实例都只存在一个
1.2单例模式类图

1.3单例模式的实现方法
饿汉式
|
6
7
8
9
10
11
12
13
14
15
16
|
public
class
Singleton{
//在自己内部定义自己的一个实例,只供内部调用
private
static
final Singleton instance =
new
Singleton();
private
Singleton(){
//do something
}
//这里提供了一个供外部访问本class的静态方法,可以直接访问
public
static
Singleton getInstance(){
return
instance;
}
}
|
|
1
2
3
4
5
6
7
8
9
10
11
12
13
|
public
class
SingletonClass{
private
static
SingletonClass instance=
null
;
public
static
synchronized
SingletonClass getInstance()
{
if
(instance==
null
)
{
instance=
new
SingletonClass();
}
return
instance;
}
private
SingletonClass(){
}
}
|
|
1
2
3
4
5
6
7
8
9
10
11
12
13
14
15
16
|
public
class
Singleton{
private
static
Singleton instance=
null
;
private
Singleton(){
//do something
}
public
static
Singleton getInstance(){
if
(instance==
null
){
synchronized(Singleton.
class
){
if
(
null
==instance){
instance=
new
Singleton();
}
}
}
return
instance;
}
}
|
2.1什么是适配器模式
将一个已经存在的类的接口转换成客户希望的另外一个接口。Adapter模式使得原本由于接口不兼容而不能一起工作的那些类可以在一起工作
适配器会涉及到三个类,一个目标接口,一个需要适配的类,和一个适配器类,通过关联关系将需要被适配的类放入适配器类中,然后让适配器实现目标接口,这样目标接口就可以通过适配器类调用 其中的方法
2.2适配器类图

2.3适配器举例
// 目标接口,或称为标准接口
interface Target {
	public void request();
}
// 已存在的、具有特殊功能、但不符合我们既有的标准接口的类
class Adaptee {
	public void specificRequest() {
		System.out.println("被适配类具有 特殊功能...");
	}
}
// 适配器类,直接关联被适配类,同时实现标准接口
class Adapter implements Target{
	// 直接关联被适配类
	private Adaptee adaptee;

	// 可以通过构造函数传入具体需要适配的被适配类对象
	public Adapter (Adaptee adaptee) {
		this.adaptee = adaptee;
	}

	public void request() {
		// 这里是使用委托的方式完成特殊功能
		this.adaptee.specificRequest();
	}
}
// 测试类
public class Client {
	public static void main(String[] args) {
		// 使用特殊功能类,即适配类,
		// 需要先创建一个被适配类的对象作为参数
		Target adapter = new Adapter(new Adaptee());
		adapter.request();
	}
}
3,观察者模式
3.1什么是观察者模式
观察者模式定义了一种一对多的依赖关系,让多个观察者对象同时监听某一个主题对象。这个主题对象在状态上发生变化时,会通知所有观察者对象,让它们能够自动更新自己
3.2观察者模式类图

3.3观察者模式举例
//抽象观察者角色
public interface Watcher
{
    public void update(String str);

}
//具体观察者角色
public class ConcreteWatcher implements Watcher
{

    @Override
    public void update(String str)
    {
        System.out.println(str);
    }

}
//抽象主题角色,watched:被观察
public interface Watched
{
    public void addWatcher(Watcher watcher);

    public void removeWatcher(Watcher watcher);

    public void notifyWatchers(String str);

}
//具体主题角色,watched:被观察
public class ConcreteWatched implements Watched
{
    // 存放观察者
    private List<Watcher> list = new ArrayList<Watcher>();

    @Override
    public void addWatcher(Watcher watcher)
    {
        list.add(watcher);
    }

    @Override
    public void removeWatcher(Watcher watcher)
    {
        list.remove(watcher);
    }

    @Override
    public void notifyWatchers(String str)
    {
        // 自动调用实际上是主题进行调用的
        for (Watcher watcher : list)
        {
            watcher.update(str);
        }
    }

}
//测试类
public class Test
{
    public static void main(String[] args)
    {
        Watched girl = new ConcreteWatched();

        Watcher watcher1 = new ConcreteWatcher();
        Watcher watcher2 = new ConcreteWatcher();
        Watcher watcher3 = new ConcreteWatcher();

        girl.addWatcher(watcher1);
        girl.addWatcher(watcher2);
        girl.addWatcher(watcher3);

        girl.notifyWatchers("开心");
    }

}
4,简单工厂模式
4.1什么是简单工厂模式
简单工厂类有一个生产实例的方法,这个方法会根据传入的参数生产相应的实例
4.2简单工厂模式类图

4.3简单工厂模式举例
- class OperationFactory
- {
- public static Operation createOperate(string operate)
- {
- Operation oper = null;
- switch (operate)
- {
- case "+":
- {
- oper = new OperationAdd();
- break;
- }
- case "-":
- {
- oper = new OperationSub();
- break;
- }
- case "*":
- {
- oper = new OperationMul();
- break;
- }
- case "/":
- {
- oper = new OperationDiv();
- break;
- }
- }
- return oper;
- }
- }
- }
oper=OperationFactory.createOperate("+");
oper.NumberA=1;
oper.NumberB=2;
double result=oper.GetResult();
5,工厂方法模式
5.1什么是工厂方法模式
工厂方法模式中每一个产品都有相应的工厂,从不同的工厂可以得到不同的实例。工厂方法模式遵循了 对扩展开发-对修改关闭 的原则
创建不同的工厂实例,生产相应的实例对象。
5.2工厂方法模式类图

5.3工厂方法模式举例

6,抽象工厂模式
6.1什么是抽象工厂模式
一个抽象工厂类,可以派生出多个具体工厂类,每个具体工厂类可以创建多个具体产品类的实例。
6.2抽象工厂模式类图

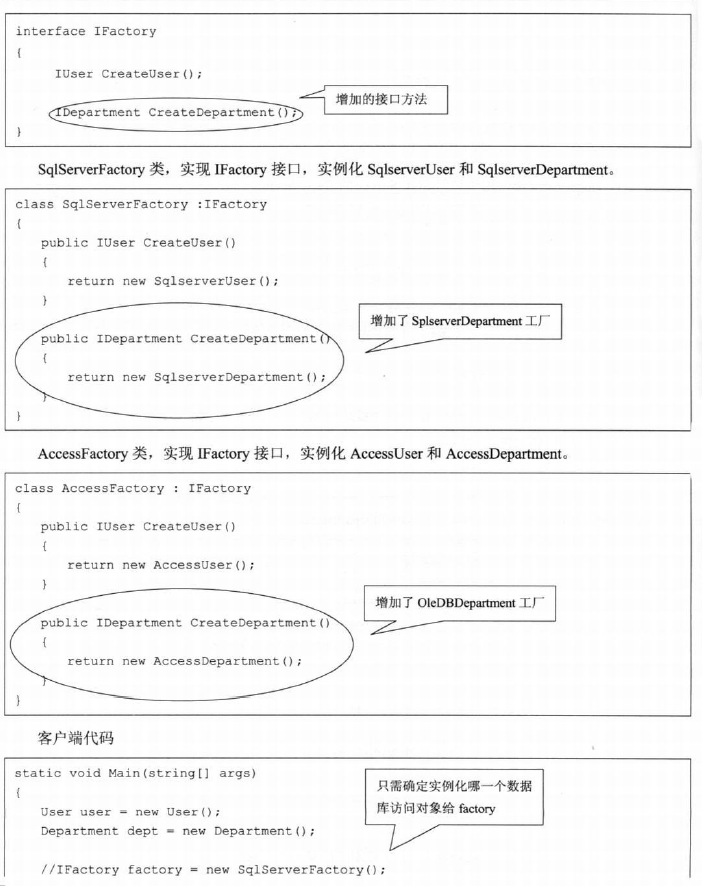
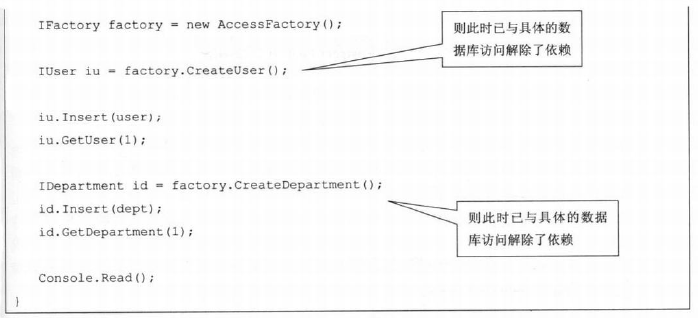
6.3抽象工厂模式举例
//IDepartment
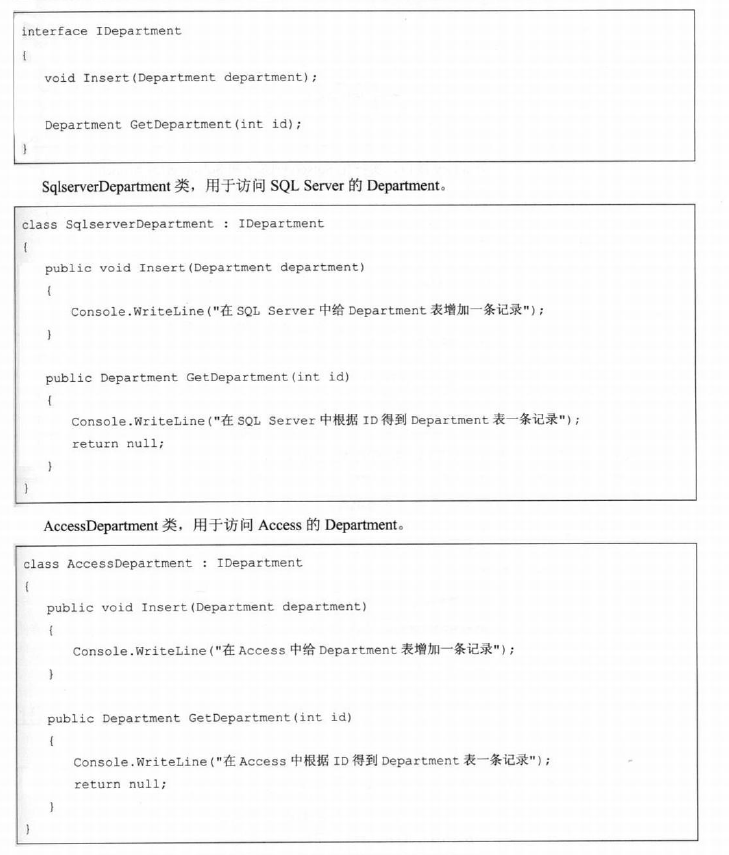
//IUser


//IFactory
工厂方法模式:
一个抽象工厂类,可以派生出多个具体工厂类。
每个具体工厂类只能创建一个具体产品类的实例。
只有一个抽象产品类,可以派生出多个具体产品类。
抽象工厂模式:
一个抽象工厂类,可以派生出多个具体工厂类。
每个具体工厂类可以创建多个具体产品类的实例。
有多个抽象产品类,每个抽象产品类可以派生出多个具体产品类。
区别:
工厂方法模式的具体工厂类只能创建一个具体产品类的实例,而抽象工厂模式的具体工厂类可以创建多个。
工厂方法模式只有一个抽象产品类,而抽象工厂模式有多个。
7.代理模式
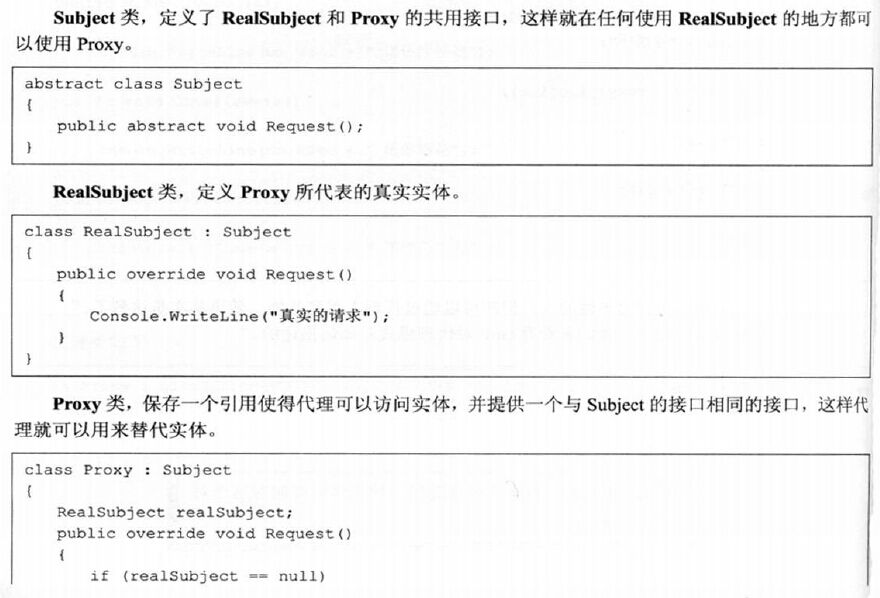
7.1什么是代理模式?
为一个对象提供一个代理,以后要访问这个对象访问这个代理即可。
代理模式会涉及到三个角色:
抽象角色:通过接口或抽象类申明业务方法。
真实角色:实现抽象角色,定义业务方法逻辑。
代理角色:实现抽象角色,是真实角色的代理。
7.2代理模式类图

7.3代理模式举例

8 建造者模式
8.1 什么是建造者模式?
将一个复杂对象的构建和它的表示分离,使得同样的创建过程可以创建不同的表示
8.2 类图
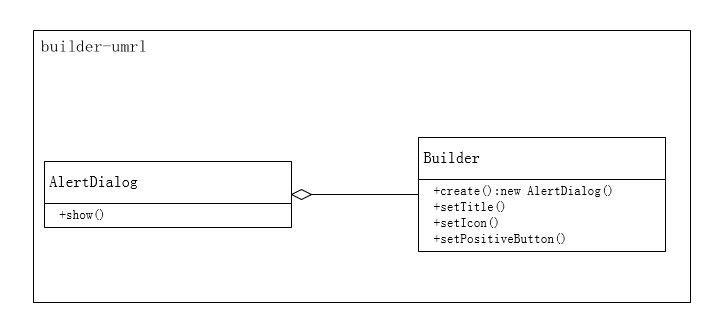
builder类中create()方法用于创建AlertDialog,各种设置属性的方法setXXX用于给创建的AlertDialog方法赋值
8.3 举例
private void showDialog(Context context) {
    AlertDialog.Builder builder = new AlertDialog.Builder(context);
    builder.setIcon(R.drawable.icon);
    builder.setTitle("Title");
    builder.setMessage("Message");
    builder.setPositiveButton("Button1",
            new DialogInterface.OnClickListener() {
                public void onClick(DialogInterface dialog, int whichButton) {
                    setTitle("点击了对话框上的Button1");
                }
            });
    builder.setNeutralButton("Button2",
            new DialogInterface.OnClickListener() {
                public void onClick(DialogInterface dialog, int whichButton) {
                    setTitle("点击了对话框上的Button2");
                }
            });
    builder.setNegativeButton("Button3",
            new DialogInterface.OnClickListener() {
                public void onClick(DialogInterface dialog, int whichButton) {
                    setTitle("点击了对话框上的Button3");
                }
            });
    builder.create().show();  // 构建AlertDialog, 并且显示
}
public static class Builder {
private final AlertController.AlertParams P;
private int mTheme;
public Builder(Context context) {
this(context, resolveDialogTheme(context, 0));
}
public Builder setTitle(int titleId) {
......
}
public Builder setIcon(Drawable icon) {
......
}
public Builder setPositiveButton(int textId, final OnClickListener listener) {
......
}
public Builder setNegativeButton(int textId, final OnClickListener listener) {
......
}
public AlertDialog create() {
final AlertDialog dialog = new AlertDialog(P.mContext, mTheme, false);
......
return dialog;
}
public AlertDialog show() {
AlertDialog dialog = create();
dialog.show();
return dialog;
}
}8.4 常用场景
AlertDialog.Builder ImageLoader的初始配置
9 桥接模式
9.1 什么是桥接模式?
将 抽象部分(继承体系) 与 实现部分(接口系统) 分离,使他们都可以分别独立地进行变化(使用了组合的关系),桥接模式(Bridge)主要来做多维度变化;
桥接模式使用“对象间的组合关系”解耦了抽象和实现之间固有的绑定关系,使得抽象和实现可以沿着各自的维度来变化
9.2 类图
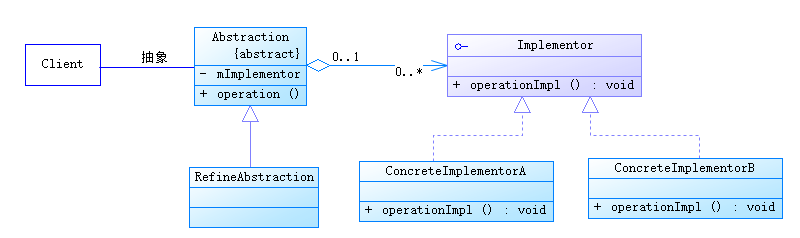
抽象部分(基类/接口+实现类)
保持一个对实现部分对象的引用,抽象部分中的方法需要调用实现部分的对象来实现
实现部分(基类/接口+实现类)
可以为接口或者是抽象类,其方法不一定要与抽象部分中的一致,一般情况下是由实现部分提供基本的操作,而抽象部分定义的则是基于实现部分基本操作的业务方法
9.3 举例
抽象部分
public abstract class Car {
    private ITire tire;

    public Car(ITire tire) {
        this.tire = tire;
    }

    public ITire getTire() {
        return tire;
    }

    public abstract void carGo();
}
public class RacingCar extends Car{
public RacingCar(ITire tire) {
super(tire);
}
@Override
public void carGo() {
Log.e("shawn", "racing car " + getTire().tireRun());
}
}实现部分
public interface ITire {
    String tireRun();
}
public class RainyTire implements ITire{
@Override
public String tireRun() {
return "run on the rainy road.";
}
}测试用例:
Car car = new SedanCar(new RainyTire());
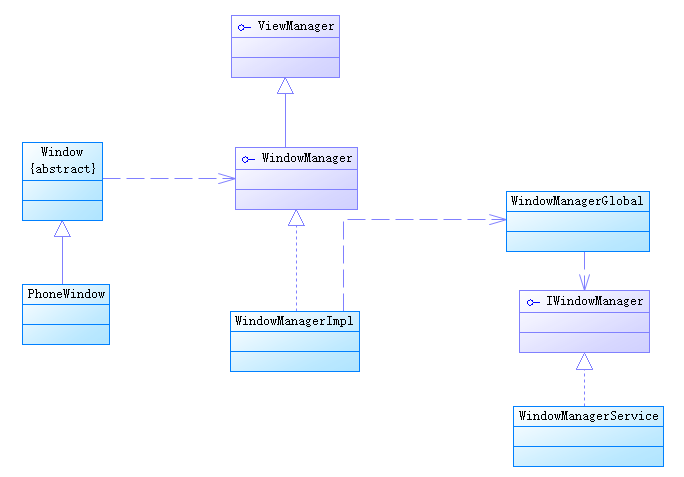
car.tireRun();9.4 常用场景
Window和PhoneWindow,WindowManager和WindowManagerImpl
Window 类和 PhoneWindow 类为抽象部分,WindowManager 接口和 WindowManagerImpl 类就组成了实现部分,这四个类使用的就是典型的桥接模式
参考:http://blog.csdn.net/self_study/article/details/51622243#t3
参考:http://www.cnblogs.com/houleixx/archive/2008/02/23/1078877.html
10 装饰者模式
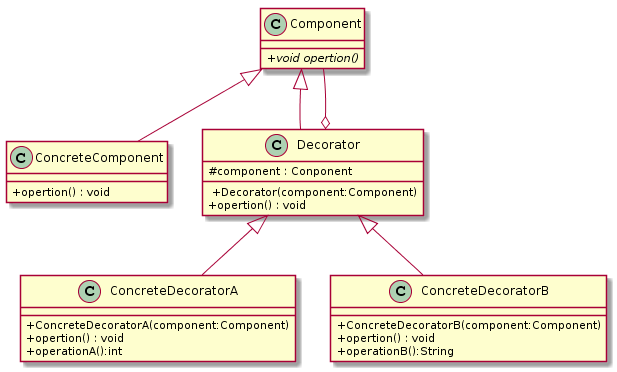
10.1 什么是装饰者模式?
装饰者模式实现的是以组合的形式将需要被装饰的对象注入 装饰者中,装饰过的对象,从客户端来看已经不再是原来的对象,而是经过一系列装饰者装饰过的对象
被装饰者:concreteComponent
装饰者:Decorator
10.2 类图
10.3 举例
Component
public abstract class Component {
    //抽象方法 没有具体操作
    public abstract void operation();
}
ConcreteComponent
public class ConcreteComponent extends Component {

    @Override
    public void operation() {
        //重写方法 做基本的操作
        System.out.print(" ConcreteComponent operation\n");
    }
}
Decorator
public abstract class Decorator extends Component {

    /**
     * 内部持有的组件接口对象
     */
    protected Component component;

    /**
     * 依赖注入
     * @param component 依赖的对象
     */
    public Decorator(Component component) {
        this.component = component;
    }

    /**
     * 转发请求给组件对象 这里可以做一些附加操作
     */
    @Override
    public void operation() {
        component.operation();
    }
}
ConcreteDectrator
public class ConcreteDecoratorA  extends Decorator{

    /**
     * 依赖注入
     *
     * @param component 依赖的对象
     */
    public ConcreteDecoratorA(Component component) {
        super(component);
    }

    public int operationA(){
        System.out.print(" ConcreteDecoratorA operationA\n");
        return 0;
    }

    @Override
    public void operation() {
        operationA();
        super.operation();
    }
}
客户端调用代码
public class Client {
    public static void main(String[] args){
        Component component=new ConcreteComponent();

        Decorator decorator=new ConcreteDecoratorA(component);

        decorator.operation();
    }
}
10 .4 使用场景
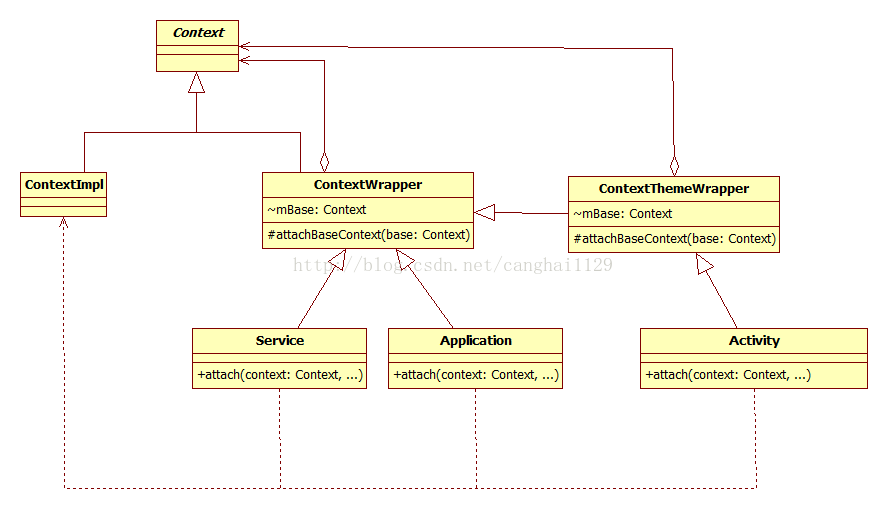
抽象构件(Context)角色:给出一个抽象接口,以规范准备接收附加责任的对象
具体构件(ContextImpl),被装饰者:定义一个需要被装饰的类
装饰(ContextWrapper),装饰者:持有一个被装饰者(ContextImpl)的实例,并定义一个与抽象构件接口一致的接口
具体装饰(Activity/Service/Application),具体装饰者:负责给被装饰者的对象“贴上”附加的责任。
参考:http://blog.csdn.net/canghai1129/article/details/41577901
参考:http://www.2cto.com/kf/201604/502267.html
11 迭代器模式
11.1 什么是迭代器?
提供一种访问一个容器对象中各个元素的方法,可以不暴露该对象的内部细节
迭代器模式的优点:简化了遍历方式,封装性良好
11.2 类图
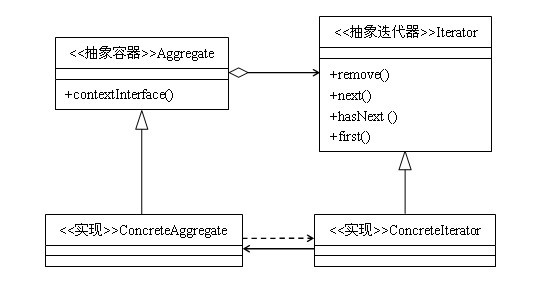
迭代器模式的结构
抽象容器:一般是一个接口,提供一个iterator()方法,例如java中的Collection接口,List接口,Set接口等
具体容器:就是抽象容器的具体实现类,比如List接口的有序列表实现ArrayList,List接口的链表实现LinkList,Set接口的哈希列表的实现HashSet等
抽象迭代器:定义遍历元素所需要的方法,一般来说会有这么三个方法:取得第一个元素的方法first(),取得下一个元素的方法next(),判断是否遍历结束的方法isDone()(或者叫hasNext()),移出当前对象的方法remove(),
迭代器实现:实现迭代器接口中定义的方法,完成集合的迭代
11.3 举例
Iterator是迭代器接口
interface Iterator {
    public Object next();
    public boolean hasNext();
}class ConcreteIterator implements Iterator{
private List list = new ArrayList();
private int cursor =0;
public ConcreteIterator(List list){
this.list = list;
}
public boolean hasNext() {
if(cursor==list.size()){
return false;
}
return true;
}
public Object next() {
Object obj = null;
if(this.hasNext()){
obj = this.list.get(cursor++);
}
return obj;
}
} Aggregate是容器类接口
interface Aggregate {
    public void add(Object obj);
    public void remove(Object obj);
    public Iterator iterator();
}class ConcreteAggregate implements Aggregate {
private List list = new ArrayList();
public void add(Object obj) {
list.add(obj);
}
public Iterator iterator() {
return new ConcreteIterator(list);
}
public void remove(Object obj) {
list.remove(obj);
}
}客户端代码
public class Client {
    public static void main(String[] args){
        Aggregate ag = new ConcreteAggregate();
        ag.add("小明");
        ag.add("小红");
        ag.add("小刚");
        Iterator it = ag.iterator();
        while(it.hasNext()){
            String str = (String)it.next();
            System.out.println(str);
        }
    }
}
11.4 常用场景
迭代器模式是与集合共生共死的,一般来说,我们只要实现一个集合,就需要同时提供这个集合的迭代器,就像java中的Collection,List、Set、Map等,这些集合都有自己的迭代器。假如我们要实现一个这样的新的容器,当然也需要引入迭代器模式,给我们的容器实现一个迭代器。
但是,由于容器与迭代器的关系太密切了,所以大多数语言在实现容器的时候都给提供了迭代器,并且这些语言提供的容器和迭代器在绝大多数情况下就可以满足我们的需要,所以现在需要我们自己去实践迭代器模式的场景还是比较少见的,我们只需要使用语言中已有的容器和迭代器就可以了
12 责任链模式
12.1 什么是责任链模式?
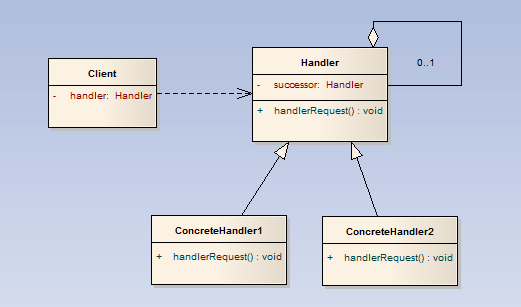
一个请求沿着一条“链”传递,直到该“链”上的某个处理者处理它为止
12.2 类图
12.3 举例
public abstract class ProgramApes {

    public abstract int getExpenses();

    public abstract String getApply();
}
public class AndroidApe extends ProgramApes {
private int expenses;
private String apply = "爹要点钱出差";
public AndroidApe(int expenses) {
this.expenses = expenses;
}
@Override
public int getExpenses() {
return expenses;
}
@Override
public String getApply() {
return apply;
}
}
public abstract class Leader {
    private int expenses;// 当前领导能批复的金额
    private Leader mSuperiorLeader;// 上级领导

    public Leader(int expenses) {
        this.expenses = expenses;
    }

    protected abstract void reply(ProgramApe ape);


    public void handleRequest(ProgramApe ape) {

        if (ape.getExpenses() <= expenses) {
            reply(ape);
        } else {
            if (null != mSuperiorLeader) {
                mSuperiorLeader.handleRequest(ape);
            } else {
                System.out.println("Goodbye my money......");
            }
        }
    }

    public void setLeader(Leader superiorLeader) {
        this.mSuperiorLeader = superiorLeader;
    }
}
public class GroupLeader extends Leader {
public GroupLeader() {
super(1000);
}
@Override
protected void reply(ProgramApe ape) {
System.out.println(ape.getApply());
System.out.println("GroupLeader: Of course Yes!");
}
}public class Director extends Leader{
public Director() {
super(5000);
}
@Override
protected void reply(ProgramApe ape) {
System.out.println(ape.getApply());
System.out.println("Director: Of course Yes!");
}
}public class Manager extends Leader {
public Manager() {
super(10000);
}
@Override
protected void reply(ProgramApe ape) {
System.out.println(ape.getApply());
System.out.println("Manager: Of course Yes!");
}
}public class Boss extends Leader {
public Boss() {
super(40000);
}
@Override
protected void reply(ProgramApe ape) {
System.out.println(ape.getApply());
System.out.println("Boss: Of course Yes!");
}
}public class Client {
public static void main(String[] args) {
ProgramApe ape = new ProgramApe((int) (Math.random() * 30000));
Leader leader = new GroupLeader();
Leader director = new Director();
Leader manager = new Manager();
Leader boss = new Boss();
leader.setLeader(director);
director.setLeader(manager);
manager.setLeader(boss);
leader.handleRequest(ape);
}
}参考:http://blog.csdn.net/u014675538/article/details/50905730
12.4 常用场景
13 状态模式
13.1 什么是状态模式?
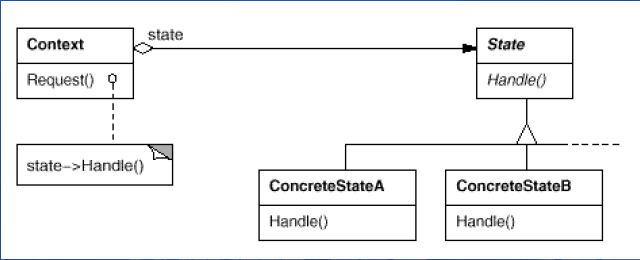
当一个对象的内在状态改变时允许改变其行为,这个对象看起来像是改变了其类
主要解决的是当控制一个对象状态转换的条件表达式过于复杂时的情况。把状态的判断逻辑转移到表示不同的一系列类当中,可以把复杂的逻辑判断简单化
13.2 类图
13.3 举例
State接口
public interface State {
    public void fight();
}
public class CarState implements State {
    private static String  stateName ="汽车形态";

    @Override
    public void fight() {
        System.out.println("横冲直撞碾压");
    }


    @Override
    public String toString() {
        return stateName;
    }
}
FlightState
public class FlightState implements State {
    private static String  stateName ="飞机形态";
    @Override
    public void fight() {
        System.out.println("发射导弹攻击");
    }
    @Override
    public String toString() {
        return stateName;
    }
}public class HumanState implements State {
private static String stateName ="人性形态";
@Override
public void fight() {
System.out.println("赤手空拳搏斗");
}
@Override
public String toString() {
return stateName;
}
}Context类
public class Transformer {
    private String name;
    private State currentState;
    public State  transformTo(State state){
        this.currentState=state;
        return this.currentState;
    }
    public void fight(){
        this.currentState.fight();
    }
    public Transformer(String name,State currentState) {
        this.name=name;
        this.currentState = currentState;
    }
}
客户端用例
public class TransformerTest {
     public static void main(String[] args){
         State currentState;
         //创建初始形态
         State initState=new CarState();
         //创建变形金刚
         Transformer bumblebee= new Transformer("大黄蜂", initState);
         //开始战斗
         bumblebee.fight();
         //切换到人形形态
         currentState= bumblebee.transformTo(new HumanState());
         System.out.println("切换到:"+currentState);
         bumblebee.fight();
         //切换到飞机形态
         currentState= bumblebee.transformTo(new FlightState());
         System.out.println("切换到:"+currentState);
         bumblebee.fight();
     }
}
输出结果
横冲直撞碾压
切换到:人性形态
赤手空拳搏斗
切换到:飞机形态
发射导弹攻击
状态机
14 原型模式
14.1 什么是原型模式?
原型模式主要用于对象的复制,实现接口Cloneable,重写方法clone()即完成了原型模式
14.2 类图
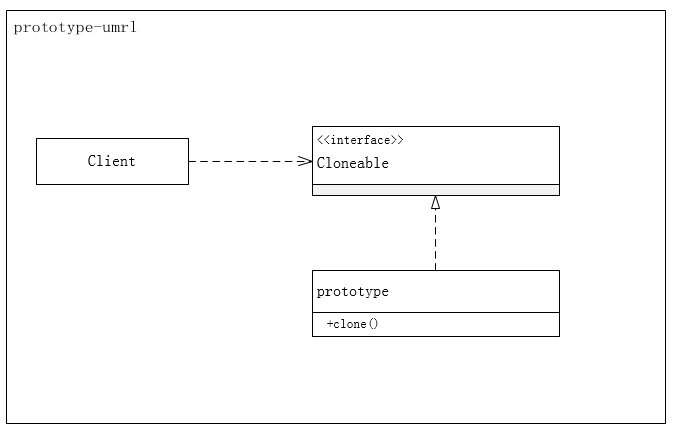
原型模式主要用于对象的复制,它的核心是就是类图中的原型类Prototype。Prototype类需要具备以下两个条件:
1)实现Cloneable接口。在java语言有一个Cloneable接口,它的作用只有一个,就是在运行时通知虚拟机可以安全地在实现了此接口的类上使用clone方法。在java虚拟机中,只有实现了这个接口的类才可以被拷贝,否则在运行时会抛出CloneNotSupportedException异常
2)重写Object类中的clone方法。Java中,所有类的父类都是Object类,Object类中有一个clone方法,作用是返回对象的一个拷贝,但是其作用域protected类型的,一般的类无法调用,因此,Prototype类需要将clone方法的作用域修改为public类型
14.3 应用举例
class Prototype implements Cloneable {
    public Prototype clone(){
        Prototype prototype = null;
        try{
            prototype = (Prototype)super.clone();
        }catch(CloneNotSupportedException e){
            e.printStackTrace();
        }
        return prototype;
    }
}

class ConcretePrototype extends Prototype{
    public void show(){
        System.out.println("原型模式实现类");
    }
}

public class Client {
    public static void main(String[] args){
        ConcretePrototype cp = new ConcretePrototype();
        for(int i=0; i< 10; i++){
            ConcretePrototype clonecp = (ConcretePrototype)cp.clone();
            clonecp.show();
        }
    }
}
14.4 常用场景
原型模式的优点及适用场景
使用原型模式创建对象比直接new一个对象在性能上要好的多,因为Object类的clone方法是一个本地方法,它直接操作内存中的二进制流,特别是复制大对象时,性能的差别非常明显。
使用原型模式的另一个好处是简化对象的创建,使得创建对象就像我们在编辑文档时的复制粘贴一样简单。
因为以上优点,所以在需要重复地创建相似对象时可以考虑使用原型模式。比如需要在一个循环体内创建对象,假如对象创建过程比较复杂或者循环次数很多的话,使用原型模式不但可以简化创建过程,而且可以使系统的整体性能提高很多
原型模式的注意事项
使用原型模式复制对象不会调用类的构造方法。因为对象的复制是通过调用Object类的clone方法来完成的,它直接在内存中复制数据,因此不会调用到类的构造方法。不但构造方法中的代码不会执行,甚至连访问权限都对原型模式无效。还记得单例模式吗?单例模式中,只要将构造方法的访问权限设置为private型,就可以实现单例。但是clone方法直接无视构造方法的权限,所以,单例模式与原型模式是冲突的,在使用时要特别注意。
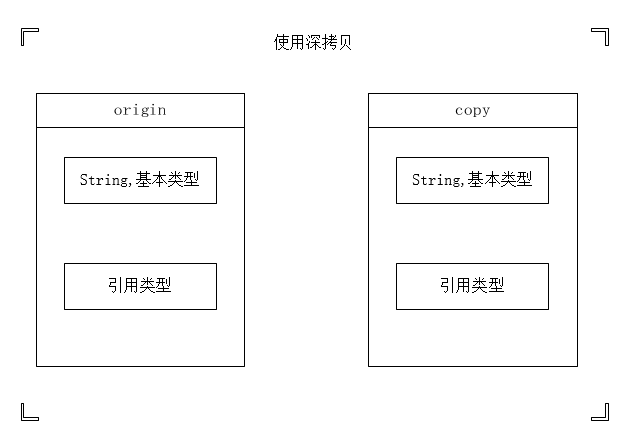
深拷贝与浅拷贝。Object类的clone方法只会拷贝对象中的基本的数据类型,对于数组、容器对象、引用对象等都不会拷贝,这就是浅拷贝。如果要实现深拷贝,必须将原型模式中的数组、容器对象、引用对象等另行拷贝。例如
PS:深拷贝与浅拷贝问题中,会发生深拷贝的有java中的8中基本类型以及他们的封装类型,另外还有String类型。其余的都是浅拷贝。
参考:http://blog.csdn.net/zhengzhb/article/details/7393528


 1万+
1万+

 被折叠的 条评论
为什么被折叠?
被折叠的 条评论
为什么被折叠?
 到【灌水乐园】发言


