


setContentView方法大家再熟悉不过了,但是能说说setContentView加载原理的并不多,现在我们就来了解下这个熟悉且神秘的朋友
1 源码分析
(1)Activity
Activity是在onCreate方法中使用setContentView方法来加载布局的,所以当然要进入Activity
public void setContentView(int layoutResID) {
        getWindow().setContentView(layoutResID);
        initActionBar();
}(2)PhoneWindow
@Override
    public void setContentView(int layoutResID) {
        if (mContentParent == null) {
            installDecor();
        } else {
            mContentParent.removeAllViews();
        }
        mLayoutInflater.inflate(layoutResID, mContentParent);
        ......
}下面重点看看installDecor方法
private void installDecor() {
        if (mDecor == null) {
            mDecor = generateDecor();
           ......
        }
        if (mContentParent == null) {
            mContentParent = generateLayout(mDecor);
       ......
     }
}
很显然,在这里实例化了大名鼎鼎的DecorView,DecorView继承FrameLayout,然后将DecorView传入generateLayout生成mContentParent
这个mContentParent 又是什么鬼呢?
protected DecorView generateDecor() {
        return new DecorView(getContext(), -1);
}public DecorView(Context context, int featureId) {
super(context);
mFeatureId = featureId;
}protected ViewGroup generateLayout(DecorView decor) {
// 首先getWindowStyle获取我们当前Window中定义的theme属性,我们在清单文件中设置的Activity theme在这里进行处理
TypedArray a = getWindowStyle();
//然后通过WindowStyle中设置的各种属性,对Window进行requestFeature或者setFlags
if (a.getBoolean(com.android.internal.R.styleable.Window_windowNoTitle, false)) {
requestFeature(FEATURE_NO_TITLE);
}
//...
if (a.getBoolean(com.android.internal.R.styleable.Window_windowFullscreen, false)) {
setFlags(FLAG_FULLSCREEN, FLAG_FULLSCREEN & (~getForcedWindowFlags()));
}
// 下面的过程通过对features和mIsFloating的判断为layoutResource赋值
// features的设置我们可以通过android:theme="..."我们也可以在onCreate的setContentView之前进行requestFeature
int layoutResource;
int features = getLocalFeatures();
if ((features & ((1 << FEATURE_LEFT_ICON) | (1 << FEATURE_RIGHT_ICON))) != 0) {
if (mIsFloating) {
TypedValue res = new TypedValue();
getContext().getTheme().resolveAttribute(
com.android.internal.R.attr.dialogTitleIconsDecorLayout, res, true);
layoutResource = res.resourceId;
......
} else if ((features & (1 << FEATURE_ACTION_MODE_OVERLAY)) != 0) {
layoutResource = com.android.internal.R.layout.screen_simple_overlay_action_mode;
} else {
layoutResource = com.android.internal.R.layout.screen_simple;
}
//得到了layoutResource以后,通过LayoutInflater把布局转化成view,加入到我们的decorView中
View in = mLayoutInflater.inflate(layoutResource, null);
decor.addView(in, new ViewGroup.LayoutParams(MATCH_PARENT, MATCH_PARENT));
ViewGroup contentParent = (ViewGroup)findViewById(ID_ANDROID_CONTENT);
//...
return contentParent;
}
} 这里出现了decorView,layoutResource ,mContentParent 他们是什么关系呢?
我们知道decoreView是继承FrameLayout,layoutResource 是根据theme选择出来的系统布局,类似下面的XML
LinearLayout xmlns:android="http://schemas.android.com/apk/res/android"
    android:layout_width="match_parent"
    android:layout_height="match_parent"
    android:fitsSystemWindows="true"
    android:orientation="vertical">
    <ViewStub android:id="@+id/action_mode_bar_stub"
              android:inflatedId="@+id/action_mode_bar"
              android:layout="@layout/action_mode_bar"
              android:layout_width="match_parent"
              android:layout_height="wrap_content" />
    <FrameLayout
         android:id="@android:id/content"
         android:layout_width="match_parent"
         android:layout_height="match_parent"
         android:foregroundInsidePadding="false"
         android:foregroundGravity="fill_horizontal|top"
         android:foreground="?android:attr/windowContentOverlay" />
</LinearLayout><LinearLayout xmlns:android="http://schemas.android.com/apk/res/android"
android:orientation="vertical"
android:fitsSystemWindows="true">
<!-- Popout bar for action modes -->
<ViewStub android:id="@+id/action_mode_bar_stub"
android:inflatedId="@+id/action_mode_bar"
android:layout="@layout/action_mode_bar"
android:layout_width="match_parent"
android:layout_height="wrap_content" />
<FrameLayout android:id="@android:id/title_container"
android:layout_width="match_parent"
android:layout_height="?android:attr/windowTitleSize"
style="?android:attr/windowTitleBackgroundStyle">
</FrameLayout>
<FrameLayout android:id="@android:id/content"
android:layout_width="match_parent"
android:layout_height="0dip"
android:layout_weight="1"
android:foregroundGravity="fill_horizontal|top"
android:foreground="?android:attr/windowContentOverlay" />
</LinearLayout> generateLayout中ViewGroup contentParent = (ViewGroup)findViewById(ID_ANDROID_CONTENT) 就是将id为content的
FrameLayout返回给mContentParent,然后setContentView中mLayoutInflater.inflate(layoutResID, mContentParent); 就是将
setContentView传进来的layoutResID(Activity所在的布局id)加载到mContentParent中
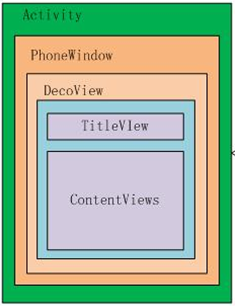
2 总结
总结下整个流程:
首先初始化mDecor(DecorView为FrameLayout的子类,就是我们整个窗口的根视图了)。
然后,根据theme中的属性值,选择合适的布局,通过infalter.inflater放入到我们的mDecor中。
在这些布局中,会包含ActionBar,Title,和一个id为content的FrameLayout。
最后,我们在Activity中设置的布局,会通过infalter.inflater压入到我们的id为content的FrameLayout中去
最后附上经典图片:


 322
322

 被折叠的 条评论
为什么被折叠?
被折叠的 条评论
为什么被折叠?
 到【灌水乐园】发言


