


前言
博主由于项目中频繁的使用了V7包中的RecyclerView来代替ListView的列表展示,所以抽空基于ListView的通用适配器的原理,给RecyclerView也写了一个通用适配器主要支持以下功能:
1.支持item的点击事件,在多布局的情况下可以指定生效的itemType
2.支持item中的控件的点击事件(博主觉得具有创新性),在多布局的情况下可以指定生效的itemType
3.支持添加和移除头部
4.支持添加和移除尾部
5.支持多布局(其实这个并不是博主写的功能,而是自带的,下面会陈述)
以上的功能都是通用适配器完成的,对RecyclerView本身没有做任何的更改
那么博主就先带大家来看看是如何使用的吧,看看他是如果提高我们的开发效率的!
Xml布局
<?xml version="1.0" encoding="utf-8"?>
<RelativeLayout xmlns:android="http://schemas.android.com/apk/res/android"
    xmlns:tools="http://schemas.android.com/tools"
    android:layout_width="match_parent"
    android:layout_height="match_parent"
    tools:context="com.yoursecondworld.recyclerviewdemo.MainActivity">

    <android.support.v7.widget.RecyclerView
        android:id="@+id/rv"
        android:layout_width="match_parent"
        android:layout_height="match_parent"/>

</RelativeLayout>
Number One(一个竖直的简单的列表,显示人名)
public class MainActivity extends AppCompatActivity {

    //展示数据的列表
    private RecyclerView rv = null;

    //需要展示的数据
    private List<String> data = new ArrayList<String>();

    @Override
    protected void onCreate(Bundle savedInstanceState) {
        super.onCreate(savedInstanceState);
        setContentView(R.layout.activity_main);


        //展示的数据造假
        for(int i = 0; i < 100; i++) {
            data.add("item:" + i);
        }

        //寻找控件
        rv = (RecyclerView) findViewById(R.id.rv);

        //创建一个线性的布局管理器并设置
        LinearLayoutManager layoutManager = new LinearLayoutManager(this);
        layoutManager.setOrientation(LinearLayoutManager.VERTICAL);
        rv.setLayoutManager(layoutManager);

        CommonRecyclerViewAdapter<String> adapter = new CommonRecyclerViewAdapter<String>(this, data) {
            @Override
            public void convert(CommonRecyclerViewHolder h, String entity, int position) {
                h.setText(android.R.id.text1, entity);
            }

            //返回item布局的id
            @Override
            public int getLayoutViewId(int viewType) {
                return android.R.layout.simple_list_item_1;
            }
        };

        //设置适配器
        rv.setAdapter(adapter);

    }
}
你可以看到适配器是通过内部类new出来的,因为代码量比较少所以这样子写了,你们在项目中最好创建一个类哦
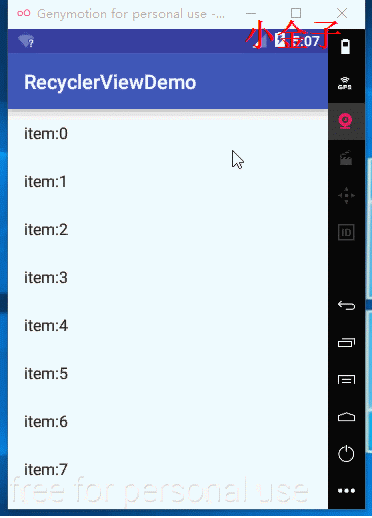
代码很简单,就是让RecyclerView竖直的展示了数据,item的布局暂时使用了系统的
效果

可以看到显示没有一点问题,那么我要实现条目的点击怎么办?
实现item的点击效果
adapter.setOnRecyclerViewItemClickListener(new CommonRecyclerViewAdapter.OnRecyclerViewItemClickListener() {
        @Override
        public void onItemClick(View v, int position) {
               Toast.makeText(MainActivity.this, "你点击了第" + position + "个item", Toast.LENGTH_SHORT).show();
        }
});点击item效果
可以看到,点击事件生效
多布局demo
由于显示的需要,我们需要一个实体对象
entity
public class DemoEntity {

    //如果有这个说明需要使用tag条目
    private String tag;

    //如果有这个说明要使用item条目
    private String name;

    public DemoEntity(String tag, String name) {
        this.tag = tag;
        this.name = name;
    }

    public String getTag() {
        return tag;
    }

    public void setTag(String tag) {
        this.tag = tag;
    }

    public String getName() {
        return name;
    }

    public void setName(String name) {
        this.name = name;
    }
}
注释中可以看出,如果有tag属性,那么没有name属性
既然是多布局,那么两个及以上的布局,这里以两个布局为例子
xml(TagItem)
<?xml version="1.0" encoding="utf-8"?>
<RelativeLayout xmlns:android="http://schemas.android.com/apk/res/android"
    android:layout_width="match_parent"
    android:layout_height="wrap_content">

    <TextView
        android:id="@+id/tv_tag"
        android:layout_width="wrap_content"
        android:layout_height="wrap_content"
        android:textColor="#0000FF"
        android:textSize="24dp" />

</RelativeLayout>
xml(NameItem)
<?xml version="1.0" encoding="utf-8"?>
<RelativeLayout xmlns:android="http://schemas.android.com/apk/res/android"
    android:layout_width="match_parent"
    android:layout_height="match_parent">

    <TextView
        android:id="@+id/tv_name"
        android:layout_width="wrap_content"
        android:layout_height="wrap_content"
        android:layout_marginLeft="16dp"
        android:textSize="16dp" />

</RelativeLayout>
然后我们在适配器中需要多一个方法了,先看代码
修改后的Activity代码
public class MainActivity extends AppCompatActivity {

    //展示数据的列表
    private RecyclerView rv = null;

    //需要展示的数据
    private List<DemoEntity> data = new ArrayList<DemoEntity>();

    @Override
    protected void onCreate(Bundle savedInstanceState) {
        super.onCreate(savedInstanceState);
        setContentView(R.layout.activity_main);


        //展示的数据造假
        data.add(new DemoEntity("A", null));
        data.add(new DemoEntity(null, "阿大"));
        data.add(new DemoEntity(null, "阿姨"));
        data.add(new DemoEntity("C", null));
        data.add(new DemoEntity(null, "陈旭金"));

        //寻找控件
        rv = (RecyclerView) findViewById(R.id.rv);

        //创建一个线性的布局管理器并设置
        LinearLayoutManager layoutManager = new LinearLayoutManager(this);
        layoutManager.setOrientation(LinearLayoutManager.VERTICAL);
        rv.setLayoutManager(layoutManager);

        CommonRecyclerViewAdapter<DemoEntity> adapter = new CommonRecyclerViewAdapter<DemoEntity>(this, data) {

            @Override
            public void convert(CommonRecyclerViewHolder h, DemoEntity entity, int position) {
                int itemViewType = getItemType(position);
                if (itemViewType == 1) {
                    h.setText(R.id.tv_tag, entity.getTag());
                } else {
                    h.setText(R.id.tv_name, entity.getName());
                }
            }

            //返回item布局的id
            @Override
            public int getLayoutViewId(int viewType) {
                if (viewType == 1) {
                    return R.layout.tag;
                } else {
                    return R.layout.item;
                }
            }

            //默认是返回0,所以你可以定义返回1表示使用tag,2表示使用item,
            //这里返回的值将在getLayoutViewId方法中出现
            @Override
            public int getItemType(int position) {
                //根据实体对象中的属性来返回view的类型
                DemoEntity demoEntity = data.get(position);
                if (demoEntity.getTag() != null) { //如果是tag,应该返回1
                    return 1;
                } else {
                    return 2;
                }
            }
        };

        //设置适配器
        rv.setAdapter(adapter);

        adapter.setOnRecyclerViewItemClickListener(new CommonRecyclerViewAdapter.OnRecyclerViewItemClickListener() {
            @Override
            public void onItemClick(View v, int position) {
                Toast.makeText(MainActivity.this, "你点击了第" + position + "个item", Toast.LENGTH_SHORT).show();
            }
        });

    }
}
我们看到多了一个getItemType方法,用来返回下标为position的时候的viewItem的标识,这个可以随你自己定义,上面就是1表示Tag,2表示name
然后我们的getLayoutViewId方法就不再是单纯的返回同一个布局啦,就要根据刚刚的标识返回对应的xml的id啦
同理,在convert方法中也得判断后再进行对item中的控件赋值啦!代码不难,博主也做了注释
看效果
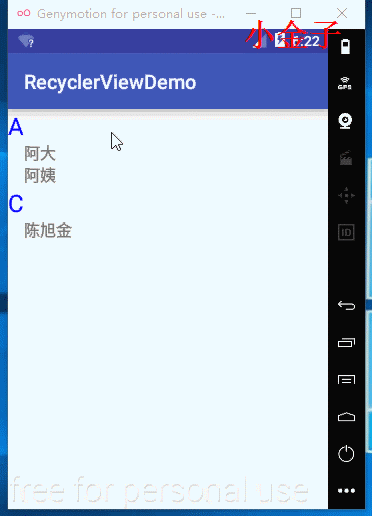
数据的数量比较少就不能滑动了,你自己数据弄多点就行啦
针对多布局的item点击事件,有时候我们需要只要名称的item的点击作用生效就行了,所以adapter中也提供了相应的方法
public void setOnRecyclerViewItemClickListener(OnRecyclerViewItemClickListener onRecyclerViewItemClickListener, int... itemTypes)
adapter.setOnRecyclerViewItemClickListener(new CommonRecyclerViewAdapter.OnRecyclerViewItemClickListener() {
        @Override
        public void onItemClick(View v, int position) {
             Toast.makeText(MultiLayoutActivity.this, "你点击了第" + position + "个item", Toast.LENGTH_SHORT).show();
        }
}, 2);
细心一点可以看到,设置监听的最后我跟上了一个2,那么这个2是什么用呢?还记得上面的多布局,我们的2表示显示名称的item,所以这里的2就是指点击事件只对显示名称的item起作用,而这个2也是你自己在上面自定义的,所以要学会变通
看效果!

可以看我我无论如何点击蓝色的字母,这里都没有起作用,这个设计博主觉得挺6的,你说呢?
演示监听item内部控件的点击事件
<?xml version="1.0" encoding="utf-8"?>
<RelativeLayout xmlns:android="http://schemas.android.com/apk/res/android"
    android:layout_width="match_parent"
    android:layout_height="match_parent">

    <TextView
        android:id="@+id/tv_name"
        android:layout_width="wrap_content"
        android:layout_height="wrap_content"
        android:layout_centerVertical="true"
        android:layout_marginLeft="16dp"
        android:text="name"
        android:textSize="16dp" />

    <!--新添加一个按钮,在文本的右边-->
    <Button
        android:id="@+id/bt"
        android:layout_width="wrap_content"
        android:layout_height="wrap_content"
        android:layout_centerVertical="true"
        android:layout_toRightOf="@+id/tv_name"
        android:text="点我" />

</RelativeLayout>
就添加了一个按钮
然后呢,我们在Activity去监听这个item中的按钮!方法为:
public void setOnViewInItemClickListener(OnViewInItemClickListener onViewInItemClickListener, int... viewIdsInItem)用法:
//添加item中按钮控件监听
adapter.setOnViewInItemClickListener(new CommonRecyclerViewAdapter.OnViewInItemClickListener() {
        @Override
        public void onViewInItemClick(View v, int position) {
            DemoEntity demoEntity = data.get(position);
            Toast.makeText(MultiLayoutActivity.this, "你点击了第" + position + "个item,name = " + demoEntity.getName(), Toast.LENGTH_SHORT).show();
        }
}, R.id.bt);
为了可以滑动,数据我造假多一点
        data.add(new DemoEntity("A", null));
        data.add(new DemoEntity(null, "阿大"));
        data.add(new DemoEntity(null, "阿姨1"));
        data.add(new DemoEntity(null, "阿姨2"));
        data.add(new DemoEntity(null, "阿姨3"));
        data.add(new DemoEntity(null, "阿姨4"));
        data.add(new DemoEntity("C", null));
        data.add(new DemoEntity(null, "陈旭金1"));
        data.add(new DemoEntity(null, "陈旭金2"));
        data.add(new DemoEntity(null, "陈旭金3"));
        data.add(new DemoEntity(null, "陈旭金4"));
效果
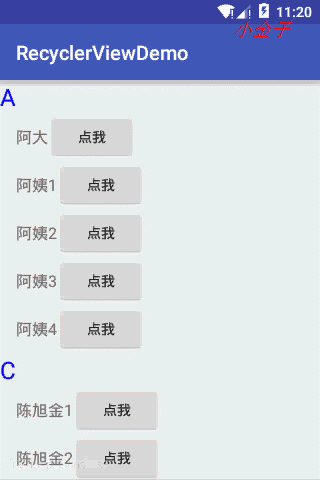
可以看到item中的按钮被成功点击!并且显示出对应的名称和点击item是有点区别的
演示添加头部试图
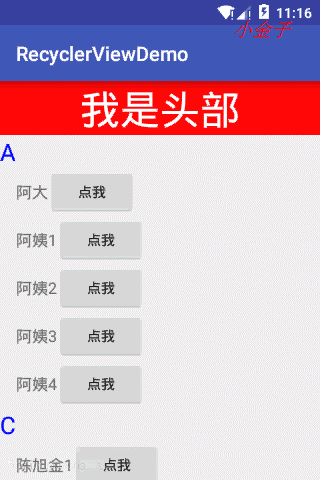
头部xml
<?xml version="1.0" encoding="utf-8"?>
<RelativeLayout xmlns:android="http://schemas.android.com/apk/res/android"
    android:layout_width="match_parent"
    android:layout_height="match_parent"
    android:background="#FF0000">


    <RelativeLayout
        android:layout_width="match_parent"
        android:layout_height="wrap_content">

        <TextView
            android:layout_width="wrap_content"
            android:layout_height="wrap_content"
            android:layout_centerInParent="true"
            android:text="我是头部"
            android:textColor="#FFFFFF"
            android:textSize="40dp" />

    </RelativeLayout>


</RelativeLayout>
adapter.addHeaderView(View.inflate(this, R.layout.header, null));效果


 148
148

 被折叠的 条评论
为什么被折叠?
被折叠的 条评论
为什么被折叠?
 到【灌水乐园】发言


