


Linux中常用命令汇总二地址:https://blog.csdn.net/u011837804/article/details/128997250
1、用户组管理类
每个用户都有一个用户组,系统可以对一个用户组中的所有用户进行集中管理。不同 Linux 系统对用户组的规定有所不同,如Linux下的用户属于与它同名的用户组,这个用户组在创建用户时同时创建。
用户组的管理涉及用户组的添加、删除和修改。组的增加、删除和修改实际上就是对 /etc/group文件的更新。
1.1、groupadd新增组
基本语法
groupadd 组名
实例
# 添加组名为test_01的用户组
[root@liuchao ~]# groupadd test_01
1.2、groupdel删除组
基本语法
groupdel 组名
实例
# 删除test_01 用户组
[root@liuchao ~]# groupdel test_01
1.3、groupmod修改组
基本语法
groupmod -n 新组名 老组名
选项说明
选项 | 说明 |
-n<新组名> | 指定工作组的新组名 |
实例
# 添加test_01 分组
[root@liuchao ~]# groupadd test_01
[root@liuchao ~]#
# 将test_01 改为test_02
[root@liuchao ~]# groupmod -n test_02 test_01
[root@liuchao ~]#
# 删除test_01 提示错误,说明组名称已被更改
[root@liuchao ~]# groupdel test_01
groupdel:“test_01”组不存在
[root@liuchao ~]#
1.4、cat /etc/group 查看创建了哪些组
基本操作
# 查看所有已创建分组
[root@liuchao ~]# cat /etc/group
2、文件权限类
2.1、文件属性
Linux系统是一种典型的多用户系统,不同的用户处于不同的地位,拥有不同的权限。 为了保护系统的安全性,Linux系统对不同的用户访问同一文件(包括目录文件)的权限做 了不同的规定。在Linux中我们可以使用ll或者ls -l命令来显示一个文件的属性以及文件所属 的用户和组。
linux中文件属性使用从左到右的 10 个字符表示,如果没有权限,就会出现减号[ - ]而已。从左至右用0-9这些数字来表示:

详解:
(1)、0 首位表示类型
在Linux中第一个字符代表这个文件是目录、文件或链接文件等等
- 代表文件
d 代表目录
l 链接文档(link file)
(2)、第1-3位确定属主(该文件的所有者)拥有该文件的权限。---User
(3)、第4-6位确定属组(所有者的同组用户)拥有该文件的权限,---Group
(4)、第7-9位确定其他用户拥有该文件的权限 ---Other
rwx 作用文件和目录的不同详细解释
(1)、作用到文件
[ r ]代表可读(read): 可以读取,查看
[ w ]代表可写(write): 可以修改,但是不代表可以删除该文件,删除一个文件的前
提条件是对该文件所在的目录有写权限,才能删除该文件.
[ x ]代表可执行(execute):可以被系统执行
(2)、作用到目录
[ r ]代表可读(read): 可以读取,ls查看目录内容
[ w ]代表可写(write): 可以修改,目录内创建+删除+重命名目录
[ x ]代表可执行(execute):可以进入该目录
实例
# 通过ll命令查看文件、文件夹、软连接属性
[root@liuchao test]# ll
总用量 0
# 文件
-rw-r--r-- 1 root root 0 2月  13 13:10 1.txt
# 文件夹
drwxr-xr-x 2 root root 6 2月  13 13:10 test
# 软连接
lrwxrwxrwx 1 root root 5 2月  13 13:10 test2 -> 1.txt
[root@liuchao test]#
2.2、chmod改变权限
基本语法

第一种方式变更权限
chmod [{ugoa}{+-=}{rwx}]文件或目录
第二种方式变更权限
chmod [mode=421 ] [文件或目录]
经验技巧
u:所有者 g:所有组 o:其他人 a:所有人(u、g、o的总和)
r=4 w=2 x=1 rwx=4+2+1=7
选项说明
选项 | 说明 |
-R | 递归操作 |
实例
(1)、修改文件使其所属主用户具有执行权限
[root@liuchao test]# ll
总用量 0
-rw-r--r-- 1 root root 0 2月  13 13:10 1.txt
[root@liuchao test]#
[root@liuchao test]#
# u代表所属主,x代表可执行权限
[root@liuchao test]# chmod u+x 1.txt
[root@liuchao test]#
[root@liuchao test]# ll
总用量 0
-rwxr--r-- 1 root root 0 2月  13 13:10 1.txt
[root@liuchao test]#
(2)、修改文件使其所属组用户具有执行权限
[root@liuchao test]# ll
总用量 0
-rwxr--r-- 1 root root 0 2月  13 13:10 1.txt
[root@liuchao test]#
# g代表组,x代表可执行
[root@liuchao test]# chmod g+x 1.txt
[root@liuchao test]#
[root@liuchao test]# ll
总用量 0
-rwxr-xr-- 1 root root 0 2月  13 13:10 1.txt
[root@liuchao test]#
(3)、修改文件所属主用户执行权限,并使其他用户具有执行权限
[root@liuchao test]# ll
总用量 0
-rwxr-xr-- 1 root root 0 2月  13 13:10 1.txt
[root@liuchao test]#
# 取消所属主可执行权限,增加其他用户可执行权限
[root@liuchao test]# chmod u-x,o+x 1.txt
[root@liuchao test]#
[root@liuchao test]# ll
总用量 0
-rw-r-xr-x 1 root root 0 2月  13 13:10 1.txt
[root@liuchao test]#
(4)、采用数字的方式,设置文件所有者、所属组、其他用户都具有可读可写可执行权
限。
[root@liuchao test]# ll
总用量 0
-rw-r-xr-x 1 root root 0 2月  13 13:10 1.txt
[root@liuchao test]#
#第一个7代表修改所属主,第二个7代表修改所属组,第三个7代表其他用
[root@liuchao test]# chmod 777 1.txt
[root@liuchao test]#
[root@liuchao test]# ll
总用量 0
-rwxrwxrwx 1 root root 0 2月  13 13:10 1.txt
[root@liuchao test]#
(5)、修改整个文件夹里面的所有文件的所有者、所属组、其他用户都具有可读可写可 执行权限。
# -R 代表递归,如果文件夹下文件太多,并且都需要同一个权限,则加上-R一次性将所有的文件都加上相同的权限
[root@liuchao /]# chmod -R 777 ./test/
2.3、chown改变所属主(所有者)
基本语法
chown [选项] [最终用户] [文件或目录] (功能描述:改变文件或者目录的所有者)
选项说明
选项 | 说明 |
-R | 递归操作 |
实例
[root@liuchao home]# useradd test_01
[root@liuchao home]#
[root@liuchao home]# ll /test
总用量 0
drwxr-xr-x 2 root root 6 2月  13 13:27 test1
drwxr-xr-x 2 root root 6 2月  13 13:28 test2
drwxr-xr-x 2 root root 6 2月  13 13:28 test3
[root@liuchao home]#
[root@liuchao home]# chown test_01 /test/test1
[root@liuchao home]#
[root@liuchao home]# ll /test/
总用量 0
drwxr-xr-x 2 test_01 root 6 2月  13 13:27 test1
drwxr-xr-x 2 root    root 6 2月  13 13:28 test2
drwxr-xr-x 2 root    root 6 2月  13 13:28 test3
[root@liuchao home]#
[root@liuchao home]# chown -R test_01 /test/
[root@liuchao home]#
[root@liuchao home]# ll /test
总用量 0
drwxr-xr-x 2 test_01 root 6 2月  13 13:27 test1
drwxr-xr-x 2 test_01 root 6 2月  13 13:28 test2
drwxr-xr-x 2 test_01 root 6 2月  13 13:28 test3
[root@liuchao home]#
2.4、chgrp改变所属组
基本语法
chgrp [最终用户组] [文件或目录] (功能描述:改变文件或者目录的所属组)
选项说明
选项 | 说明 |
-R | 递归操作 |
实例
[root@liuchao /]# groupadd test_01
[root@liuchao /]#
[root@liuchao /]# ll /test/
总用量 0
drwxr-xr-x 2 root root 6 2月  13 13:33 test1
drwxr-xr-x 2 root root 6 2月  13 13:33 test2
drwxr-xr-x 2 root root 6 2月  13 13:33 test3
[root@liuchao /]#
[root@liuchao /]# chgrp test_01 /test/test1
[root@liuchao /]#
[root@liuchao /]# ll /test/
总用量 0
drwxr-xr-x 2 root test_01 6 2月  13 13:33 test1
drwxr-xr-x 2 root root    6 2月  13 13:33 test2
drwxr-xr-x 2 root root    6 2月  13 13:33 test3
[root@liuchao /]#
[root@liuchao /]# chgrp -R test_01 /test/
[root@liuchao /]#
[root@liuchao /]# ll /test/
总用量 0
drwxr-xr-x 2 root test_01 6 2月  13 13:33 test1
drwxr-xr-x 2 root test_01 6 2月  13 13:33 test2
drwxr-xr-x 2 root test_01 6 2月  13 13:33 test3
[root@liuchao /]#
5、搜索查找类
5.1、find查找文件或者目录
find 指令将从指定目录向下递归地遍历其各个子目录,将满足条件的文件显示在终端。
基本语法
find [搜索范围] [选项]
选项说明
选项 | 说明 |
-name<查询方式> | 按照指定的文件名查找模式查找文件 |
-user<用户名> | 查找属于指定用户名所有文件 |
-size<文件大小> | 按照指定的文件大小查找文件,单位为: b —— 块(512 字节) c —— 字节 w —— 字(2 字节) k —— 千字节 M —— 兆字节 G —— 吉字节 |
实例
(1)、按文件名:根据名称查找/test/目录下所有的txt文件。
[root@liuchao test]# find /test/ -name "*.txt"
/test/1.txt
[root@liuchao test]#
(2)、按拥有者:查找/test/目录下所属主为test_01的文件
[root@liuchao test]# ll
总用量 0
drwxr-xr-x 2 test_01 root 6 2月  13 13:56 test1
drwxr-xr-x 2 root    root 6 2月  13 13:56 test2
drwxr-xr-x 2 root    root 6 2月  13 13:56 test3
[root@liuchao test]# find /test/ -user test_01
/test/test1
[root@liuchao test]#
(3)、按文件大小:在/home目录下查找大于200m的文件(+n 大于 -n小于 n等于)
[root@liuchao test]# find /test/ -size +204800
[root@liuchao test]#
5.2、locate快速定位文件路径
locate 指令利用事先建立的系统中所有文件名称及路径的 locate 数据库实现快速定位给 定的文件。Locate 指令无需遍历整个文件系统,查询速度较快。为了保证查询结果的准确
度,管理员必须定期更新 locate 时刻。
基本语法
locate 搜索文件
经验技巧
由于 locate 指令基于数据库进行查询,所以第一次运行前,必须使用 updatedb 指令创建 locate 数据库。
实例
[root@liuchao test]# updatedb
[root@liuchao test]# locate tmp
5.3、grep过滤查找及“|”管道符
管道符,“|”,表示将前一个命令的处理结果输出传递给后面的命令处理
基本语法
grep 选项 查找内容 源文件
选项说明
选项 | 说明 |
-n | 显示匹配行及行号 |
实例
[root@liuchao test]# ll
总用量 0
drwxr-xr-x 2 test_01 root 6 2月  13 13:56 test1
drwxr-xr-x 2 root    root 6 2月  13 13:56 test2
drwxr-xr-x 2 root    root 6 2月  13 13:56 test3
[root@liuchao test]#
[root@liuchao test]#
# 查找test2文件并展示在第几行
[root@liuchao test]# ll | grep -n test2
3:drwxr-xr-x 2 root    root 6 2月  13 13:56 test2
[root@liuchao test]#
6、压缩解压类
6.1、gzip/gunzip压缩
基本语法
gzip 文件 (功能描述:压缩文件,只能将文件压缩为*.gz 文件)
gunzip 文件.gz (功能描述:解压缩文件命令)
经验技巧
(1)、只能压缩文件不能压缩目录
(2)、不保留原来的文件
(3)、同时多个文件会产生多个压缩包
实例
[root@liuchao test]# ls
1.txt  test1  test2  test3
[root@liuchao test]#
[root@liuchao test]# gzip test1
gzip: test1 is a directory -- ignored
[root@liuchao test]#
[root@liuchao test]# gzip 1.txt
[root@liuchao test]#
[root@liuchao test]# ls
1.txt.gz  test1  test2  test3
[root@liuchao test]#
[root@liuchao test]# touch 2.txt 3.txt
[root@liuchao test]#
[root@liuchao test]# ls
1.txt.gz  2.txt  3.txt  test1  test2  test3
[root@liuchao test]#
[root@liuchao test]# gzip 2.txt 3.txt
[root@liuchao test]#
[root@liuchao test]# ls
1.txt.gz  2.txt.gz  3.txt.gz  test1  test2  test3
[root@liuchao test]#
[root@liuchao test]# gunzip 1.txt.gz
[root@liuchao test]#
[root@liuchao test]# gunzip 2.txt.gz 3.txt.gz
[root@liuchao test]#
[root@liuchao test]# ls
1.txt  2.txt  3.txt  test1  test2  test3
[root@liuchao test]#
[root@liuchao test]#
6.2、zip/unzip压缩
基本语法
zip [选项] XXX.zip 将要压缩的内容 (功能描述:压缩文件和目录的命令)
unzip [选项] XXX.zip (功能描述:解压缩文件)
选项说明
zip选项 | 说明 |
-r | 压缩目录 |
uzip选项 | 说明 |
-d<目录> | 指定解压后的文件的存放目录 |
经验技巧
zip 压缩命令在windows/linux都通用,可以压缩目录且保留源文件。
实例
[root@liuchao test]# ls
1.txt  2.txt  3.txt  test1  test2  test3
[root@liuchao test]#
[root@liuchao test]# zip 1.zip 1.txt
  adding: 1.txt (stored 0%)
[root@liuchao test]# ls
1.txt  1.zip  2.txt  3.txt  test1  test2  test3
[root@liuchao test]#
[root@liuchao test]# zip -r test1.zip test1
  adding: test1/ (stored 0%)
[root@liuchao test]#
[root@liuchao test]# ls
1.txt  1.zip  2.txt  3.txt  test1  test1.zip  test2  test3
[root@liuchao test]#
[root@liuchao test]# unzip -d 1 1.zip
Archive:  1.zip
 extracting: 1/1.txt
[root@liuchao test]# ls
1  1.txt  1.zip  2.txt  3.txt  test1  test1.zip  test2  test3
[root@liuchao test]#
[root@liuchao test]# unzip test1.zip
Archive:  test1.zip
[root@liuchao test]# ls
1  1.txt  1.zip  2.txt  3.txt  test1  test1.zip  test2  test3
[root@liuchao test]#
6.3、tar打包
基本语法
tar [选项] XXX.tar.gz 将要打包进去的内容 (功能描述:打包目录,压缩后的文件格式.tar.gz)
选项说明
选项 | 说明 |
-c | 产生.tar打包文件 |
-v | 显示详细信息 |
-f | 指定压缩后的文件名 |
-z | 打包同时压缩 |
-x | 解包.tar文件 |
-C | 解压到指定文件 |
实例
[root@liuchao test]# ls
1.txt  2.txt  3.txt  test1  test2  test3
[root@liuchao test]#
[root@liuchao test]# tar -zcvf 1.tar.gz 1.txt 2.txt
1.txt
2.txt
[root@liuchao test]# ls
1.tar.gz  1.txt  2.txt  3.txt  test1  test2  test3
[root@liuchao test]# ls
1.tar.gz  1.txt  2.txt  3.txt  test1  test2  test3
[root@liuchao test]# rm -fr 1.tar.gz
[root@liuchao test]# clear
[root@liuchao test]#
[root@liuchao test]#
[root@liuchao test]#
[root@liuchao test]# tar -zcvf 1.tar.gz 1.txt 2.txt
1.txt
2.txt
[root@liuchao test]# ls
1.tar.gz  1.txt  2.txt  3.txt  test1  test2  test3
[root@liuchao test]#
[root@liuchao test]# tar -zcvf test1.tar.gz test1 test2
test1/
test2/
[root@liuchao test]# ls
1.tar.gz  1.txt  2.txt  3.txt  test1  test1.tar.gz  test2  test3
[root@liuchao test]#
[root@liuchao test]# tar -zxvf 1.tar.gz
1.txt
2.txt
[root@liuchao test]# ls
1.tar.gz  1.txt  2.txt  3.txt  test1  test1.tar.gz  test2  test3
[root@liuchao test]#
[root@liuchao test]# mkdir test4
[root@liuchao test]#
[root@liuchao test]# tar -zxvf test1.tar.gz -C ./test4
test1/
test2/
[root@liuchao test]# ll ./test4/
总用量 0
drwxr-xr-x 2 test_01 root 6 2月  13 13:56 test1
drwxr-xr-x 2 root    root 6 2月  13 13:56 test2
[root@liuchao test]#
7、磁盘查看和分区类
7.1、du查看文件或者目录占用的磁盘空间
du: disk usage 磁盘占用情况
基本语法
du 目录/文件(功能描述:显示目录下每个子目录的磁盘使用情况)
选项说明
选项 | 说明 |
-h | 以人们较易阅读的 GBytes, MBytes, KBytes 等格式自行显示; |
-a | 不仅查看子目录大小,还要包括文件 |
-c | 显示所有的文件和子目录大小后,显示总和 |
-s | 只显示总和 |
--max-depth=n | 指定统计子目录的深度为第 n 层 |
实例
# 查询当前目录占用的磁盘空间大小
[root@liuchao logs]# du -sh
9.3G    .
[root@liuchao logs]# ls
7.2、df查看磁盘空间使用情况
df: disk free 空余磁盘
基本语法
df 选项 (功能描述:列出文件系统的整体磁盘使用量,检查文件系统的磁盘空间占用情况)
选项说明
选项 | 说明 |
-h | 以人们较易阅读的 GBytes, MBytes, KBytes 等格式自行显示; |
实例
# 查看磁盘使用情况
[root@liuchao logs]# df -h
文件系统        容量  已用  可用 已用% 挂载点
devtmpfs         32G     0   32G    0% /dev
tmpfs            32G     0   32G    0% /dev/shm
tmpfs            32G  193M   32G    1% /run
tmpfs            32G     0   32G    0% /sys/fs/cgroup
/dev/sda4       123G  102G   22G   83% /
/dev/sda2       294M  138M  157M   47% /boot
/dev/sda1       200M  9.8M  191M    5% /boot/efi
tmpfs           6.3G     0  6.3G    0% /run/user/0
7.3、lsblk查看设备挂载情况
基本语法
lsblk (功能描述:查看设备挂载情况)
选项说明
选项 | 说明 |
-f | 查看详细的设备挂载情况,显示文件系统信息 |
实例
[root@liuchao logs]# lsblk -f
NAME   FSTYPE LABEL UUID                                 MOUNTPOINT
sda
├─sda1 vfat         6DC1-D054                            /boot/efi
├─sda2 xfs          319e55eb-868c-4945-90cf-c14512d6f04a /boot
├─sda3 swap         3ff321a8-9891-4a25-a8cb-dcab9cc40ddc [SWAP]
└─sda4 xfs          291cb185-52f4-4b13-a0af-d617edff82d4 /
sr0
[root@liuchao logs]#
7.4、mount/umount挂载/卸载
对于Linux用户来讲,不论有几个分区,分别分给哪一个目录使用,它总归就是一个根 目录、一个独立且唯一的文件结构。
Linux中每个分区都是用来组成整个文件系统的一部分,它在用一种叫做“挂载”的处理方法,它整个文件系统中包含了一整套的文件和目录,并将一个分区和一个目录联系起来,要载入的那个分区将使它的存储空间在这个目录下获得。
基本语法
mount [-t vfstype] [-o options] device dir (功能描述:挂载设备)
umount 设备文件名或挂载点 (功能描述:卸载设备)
参数说明
参数 | 说明 |
-t vfstype | 指定文件系统的类型,通常不必指定。mount 会自动选择正确的类 型。常用类型有: 光盘或光盘镜像:iso9660 DOS fat16 文件系统:msdos Windows 9x fat32 文件系统:vfat Windows NT ntfs 文件系统:ntfs Mount Windows 文件网络共享:smbfs UNIX(LINUX) 文件网络共享:nfs |
-o options | 主要用来描述设备或档案的挂接方式。常用的参数有: loop:用来把一个文件当成硬盘分区挂接上系统 ro:采用只读方式挂接设备 rw:采用读写方式挂接设备 iocharset:指定访问文件系统所用字符集 |
device | 要挂接(mount)的设备 |
dir | 设备在系统上的挂接点(mount point) |
实例
[root@hadoop101 ~]# mkdir /mnt/cdrom/ 建立挂载点
[root@hadoop101 ~]# mount -t iso9660 /dev/cdrom /mnt/cdrom/ 设备/dev/cdrom 挂载到 挂载点 : /mnt/cdrom中
[root@hadoop101 ~]# ll /mnt/cdrom/

# 卸载
[root@hadoop101 ~]# umount /mnt/cdrom
设置开机自动挂载
[root@hadoop101 ~]# vi /etc/fstab添加红框中内容,保存退出
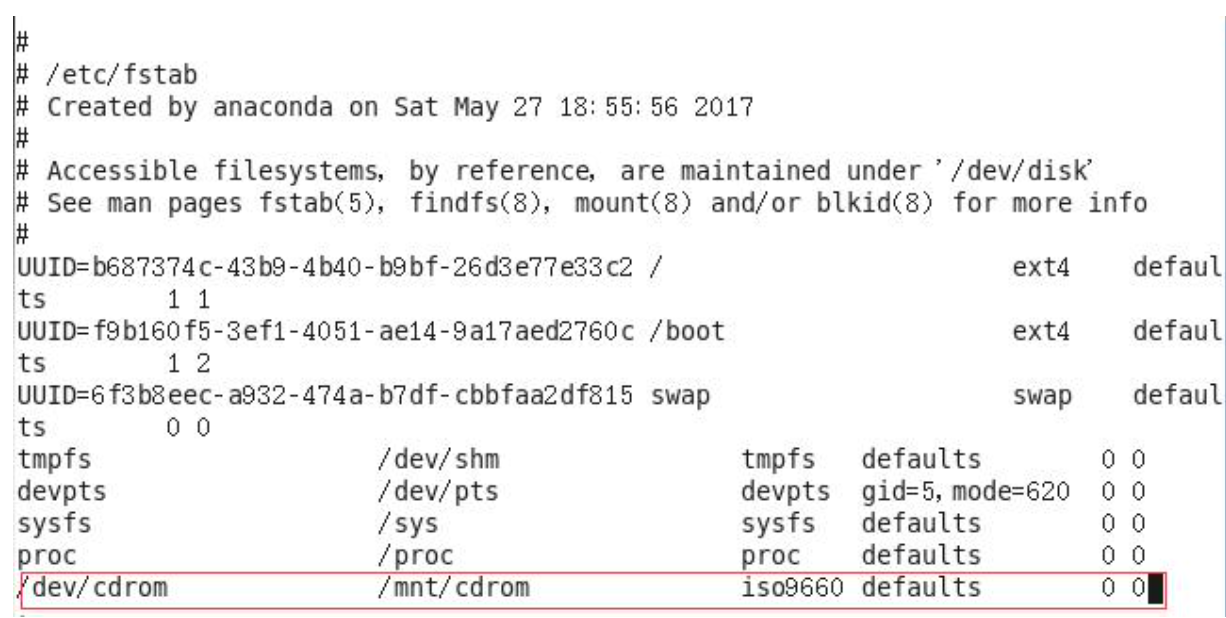
7.5、fdisk分区
基本语法
fdisk -l (功能描述:查看磁盘分区详情)
fdisk硬盘设备名 (功能描述:对新增硬盘进行分区操作)
选项说明
选项 | 说明 |
-l | 显示所有硬盘的分区列表 |
经验技巧
该命令必须在 root 用户下才能使用
功能说明
(1)、Linux 分区
Device:分区序列
Boot:引导
Start:从X磁柱开始
End:到Y磁柱结束
Blocks:容量
Id:分区类型ID
System:分区类型
(2)、分区操作按键说明
m:显示命令列表
p:显示当前磁盘分区
n:新增分区
w:写入分区信息并退出
q:不保存分区信息直接退出
实例
# 查看分区信息
[root@liuchao test]# fdisk -l
WARNING: fdisk GPT support is currently new, and therefore in an experimental phase. Use at your own discretion.

磁盘 /dev/sda:136.4 GB, 136365211648 字节,266338304 个扇区
Units = 扇区 of 1 * 512 = 512 bytes
扇区大小(逻辑/物理):512 字节 / 4096 字节
I/O 大小(最小/最佳):4096 字节 / 4096 字节
磁盘标签类型:gpt
Disk identifier: CBE92C0A-6518-4B41-AE52-F2D01D83BA5F


#         Start          End    Size  Type            Name
 1         2048       411647    200M  EFI System      EFI System Partition
 2       411648      1026047    300M  Microsoft basic
 3      1026048      9414655      4G  Linux swap
 4      9414656    266336255  122.5G  Microsoft basic
[root@liuchao test]#
8、进程管理类
进程是正在执行的一个程序或命令,每一个进程都是一个运行的实体,都有自己的地址空间,并占用一定的系统资源。
8.1、ps查看当前系统进程状态
ps:process status 进程状态
基本语法
ps aux | grep xxx (功能描述:查看系统中所有进程)
ps -ef | grep xxx (功能描述:可以查看子父进程之间的关系)
选项说明
选项 | 说明 |
a | 列出带有终端的所有用户的进程 |
x | 列出当前用户的所有进程,包括没有终端的进程 |
u | 面向用户友好的显示风格 |
-e | 列出所有进程 |
-u 用户名 | 列出某个用户关联的所有进程 |
-f | 显示完整格式的进程列表 |
功能说明
(1)、ps aux 显示信息说明
PID:进程的 ID 号
%CPU:该进程占用 CPU 资源的百分比,占用越高,进程越耗费资源;
%MEM:该进程占用物理内存的百分比,占用越高,进程越耗费资源;
VSZ:该进程占用虚拟内存的大小,单位 KB;
RSS:该进程占用实际物理内存的大小,单位 KB;
TTY:该进程是在哪个终端中运行的。对于 CentOS 来说,tty1 是图形化终端, tty2-tty6 是本地的字符界面终端。pts/0-255 代表虚拟终端。
STAT:进程状态。常见的状态有:R:运行状态、S:睡眠状态、T:暂停状态、
Z:僵尸状态、s:包含子进程、l:多线程、+:前台显示
START:该进程的启动时间
TIME:该进程占用 CPU 的运算时间,注意不是系统时间
COMMAND:产生此进程的命令名
(2)、ps -ef 显示信息说明
UID:用户 ID
PID:进程 ID
PPID:父进程 ID
C:CPU 用于计算执行优先级的因子。数值越大,表明进程是 CPU 密集型运算, 执行优先级会降低;数值越小,表明进程是 I/O 密集型运算,执行优先级会提高 STIME:进程启动的时间
TTY:完整的终端名称
TIME:CPU 时间
CMD:启动进程所用的命令和参数
经验技巧
如果想查看进程的 CPU 占用率和内存占用率,可以使用 aux;
如果想查看进程的父进程 ID 可以使用 ef;
实例
[root@liuchao test]# ps aux
USER        PID %CPU %MEM    VSZ   RSS TTY      STAT START   TIME COMMAND
root          1  0.0  0.0 191028  4212 ?        Ss    2022  63:55 /usr/lib/systemd/systemd --switched-root --system --deserialize 22
root          2  0.0  0.0      0     0 ?        S     2022   0:04 [kthreadd]
root          3  0.0  0.0      0     0 ?        S     2022  38:06 [ksoftirqd/0]
root          5  0.0  0.0      0     0 ?        S<    2022   0:00 [kworker/0:0H]
root          7  0.0  0.0      0     0 ?        S     2022 185:20 [rcu_sched]
root          8  0.0  0.0      0     0 ?        S     2022   0:00 [rcu_bh]
root          9  0.0  0.0      0     0 ?        S     2022 216:42 [rcuos/0]
root         10  0.0  0.0      0     0 ?        S     2022   0:00 [rcuob/0]

[root@liuchao test]# ps -ef
UID         PID   PPID  C STIME TTY          TIME CMD
root          1      0  0  2022 ?        01:03:55 /usr/lib/systemd/systemd --switched-root --system --deserialize 22
root          2      0  0  2022 ?        00:00:04 [kthreadd]
root          3      2  0  2022 ?        00:38:06 [ksoftirqd/0]
root          5      2  0  2022 ?        00:00:00 [kworker/0:0H]
root          7      2  0  2022 ?        03:05:20 [rcu_sched]
root          8      2  0  2022 ?        00:00:00 [rcu_bh]
root          9      2  0  2022 ?        03:36:42 [rcuos/0]
root         10      2  0  2022 ?        00:00:00 [rcuob/0]
8.2、kill终止进程
基本语法
kill [选项]进程号 (功能描述:通过进程号杀死进程)
kill all 进程名称 (功能描述:通过进程名称杀死进程,也支持通配符,这在系统因负载过大而变得很慢时很有用)
选项说明
选项 | 说明 |
-9 | 表示强迫进程立即停止 |
实例
# 杀死浏览器进程
[root@liuchao test]# kill -9 5102
# 通过进程名称杀死进程
[root@liuchao test]# kill all firefox
8.3、pstree查看进程树
基本语法
pstree [选项]
选项说明
选项 | 说明 |
-p | 显示进程的 PID |
-u | 显示进程的所属用户 |
实例
# 显示进程 pid
[root@liuchao test]# pstree -p
# 显示进程所属用户
[root@liuchao test]# pstree -u
8.4、top实时监控进程状态
基本语法
top [选项]
选项说明
选项 | 说明 |
-d 秒数 | 指定 top 命令每隔几秒更新。默认是 3 秒在 top 命令的交互模式当中可以执行的命令 |
-i | 使 top 不显示任何闲置或者僵死进程。 |
-p | 通过指定监控进程 ID 来仅仅监控某个进程的状态。 |
操作说明
操作 | 说明 |
P | 以 CPU 使用率排序,默认就是此项 |
M | 以内存的使用率排序 |
N | 以PID排序 |
q | 退出top |
查询结果字段说明
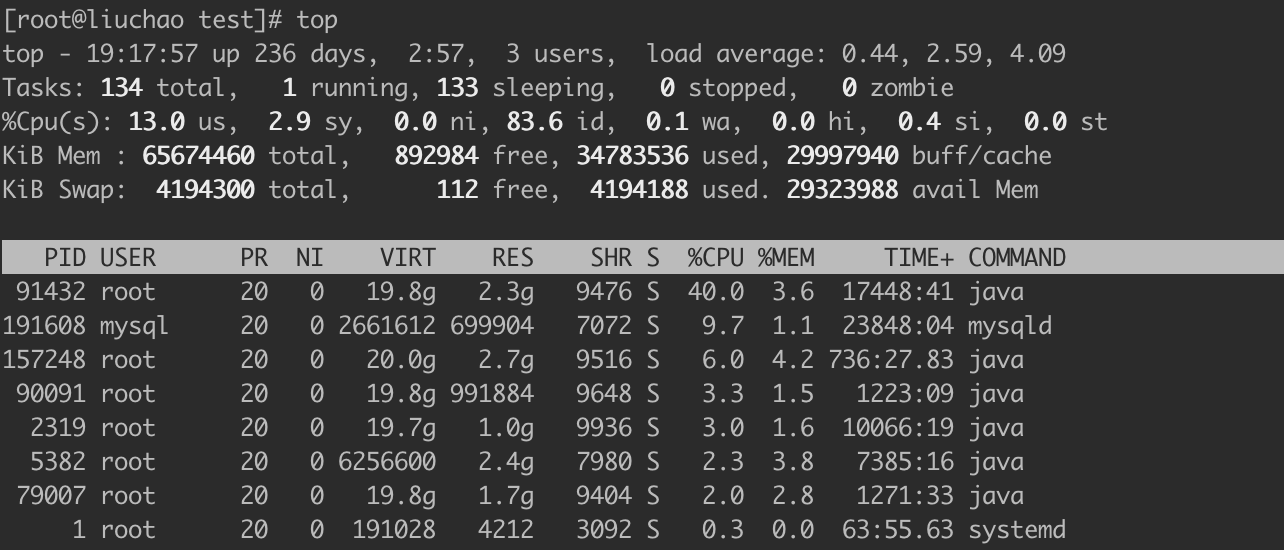
第一行信息为任务队列信息
内容 | 说明 |
19:17:57 | 系统当前时间 |
up 236 days,2:57 | 系统的运行时间,本机已经运行 236 天2小时57分钟 |
3 users | 当前登录了3个用户 |
load average: 0.44, 2.59, 4.09 | 系统在之前 1 分钟,5 分钟,15 分钟的平均负 载。一般认为小于 1 时,负载较小。如果大于 1,系统已经超出负荷。 |
第二行为进程信息
内容 | 说明 |
134 total | 系统中的进程总数 |
1 running | 正在运行的进程数 |
133 sleeping | 睡眠的进程 |
0 stopped | 正在停止的进程 |
0 zombie | 僵尸进程。如果不是 0,需要手工检查僵尸进程 |
第三行为 CPU 信息
内容 | 说明 |
13.0 us | 用户模式占用的CPU百分比 |
2.9 sy | 系统模式占用的 CPU 百分比 |
0.0 ni | 改变过优先级的用户进程占用的 CPU 百分比 |
83.6 id | 空闲 CPU 的 CPU 百分比 |
0.1 wa | 等待输入/输出的进程的占用 CPU 百分比 |
0.0 hi | 硬中断请求服务占用的 CPU 百分比 |
0.4 si | 软中断请求服务占用的 CPU 百分比 |
0.0 st | st(Steal time)虚拟时间百分比。就是当有虚拟 机时,虚拟 CPU 等待实际 CPU 的时间百分比。 |
第四行为物理内存信息
内容 | 说明 |
Mem : 65674460 total | 物理内存的总量,单位 KB |
34783536 used | 已经使用的物理内存数量 |
892984 free | 空闲的物理内存数量,我们使用的是虚拟机,总 共只分配了 628MB 内存,所以只有 53MB 的空 闲内存了 |
29997940 buff/cache | 作为缓冲的内存数量 |
第五行为交换分区(swap)信息
内容 | 说明 |
Swap: 4194300 total | 交换分区(虚拟内存)的总大小 |
4194188 used | 已经使用的交互分区的大小 |
112 free | 空闲交换分区的大小 |
29323988 avail Mem | 作为缓存的交互分区的大小 |
实例
#执行下述命令后,可以按 P、M、N 对查询出的进程结果进行排序。
[root@liuchao test]# top
[root@liuchao test]# top -d 2
[root@liuchao test]# top -i
[root@liuchao test]# top -id 2
8.5、netstat显示网络状态和端口占用信息
基本语法
netstat -anp | grep 进程号 (功能描述:查看该进程网络信息)
netstat –nlp | grep 端口号 (功能描述:查看网络端口号占用情况)
选项说明
选项 | 说明 |
-a | 显示所有正在监听(listen)和未监听的套接字(socket) |
-n | 拒绝显示别名,能显示数字的全部转化成数字 |
-l | 仅列出在监听的服务状态 |
-p | 表示显示哪个进程在调用 |
实例
# 通过进程号查看sshd进程的网络信息
[root@liuchao test]# netstat -anp |grep sshd
tcp        0      0 0.0.0.0:22              0.0.0.0:*               LISTEN      810/sshd
tcp        0    156 192.168.13.15:22        192.168.12.181:52926    ESTABLISHED 130752/sshd: root@p
tcp        0      0 192.168.13.15:22        192.168.150.12:60076    ESTABLISHED 124524/sshd: root@p
tcp6       0      0 :::22                   :::*                    LISTEN      810/sshd
unix  3      [ ]         STREAM     CONNECTED     20222    810/sshd
unix  2      [ ]         DGRAM                    322031775 124524/sshd: root@p
unix  2      [ ]         DGRAM                    322326053 130752/sshd: root@p
[root@liuchao test]#

# 查看某端口号是否被占用
[root@liuchao test]# netstat -nltp | grep 22
tcp        0      0 0.0.0.0:22              0.0.0.0:*               LISTEN      810/sshd
tcp6       0      0 :::8719                 :::*                    LISTEN      2275/java
tcp6       0      0 :::1103                 :::*                    LISTEN      2275/java
tcp6       0      0 :::1104                 :::*                    LISTEN      2275/java
tcp6       0      0 :::22                   :::*                    LISTEN      810/sshd
tcp6       0      0 :::2203                 :::*                    LISTEN      148136/java
tcp6       0      0 :::2204                 :::*                    LISTEN      148136/java
[root@liuchao test]#
9、crontab系统定时任务
9.1、crontab服务管理
# 重新启动crond服务
[root@liuchao test]#systemctl restart crond
9.2、crontab定时任务设置
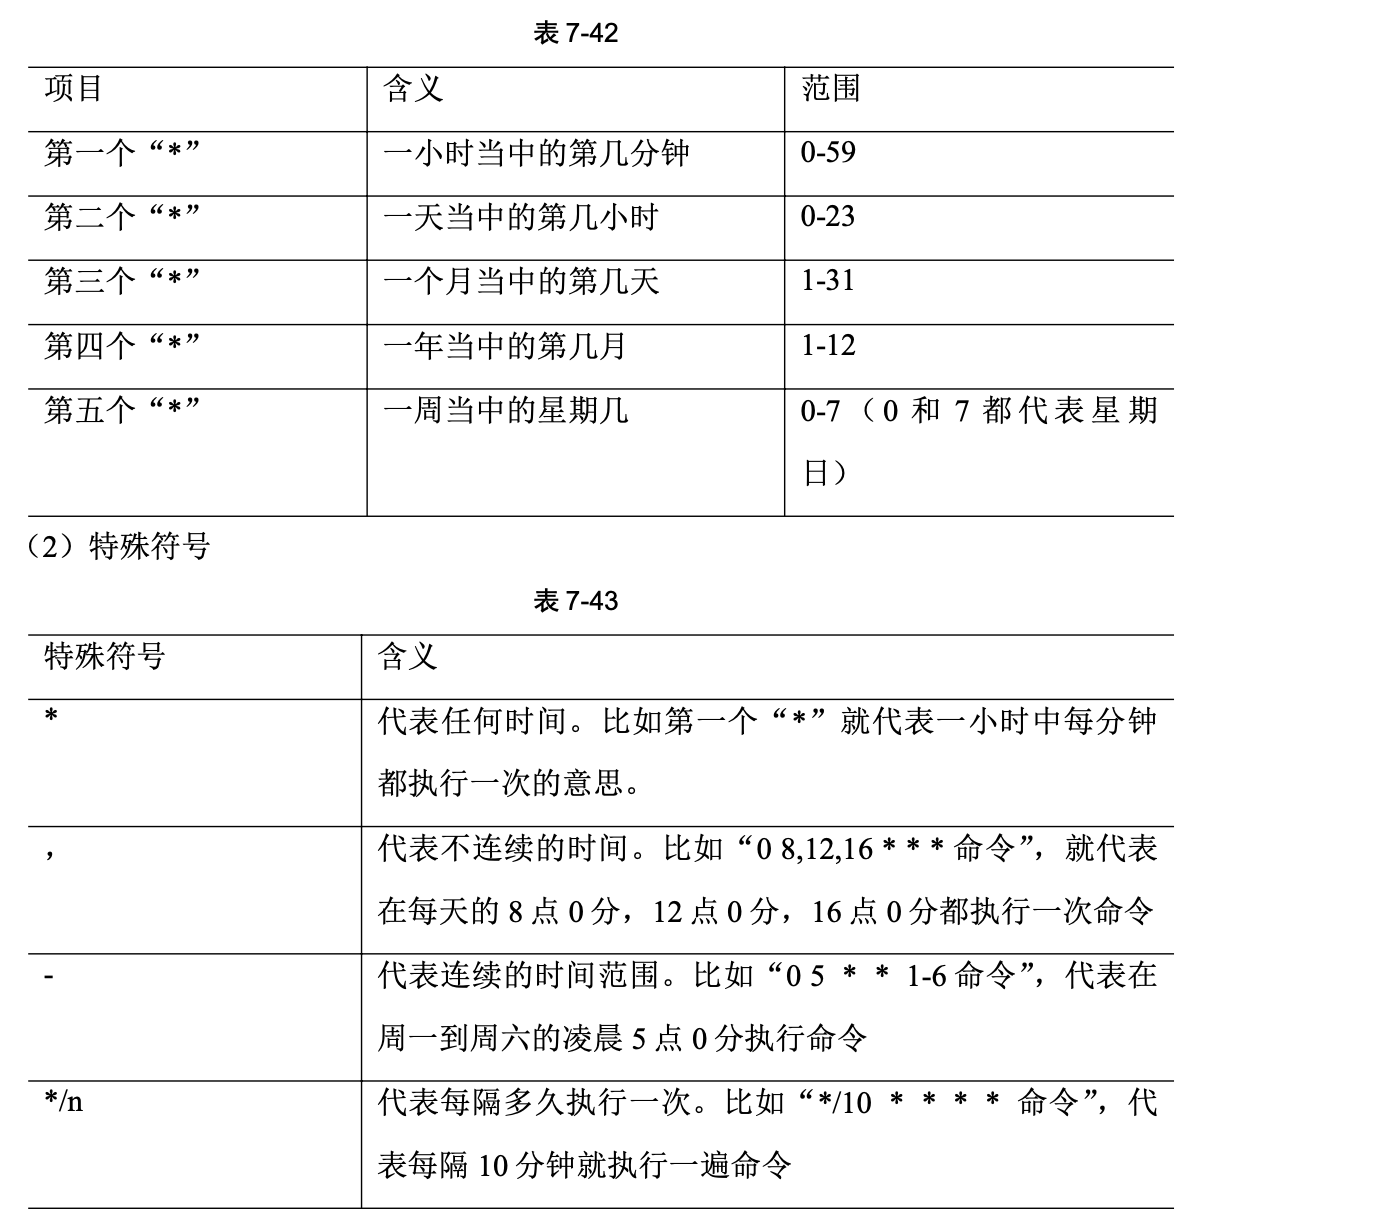
基本语法
crontab [选项]
选项说明

参数说明
# 进入 crontab 编辑界面。会打开 vim 编辑你的工作。
[root@liuchao test]# crontab -e
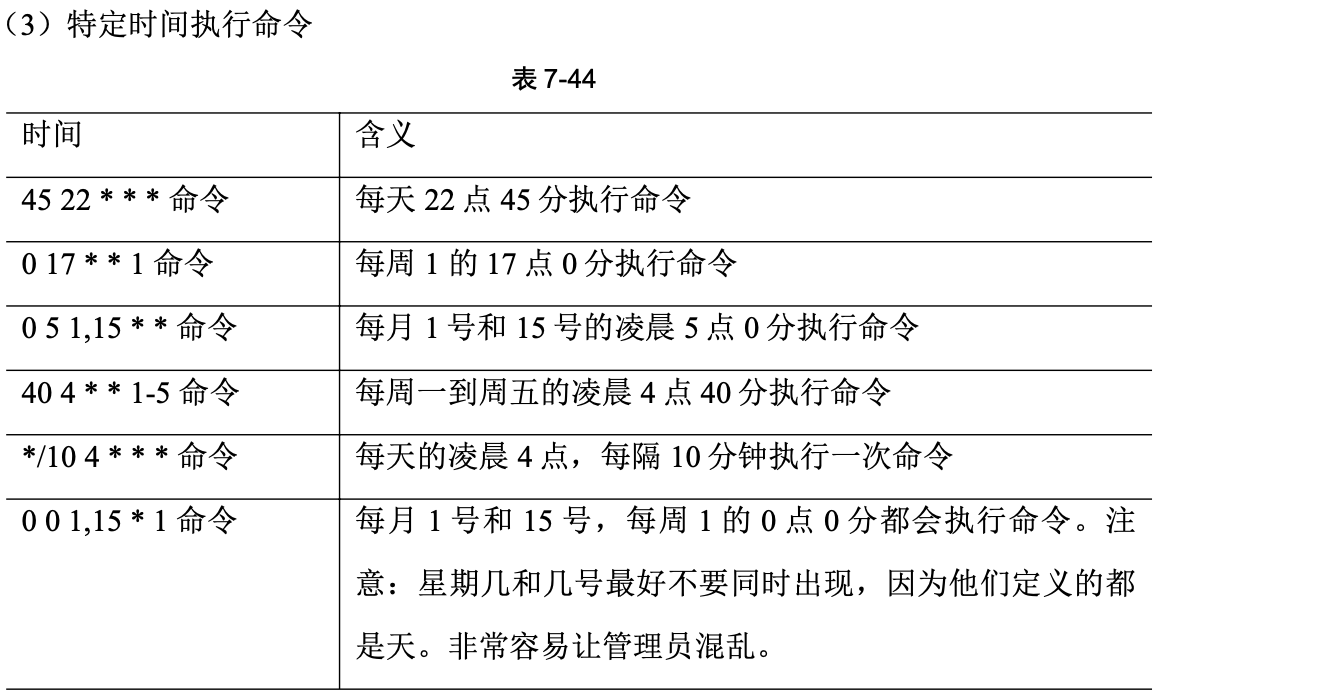
实例
# 每隔 1 分钟,向/root/bailongma.txt 文件中添加一个 11 的数字
*/1 * * * * /bin/echo ”11” >> /root/bailongma.txt


 384
384

 被折叠的 条评论
为什么被折叠?
被折叠的 条评论
为什么被折叠?
 到【灌水乐园】发言


