


一、简介
Command命令模式为了解决的问题是:当系统请求繁多复杂时,将请求封装到一个对象(Command)中,并将请求的接受者存放到具体的ConcreteCommand类(Receiver)中,从而实现调用操作的对象和操作的具体实现者之间的解耦。
Command 模式的典型结构图为:
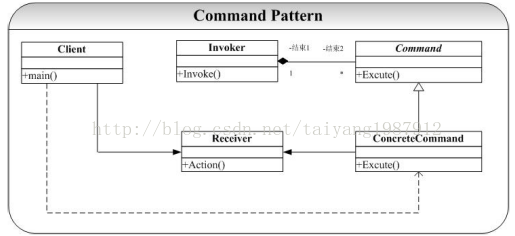
Command模式结构图中,将请求的接收者(处理者)放到Command的具体子类ConcreteCommand中,当请求到来时(Invoker 发出Invoke消息激活Command对象),ConcreteCommand将处理请求交给Receiver对象进行处理。
二、详解
1、正常对象参数传递调用
(1)代码reveiver.h:
(2)代码reveiver.cpp:
(3)代码invoker.h:
(4)代码invoker.cpp:
(6)代码command.cpp:
(7)代码main.cpp:
(8)代码makefile:
2、函数地址回调机制调用
(1)代码receiver.h:
(2)代码receiver.cpp:
(3)代码command.h:
(4)代码main.cpp:
(4)makefile:
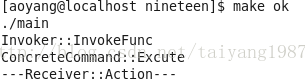
3、运行结果
(Centos6.3系统中运行结果:)
Command模式的实现和思想都很简单,其关键就是将一个请求封装到一个类(Command)中,再提供处理对象(Receiver),最后Command命令由Invoker激活。
在上述2中用到 C++中的类成员函数指针,将请求接收者的处理抽象出来作为参数传给Command对象,实际也就是回调的机制(Callback)来实现这一点,即将处理操作方法地址(在对象内部)通过参数传递给Command对象,Command在适当的时候(Invoke激活的时候)再调用该函数。
三、总结
(1)Command模式关键就是提供一个抽象的Command类,并将执行操作封装到Command类接口中,Command类中一般就是只是一些接口的集合,并不包含任何的数据属性。
(2)Command模式将调用操作的对象和知道如何实现该操作的对象解耦,在上述结构图中Invoker对象根本就不知道具体的是那个对象在处理Excute操作(当然要知道是Command类别的对象,也仅此而已)。
(3)在Command要增加新的处理对象很容易,可以通过创建新的继承自Command的子类来实现这一点。
(4)Command模式可以和Memento模式结合起来,支持取消的操作。
(5)源码已经打包上传到csdn上可登录下载(http://download.csdn.net/detail/taiyang1987912/8437165)。
本文转自:
http://blog.csdn.net/taiyang1987912/article/details/43567077


 1000
1000

 被折叠的 条评论
为什么被折叠?
被折叠的 条评论
为什么被折叠?
 到【灌水乐园】发言


