


适配器模式(Adapter):将一个类的接口转换成客户希望的另外一个接口。A d a p t e r 模式使得原本由于接口不兼容而不能一起工作的那些类可以一起工作。
适用场景:
1、已经存在的类的接口不符合我们的需求;
2、创建一个可以复用的类,使得该类可以与其他不相关的类或不可预见的类(即那些接口可能不一定兼容的类)协同工作;
3、在不对每一个都进行子类化以匹配它们的接口的情况下,使用一些已经存在的子类。
UML类图:
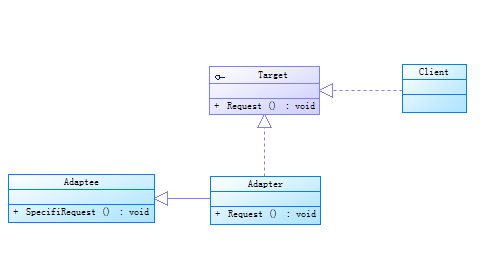
适配器模式分为两种:对象适配器和类适配器。
在这里我使用了两个例子介绍适配器模式,每个例子都有对象模式和适配器模式的实现,有些java基础的应该都能看懂。
第一个例子:
//已经存在的实现方法
public class Adaptee {
    public void specificRequest() {
        System.out.println("被适配类具有 特殊功能...");
    }
}
//目标接口
public interface Target {
    public void request();
}
//使用类适配器
public class Adapter extends Adaptee implements Target{
    public void request() {
        super.specificRequest();
    }
}
//使用对象适配器
public class Adapter1 implements Target{

    private Adaptee adaptee;

     public Adapter1 (Adaptee adaptee) {
            this.adaptee = adaptee;
        }
    public void request() {
        this.adaptee.specificRequest();

    }
}
//测试主类
public class Test {
    public static void main(String[] args) {
        System.out.println("第一个例子测试");
        System.out.println("类适配器测试-----");
        Target adapter = new Adapter();
        adapter.request();
        System.out.println("对象适配器测试------");
        Target adapter1 = new Adapter1(new Adaptee());
        adapter1.request();
}
看了上面的例子应该能懂了吧,再来一个例子巩固一下。
//已经存在的实现方法
public class Adaptee1 {
public void Existingadd(){
System.out.println("进行加法运算");
}
}
//目标接口
public interface Target1 {
public void add();
}
//类适配器
public class Adapter2 extends Adaptee1 implements Target1{
public void add() {
super.Existingadd();
}
}
//对象适配器
public class Adapter3 implements Target1{
private Adaptee1 adaptee1;
public Adapter3(Adaptee1 adaptee1){
this.adaptee1=adaptee1;
}
public void add() {
this.adaptee1.Existingadd();
}
}
//测试主类
public class Test {
public static void main(String[] args) {
System.out.println("第二个例子测试");
Target1 adapter2 = new Adapter2();
System.out.println("类适配器测试-----");
adapter2.add();
System.out.println("对象适配器测试------");
Target1 adapter3 = new Adapter3(new Adaptee1());
adapter3.add();
}
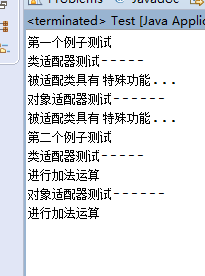
}上面两个例子运行结果:
总结一下,对象适配器和类适配器的区别:
1、类适配器模式通过创建自身实现,对象适配器通过实例类调用。
2、类适配器通过重写接口的方法来实现,对象适配器通过实例化的成员变量调用已经实现的方法。
3、类适配器是继承,对象适配器是组合相对灵活。
本人在刚开始看的时候也是能够看懂代码,但是不实际操作一下,理解的还是不够深刻,建议大家自己写个例子出来练习一下。


 954
954

 被折叠的 条评论
为什么被折叠?
被折叠的 条评论
为什么被折叠?
 到【灌水乐园】发言


