


概述
在使用qml的过程中,ListView应该是最常用的视图了,从MVC(model view control) 到现在的MVD(model view delegete),model是其中的数据载体,为视图提供数据来源,也是最核心的环节。
qml 中提供了多种Data model,本文将对其中常见的做个总结。
QML Data Models
ListModel
Properties
count : int
dynamicRoles : bool //默认是false
Methods
append(jsobject dict)
clear()
object get(int index)
insert(int index, jsobject dict)
move(int from, int to, int n)
remove(int index, int count)
set(int index, jsobject dict)
setProperty(int index, string property, variant value)
sync()
从属性和方法的名字基本可以知道其作用
ListModel 举例
ListModel {
    id: fruitModel
    ListElement {name: "Apple" cost: 2.45}
    ListElement {name: "Orange"cost: 3.25}
    ListElement {name: "Banana"cost: 1.95}
}
模型有两个role,name 和cost
Rectangle {
    width: 200; height: 200

    ListModel {
        id: fruitModel
        ...
    }

    Component {
        id: fruitDelegate
        Row {
            spacing: 10
            Text { text: name }
            Text { text: '$' + cost }
        }
    }

    ListView {
        anchors.fill: parent
        model: fruitModel
        delegate: fruitDelegate
    }
}
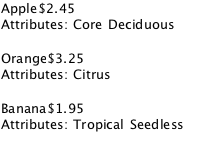
roles角色有可能包含列表数据。在以下示例中,我们创建一个列表的水果属性:
ListModel {
    id: fruitModel

    ListElement {
        name: "Apple"
        cost: 2.45
        attributes: [
            ListElement { description: "Core" },
            ListElement { description: "Deciduous" }
        ]
    }
    ListElement {
        name: "Orange"
        cost: 3.25
        attributes: [
            ListElement { description: "Citrus" }
        ]
    }
    ListElement {
        name: "Banana"
        cost: 1.95
        attributes: [
            ListElement { description: "Tropical" },
            ListElement { description: "Seedless" }
        ]
    }
}
创建上述model的代理
Component {
    id: fruitDelegate
    Item {
        width: 200; height: 50
        Text { id: nameField; text: name }
        Text { text: '$' + cost; anchors.left: nameField.right }
        Row {
            anchors.top: nameField.bottom
            spacing: 5
            Text { text: "Attributes:" }
            Repeater {
                model: attributes
                Text { text: description }
            }
        }
    }
}
实现效果,如图
修改ListModel
可以通过 clear(), append(), set(), insert() 和 setProperty() 这些方法;
 Component {
        id: fruitDelegate
        Item {
            width: 200; height: 50
            Text { text: name }
            Text { text: '$' + cost; anchors.right: parent.right }

            // Double the price when clicked.
            MouseArea {
                anchors.fill: parent
                onClicked: fruitModel.setProperty(index, "cost", cost * 2) //价格x2
            }
        }
    }
Component.onCompleted: {
    fruitModel.append({"cost": 5.95, "name":"Jackfruit"});
    console.log(fruitModel.get(0).cost);
    fruitModel.get(0).cost = 10.95;
}
fruitModel.append(..., "attributes":
    [{"name":"spikes","value":"7mm"},
     {"name":"color","value":"green"}]);
fruitModel.get(0).attributes.get(1).value; // == "green"

fruitModel.insert(2, {"cost": 5.95, "name":"Pizza"})
fruitModel.move(0, fruitModel.count - 3, 3)
fruitModel.set(3, {"cost": 5.95, "name":"Pizza"})
fruitModel.setProperty(3, "cost", 5.95)
XmlListModel
XmlListModel允许从XML数据源模型的建设。通过指定的角色XmlRole类型。需要导入的类型。
import QtQuick。XmlListModel 2.0
下面的模型有三个角色,title、link和description:
  XmlListModel {
       id: feedModel
       source: "http://rss.news.yahoo.com/rss/oceania"
       query: "/rss/channel/item"
       XmlRole { name: "title"; query: "title/string()" }
       XmlRole { name: "link"; query: "link/string()" }
       XmlRole { name: "description"; query: "description/string()" }
  }
ObjectModel
ObjectModel可以用QML items ,比如Rectanle,Text作为模型。这种模型包括了数据和代理,所以不需要额外提供delegate
  import QtQuick 2.0
  import QtQml.Models 2.1

  Rectangle {
      ObjectModel {
          id: itemModel
          Rectangle { height: 30; width: 80; color: "red" }
          Rectangle { height: 30; width: 80; color: "green" }
          Rectangle { height: 30; width: 80; color: "blue" }
      }

      ListView {
          anchors.fill: parent
          model: itemModel
      }
  }
  VisualItemModel {
      id: itemModel
      Rectangle { height: 30; width: 80; color: "red" }
      Rectangle { height: 30; width: 80; color: "green" }
      Rectangle { height: 30; width: 80; color: "blue" }
  }

  ListView {
      anchors.fill: parent
      model: itemModel
  }
整数模型
不含任何角色
Item {
      width: 200; height: 250

      Component {
          id: itemDelegate
          Text { text: "I am item number: " + index }
      }

      ListView {
          anchors.fill: parent
          model: 5
          delegate: itemDelegate
      }

  }
对象实例作为模型
对象的属性来作为模型的role,比如下面的myText 的属性text 和 color
Rectangle {
      width: 200; height: 250

      Text {
          id: myText
          text: "Hello"
          color: "#dd44ee"
      }

      Component {
          id: myDelegate
          Text { text: model.color }
      }

      ListView {
          anchors.fill: parent
          anchors.topMargin: 30
          model: myText
          delegate: myDelegate
      }
  }
C++ 数据模型
QStringList
QStringList通过 modelData 来提供数据
 	QStringList dataList;
    dataList.append("Item 1");
    dataList.append("Item 2");
    dataList.append("Item 3");
    dataList.append("Item 4");

    QQuickView view;
    QQmlContext *ctxt = view.rootContext();
    ctxt->setContextProperty("myModel", QVariant::fromValue(dataList));
ListView {
      width: 100; height: 100
      model: myModel
      delegate: Rectangle {
          height: 25
          width: 100
          Text { text: modelData }
      }
  }
但需要注意的是,当模型中数据改变时,即QStringList改变,不会自动同步到视图显示,需要我们再一次调用 QDeclarativeContext::setContextProperty() ,重新设定模型
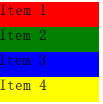
QObjectList-based Model
class myItem : public QObject
{
    Q_OBJECT
    Q_PROPERTY(QString name READ name WRITE setName NOTIFY nameChanged)
    Q_PROPERTY(QString color READ color WRITE setColor NOTIFY colorChanged)
public:
    explicit myItem(QObject *parent = nullptr)
    myItem(QString name,QString colo)
    {
        m_name = name;
        m_color = colo;
    }

    QString  name(){return m_name;}
    void setName(QString str){m_name =str; emit nameChanged();}
    QString  color(){return  m_color;}
    void setColor(QString co){m_color = co;emit colorChanged();}

signals:
    void nameChanged();
    void colorChanged();
private:
    QString m_name;
    QString m_color;
};
int main(int argc, char *argv[])
{
    QCoreApplication::setAttribute(Qt::AA_EnableHighDpiScaling);
    QGuiApplication app(argc, argv);

    QList<QObject*> dataList;
    dataList.append(new myItem("Item 1", "red"));
    dataList.append(new myItem("Item 2", "green"));
    dataList.append(new myItem("Item 3", "blue"));
    dataList.append(new myItem("Item 4", "yellow"));

    QQmlApplicationEngine engine;
    QQmlContext *pcont = engine.rootContext();
    pcont->setContextProperty("myModel", QVariant::fromValue(dataList));
    const QUrl url(QStringLiteral("qrc:/main.qml"));
    QObject::connect(&engine, &QQmlApplicationEngine::objectCreated,
                     &app, [url](QObject *obj, const QUrl &objUrl) {
        if (!obj && url == objUrl)
            QCoreApplication::exit(-1);
    }, Qt::QueuedConnection);
    engine.load(url);

    return app.exec();
}
import QtQuick 2.12
import QtQuick.Window 2.12

Window {
    visible: true
    width: 640
    height: 480
    title: qsTr("Hello World")

    ListView {
        width: 100; height: 100
        anchors.fill: parent

        model: myModel
        delegate: Rectangle {
            height: 25
            width: 100
            color: model.modelData.color  //也可以通过model.color
            Text { text: model.modelData.name }  //也可以通过model.name
        }
    }
}
效果:
继承QAbstractItemModel
QAbstractItemModel还可以自动通知QML视图模型数据改变时。
QAbstractItemModel子类的角色可以被重新实现暴露QML QAbstractItemModel:: roleNames ()。
QML视图模型改变时自动更新。模型必须遵循的标准规则模型更改并通知视图,当模型改变了通过使用QAbstractItemModel:: dataChanged (), QAbstractItemModel: beginInsertRows(),等等
model.h
class Animal
{
public:
    Animal(const QString &type, const QString &size);
    QString type() const;
    QString size() const;
private:
    QString m_type;
    QString m_size;
};

class AnimalModel : public QAbstractListModel
{
    Q_OBJECT
public:
    enum AnimalRoles {
        TypeRole = Qt::UserRole + 1,
        SizeRole
    };
    AnimalModel(QObject *parent = 0);
    void addAnimal(const Animal &animal);
    int rowCount(const QModelIndex & parent = QModelIndex()) const;
    QVariant data(const QModelIndex & index, int role = Qt::DisplayRole) const;
protected:
    QHash<int, QByteArray> roleNames() const;
private:
    QList<Animal> m_animals;
};
model.cpp
Animal::Animal(const QString &type, const QString &size)
    : m_type(type), m_size(size)
{
}

QString Animal::type() const
{
    return m_type;
}

QString Animal::size() const
{
    return m_size;
}

AnimalModel::AnimalModel(QObject *parent)
    : QAbstractListModel(parent)
{
}

void AnimalModel::addAnimal(const Animal &animal)
{
    beginInsertRows(QModelIndex(), rowCount(), rowCount());
    m_animals << animal;
    endInsertRows();
}

int AnimalModel::rowCount(const QModelIndex & parent) const {
    Q_UNUSED(parent);
    return m_animals.count();
}

QVariant AnimalModel::data(const QModelIndex & index, int role) const {
    if (index.row() < 0 || index.row() >= m_animals.count())
        return QVariant();

    const Animal &animal = m_animals[index.row()];
    if (role == TypeRole)
        return animal.type();
    else if (role == SizeRole)
        return animal.size();
    return QVariant();
}

QHash<int, QByteArray> AnimalModel::roleNames() const {
    QHash<int, QByteArray> roles;
    roles[TypeRole] = "type";
    roles[SizeRole] = "size";
    return roles;
}
main.cpp
//![0]
int main(int argc, char ** argv)
{
    QGuiApplication app(argc, argv);

    AnimalModel model;
    model.addAnimal(Animal("Wolf", "Medium"));
    model.addAnimal(Animal("Polar bear", "Large"));
    model.addAnimal(Animal("Quoll", "Small"));

    QQuickView view;
    view.setResizeMode(QQuickView::SizeRootObjectToView);
    QQmlContext *ctxt = view.rootContext();
    ctxt->setContextProperty("myModel", &model);
//![0]

    view.setSource(QUrl("qrc:view.qml"));
    view.show();

    return app.exec();
}
view.qml
import QtQuick 2.0

//![0]
ListView {
    width: 200; height: 250
    model: myModel
    delegate: Text { text: "Animal: " + type + ", " + size }
}
//![0]


 953
953

 被折叠的 条评论
为什么被折叠?
被折叠的 条评论
为什么被折叠?
 到【灌水乐园】发言


