


8 cbExiGen编解码库分析
8.3 测试ISO15118-2命令supportedAppProtocolReq编解码
本节开始编写测试代码,先尝试对supportedAppProtocolReq命令编解码,成功以后将对其他命令进行测试。
cbExiGen只是根据schema生成了对应的结构体数据结构、关键的编解码函数,缺少把xml表达成数据结构代码,因此只能自己手动填写命令的数据结构了,一般步骤如下:
(1)定义文档对象,初始化
    定义请求命令数据结构
        定义协议原型数据结构,填充具体数据
    填充请求命令数据结构
    填充文档对象
(2)定义输出码流的数据结构
    分配内存空间,
    初始化各种位置标记
(3)开始编码
(4)检查返回值,确定编码成功,
(5)输出码流数据
8.3.1 搭建工程环境
作者建立了测试工程cbexigen-Test,把cbExiGen生成的src/output代码搬移了过来。建立test目录,编写测试文件test.c, 编写makefile。
工程目录:C:\E\codes\cbexigen-Test
bin:  编译后可执行文件存放在此目录
schemas: 存放xsd文件
src: 存放自动生成的c文件, 这些文件以后我们都不会修改的。
test:存放自己编写的测试文件。
编写的makefile文件内容如下:
#此项目源文件后缀类型
PROJECTTYPE = .c

# The project root directory
PROJECT_ROOT = .

#您想要生成可执行文件的名字
BinName := test
#BinName := se_main
BIN_DIR = $(PROJECT_ROOT)/bin

#获取当前makefile绝对路径
pes_parent_dir:=$(shell pwd)/$(lastword $(MAKEFILE_LIST))
pes_parent_dir:=$(shell dirname $(pes_parent_dir))

#C语言编译器
CC = gcc

#C++编译器
CXX = g++
#简化rm -f
RM = -rm -f

#C语言配置参数,
CFLAGS = -g  -Wall -O0

#C++配置参数
CXXFLAGS = -g -Wall

# Static and dynamic library output directory
LIB_BIN_DIR = $(BIN_DIR)/lib

# All directories containing *.c files
VPATH  = $(PROJECT_ROOT)/src/common
VPATH += $(PROJECT_ROOT)/src/appHandshake
VPATH += $(PROJECT_ROOT)/test

#工程包含的全部目录
AllDirs = $(VPATH)

#获取所有 .c/.cpp文件路径
Sources := $(foreach n,$(AllDirs) , $(wildcard $(n)/*$(PROJECTTYPE)))

#处理得到*.o 后缀文件名
OBJS = $(patsubst %$(PROJECTTYPE),%.o, $(Sources))

#真实二进制文件输出路径(绝对)
Bin :=$(BIN_DIR)/$(BinName)

#头文件搜索路径
INCLUDE_PATH = $(foreach n,$(AllDirs) , -I$(n))

LDFLAGS =

all: $(Bin)

.PHONY : clean
clean:
    @echo '清理所有文件'
    @$(RM) $(OBJS) $(Bin)

.PHONY : cleanO
cleanO:
    @echo '清理Obj && Dep'
    @$(RM) $(OBJS)

#声明这个标签 des 用于观察当前的路径是否正确
.PHONY:des
des:
    @echo OBJS =  $(OBJS)
    @echo cur_makefile_path = $(pes_parent_dir)
    @echo AllDirs = $(AllDirs)
    @echo Sources = $(Sources)
    @echo INCLUDE_PATH = $(INCLUDE_PATH)
    @echo Bin = $(Bin)

#对于include中的*.d文件,只要里面任意有一个文件被修改,那么就会触发此规则生成一个新的*.o文件
#%.o: %.c
#    @echo compile $(<:d=c)
#    @$(CC) -c $(<:.d=.c) $(INCLUDE_PATH)  $@

%.o: %.c
    @echo compile $<
    $(CC) -c $<  $(CFLAGS) $(INCLUDE_PATH) -o $@

$(Bin) : $(OBJS)
    @echo bulding....
    $(CC) $(OBJS) -o  $(Bin)
    @echo created file: $(BinName)
由于源代码的头文件分散在各个目录中,为了以后编译时能方便的include头文件,因此makefile中集中定义了include路径:
#头文件搜索路径
INCLUDE_PATH = $(foreach n,$(AllDirs) , -I$(n))
8.3.2 编写测试文件
test.c
#include <stdio.h>
#include <unistd.h>
#include <string.h>
#include <stdlib.h>

#include "appHand_Encoder.h"

//supportedAppProtocolReq
static const char *xmlFileName = "supportedAppProtocolRes.xml";
static const char *encodedFileName = "supportedAppProtocolRes.xml.exi";


static const uint8_t supportedAppProtocolReq[] = {
        0x80, 0x00, 0xEB, 0xAB, 0x93, 0x71, 0xD3, 0x4B, 0x9B, 0x79, 0xD1, 0x89, 0xA9, 0x89, 0x89, 0xC1,
        0xD1, 0x91, 0xD1, 0x91, 0x81, 0x89, 0x99, 0xD2, 0x6B, 0x9B, 0x3A, 0x23, 0x2B, 0x30, 0x02, 0x00,
        0x00, 0x04, 0x00, 0x40
    };
static const uint8_t supportedAppProtocolRes[] = {
        0x80, 0x40, 0x00, 0x40
    };

static const char * exiDataFile = "supportedAppProtocolRes.exi";

static const char * ns = "urn:iso:15118:2:2013:MsgDef";


int main() {

       char buf[80];
       getcwd(buf, sizeof(buf));
       printf("current working directory: %s\n", buf);


       //开始根据xml内容编码

       // 初始化 文档对象
       struct appHand_exiDocument exiDoc;
       init_appHand_exiDocument( &exiDoc );
       exiDoc.supportedAppProtocolReq_isUsed = 1;   // 设置为req命令

       //初始化请求命令
       struct appHand_supportedAppProtocolReq supportedAppProtocolReq;
       init_appHand_supportedAppProtocolReq( &supportedAppProtocolReq );

       //初始化命令原型数据结构
       struct appHand_AppProtocolType  appProtocol;
       strcpy(appProtocol.ProtocolNamespace.characters,ns);
       appProtocol.ProtocolNamespace.charactersLen = strlen(ns);
       appProtocol.VersionNumberMajor = 2;
       appProtocol.VersionNumberMinor = 0;
       appProtocol.SchemaID = 1;
       appProtocol.Priority = 1;

        //填充请求命令, 只包含一组参数
       supportedAppProtocolReq.AppProtocol.array[0] = appProtocol;
//       memcpy(&supportedAppProtocolReq.AppProtocol.array[0], &appProtocol, sizeof(appProtocol));
       supportedAppProtocolReq.AppProtocol.arrayLen =1;

       //填充文档对象
       exiDoc.supportedAppProtocolReq = supportedAppProtocolReq;

       //初始化输出流, 手动分配内存,记住长度,以后要记得释放啊。
       exi_bitstream_t stream;
       uint8_t* data = (uint8_t*)malloc(100);
       exi_bitstream_init(&stream, data, 100, 0, NULL);

       //开始编码,返回值为0表示正确。 输出流的byte_pos表示数据结尾的字节序号,实际的数据长度=byte_pos+1
       int ret1 = encode_appHand_exiDocument(&stream, &exiDoc);
       printf("ret1= %d \n",ret1);
       printf("stream.byte_pos =%d \n",stream.byte_pos);
       log_hexdump("data", data, stream.byte_pos+1);


       //开始解码
       exi_bitstream_t stream2;
       exi_bitstream_reset(&stream);
       struct appHand_exiDocument exiDoc2;
       int ret2 = decode_appHand_exiDocument(&stream, &exiDoc2);
       printf("ret2= %d \n",ret2);


   return 0;
}


int log_hexdump(const char *title, const unsigned char *data, int len) {
    char str[160], octet[10];
    int ofs, i, k, d;
    const unsigned char *buf = (const unsigned char*) data;
    const char dimm[] =
            "+------------------------------------------------------------------------------+";

    printf("%s (%d bytes):\r\n", title, len);
    printf("%s\r\n", dimm);
    printf(
            "| Offset  : 00 01 02 03 04 05 06 07 08 09 0A 0B 0C 0D 0E 0F   0123456789ABCDEF |\r\n");
    printf("%s\r\n", dimm);

    for (ofs = 0; ofs < (int) len; ofs += 16) {
        d = snprintf(str, sizeof(str), "| %08X: ", ofs);

        for (i = 0; i < 16; i++) {
            if ((i + ofs) < (int) len) {
                snprintf(octet, sizeof(octet), "%02X ", buf[ofs + i]);
            } else {
                snprintf(octet, sizeof(octet), "   ");
            }

            d += snprintf(&str[d], sizeof(str) - d, "%s", octet);
        }
        d += snprintf(&str[d], sizeof(str) - d, "  ");
        k = d;

        for (i = 0; i < 16; i++) {
            if ((i + ofs) < (int) len) {
                str[k++] =
                        (0x20 <= (buf[ofs + i]) && (buf[ofs + i]) <= 0x7E) ?
                                buf[ofs + i] : '.';
            } else {
                str[k++] = ' ';
            }
        }

        str[k] = '\0';
        printf("%s |\r\n", str);
    }

    printf("%s\r\n", dimm);

    return 0;
}
实际运行结果:
root@Tom-Hongtao# make
compile test/test.c
gcc -c test/test.c  -g  -Wall -O0  -I./src/common  -I./src/appHandshake  -I./test -o test/test.o
test/test.c: In function ‘main’:
test/test.c:63:35: warning: format ‘%d’ expects argument of type ‘int’, but argument 2 has type ‘size_t’ {aka ‘long unsigned int’} [-Wformat=]
   63 |         printf("stream.byte_pos =%d \n",stream.byte_pos);
      |                                  ~^     ~~~~~~~~~~~~~~~
      |                                   |           |
      |                                   int         size_t {aka long unsigned int}
      |                                  %ld
test/test.c:64:9: warning: implicit declaration of function ‘log_hexdump’ [-Wimplicit-function-declaration]
   64 |         log_hexdump("data", data, stream.byte_pos+1);
      |         ^~~~~~~~~~~
test/test.c:71:20: warning: implicit declaration of function ‘decode_appHand_exiDocument’; did you mean ‘encode_appHand_exiDocument’? [-Wimplicit-function-declaration]
   71 |         int ret2 = decode_appHand_exiDocument(&stream, &exiDoc2);
      |                    ^~~~~~~~~~~~~~~~~~~~~~~~~~
      |                    encode_appHand_exiDocument
test/test.c:68:25: warning: unused variable ‘stream2’ [-Wunused-variable]
   68 |         exi_bitstream_t stream2;
      |                         ^~~~~~~
At top level:
test/test.c:22:21: warning: ‘exiDataFile’ defined but not used [-Wunused-variable]
   22 | static const char * exiDataFile = "supportedAppProtocolRes.exi";
      |                     ^~~~~~~~~~~
test/test.c:18:22: warning: ‘supportedAppProtocolRes’ defined but not used [-Wunused-const-variable=]
   18 | static const uint8_t supportedAppProtocolRes[] = {
      |                      ^~~~~~~~~~~~~~~~~~~~~~~
test/test.c:13:22: warning: ‘supportedAppProtocolReq’ defined but not used [-Wunused-const-variable=]
   13 | static const uint8_t supportedAppProtocolReq[] = {
      |                      ^~~~~~~~~~~~~~~~~~~~~~~
test/test.c:11:20: warning: ‘encodedFileName’ defined but not used [-Wunused-variable]
   11 | static const char *encodedFileName = "supportedAppProtocolRes.xml.exi";
      |                    ^~~~~~~~~~~~~~~
test/test.c:10:20: warning: ‘xmlFileName’ defined but not used [-Wunused-variable]
   10 | static const char *xmlFileName = "supportedAppProtocolRes.xml";
      |                    ^~~~~~~~~~~
bulding....
gcc ./src/common/exi_basetypes.o ./src/common/exi_basetypes_decoder.o ./src/common/exi_basetypes_encoder.o ./src/common/exi_bitstream.o ./src/common/exi_header.o ./src/common/exi_types_decoder.o ./src/appHandshake/appHand_Datatypes.o ./src/appHandshake/appHand_Decoder.o ./src/appHandshake/appHand_Encoder.o ./test/test.o -o  ./bin/test
created file: test
8.3.3 对码流进行解码
上面编码成功后得到了exi码流,共36字节。
现在要想直接对该stream数据结构进行解码,必须复位各个位置指针,这样才能要个解码器从第0字节开始读取数据。关键就是 exi_bitstream_reset(&stream)函数。
解码后的生成文档对象exiDoc2, 在解码函数内部会对这个exiDoc2进行初始化,因此外部只要定义为变量或分配个内存空间就可以了。
跟踪内存变量exiDoc2:
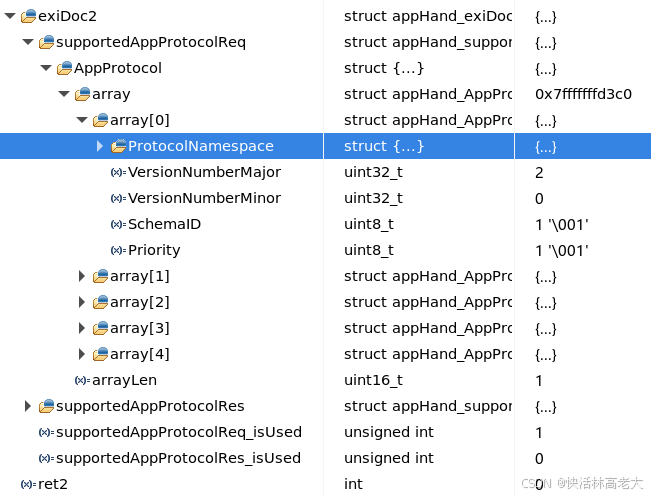
展开字符串数组:
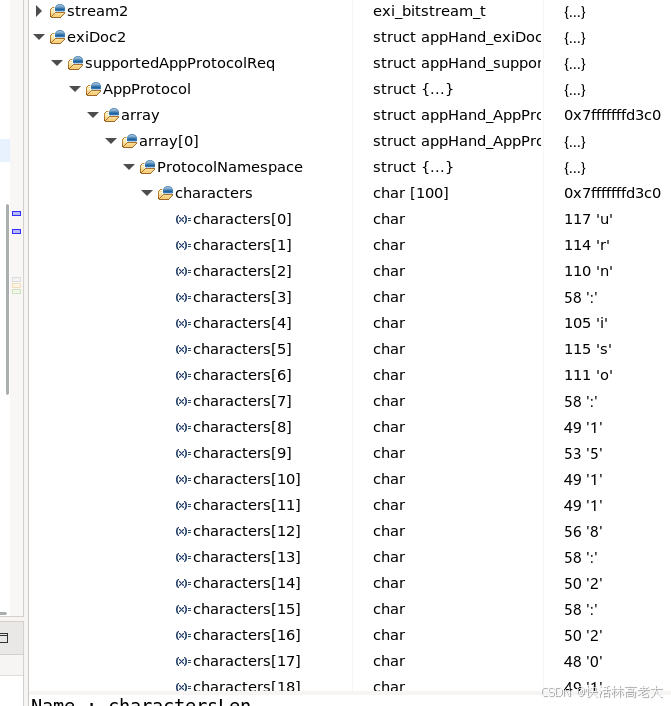
上图表明 exi码流已经正确解码,数据是以struct形式保存在内存中,以后还需要输出成json格式展示出来。
8.3.4 对supportedAppProtocolRes编解码
同样的操作方法,对supportedAppProtocolRes命令编解码成功。
核心代码如下:
    // init for structs
    struct appHand_exiDocument exiDocRes;
    init_appHand_exiDocument( &exiDocRes );
    exiDocRes.supportedAppProtocolRes_isUsed = 1;

    struct appHand_supportedAppProtocolRes supportedAppProtocolRes;
    init_appHand_supportedAppProtocolRes( &supportedAppProtocolRes );

    supportedAppProtocolRes.ResponseCode = appHand_responseCodeType_OK_SuccessfulNegotiation;
    supportedAppProtocolRes.SchemaID = 1;
    supportedAppProtocolRes.SchemaID_isUsed =1;

    exiDocRes.supportedAppProtocolRes = supportedAppProtocolRes;

    exi_bitstream_t streamRes;
    uint8_t* dataRes = (uint8_t*)malloc(100);
    exi_bitstream_init(&streamRes, dataRes, 100, 0, NULL);

    ret1 = encode_appHand_exiDocument(&streamRes, &exiDocRes);
    printf("ret1= %d \n",ret1);
    printf("streamRes.byte_pos =%d \n",streamRes.byte_pos);
    log_hexdump("dataRes", dataRes, streamRes.byte_pos+1);


    exi_bitstream_reset(&streamRes);
    struct appHand_exiDocument exiDocRes2;
    ret2 = decode_appHand_exiDocument(&streamRes, &exiDocRes2);
    printf("ret2= %d \n",ret2);
运行结果成功:略
经过对比,上述命令编码和解码结果与EXICodec.jar完全相同,cbExiGen初步测试成功。


 被折叠的 条评论
为什么被折叠?
被折叠的 条评论
为什么被折叠?
 到【灌水乐园】发言


