1.问题
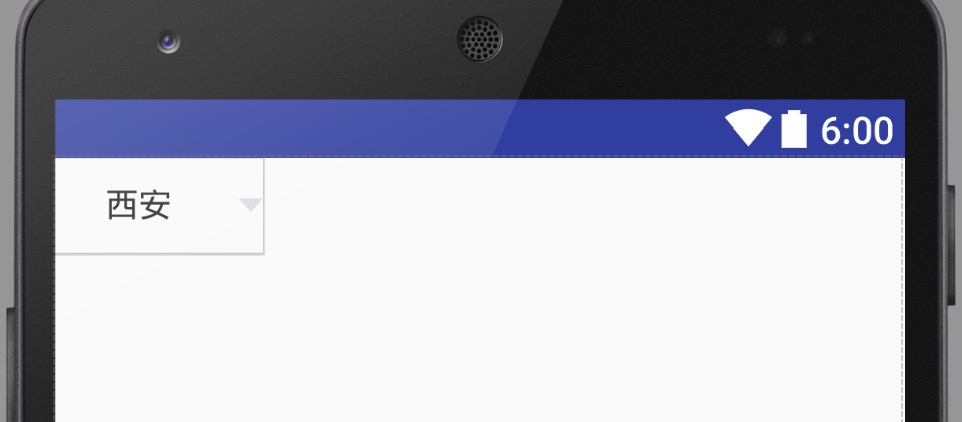
我想很多小伙伴都和我一样应该很喜欢TextView中drawableLeft、drawableTop、drawableRight、drawableBottom这几个属性,因为我们可以直接用它来画出来一个图文排列的标签或者按钮,这样就对于用两个控件组成的相对复杂的布局来说容易的多,这在移动UI开发中很常用,但是这样经常会有个问题困扰着我,因为有时候我们想把图片和文字对应居中,这样就会出现关于图片和文字之间的间距不好控制的问题,有时候我们设置drawablePadding这个属性之后发现也并没有达到我们想要的效果。
2.原因
大概看了下源码实现,得出的结论就是android:drawablePadding这个属性在 我们给view设置的宽度或者高度足够小(以至于将两者挤压在一起)的时候,这个属性才会起作用,也即在图片和文字之间会有间距产生。如果你的view所设置的宽度或者高度大于drawableLeft/drawableRight或者drawableTop/drawableBottom所产生的间距,那么这个属性当然也就不会起作用。
3.实践
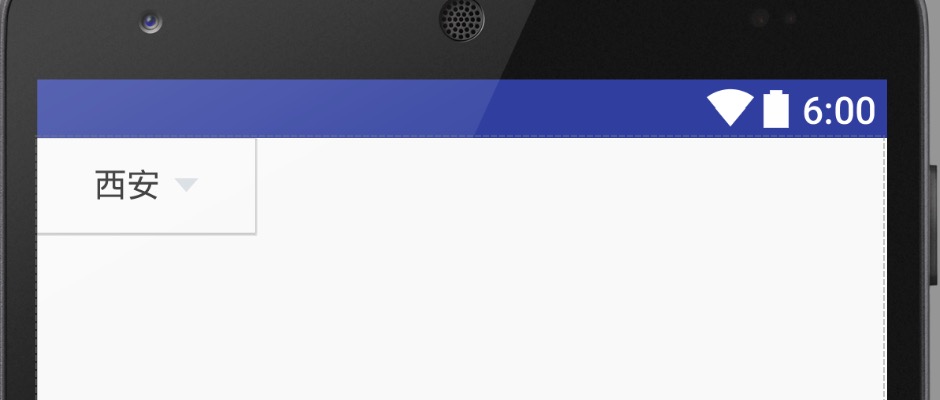
一种最简单方法是我们可以直接去解决,就是通过设置view的内填充,我们从上面原因中可以知道,drawablePadding不起作用是因为view的宽度过宽,导致view内文本和图片间距过大,那我们可以通过设置paddingLeft、paddingRight、paddingTop、paddingBottom来缩写这个间距,如下代码:
<Button
    android:layout_width="wrap_content"
    android:layout_height="40dp"
    android:text="@string/xian_txt"
    android:drawableRight="@mipmap/ic_triangle_down"
    android:background="@android:color/transparent"
    android:drawablePadding="6dp"
    android:gravity="center"
    android:paddingRight="24dp"
    android:paddingLeft="24dp"
    />
对应的效果也可以实现
另外,我们也可以通过自定义View来精确的计算:
我们先自定义属性iconPadding来设置间距,并提供方法给外部调用
重写setCompoundDrawablesWithIntrinsicBounds()方法来获取我们设置的drawable宽度。
最后重写onLayout方法,因为这里面改变了一些位置属性,需要通过重新布局才能起作用。
相关代码:
public class IconButton extends Button {
    private int drawableWidth;
    private int iconPadding;
    private DrawablePosition position;

    Rect bounds;

    private enum DrawablePosition{
        NONE,
        LEFT_AND_RIGHT,
        LEFT,
        RIGHT
    }

    public IconButton(Context context) {
        this(context,null,0);
    }

    public IconButton(Context context, AttributeSet attrs) {
        this(context, attrs,0);
    }


    public IconButton(Context context, AttributeSet attrs, int defStyle) {
        super(context, attrs, defStyle);
        bounds = new Rect();
        applyAttributes(attrs);
    }

    protected void applyAttributes(AttributeSet attrs) {

        if (null == bounds) {
            bounds = new Rect();
        }

        TypedArray typedArray = getContext().obtainStyledAttributes(attrs, R.styleable.IconButton);
        int paddingId = typedArray.getDimensionPixelSize(R.styleable.IconButton_iconPadding, 0);
        setIconPadding(paddingId);
        typedArray.recycle();
    }

    public void setIconPadding(int padding) {
        iconPadding = padding;
        requestLayout();
    }

    @Override
    protected void onLayout(boolean changed, int left, int top, int right, int bottom) {
        super.onLayout(changed, left, top, right, bottom);

        Paint textPaint = getPaint();
        String text = getText().toString();
        textPaint.getTextBounds(text, 0, text.length(), bounds);

        int textWidth = bounds.width();
        int factor = (position == DrawablePosition.LEFT_AND_RIGHT) ? 2 : 1;
        int contentWidth = drawableWidth + iconPadding * factor + textWidth;
        int horizontalPadding = (int) ((getWidth() / 2.0) - (contentWidth / 2.0));

        setCompoundDrawablePadding(-horizontalPadding + iconPadding);

        switch (position) {
            case LEFT:
                setPadding(horizontalPadding, getPaddingTop(), 0, getPaddingBottom());
                break;

            case RIGHT:
                setPadding(0, getPaddingTop(), horizontalPadding, getPaddingBottom());
                break;

            case LEFT_AND_RIGHT:
                setPadding(horizontalPadding, getPaddingTop(), horizontalPadding, getPaddingBottom());
                break;

            default:
                setPadding(0, getPaddingTop(), 0, getPaddingBottom());
        }
    }


    @Override
    public void setCompoundDrawablesWithIntrinsicBounds(Drawable left, Drawable top, Drawable right, Drawable bottom) {
        super.setCompoundDrawablesWithIntrinsicBounds(left, top, right, bottom);

        if (left != null && right != null) {
            drawableWidth = left.getIntrinsicWidth() + right.getIntrinsicWidth();
            position = DrawablePosition.LEFT_AND_RIGHT;
        } else if (left != null) {
            drawableWidth = left.getIntrinsicWidth();
            position = DrawablePosition.LEFT;
        } else if (right != null) {
            drawableWidth = right.getIntrinsicWidth();
            position = DrawablePosition.RIGHT;
        } else {
            position = DrawablePosition.NONE;
        }

        requestLayout();
    }
}
- 1
- 2
- 3
- 4
- 5
- 6
- 7
- 8
- 9
- 10
- 11
- 12
- 13
- 14
- 15
- 16
- 17
- 18
- 19
- 20
- 21
- 22
- 23
- 24
- 25
- 26
- 27
- 28
- 29
- 30
- 31
- 32
- 33
- 34
- 35
- 36
- 37
- 38
- 39
- 40
- 41
- 42
- 43
- 44
- 45
- 46
- 47
- 48
- 49
- 50
- 51
- 52
- 53
- 54
- 55
- 56
- 57
- 58
- 59
- 60
- 61
- 62
- 63
- 64
- 65
- 66
- 67
- 68
- 69
- 70
- 71
- 72
- 73
- 74
- 75
- 76
- 77
- 78
- 79
- 80
- 81
- 82
- 83
- 84
- 85
- 86
- 87
- 88
- 89
- 90
- 91
- 92
- 93
- 94
- 95
- 96
- 97
- 98
- 99
- 100
这样同样可以实现我们想要的效果,并且可以自由设置间距
<com.yuxingxin.iconview.IconButton
    android:layout_width="wrap_content"
    android:layout_height="wrap_content"
    android:text="@string/app_name"
    android:gravity="center"
    android:drawableRight="@mipmap/ic_triangle_down"
    app:iconPadding="6dp"
    android:background="@color/colorPrimary"
    android:textColor="@android:color/white"
    />
转载原文链接
转载原文demo下载地址
========== 以下为个人实践经验 ================
<1>IconButton 重写了setCompoundDrawablesWithIntrinsicBounds方法,该方法画的drawable宽高是按照drawable固定的宽高,有时我们需要在代码设置drawable图片宽高,这时就需要重写setCompoundDrawables 方法。
如:代码中重设drawable宽高
IconTextView itv = (IconTextView)findViewById(R.id.itv_text);

        Drawable[] drawables =null;
        drawables= itv.getCompoundDrawables();
        if (drawables.length==4) {
            if (drawables[0]!=null){
                drawables[0].setBounds(0, 0, 150, 150);
            }
            if (drawables[1]!=null){
                drawables[1].setBounds(0, 0, 150, 150);
            }
            if (drawables[2]!=null){
                drawables[2].setBounds(0, 0, 150, 150);
            }
            if (drawables[3]!=null){
                drawables[3].setBounds(0, 0, 150, 150);
            }
        }
        itv.setCompoundDrawables(drawables[0], drawables[1], drawables[2], drawables[3]);
- 1
- 2
- 3
- 4
- 5
- 6
- 7
- 8
- 9
- 10
- 11
- 12
- 13
- 14
- 15
- 16
- 17
- 18
- 19
在IconButton 中重写setCompoundDrawables方法如下:
@Override
public void setCompoundDrawables(Drawable left, Drawable top,
Drawable right, Drawable bottom) {
super.setCompoundDrawables(left, top, right, bottom);
if (left != null) {
Rect leftRect = left.getBounds();
leftDrawableWidth = leftRect.right - leftRect.left;
}
if (right != null) {
Rect rightRect = right.getBounds();
rightDrawableWidth = rightRect.right - rightRect.left;
}
if (top != null) {
Rect topRect = top.getBounds();
topDrawableHeight = topRect.bottom - topRect.top;
}
if (bottom != null) {
Rect bottomRect = bottom.getBounds();
bottomDrawableHeight = bottomRect.bottom - bottomRect.top;
}
}
- 1
- 2
- 3
- 4
- 5
- 6
- 7
- 8
- 9
- 10
- 11
- 12
- 13
- 14
- 15
- 16
- 17
- 18
- 19
- 20
- 21
- 22
二、设置的drawable足够小时,IconButton 能够很好的控制drawablepadding距离,那drawable改多小才行?要小于文本Text的宽/高才行,并且横向、纵向都设置drawable其实也有问题的,所以IconButton的限制还是有的。
IconButton的onLayout方法如下
 Paint textPaint = getPaint();
        String text = getText().toString();
        textPaint.getTextBounds(text, 0, text.length(), bounds);

        int textWidth = bounds.width();
        int factor = (position == DrawablePosition.LEFT_AND_RIGHT) ? 2 : 1;
        int contentWidth = drawableWidth + iconPadding * factor + textWidth;
        int horizontalPadding = (int) ((getWidth() / 2.0) - (contentWidth / 2.0));

        setCompoundDrawablePadding(-horizontalPadding + iconPadding);
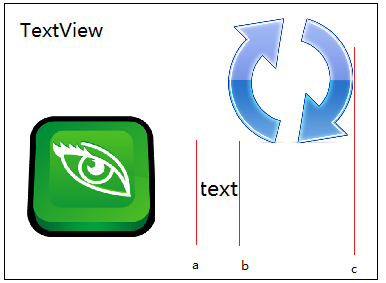
值得注意的是,contentWidth是通过图片宽度+图片与文本距离+文本宽度功能决定的。
如下图,如果text都比drawable图片下,那么textwidth的距离还是ab线段之间,实际上应该是ac线段之间长度才是正确的,由于topDrawable太大,宽度比text长度要长,自然就加大了text的实际长度。
所以如果需要灵活的设置drawablepadding,还是在容器布局LinearLayout/RelativeLayout中添加需要的drawable和text是比较合适的,TextView/ButtonView中只适用添加的drawable足够小,且drawable是同方向的(左右图片,或是上下图片),还有值得注意的是,IconButton是通过设置padding的方式确定drawablePadding的,所以使用IconButton时,同方向上的padding不在由用户决定,IconButton的onLayout方法中重新设置了padding大小。


 本文探讨了在Android开发中遇到的TextView图文不居中及间距难以控制的问题,并提供了两种解决方案:一是通过设置view的内填充调整;二是自定义View精确计算间距。


 1万+
1万+

 被折叠的 条评论
为什么被折叠?
被折叠的 条评论
为什么被折叠?
 到【灌水乐园】发言


