


 本文介绍如何实现Android设备上的静默安装,包括增加权限、注册广播监听、使用第三方下载库进行下载及安装等步骤,并提供了具体代码实现。
随着物联网的兴起,无人值守的android设备越来越多,我目前手里刚好在接相关的售票机器,需要实现更新、下载、静默安装、自动打开,网上相关文章太多了,很容易眼花缭乱,我这边整理出来留作记录,亲测有效!
前提:root!
非root设备就需要rom厂商的签名了
第一步
增加权限
    <uses-permission android:name="android.permission.INSTALL_PACKAGES" />
    <uses-permission android:name="android.permission.REQUEST_INSTALL_PACKAGES" />
    <uses-permission android:name="android.permission.BROADCAST_PACKAGE_REMOVED" />
    <!--启动系统的广播监听-->
    <uses-permission android:name="android.permission.RECEIVE_BOOT_COMPLETED" />
Manifest文件 的appliacation节点下增加
        android:sharedUserId="android.uid.shell"
        我还试了android.uid.system,也是可以正常静默安装的,其他几个uid没有测试,猜测也是可用的。


    <application
        android:name=".MyApplication"
        android:allowBackup="false"
        android:icon="@mipmap/ic_launcher"
        android:label="@string/app_name"
        android:networkSecurityConfig="@xml/network_security_config"
        android:roundIcon="@mipmap/ic_launcher_round"
        android:supportsRtl="false"
        android:sharedUserId="android.uid.shell"
        android:theme="@style/AppTheme">
第二步
注册广播监听重启或安装包卸载
        <receiver android:name=".receiver.AppBootReceiver">
            <intent-filter>
                <action android:name="android.intent.action.BOOT_COMPLETED" />
                <category android:name="android.intent.category.HOME" />
            </intent-filter>
            <intent-filter>
                <action android:name="android.intent.action.PACKAGE_REPLACED" />
                <!--scheme就是填写package这个单词,而不是要替换为packName之类的-->
                <data android:scheme="package" />
            </intent-filter>
        </receiver>
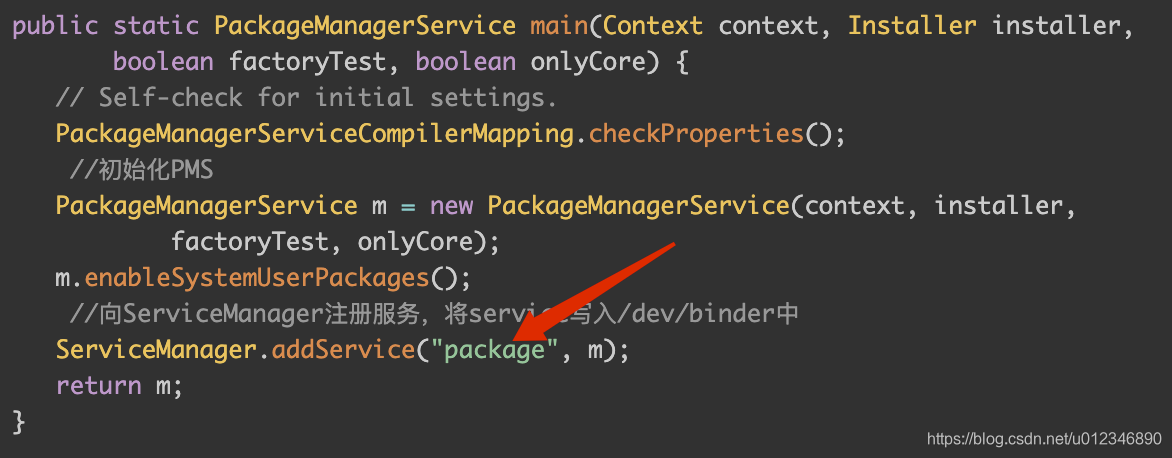
这个地方有点意思:为什么scheme的值是package,追到源码可以发现 这个package其实是服务的名字(PMS的main方法中)
第三步
这里我用的是第三方的下载库,实际上只需要关心静默安装那一行代码
    /**
     * 下载apk,并调用安装
     */
    private fun downloadApk(context: Context, apkUrl: String?) {
        FileDownloader.setup(context)
        if (!apkUrl.isNullOrEmpty()) {
            val apkPath = "${PathUtils.getExternalAppDownloadPath()}/upgrade.apk"

            FileDownloader.getImpl().create(apkUrl)
                .setPath(apkPath)
                .setForceReDownload(true)
                .setListener(object :
                    FileDownloadSampleListener() {
                    override fun completed(task: BaseDownloadTask?) {
                        super.completed(task)
                        LogUtils.i("下载完成,${task?.targetFilePath}")

                        if (task?.targetFilePath == null) {
                            doRetry()
                        } else {
                            //下载完,安装
                            if (AppUtils.isAppRoot()) {
                                val installAppSilent =
                                    DangerousUtils.installAppSilent(task.targetFilePath, "-r")
                                LogUtils.i("静默安装apk 结果 $installAppSilent")
                            } else {
                                AppUtils.installApp(task.targetFilePath)
                                LogUtils.i("普通安装apk")
                            }
                        }
                    }

                    override fun progress(
                        task: BaseDownloadTask?,
                        soFarBytes: Int,
                        totalBytes: Int
                    ) {
                        super.progress(task, soFarBytes, totalBytes)
                        val process = (soFarBytes.toDouble() / totalBytes * 100).toInt()
                        viewModel.currentProcess.value = "$process%..."
                    }

                    override fun error(task: BaseDownloadTask?, e: Throwable?) {
                        super.error(task, e)
                        LogUtils.e(e?.message)
                        doRetry()
                    }
                }).start()
        }
    }
        fun installAppSilent(filePath: String, params: String?): Boolean {
            return installAppSilent(getFileByPath(filePath), params)
        }


        @JvmOverloads
        fun installAppSilent(
            file: File?,
            params: String? = null,
            isRooted: Boolean = isDeviceRooted
        ): Boolean {
            if (!isFileExists(file)) return false
            val filePath = '"'.toString() + file!!.absolutePath + '"'
            val command = ("LD_LIBRARY_PATH=/vendor/lib*:/system/lib* pm install " +
                    (if (params == null) "" else "$params ")
                    + filePath)
            val commandResult = ShellUtils.execCmd(command, isRooted)
            return if (commandResult.successMsg != null
                && commandResult.successMsg.toLowerCase().contains("success")
            ) {
                true
            } else {
                Log.e(
                    "AppUtils", "installAppSilent successMsg: " + commandResult.successMsg +
                            ", errorMsg: " + commandResult.errorMsg
                )
                false
            }
        }
具体实现如上:DangerousUtils文件在这里,可以下载
第四步
监听,延迟5秒后启动,看需要也可以不延迟。
class AppBootReceiver : BroadcastReceiver() {

    override fun onReceive(context: Context, intent: Intent) {
        LogUtils.e("检测到系统启动广播: ${intent.action}")
        if (intent.action == Intent.ACTION_BOOT_COMPLETED || intent.action == Intent.ACTION_PACKAGE_REPLACED) {
            LogUtils.i("检测到系统启动广播,启动App")
            //同事沟通,业务需求场景处理,延迟5s后再启动
            GlobalScope.launch {
                delay(5 * 1000)
                ActivityUtils.startActivity(MainActivity::class.java)
            }
        }
    }
}
startActvity也有点道道
两种方式:一种是
   val intent2 = Intent(context, MainActivity::class.java)
   //必须加,否则报错 android.util.AndroidRuntimeException: Calling startActivity() from outside of an Activity  context requires the FLAG_ACTIVITY_NEW_TASK flag. Is this really what you want?
   intent2.addFlags(Intent.FLAG_ACTIVITY_NEW_TASK)
   context.startActivity(intent2)
另外一种隐式启动:
我这边因为项目里引用了https://github.com/Blankj/AndroidUtilCode 这个工具库,所以可以一行代码,
ActivityUtils.startActivity(MainActivity::class.java)
其实际上是隐式调用:
  Intent intent = new Intent();
  if (extras != null) intent.putExtras(extras);
  intent.setComponent(new ComponentName(pkg, cls));
  startActivity(intent, context, options);
拓展
如果想实现,静默安装,就需要设置好UID,只有设置这个UID后,才有安装的权限
但是这个UID必须要求有系统的[签名], 而这个系统的[签名]是属于各大手机厂商的机密,除非root,刚好我手里的设备就是root过的,所以才有上面的步骤。
PSM里面定义的UID我都找出来了:
mSettings.addSharedUserLPw(“android.uid.system”, Process.SYSTEM_UID, ApplicationInfo.FLAG_SYSTEM, ApplicationInfo.PRIVATE_FLAG_PRIVILEGED);
mSettings.addSharedUserLPw(“android.uid.phone”, RADIO_UID, ApplicationInfo.FLAG_SYSTEM, ApplicationInfo.PRIVATE_FLAG_PRIVILEGED);
mSettings.addSharedUserLPw(“android.uid.log”, LOG_UID, ApplicationInfo.FLAG_SYSTEM, ApplicationInfo.PRIVATE_FLAG_PRIVILEGED);
mSettings.addSharedUserLPw(“android.uid.nfc”, NFC_UID, ApplicationInfo.FLAG_SYSTEM, ApplicationInfo.PRIVATE_FLAG_PRIVILEGED);
mSettings.addSharedUserLPw(“android.uid.bluetooth”, BLUETOOTH_UID, ApplicationInfo.FLAG_SYSTEM, ApplicationInfo.PRIVATE_FLAG_PRIVILEGED);
mSettings.addSharedUserLPw(“android.uid.shell”, SHELL_UID, ApplicationInfo.FLAG_SYSTEM, ApplicationInfo.PRIVATE_FLAG_PRIVILEGED);
mSettings.addSharedUserLPw(“android.uid.se”, SE_UID, ApplicationInfo.FLAG_SYSTEM, ApplicationInfo.PRIVATE_FLAG_PRIVILEGED);
mSettings.addSharedUserLPw(“android.uid.networkstack”, NETWORKSTACK_UID, ApplicationInfo.FLAG_SYSTEM, ApplicationInfo.PRIVATE_FLAG_PRIVILEGED);


 2168
2168

 被折叠的 条评论
为什么被折叠?
被折叠的 条评论
为什么被折叠?
 到【灌水乐园】发言


