


一 .用 FragmentTabHost 实现底部菜单
FragmentTabHost官网文档:https://developer.android.com/reference/android/support/v4/app/FragmentTabHost.html
1.FragmentTabHost用法
(1)Activity要继承FragmentActivity
(2)调用setup()方法
(3)添加TabSpec
(1)Activity要继承FragmentActivity
(2)调用setup()方法
(3)添加TabSpec
1.FragmentTabHost (复写了FragmentTabHost, 直接用)
package cniao5.com.cniao5shop.widget;


/**
 * Created by monkey
 * on 2014/9/24
 * 功能描述:修改过的FragmentTabHost,保存fragment实例不销毁
 */
/*
 * Copyright (C) 2012 The Android Open Source Project
 *
 * Licensed under the Apache License, Version 2.0 (the "License");
 * you may not use this file except in compliance with the License.
 * You may obtain a copy of the License at
 *
 *      http://www.apache.org/licenses/LICENSE-2.0
 *
 * Unless required by applicable law or agreed to in writing, software
 * distributed under the License is distributed on an "AS IS" BASIS,
 * WITHOUT WARRANTIES OR CONDITIONS OF ANY KIND, either express or implied.
 * See the License for the specific language governing permissions and
 * limitations under the License.
 */


        import java.util.ArrayList;

        import android.content.Context;
        import android.content.res.TypedArray;
        import android.os.Bundle;
        import android.os.Parcel;
        import android.os.Parcelable;
        import android.support.v4.app.Fragment;
        import android.support.v4.app.FragmentManager;
        import android.support.v4.app.FragmentTransaction;
        import android.util.AttributeSet;
        import android.view.View;
        import android.view.ViewGroup;
        import android.widget.FrameLayout;
        import android.widget.LinearLayout;
        import android.widget.TabHost;
        import android.widget.TabWidget;

/**
 * Special TabHost that allows the use of {@link Fragment} objects for its tab
 * content. When placing this in a view hierarchy, after inflating the hierarchy
 * you must call {@link #setup(Context, FragmentManager, int)} to complete the
 * initialization of the tab host.
 *
 * <p>
 * Here is a simple example of using a FragmentTabHost in an Activity:
 *
 * {@sample
 * development/samples/Support4Demos/src/com/example/android/supportv4/app/
 * FragmentTabs.java complete}
 *
 * <p>
 * This can also be used inside of a fragment through fragment nesting:
 *
 * {@sample
 * development/samples/Support4Demos/src/com/example/android/supportv4/app/
 * FragmentTabsFragmentSupport.java complete}
 */
public class FragmentTabHost extends TabHost implements
        TabHost.OnTabChangeListener {
    private final ArrayList<TabInfo> mTabs = new ArrayList<TabInfo>();
    private FrameLayout mRealTabContent;
    private Context mContext;
    private FragmentManager mFragmentManager;
    private int mContainerId;
    private OnTabChangeListener mOnTabChangeListener;
    private TabInfo mLastTab;
    private boolean mAttached;

    static final class TabInfo {
        private final String tag;
        private final Class<?> clss;
        private final Bundle args;
        private Fragment fragment;

        TabInfo(String _tag, Class<?> _class, Bundle _args) {
            tag = _tag;
            clss = _class;
            args = _args;
        }
    }

    static class DummyTabFactory implements TabContentFactory {
        private final Context mContext;

        public DummyTabFactory(Context context) {
            mContext = context;
        }

        @Override
        public View createTabContent(String tag) {
            View v = new View(mContext);
            v.setMinimumWidth(0);
            v.setMinimumHeight(0);
            return v;
        }
    }

    static class SavedState extends BaseSavedState {
        String curTab;

        SavedState(Parcelable superState) {
            super(superState);
        }

        private SavedState(Parcel in) {
            super(in);
            curTab = in.readString();
        }

        @Override
        public void writeToParcel(Parcel out, int flags) {
            super.writeToParcel(out, flags);
            out.writeString(curTab);
        }

        @Override
        public String toString() {
            return "FragmentTabHost.SavedState{"
                    + Integer.toHexString(System.identityHashCode(this))
                    + " curTab=" + curTab + "}";
        }

        public static final Creator<SavedState> CREATOR = new Creator<SavedState>() {
            public SavedState createFromParcel(Parcel in) {
                return new SavedState(in);
            }

            public SavedState[] newArray(int size) {
                return new SavedState[size];
            }
        };
    }

    public FragmentTabHost(Context context) {
        // Note that we call through to the version that takes an AttributeSet,
        // because the simple Context construct can result in a broken object!
        super(context, null);
        initFragmentTabHost(context, null);
    }

    public FragmentTabHost(Context context, AttributeSet attrs) {
        super(context, attrs);
        initFragmentTabHost(context, attrs);
    }

    private void initFragmentTabHost(Context context, AttributeSet attrs) {
        TypedArray a = context.obtainStyledAttributes(attrs,
                new int[] { android.R.attr.inflatedId }, 0, 0);
        mContainerId = a.getResourceId(0, 0);
        a.recycle();

        super.setOnTabChangedListener(this);
    }

    private void ensureHierarchy(Context context) {
        // If owner hasn't made its own view hierarchy, then as a convenience
        // we will construct a standard one here.
        if (findViewById(android.R.id.tabs) == null) {
            LinearLayout ll = new LinearLayout(context);
            ll.setOrientation(LinearLayout.VERTICAL);
            addView(ll, new LayoutParams(
                    ViewGroup.LayoutParams.MATCH_PARENT,
                    ViewGroup.LayoutParams.MATCH_PARENT));

            TabWidget tw = new TabWidget(context);
            tw.setId(android.R.id.tabs);
            tw.setOrientation(TabWidget.HORIZONTAL);
            ll.addView(tw, new LinearLayout.LayoutParams(
                    ViewGroup.LayoutParams.MATCH_PARENT,
                    ViewGroup.LayoutParams.WRAP_CONTENT, 0));

            FrameLayout fl = new FrameLayout(context);
            fl.setId(android.R.id.tabcontent);
            ll.addView(fl, new LinearLayout.LayoutParams(0, 0, 0));

            mRealTabContent = fl = new FrameLayout(context);
            mRealTabContent.setId(mContainerId);
            ll.addView(fl, new LinearLayout.LayoutParams(
                    LinearLayout.LayoutParams.MATCH_PARENT, 0, 1));
        }
    }

    /**
     * @deprecated Don't call the original TabHost setup, you must instead call
     *             {@link #setup(Context, FragmentManager)} or
     *             {@link #setup(Context, FragmentManager, int)}.
     */
    @Override
    @Deprecated
    public void setup() {
        throw new IllegalStateException(
                "Must call setup() that takes a Context and FragmentManager");
    }

    public void setup(Context context, FragmentManager manager) {
        ensureHierarchy(context); // Ensure views required by super.setup()
        super.setup();
        mContext = context;
        mFragmentManager = manager;
        ensureContent();
    }

    public void setup(Context context, FragmentManager manager, int containerId) {
        ensureHierarchy(context); // Ensure views required by super.setup()
        super.setup();
        mContext = context;
        mFragmentManager = manager;
        mContainerId = containerId;
        ensureContent();
        mRealTabContent.setId(containerId);

        // We must have an ID to be able to save/restore our state. If
        // the owner hasn't set one at this point, we will set it ourself.
        if (getId() == View.NO_ID) {
            setId(android.R.id.tabhost);
        }
    }

    private void ensureContent() {
        if (mRealTabContent == null) {
            mRealTabContent = (FrameLayout) findViewById(mContainerId);
            if (mRealTabContent == null) {
                throw new IllegalStateException(
                        "No tab content FrameLayout found for id "
                                + mContainerId);
            }
        }
    }

    @Override
    public void setOnTabChangedListener(OnTabChangeListener l) {
        mOnTabChangeListener = l;
    }

    public void addTab(TabSpec tabSpec, Class<?> clss, Bundle args) {
        tabSpec.setContent(new DummyTabFactory(mContext));
        String tag = tabSpec.getTag();

        TabInfo info = new TabInfo(tag, clss, args);

        if (mAttached) {
            // If we are already attached to the window, then check to make
            // sure this tab's fragment is inactive if it exists. This shouldn't
            // normally happen.
            info.fragment = mFragmentManager.findFragmentByTag(tag);
            if (info.fragment != null && !info.fragment.isDetached()) {
                FragmentTransaction ft = mFragmentManager.beginTransaction();
//				ft.detach(info.fragment);
                ft.hide(info.fragment);
                ft.commit();
            }
        }

        mTabs.add(info);
        addTab(tabSpec);
    }

    @Override
    protected void onAttachedToWindow() {
        super.onAttachedToWindow();

        String currentTab = getCurrentTabTag();

        // Go through all tabs and make sure their fragments match
        // the correct state.
        FragmentTransaction ft = null;
        for (int i = 0; i < mTabs.size(); i++) {
            TabInfo tab = mTabs.get(i);
            tab.fragment = mFragmentManager.findFragmentByTag(tab.tag);
//			if (tab.fragment != null && !tab.fragment.isDetached()) {
            if (tab.fragment != null) {
                if (tab.tag.equals(currentTab)) {
                    // The fragment for this tab is already there and
                    // active, and it is what we really want to have
                    // as the current tab. Nothing to do.
                    mLastTab = tab;
                } else {
                    // This fragment was restored in the active state,
                    // but is not the current tab. Deactivate it.
                    if (ft == null) {
                        ft = mFragmentManager.beginTransaction();
                    }
//					ft.detach(tab.fragment);
                    ft.hide(tab.fragment);
                }
            }
        }

        // We are now ready to go. Make sure we are switched to the
        // correct tab.
        mAttached = true;
        ft = doTabChanged(currentTab, ft);
        if (ft != null) {
            ft.commitAllowingStateLoss();
            mFragmentManager.executePendingTransactions();
        }
    }

    @Override
    protected void onDetachedFromWindow() {
        super.onDetachedFromWindow();
        mAttached = false;
    }

    @Override
    protected Parcelable onSaveInstanceState() {
        Parcelable superState = super.onSaveInstanceState();
        SavedState ss = new SavedState(superState);
        ss.curTab = getCurrentTabTag();
        return ss;
    }

    @Override
    protected void onRestoreInstanceState(Parcelable state) {
        SavedState ss = (SavedState) state;
        super.onRestoreInstanceState(ss.getSuperState());
        setCurrentTabByTag(ss.curTab);
    }

    @Override
    public void onTabChanged(String tabId) {
        if (mAttached) {
            FragmentTransaction ft = doTabChanged(tabId, null);
            if (ft != null) {
                ft.commit();
            }
        }
        if (mOnTabChangeListener != null) {
            mOnTabChangeListener.onTabChanged(tabId);
        }
    }

    private FragmentTransaction doTabChanged(String tabId,
                                             FragmentTransaction ft) {
        TabInfo newTab = null;
        for (int i = 0; i < mTabs.size(); i++) {
            TabInfo tab = mTabs.get(i);
            if (tab.tag.equals(tabId)) {
                newTab = tab;
            }
        }
        if (newTab == null) {
            throw new IllegalStateException("No tab known for tag " + tabId);
        }
        if (mLastTab != newTab) {
            if (ft == null) {
                ft = mFragmentManager.beginTransaction();
            }
            if (mLastTab != null) {
                if (mLastTab.fragment != null) {
//					ft.detach(mLastTab.fragment);
                    ft.hide(mLastTab.fragment);
                }
            }
            if (newTab != null) {
                if (newTab.fragment == null) {
                    newTab.fragment = Fragment.instantiate(mContext,
                            newTab.clss.getName(), newTab.args);
                    ft.add(mContainerId, newTab.fragment, newTab.tag);
                } else {
//					ft.attach(newTab.fragment);
                    ft.show(newTab.fragment);
                }
            }

            mLastTab = newTab;
        }
        return ft;
    }
}
2.MainActivity 布局
<LinearLayout xmlns:android="http://schemas.android.com/apk/res/android"
    xmlns:tools="http://schemas.android.com/tools"
    android:layout_width="match_parent"
    android:layout_height="match_parent"
    xmlns:app="http://schemas.android.com/apk/res-auto"
    tools:context=".MainActivity"
    android:orientation="vertical">

    <FrameLayout
        android:id="@+id/realtabcontent"
        android:layout_width="fill_parent"
        android:layout_height="0dip"
        android:layout_weight="1"
        android:background="@color/bg_color"
        />


    <cniao5.com.cniao5shop.widget.FragmentTabHost
        android:id="@android:id/tabhost"
        android:layout_width="fill_parent"
        android:layout_height="wrap_content"
        android:background="@color/white"
        >

        <FrameLayout
            android:id="@android:id/tabcontent"
            android:layout_width="0dp"
            android:layout_height="0dp"
            android:layout_weight="0" />
    </cniao5.com.cniao5shop.widget.FragmentTabHost>

</LinearLayout>
3.tab_indicator.xml 低栏每一个View的布局
<LinearLayout xmlns:android="http://schemas.android.com/apk/res/android"
    android:orientation="vertical"
    android:layout_width="match_parent"
    android:layout_height="match_parent"
    android:layout_gravity="center"
    android:paddingTop="3dp"
    android:paddingBottom="3dp"
    android:gravity="center">


    <ImageView
        android:id="@+id/icon_tab"
        android:layout_width="wrap_content"
        android:layout_height="wrap_content"
        />

    <TextView
        android:id="@+id/txt_indicator"
        android:layout_width="wrap_content"
        android:layout_height="wrap_content"
        android:textColor="@color/selector_tab_text"
        android:layout_marginTop="2dp" />


</LinearLayout>/**
* Created by Ivan on 15/9/25.
*/
public class Tab {
private int title;
private int icon;
private Class fragment;
public Tab(Class fragment,int title, int icon) {
this.title = title;
this.icon = icon;
this.fragment = fragment;
}
public int getTitle() {
return title;
}
public void setTitle(int title) {
this.title = title;
}
public int getIcon() {
return icon;
}
public void setIcon(int icon) {
this.icon = icon;
}
public Class getFragment() {
return fragment;
}
public void setFragment(Class fragment) {
this.fragment = fragment;
}
}4.图片状态选择器 selector_icon_home.xml drawable/ *4
<?xml version="1.0" encoding="utf-8"?>
<selector xmlns:android="http://schemas.android.com/apk/res/android">


    <!-- Non focused states -->
    <item android:state_focused="false" android:state_selected="false" android:state_pressed="false" android:drawable="@mipmap/icon_home" />
    <item android:state_focused="false" android:state_selected="true" android:state_pressed="false" android:drawable="@mipmap/icon_home_press" />
    <!-- Focused states -->
    <item android:state_focused="true" android:state_selected="false" android:state_pressed="false" android:drawable="@mipmap/icon_home_press" />
    <item android:state_focused="true" android:state_selected="true" android:state_pressed="false" android:drawable="@mipmap/icon_home_press" />
    <!-- Pressed -->
    <item android:state_selected="true" android:state_pressed="true" android:drawable="@mipmap/icon_home_press" />
    <item android:state_pressed="true" android:drawable="@mipmap/icon_home_press" />

</selector>
5.文字背景选择器 selector_tab_text.xml 必须写在res/color/文件夹下
<?xml version="1.0" encoding="utf-8"?>
<selector xmlns:android="http://schemas.android.com/apk/res/android">
    <item android:state_selected="true" android:color="#eb4f38" />
    <item android:state_active="true" android:color="#eb4f38"/>
    <item android:state_selected="false" android:color="#a9b7b7" />
    <item android:state_active="false" android:color="#a9b7b7"/>

</selector>
6.MianActivity ----继承了BaseActivity?
public class MainActivity extends AppCompatActivity {


    private LayoutInflater mInflater;

    private FragmentTabHost mTabhost;

    private CartFragment cartFragment;

    private List<Tab> mTabs = new ArrayList<>(5);
    @Override
    protected void onCreate(Bundle savedInstanceState) {
        super.onCreate(savedInstanceState);
        setContentView(R.layout.activity_main);

        initTab();

    }


    private void initTab() {


        Tab tab_home = new Tab(HomeFragment.class,R.string.home,R.drawable.selector_icon_home);
        Tab tab_hot = new Tab(HotFragment.class,R.string.hot,R.drawable.selector_icon_hot);
        Tab tab_category = new Tab(CategoryFragment.class,R.string.catagory,R.drawable.selector_icon_category);
        Tab tab_cart = new Tab(CartFragment.class,R.string.cart,R.drawable.selector_icon_cart);
        Tab tab_mine = new Tab(MineFragment.class,R.string.mine,R.drawable.selector_icon_mine);

        mTabs.add(tab_home);
        mTabs.add(tab_hot);
        mTabs.add(tab_category);
        mTabs.add(tab_cart);
        mTabs.add(tab_mine);


        mInflater = LayoutInflater.from(this);
        mTabhost = (FragmentTabHost) this.findViewById(android.R.id.tabhost);
        mTabhost.setup(this,getSupportFragmentManager(),R.id.realtabcontent);

        for (Tab tab : mTabs){

            TabHost.TabSpec tabSpec = mTabhost.newTabSpec(getString(tab.getTitle()));

            tabSpec.setIndicator(buildIndicator(tab));

            mTabhost.addTab(tabSpec,tab.getFragment(),null);

        }

        mTabhost.setOnTabChangedListener(new TabHost.OnTabChangeListener() {
            @Override
            public void onTabChanged(String tabId) {

                if(tabId==getString(R.string.cart)){

                    refData();
                }

            }
        });

        mTabhost.getTabWidget().setShowDividers(LinearLayout.SHOW_DIVIDER_NONE); //去掉分割线
        mTabhost.setCurrentTab(0);  //默认选择第一个


    }


    private void refData(){

        if(cartFragment == null){

            Fragment fragment =  getSupportFragmentManager().findFragmentByTag(getString(R.string.cart));
            if(fragment !=null){
                cartFragment= (CartFragment) fragment;
                cartFragment.refData();
            }
        }
        else{
            cartFragment.refData();

        }
    }


    private  View buildIndicator(Tab tab){


        View view =mInflater.inflate(R.layout.tab_indicator,null);
        ImageView img = (ImageView) view.findViewById(R.id.icon_tab);
        TextView text = (TextView) view.findViewById(R.id.txt_indicator);

        img.setBackgroundResource(tab.getIcon());
        text.setText(tab.getTitle());

        return  view;
    }


}
7.底部菜单的几种实现方式
1.TabHost+Activity(不用)
2.RadioButton+Fragment(较复杂)
3.FragmentTabHost+Fragment
Tips: 改写后的TabFragment只会首次执行onCreateView
附加:BaseActivity.java
public class BaseActivity extends AppCompatActivity {


    protected static final String TAG = BaseActivity.class.getSimpleName();

    public void startActivity(Intent intent,boolean isNeedLogin){


        if(isNeedLogin){

            User user =CniaoApplication.getInstance().getUser();
            if(user !=null){
                super.startActivity(intent);
            }
            else{

                CniaoApplication.getInstance().putIntent(intent);
                Intent loginIntent = new Intent(this
                        , LoginActivity.class);
                super.startActivity(intent);

            }

        }
        else{
            super.startActivity(intent);
        }

    }
}
2.ToolBar的使用
1.toolbar 是 android 5.0 引入的一个新控件,可以理解为是ActionBar的升级版,大大扩展了Actionbar,使用更灵活,不像actionbar那么固定,Toolbar更像是一般的View元素,可以被放置在view树体系的任意位置,可以应用动画,可以跟着scrollView滚动,可以与布局中的其他view交互
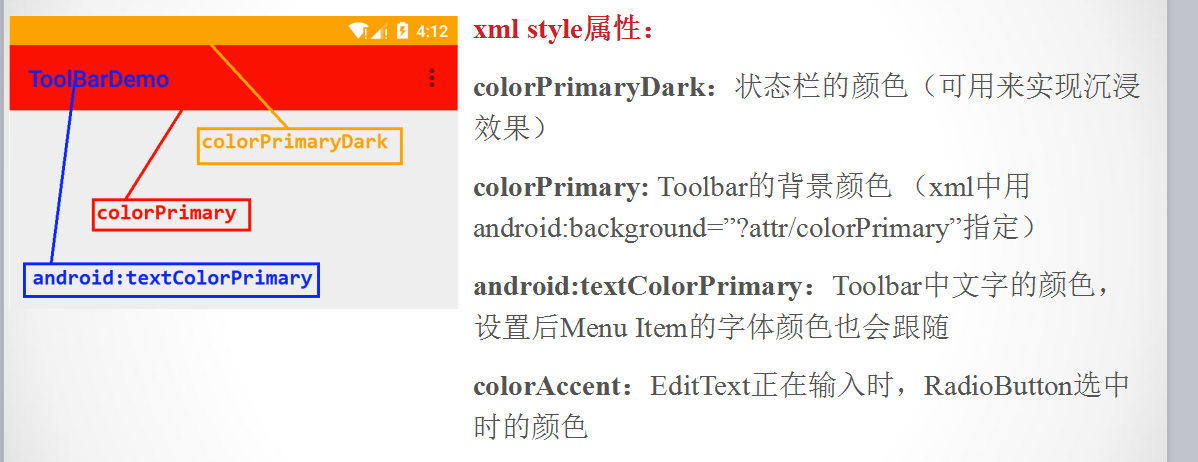
2.重要属性·
3.ToolBar的使用--------------------------------------------------------ToolBarDemo
(1)布局
<RelativeLayout xmlns:android="http://schemas.android.com/apk/res/android"
xmlns:tools="http://schemas.android.com/tools"
xmlns:app="http://schemas.android.com/apk/res-auto"
android:layout_width="match_parent"
android:layout_height="match_parent"
tools:context=".MainActivity"
android:background="#fff">
<android.support.v7.widget.Toolbar
android:id="@+id/toolbar"
android:layout_width="match_parent"
android:layout_height="wrap_content"
android:minHeight="?attr/actionBarSize"
android:background="?attr/colorPrimary"
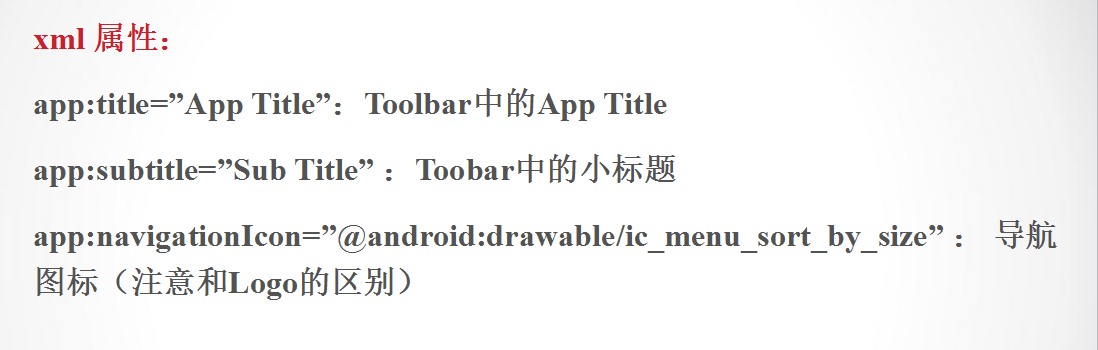
app:title="title"
app:navigationIcon="@drawable/icon_back_32px"
>
</android.support.v7.widget.Toolbar>
</RelativeLayout>(2)style.xml
<resources>

    <!-- Base application theme. -->
    <style name="AppTheme" parent="Theme.AppCompat">
        <!-- Customize your theme here. -->

        <item name="colorPrimary">@color/colorPrimary</item>
		<!-- 状态栏颜色-->
        <item name="colorPrimaryDark">@color/colorPrimaryDark</item>
		<!-- 标题字体颜色-->
        <item name="android:textColorPrimary">@color/white</item>

        <item name="android:windowActionBar">false</item>
        <item name="android:windowNoTitle">true</item>

        <item name="windowActionBar">false</item>
        <item name="windowNoTitle">true</item>


    </style>

</resources>
(3)color.xml
<?xml version="1.0" encoding="utf-8"?>
<resources>

    <item name="colorPrimary" type="color">#FF4020</item>
    <item name="white" type="color">#FFF</item>
    <item name="colorPrimaryDark" type="color">#009688</item>
</resources>
(4)MainActivity
public class MainActivity extends AppCompatActivity {


    private  Toolbar mToolBar;

    @Override
    protected void onCreate(Bundle savedInstanceState) {
        super.onCreate(savedInstanceState);
        setContentView(R.layout.activity_main);


        mToolBar = (Toolbar) this.findViewById(R.id.toolbar);
        //点击ToolBar返回键
        mToolBar.setNavigationOnClickListener(new View.OnClickListener() {
            @Override
            public void onClick(View v) {


                Toast.makeText(MainActivity.this,"Navigation Clicked",Toast.LENGTH_LONG).show();

            }
        });


        //把菜单和ToolBar进行绑定
        mToolBar.inflateMenu(R.menu.menu_main);
        //对menu进行监听
        mToolBar.setOnMenuItemClickListener(new Toolbar.OnMenuItemClickListener() {
            @Override
            public boolean onMenuItemClick(MenuItem item) {
                //获取menu的ID
                int id = item.getItemId();
                if(id == R.id.action_settings){

                    Toast.makeText(MainActivity.this,"action_settings Clicked",Toast.LENGTH_LONG).show();

                    return  true;
                }
                return false;
            }
        });


    }


}
(5)ToolBar 拓展
http://www.codeceo.com/article/android-toolbar-develop.html


 28万+
28万+

 被折叠的 条评论
为什么被折叠?
被折叠的 条评论
为什么被折叠?
 到【灌水乐园】发言


