前言
原创文章欢迎转载,请保留出处。
若有任何疑问建议,欢迎回复。
邮箱:Maxwell_nc@163.com
在Centos6.5下通过使用tcpdump抓包和wireshark分析包,初步了解抓包和解包
安装
首先我们要安装tcpdump,必须的库:
<code class="hljs cmake has-numbering" style="display: block; padding: 0px; color: inherit; box-sizing: border-box; font-family: 'Source Code Pro', monospace;font-size:undefined; white-space: pre; border-top-left-radius: 0px; border-top-right-radius: 0px; border-bottom-right-radius: 0px; border-bottom-left-radius: 0px; word-wrap: normal; background: transparent;">yum <span class="hljs-keyword" style="color: rgb(0, 0, 136); box-sizing: border-box;">install</span> flex
yum <span class="hljs-keyword" style="color: rgb(0, 0, 136); box-sizing: border-box;">install</span> bison
yum <span class="hljs-keyword" style="color: rgb(0, 0, 136); box-sizing: border-box;">install</span> gcc  </code><ul class="pre-numbering" style="box-sizing: border-box; position: absolute; width: 50px; top: 0px; left: 0px; margin: 0px; padding: 6px 0px 40px; border-right-width: 1px; border-right-style: solid; border-right-color: rgb(221, 221, 221); list-style: none; text-align: right; background-color: rgb(238, 238, 238);"><li style="box-sizing: border-box; padding: 0px 5px;">1</li><li style="box-sizing: border-box; padding: 0px 5px;">2</li><li style="box-sizing: border-box; padding: 0px 5px;">3</li></ul>
另外tcpdump是基于libpcap,这个在yum找不到,我们到tcpdump的官网(http://www.tcpdump.org/#latest-release)可以下载libpcap和tcpdump
我这里使用的tcpdump-4.7.3 .tar.gz和libpcap-1.7.2 .tar.gz 。
首先解压libpcap,然后进入目录配置安装
<code class="hljs go has-numbering" style="display: block; padding: 0px; color: inherit; box-sizing: border-box; font-family: 'Source Code Pro', monospace;font-size:undefined; white-space: pre; border-top-left-radius: 0px; border-top-right-radius: 0px; border-bottom-right-radius: 0px; border-bottom-left-radius: 0px; word-wrap: normal; background: transparent;">./configure
<span class="hljs-built_in" style="color: rgb(102, 0, 102); box-sizing: border-box;">make</span>
<span class="hljs-built_in" style="color: rgb(102, 0, 102); box-sizing: border-box;">make</span> install   </code><ul class="pre-numbering" style="box-sizing: border-box; position: absolute; width: 50px; top: 0px; left: 0px; margin: 0px; padding: 6px 0px 40px; border-right-width: 1px; border-right-style: solid; border-right-color: rgb(221, 221, 221); list-style: none; text-align: right; background-color: rgb(238, 238, 238);"><li style="box-sizing: border-box; padding: 0px 5px;">1</li><li style="box-sizing: border-box; padding: 0px 5px;">2</li><li style="box-sizing: border-box; padding: 0px 5px;">3</li></ul>
然后解压tcpdump,然后进入目录配置安装
<code class="hljs go has-numbering" style="display: block; padding: 0px; color: inherit; box-sizing: border-box; font-family: 'Source Code Pro', monospace;font-size:undefined; white-space: pre; border-top-left-radius: 0px; border-top-right-radius: 0px; border-bottom-right-radius: 0px; border-bottom-left-radius: 0px; word-wrap: normal; background: transparent;">./configure
<span class="hljs-built_in" style="color: rgb(102, 0, 102); box-sizing: border-box;">make</span>
<span class="hljs-built_in" style="color: rgb(102, 0, 102); box-sizing: border-box;">make</span> install   </code><ul class="pre-numbering" style="box-sizing: border-box; position: absolute; width: 50px; top: 0px; left: 0px; margin: 0px; padding: 6px 0px 40px; border-right-width: 1px; border-right-style: solid; border-right-color: rgb(221, 221, 221); list-style: none; text-align: right; background-color: rgb(238, 238, 238);"><li style="box-sizing: border-box; padding: 0px 5px;">1</li><li style="box-sizing: border-box; padding: 0px 5px;">2</li><li style="box-sizing: border-box; padding: 0px 5px;">3</li></ul>
一切顺利的话,就可以使用tcpdump进行抓包了。
抓包
tcpdump的过滤规则是使用bpf语法
(参考http://blog.csdn.net/jk110333/article/details/8675547)
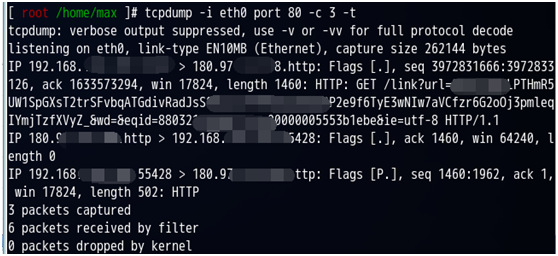
我们简单地抓取可以使用(注意要使用root权限启动tcpdump)
<code class="hljs lasso has-numbering" style="display: block; padding: 0px; color: inherit; box-sizing: border-box; font-family: 'Source Code Pro', monospace;font-size:undefined; white-space: pre; border-top-left-radius: 0px; border-top-right-radius: 0px; border-bottom-right-radius: 0px; border-bottom-left-radius: 0px; word-wrap: normal; background: transparent;">tcpdump <span class="hljs-attribute" style="box-sizing: border-box;">-i</span> eth0 port <span class="hljs-number" style="color: rgb(0, 102, 102); box-sizing: border-box;">80</span> <span class="hljs-attribute" style="box-sizing: border-box;">-c</span> <span class="hljs-number" style="color: rgb(0, 102, 102); box-sizing: border-box;">3</span> <span class="hljs-attribute" style="box-sizing: border-box;">-t</span> </code><ul class="pre-numbering" style="box-sizing: border-box; position: absolute; width: 50px; top: 0px; left: 0px; margin: 0px; padding: 6px 0px 40px; border-right-width: 1px; border-right-style: solid; border-right-color: rgb(221, 221, 221); list-style: none; text-align: right; background-color: rgb(238, 238, 238);"><li style="box-sizing: border-box; padding: 0px 5px;">1</li></ul>
(1) -i eth0 : 只抓经过接口eth0的包
(1) port 80 : 抓取数据包只抓取80端口的
(3) -c 3 : 只抓取3个数据包
(4) -t : 不显示时间戳
不过这样比较麻烦,输出到控制台对于数据包多的时候显得麻烦,我们把他输出到文件,借助wireshark帮我们分析数据包,首先要安装wireshark,直接通过yum安装。
<code class="hljs cmake has-numbering" style="display: block; padding: 0px; color: inherit; box-sizing: border-box; font-family: 'Source Code Pro', monospace;font-size:undefined; white-space: pre; border-top-left-radius: 0px; border-top-right-radius: 0px; border-bottom-right-radius: 0px; border-bottom-left-radius: 0px; word-wrap: normal; background: transparent;">yum <span class="hljs-keyword" style="color: rgb(0, 0, 136); box-sizing: border-box;">install</span> wireshark(核心,可以用命令tshark)
yum <span class="hljs-keyword" style="color: rgb(0, 0, 136); box-sizing: border-box;">install</span> wireshark-gnome(界面,可以用命令wireshark)</code><ul class="pre-numbering" style="box-sizing: border-box; position: absolute; width: 50px; top: 0px; left: 0px; margin: 0px; padding: 6px 0px 40px; border-right-width: 1px; border-right-style: solid; border-right-color: rgb(221, 221, 221); list-style: none; text-align: right; background-color: rgb(238, 238, 238);"><li style="box-sizing: border-box; padding: 0px 5px;">1</li><li style="box-sizing: border-box; padding: 0px 5px;">2</li></ul>
安装后在root权限下通过wireshark命令启动图形界面,
不过在CentOS 6.5中会出现一个错误wireshark: symbol lookup error: wireshark: undefined symbol: gtk_combo_box_text_new_with_entry
这个错误是gtk2的一个bug,我们要更新下gtk2:
<code class="hljs sql has-numbering" style="display: block; padding: 0px; color: inherit; box-sizing: border-box; font-family: 'Source Code Pro', monospace;font-size:undefined; white-space: pre; border-top-left-radius: 0px; border-top-right-radius: 0px; border-bottom-right-radius: 0px; border-bottom-left-radius: 0px; word-wrap: normal; background: transparent;">yum <span class="hljs-operator" style="box-sizing: border-box;"><span class="hljs-keyword" style="color: rgb(0, 0, 136); box-sizing: border-box;">update</span> gtk2</span></code><ul class="pre-numbering" style="box-sizing: border-box; position: absolute; width: 50px; top: 0px; left: 0px; margin: 0px; padding: 6px 0px 40px; border-right-width: 1px; border-right-style: solid; border-right-color: rgb(221, 221, 221); list-style: none; text-align: right; background-color: rgb(238, 238, 238);"><li style="box-sizing: border-box; padding: 0px 5px;">1</li></ul>
之后就可以正常启动wireshark了,我们这里也可以使用wireshark抓包,这里不做演示,我们主要使用wireshark帮我们分析包,所以首先用tcpdump抓包并且保存到文件。可以在tcpdump命令后加-w指定输出的文件,我们
<code class="hljs lasso has-numbering" style="display: block; padding: 0px; color: inherit; box-sizing: border-box; font-family: 'Source Code Pro', monospace;font-size:undefined; white-space: pre; border-top-left-radius: 0px; border-top-right-radius: 0px; border-bottom-right-radius: 0px; border-bottom-left-radius: 0px; word-wrap: normal; background: transparent;">tcpdump <span class="hljs-attribute" style="box-sizing: border-box;">-i</span> eth0 port <span class="hljs-number" style="color: rgb(0, 102, 102); box-sizing: border-box;">80</span> <span class="hljs-attribute" style="box-sizing: border-box;">-c</span> <span class="hljs-number" style="color: rgb(0, 102, 102); box-sizing: border-box;">3</span> <span class="hljs-attribute" style="box-sizing: border-box;">-t</span> <span class="hljs-attribute" style="box-sizing: border-box;">-w</span> /home/<span class="hljs-keyword" style="color: rgb(0, 0, 136); box-sizing: border-box;">max</span>/tcpdump<span class="hljs-built_in" style="color: rgb(102, 0, 102); box-sizing: border-box;">.</span>pcap</code><ul class="pre-numbering" style="box-sizing: border-box; position: absolute; width: 50px; top: 0px; left: 0px; margin: 0px; padding: 6px 0px 40px; border-right-width: 1px; border-right-style: solid; border-right-color: rgb(221, 221, 221); list-style: none; text-align: right; background-color: rgb(238, 238, 238);"><li style="box-sizing: border-box; padding: 0px 5px;">1</li></ul>
抓包后我们打开wireshark(root权限),点击File-Open打开刚才的抓包文件
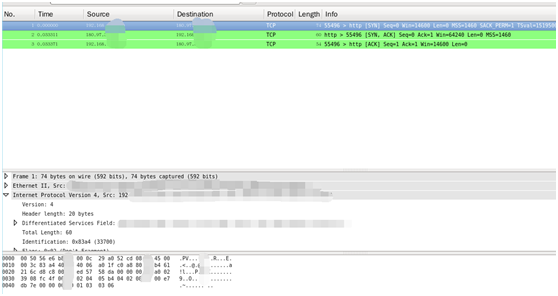
就可以分析包了,这里就不具体分析了。
过几天写一个抓包器,实现抓包并保存起来通过wireshark来分析。


 214
214

 被折叠的 条评论
为什么被折叠?
被折叠的 条评论
为什么被折叠?
 到【灌水乐园】发言


