


mob 官方文档:http://wiki.mob.com/android-短信sdk集成文档/
mob短信验证小知识
1、mob短信验证过程中需要appkey 和appsecret
在mob官网上http://www.mob.com/进行注册,之后进入个人后台,点击短信验证模块,创建自己的app项目。创建完成之后 就会获得这两个关键字。
2、mob智能短信验证,
意思是一个手机号验证成功之后,下一次请求验证码,就会自动验证,手机端这个时候不会收到验证码。mob中,创建项目之后默认的都是智能短信验证。要想一直能收到短信验证码,就需要在后台关闭智能验证。后台中心->短信设置->关闭智能验证。
最简单的GUI mob短信验证(其实这部分参照官网上的配置就好)
这里只做简单记录
环境mob 2.1.1(在官网下载sdk) android studio 2.1.1
1、将sdk中的必要包复制到项目下,如下图:
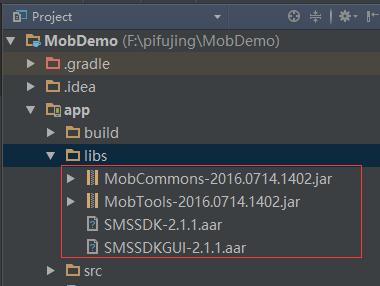
2、在module:app中添加mob环境,将下列代码放如到相关位置就可以了
android{
    ...其他配置
    repositories{
        flatDir{
            dirs 'libs' //就是你放aar的目录地址
        }
    }
}
dependencies {
.....其他配置
    compile name:'SMSSDK-2.1.1',ext:'aar'
    compile name:'SMSSDKGUI-2.1.1',ext:'aar'
}
3、在清单文件中添加权限以及activity界面
<uses-permission android:name="android.permission.READ_CONTACTS" />
    <uses-permission android:name="android.permission.READ_PHONE_STATE" />
    <uses-permission android:name="android.permission.WRITE_EXTERNAL_STORAGE" />
    <uses-permission android:name="android.permission.ACCESS_NETWORK_STATE" />
    <uses-permission android:name="android.permission.ACCESS_WIFI_STATE" />
    <uses-permission android:name="android.permission.INTERNET" />
    <uses-permission android:name="android.permission.RECEIVE_SMS" />
    <uses-permission android:name="android.permission.READ_SMS" />
    <uses-permission android:name="android.permission.GET_TASKS" />
    <uses-permission android:name="android.permission.ACCESS_FINE_LOCATION" />
这个界面是mob官网设置的短信验证界面(在后面的无GUI短信验证中,不用添加这个activity)
<activity
            android:name="com.mob.tools.MobUIShell"
            android:theme="@android:style/Theme.Translucent.NoTitleBar"
            android:configChanges="keyboardHidden|orientation|screenSize"
            android:windowSoftInputMode="stateHidden|adjustResize"/>
4、在代码中的使用
这里相当于是新建一个activity,在这个activity中初始化短信验证和打开mob提供的短信验证界面。直接可以不在oncreate设置setContentView.
//mob的初始化,可放在自己的application下面进行
 SMSSDK.initSDK(this, "您的appkey", "您的appsecret");
 //使用mob提供的短信验证界面
 //打开注册页面
RegisterPage registerPage = new RegisterPage();
registerPage.setRegisterCallback(new EventHandler() {
public void afterEvent(int event, int result, Object data) {
// 解析注册结果
if (result == SMSSDK.RESULT_COMPLETE) {
@SuppressWarnings("unchecked")
        HashMap<String,Object> phoneMap = (HashMap<String, Object>) data;
        String country = (String) phoneMap.get("country");
        String phone = (String) phoneMap.get("phone");

        // 提交用户信息(此方法可以不调用)
        registerUser(country, phone);
        }
    }
});
registerPage.show(context);
5、编译运行就可以了
短信验证 无GUI
配置同上,只是不在需要添加mob自己的验证界面,不用在清单文件中配置com.mob.tools.MobUIShell 这个activity。
1、编写短信验证界面
这是我这里的界面:
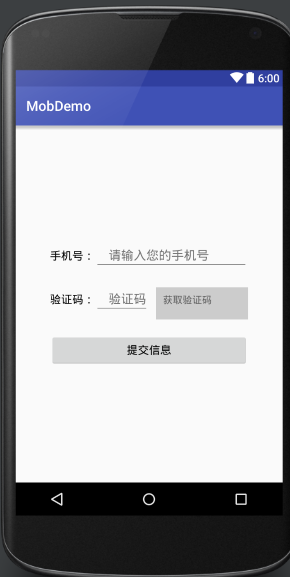
布局文件:
<?xml version="1.0" encoding="utf-8"?>
<LinearLayout xmlns:android="http://schemas.android.com/apk/res/android"
    android:layout_width="match_parent"
    android:layout_height="match_parent"
    android:gravity="center"
    android:orientation="vertical">

    <LinearLayout
        android:layout_width="match_parent"
        android:layout_height="wrap_content"
        android:layout_marginLeft="50dp"
        android:layout_marginRight="50dp"
        android:orientation="vertical">

        <LinearLayout
            android:layout_width="match_parent"
            android:layout_height="wrap_content"
            android:orientation="horizontal">

            <TextView
                android:layout_width="wrap_content"
                android:layout_height="wrap_content"
                android:text="手机号:"
                android:textColor="#000000"
                android:textSize="16sp" />

            <EditText
                android:id="@+id/et_phone"
                android:layout_width="match_parent"
                android:layout_height="wrap_content"
                android:hint="请输入您的手机号"
                android:inputType="phone"
                android:maxLength="11"
                android:paddingLeft="20sp" />
        </LinearLayout>

        <LinearLayout
            android:layout_width="match_parent"
            android:layout_height="wrap_content"
            android:layout_marginTop="20dp"
            android:orientation="horizontal">

            <TextView
                android:layout_width="wrap_content"
                android:layout_height="wrap_content"
                android:text="验证码:"
                android:textColor="#000000"
                android:textSize="16sp" />

            <EditText
                android:id="@+id/et_phone_code"
                android:layout_width="wrap_content"
                android:layout_height="wrap_content"
                android:hint="验证码"
                android:maxWidth="100dp"
                android:maxLength="8"
                android:paddingLeft="20sp" />
            <TextView
                android:id="@+id/tv_get_phone_code"
                android:layout_width="wrap_content"
                android:layout_height="50dp"
                android:padding="10dp"
                android:layout_weight="1"
                android:clickable="true"
                android:focusable="true"
                android:layout_marginLeft="10dp"
                android:focusableInTouchMode="true"
                android:background="#ccc"
                android:text="获取验证码" />
        </LinearLayout>

        <Button
            android:id="@+id/btn_submit_user"
            android:layout_width="match_parent"
            android:layout_height="wrap_content"
            android:layout_marginTop="20dp"
            android:gravity="center"
            android:text="提交信息"
            android:textColor="#000000"
            android:textSize="16sp" />
    </LinearLayout>

</LinearLayout>
2、主要方法介绍
 //初始化短信验证
        SMSSDK.initSDK(this, APPKEY, APPSECRECT);

        //注册短信回调
        //EventHandler 在这个handler中可以查看到短信验证的结果
        SMSSDK.registerEventHandler(new EventHandler() {
            @Override
            public void afterEvent(int event, int result, Object data) {
                switch (event) {
                    case SMSSDK.EVENT_SUBMIT_VERIFICATION_CODE:
                        if (result == SMSSDK.RESULT_COMPLETE) {
                            KLog.e("验证成功");
                        } else {
                            KLog.e("验证失败");
                        }
                        break;
                    case SMSSDK.EVENT_GET_VERIFICATION_CODE:
                        if (result == SMSSDK.RESULT_COMPLETE) {
                            KLog.e("获取验证成功");
                        } else {
                            KLog.e("获取验证失败");
                        }
                        break;
                }
            }
        });

         SMSSDK.getVerificationCode("86", phone);//发送短信验证码到手机号  86表示的是中国
         SMSSDK.submitVerificationCode("86", phone, code);//提交验证码  在eventHandler里面查看验证结果
这里没有其他可以测试的手机号,又不想写上自己的手机号 以下只是错误的号码时 log打印的信息。你可以下载demo 然后修改mob的两个参数,然后输入正确的手机号进行测试。这里 我并没有对手机号进行判断是否有效,测试方法中直接返回的true ,自己看下代码 修改一下就好了。
效果:
mob短信验证 无GUI demo下载地址:


 2587
2587


 被折叠的 条评论
为什么被折叠?
被折叠的 条评论
为什么被折叠?
 到【灌水乐园】发言


