


基本概念
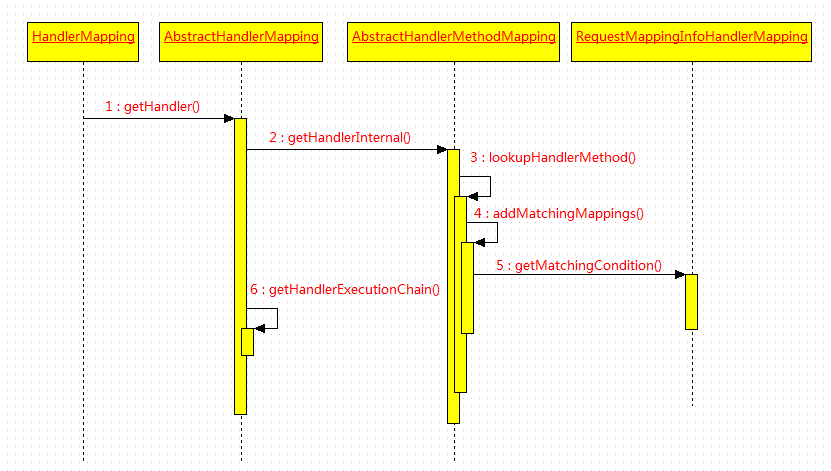
即处理器映射,它的主要作用就是根据 reqeust 获取 HandlerExecutionChain。
下面来看它的源码:
public interface HandlerMapping {
    // 省略部分代码...

    HandlerExecutionChain getHandler(HttpServletRequest request) throws Exception;
}
再来看它的继承关系:
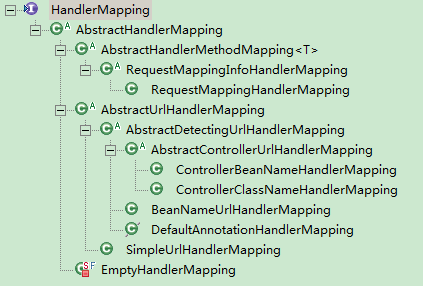
AbstractHandlerMapping
AbstractHandlerMapping 是该接口的抽象实现类,该类实现了 getHandler 方法。
public final HandlerExecutionChain getHandler(HttpServletRequest request) throws Exception {
    // 关键 -> 取得处理器,留给子类
    Object handler = getHandlerInternal(request);

    // 取得默认处理器
    if (handler == null) {
        handler = getDefaultHandler();
    }

    if (handler == null) {
        return null;
    }

    if (handler instanceof String) {
        // 若处理器是 Bean 名称,则从 SpringMVC 容器手动取得该 Bean
        String handlerName = (String) handler;
        handler = getApplicationContext().getBean(handlerName);
    }

    // 关键 -> 取得 HandlerExecutionChain
    HandlerExecutionChain executionChain =
        getHandlerExecutionChain(handler, request);

    // 省略部分代码...

    return executionChain;
}
继续追踪到 getHandlerExecutionChain 方法
protected HandlerExecutionChain getHandlerExecutionChain(Object handler, HttpServletRequest request) {

    // 1.取得 HandlerExecutionChain ,包含了处理器和拦截器,下面会详细分析
    HandlerExecutionChain chain = (handler instanceof HandlerExecutionChain ?
        (HandlerExecutionChain) handler : newHandlerExecutionChain(handler));

    // 2.获取请求路径
    // 若完整请求地址为 http://localhost:8080/Demo/hello,则 lookupPath = /hello
    String lookupPath = this.urlPathHelper.getLookupPathForRequest(request);

    // 3.添加拦截器到 HandlerExecutionChain
    // 遍历 SpringMVC 容器的所有拦截器
    for (HandlerInterceptor interceptor : this.adaptedInterceptors) {

        // 判断拦截器类型,属于 MappedInterceptor,则先匹配路径,否则直接添加
        if (interceptor instanceof MappedInterceptor) {
            MappedInterceptor mappedInterceptor = (MappedInterceptor) interceptor;
            if (mappedInterceptor.matches(lookupPath, this.pathMatcher)) {
                chain.addInterceptor(mappedInterceptor.getInterceptor());
            }
        }else {
            chain.addInterceptor(interceptor);
        }
    }
    return chain;
}
分析代码可知, HandlerMapping 的主要职责是取得 HandlerExecutionChain,具体步骤如下:
- 取得 HandlerExecutionChain 的处理器,由不同子类作实现。
- 取得 HandlerExecutionChain 的拦截器
AbstractHandlerMethodMapping
在介绍该类之前,先来看几个类:
RequestMapingInfo ,该类包含了 @ReuestMaping 的所有注解内容,包括 value,method,param,header,consumes,produces 等属性定义的内容 。
// 注解的所有内容被封装到它的成员变量中

// 包含了注解属性 value 的内容,如 "/hello"
private final PatternsRequestCondition patternsCondition;

// 包含了注解属性 method 的内容,如 GET
private final RequestMethodsRequestCondition methodsCondition;

// 省略部分代码...
MappingRegistry,它是 AbstractHandlerMethodMapping 的内部类。它内有一个 Map,维护着 SpringMVC 中所有的 RequestMapingInfo 与 HandlerMethod 的映射关系。
// T 实际就是 RequestMapingInfo
private final Map<T, HandlerMethod> mappingLookup =
    new LinkedHashMap<T, HandlerMethod>();

// 取得映射
public Map<T, HandlerMethod> getMappings() {
    return this.mappingLookup;
}
Match,它是 AbstractHandlerMethodMapping 的私有内部类,也称匹配者,封装了一个RequestMappingInfo ,以及对应的 HandlerMethod 。
private class Match {

    private final T mapping;

    private final HandlerMethod handlerMethod;

    public Match(T mapping, HandlerMethod handlerMethod) {
        this.mapping = mapping;
        this.handlerMethod = handlerMethod;
    }
}
该类是 AbstractHandlerMapping 类的子类,也是个抽象类。它实现了取得处理器的具体过程,也就是对 getHandlerInternal 作了具体实现。
protected HandlerMethod getHandlerInternal(HttpServletRequest request) throws Exception {

    // 省略部分代码...

    // 1.取得请求路径
    String lookupPath = getUrlPathHelper().getLookupPathForRequest(request);

    // 添加读锁,其他线程只能读不能写
    this.mappingRegistry.acquireReadLock();

    try {
        // 关键 -> 2.取得 HandlerMethod
        HandlerMethod handlerMethod = lookupHandlerMethod(lookupPath, request);

        // 创建控制器并返回
        return (handlerMethod != null ?
            handlerMethod.createWithResolvedBean() : null);

    }finally {
        // 释放读锁
        this.mappingRegistry.releaseReadLock();
    }
}
继续追踪到 lookupHandlerMethod 方法。
protected HandlerMethod lookupHandlerMethod(String lookupPath, HttpServletRequest request) throws Exception {

    List<Match> matches = new ArrayList<Match>();

    // 1.取得 RequestMappingInfo,根据路径进行匹配
    List<T> directPathMatches =
        this.mappingRegistry.getMappingsByUrl(lookupPath);

    if (directPathMatches != null) {
        // 2.构建 Match 并加入集合
        addMatchingMappings(directPathMatches, matches, request);
    }

    if (matches.isEmpty()) {
        addMatchingMappings(this.mappingRegistry.getMappings().keySet(),
            matches, request);
    }

    // 3.选出最佳的 Match
    if (!matches.isEmpty()) {
        // 利用比较器进行排序
        Comparator<Match> comparator =
            new MatchComparator(getMappingComparator(request));

        Collections.sort(matches, comparator);

        // 省略部分代码...

        Match bestMatch = matches.get(0);

        // 存在多个 Match 时,对前两个匹配者再比较,若相同则抛出异常
        if (matches.size() > 1) {
            // 省略部分代码...

            Match secondBestMatch = matches.get(1);
            if (comparator.compare(bestMatch, secondBestMatch) == 0) {
                // 抛出异常...
            }
        }

        // 将 相关信息添加到 reqeust 的属性。
        handleMatch(bestMatch.mapping, lookupPath, request);

        return bestMatch.handlerMethod;
    } else {
        // 处理没有 Match 的情况
        return handleNoMatch(this.mappingRegistry.getMappings().keySet(),
            lookupPath, request);
    }
}
再来看看 addMatchingMappings 的实现过程:
private void addMatchingMappings(Collection<T> mappings, List<Match> matches, HttpServletRequest request) {
    for (T mapping : mappings) {
        // 关键 -> 取得匹配的 RequetMapingInfo,留给子类实现
        T match = getMatchingMapping(mapping, request);

        // 创建 Match 并加入集合
        if (match != null) {
            matches.add(new Match(match,
                this.mappingRegistry.getMappings().get(mapping)));
        }
    }
}
综上所述,该类的主要作用是负责找到相应的处理器,也就是 HandlerMethod。它的具体步骤如下:
1.取得 RequestMappingInfo。根据请求路径进行匹配。
2.构建 Match 并加入集合。过滤 RequestMappingInfo 与 rqeust 请求不符的内容,再从 MappingRegistry 找到对应的 HandlerMethod,最后添加进集合。
3.选出最佳的 Match。利用比较器筛选中最佳的 Match,再返回 Match 中的 HandlerMethod。
RequestMappingHandlerMapping
该类是 AbstractHandlerMethodMapping 的子类。
若控制器采用了注解方法实现,则就会采用 RequestMappingHandlerMapping 来处理。在其内部实现了 getMatchingMapping 方法:
protected RequestMappingInfo getMatchingMapping(RequestMappingInfo info, HttpServletRequest request) {
    // 将 info 的内容 rqeust 的内容进行匹配
    // 假设 @RquestMapping 中 method 为 GET、POST
    // 而 reqeuest 的请求类为 GET
    // 经过匹配,RequestMappingInfo 中关于 method 的内容只剩下 GET
    return info.getMatchingCondition(request);
}
总结
整个 HandlerMapping 的工作流程如下:
根据目的就是通过 reqeust 获取 HandlerExecutionChain 的 HandlerMethod、Interceptor。
而实现的重点又在获取 HandlerMethod 的过程,即根据请求获取 Controller 中处理方法的过程。


 1679
1679


 被折叠的 条评论
为什么被折叠?
被折叠的 条评论
为什么被折叠?
 到【灌水乐园】发言


