


原文地址:Docker实现跨主机通信 (llody.top)
Docker实现跨主机通信
需求说明
1,因为服务是使用docker单机部署的,现在要新增一台机器做节点,要求两台机器中同一个网桥下的容器,内部互通。
实现方案
目前有两种可选方案:
1、使用docker的网桥,自己配置route跳转规则+iptable实现路由互通
2、基于docker swarm自带的集群模式overlay网络模式实现网络互通
开始实验
我决定使用第一种方式进行试验
环境说明
| 主机 | 主机IP地址 | docker0地址 |
|---|---|---|
| test1 | 192.168.3.44 | 10.0.44.1 |
| test2 | 192.168.3.45 | 10.0.45.1 |
安装docker
不管在线安装,离线安装,我前面都有讲,请参考我前面文章
修改docker0默认IP地址
默认情况下IP段都是相同的,为了避免冲突,需要进行自定义修改
test1
vim /etc/docker/daemon.json


{
        "bip":"10.0.44.1/24"

}
Bash
test2
vim /etc/docker/daemon.json


{
        "bip":"10.0.45.1/24"

}
Bash
重启docker
systemctl daemon-reload
systemctl start docker
Bash
检查主机的IP地址变化
# 主机test1
[root@test1 ~]# ifconfig
docker0: flags=4099<UP,BROADCAST,MULTICAST>  mtu 1500
        inet 10.0.44.1  netmask 255.255.255.0  broadcast 10.0.44.255
        ether 02:42:04:1a:6f:58  txqueuelen 0  (Ethernet)
        RX packets 0  bytes 0 (0.0 B)
        RX errors 0  dropped 0  overruns 0  frame 0
        TX packets 0  bytes 0 (0.0 B)
        TX errors 0  dropped 0 overruns 0  carrier 0  collisions 0

ens33: flags=4163<UP,BROADCAST,RUNNING,MULTICAST>  mtu 1500
        inet 192.168.3.44  netmask 255.255.255.0  broadcast 192.168.3.255
        ether 00:0c:29:00:29:83  txqueuelen 1000  (Ethernet)
        RX packets 22840  bytes 31107528 (29.6 MiB)
        RX errors 0  dropped 0  overruns 0  frame 0
        TX packets 2659  bytes 216639 (211.5 KiB)
        TX errors 0  dropped 0 overruns 0  carrier 0  collisions 0

lo: flags=73<UP,LOOPBACK,RUNNING>  mtu 65536
        inet 127.0.0.1  netmask 255.0.0.0
        loop  txqueuelen 1000  (Local Loopback)
        RX packets 42  bytes 3712 (3.6 KiB)
        RX errors 0  dropped 0  overruns 0  frame 0
        TX packets 42  bytes 3712 (3.6 KiB)
        TX errors 0  dropped 0 overruns 0  carrier 0  collisions 0

# 主机test2
[root@test2 ~]# ifconfig
docker0: flags=4099<UP,BROADCAST,MULTICAST>  mtu 1500
        inet 10.0.45.1  netmask 255.255.255.0  broadcast 10.0.45.255
        ether 02:42:2c:be:ce:87  txqueuelen 0  (Ethernet)
        RX packets 0  bytes 0 (0.0 B)
        RX errors 0  dropped 0  overruns 0  frame 0
        TX packets 0  bytes 0 (0.0 B)
        TX errors 0  dropped 0 overruns 0  carrier 0  collisions 0

ens33: flags=4163<UP,BROADCAST,RUNNING,MULTICAST>  mtu 1500
        inet 192.168.3.45  netmask 255.255.255.0  broadcast 192.168.3.255
        ether 00:0c:29:f4:f0:5b  txqueuelen 1000  (Ethernet)
        RX packets 44416  bytes 62440747 (59.5 MiB)
        RX errors 0  dropped 0  overruns 0  frame 0
        TX packets 6214  bytes 520469 (508.2 KiB)
        TX errors 0  dropped 0 overruns 0  carrier 0  collisions 0

lo: flags=73<UP,LOOPBACK,RUNNING>  mtu 65536
        inet 127.0.0.1  netmask 255.0.0.0
        loop  txqueuelen 1000  (Local Loopback)
        RX packets 32  bytes 2592 (2.5 KiB)
        RX errors 0  dropped 0  overruns 0  frame 0
        TX packets 32  bytes 2592 (2.5 KiB)
        TX errors 0  dropped 0 overruns 0  carrier 0  collisions 0
Bash
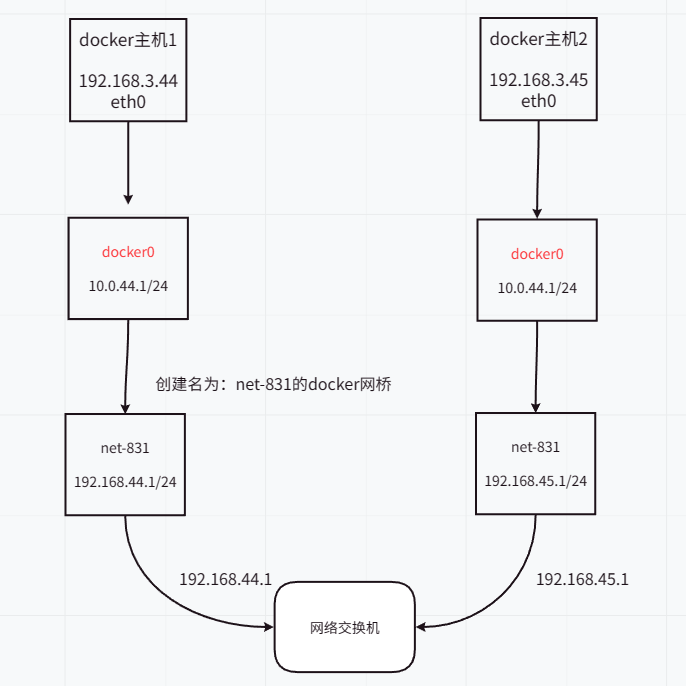
创建网桥(两个主机的网桥IP段不可冲突)
test1
docker network create --driver bridge --subnet 192.168.44.0/24 --gateway=192.168.44.1 net-831Bash
test2
docker network create --driver bridge --subnet 192.168.45.0/24 --gateway=192.168.45.1 net-831Bash
添加路由规则
test1
route add -net 192.168.45.0/24 gw 192.168.3.45Bash
说明:gw表示下一跳地址,这里的地址就是主机test2的IP地址
test2
route add -net 192.168.44.0/24 gw 192.168.3.44Bash
说明:gw表示下一跳地址,这里的地址就是主机test1的IP地址
测试效果
# 主机1网桥ping主机2网桥
[root@test1 ~]# ping 192.168.45.1
PING 192.168.45.1 (192.168.45.1) 56(84) bytes of data.
64 bytes from 192.168.45.1: icmp_seq=1 ttl=64 time=0.690 ms
64 bytes from 192.168.45.1: icmp_seq=2 ttl=64 time=1.08 ms
64 bytes from 192.168.45.1: icmp_seq=3 ttl=64 time=0.813 ms

# 主机2网桥ping主机1网桥
[root@test2 ~]# ping 192.168.44.1
PING 192.168.44.1 (192.168.44.1) 56(84) bytes of data.
64 bytes from 192.168.44.1: icmp_seq=1 ttl=64 time=0.614 ms
64 bytes from 192.168.44.1: icmp_seq=2 ttl=64 time=0.848 ms
64 bytes from 192.168.44.1: icmp_seq=3 ttl=64 time=0.861 ms
Bash
很多人做到这里以为就已经成功了,其实不然,只是网桥互通了,网桥下其他容器其实还是不通的,因为你每创建一个容器就会创建一个以veth开头的网卡。
路由持久化
test1
vi /etc/rc.local
route add -net 192.168.45.0/24 gw 192.168.3.45
Bash
test2
vi /etc/rc.local
route add -net 192.168.44.0/24 gw 192.168.3.44
Bash
什么是veth?
Linux container 中用到一个叫做veth的东西,这是一种新的设备,专门为 container 所建。veth 从名字上来看是 Virtual ETHernet 的缩写,它的作用很简单,就是要把从一个 network namespace 发出的数据包转发到另一个 namespace。veth 设备是成对的,一个是 container 之中,另一个在 container 之外,即在真实机器上能看到的。 VETH设备总是成对出现,一端请求发送的数据总是从另一端以请求接受的形式出现。创建并配置正确后,向其一端输入数据,VETH会改变数据的方向并将其送入内核网络子系统,完成数据的注入,而在另一端则能读到此数据。(Namespace,其中往veth设备上任意一端上RX到的数据,都会在另一端上以TX的方式发送出去)veth工作在L2数据链路层,veth-pair设备在转发数据包过程中并不串改数据包内容。
成数据的注入,而在另一端则能读到此数据。(Namespace,其中往veth设备上任意一端上RX到的数据,都会在另一端上以TX的方式发送出去)veth工作在L2数据链路层,veth-pair设备在转发数据包过程中并不串改数据包内容。 显然,仅有veth-pair设备,容器是无法访问网络的。因为容器发出的数据包,实质上直接进入了veth1设备的协议栈里。如果容器需要访问网络,需要使用bridge等技术,将veth1接收到的数据包通过某种方式转发出去 。
因此,如果要多台主机之间的docker通信,需要使用NAT转换。那么接下来,就是设置iptables规则了!
配置iptables规则
test1增加一条规则
iptables -t nat -A POSTROUTING -s 192.168.44.0/24 -d 192.168.45.0/24 -j MASQUERADEBash
test2增加一条规则
iptables -t nat -A POSTROUTING -s 192.168.45.0/24 -d 192.168.44.0/24 -j MASQUERADEBash
测试结果
# 测试主机1
[root@test1 ~]# docker run -it --rm --network net-831  centos:7 /bin/bash
[root@374b1c9e9ae0 /]# ping 192.168.45.2
PING 192.168.45.2 (192.168.45.2) 56(84) bytes of data.
64 bytes from 192.168.45.2: icmp_seq=1 ttl=64 time=0.123 ms
64 bytes from 192.168.45.2: icmp_seq=2 ttl=64 time=0.132 ms
64 bytes from 192.168.45.2: icmp_seq=3 ttl=64 time=0.125 ms
64 bytes from 192.168.45.2: icmp_seq=4 ttl=64 time=0.170 ms
64 bytes from 192.168.45.2: icmp_seq=5 ttl=64 time=0.176 ms
64 bytes from 192.168.45.2: icmp_seq=6 ttl=64 time=0.160 ms
64 bytes from 192.168.45.2: icmp_seq=7 ttl=64 time=0.151 ms
64 bytes from 192.168.45.2: icmp_seq=8 ttl=64 time=0.160 ms
64 bytes from 192.168.45.2: icmp_seq=9 ttl=64 time=0.163 ms

# 测试主机2
[root@test2 ~]# docker run -it --rm --network net-831  centos:7 /bin/bash
[root@2919a7a3734c /]# ping 192.168.44.2
PING 192.168.44.2 (192.168.44.2) 56(84) bytes of data.
64 bytes from 192.168.44.2: icmp_seq=1 ttl=64 time=0.135 ms
64 bytes from 192.168.44.2: icmp_seq=2 ttl=64 time=0.171 ms
64 bytes from 192.168.44.2: icmp_seq=3 ttl=64 time=0.119 ms
64 bytes from 192.168.44.2: icmp_seq=4 ttl=64 time=0.175 ms
64 bytes from 192.168.44.2: icmp_seq=5 ttl=64 time=0.158 ms
64 bytes from 192.168.44.2: icmp_seq=6 ttl=64 time=0.170 ms
64 bytes from 192.168.44.2: icmp_seq=7 ttl=64 time=0.164 ms
Bash
持久化iptables规则
iptables-save > iptables-rules   # 将现有规则写入文件中

# 创建iptables-rules.sh脚本

#!/bin/bash
iptables-restore < /root/iptables-rules

# 给脚本授权
chmod +x /root/iptables-rules.sh

# 编辑 /etc/rc.local 文件
vi /etc/rc.local

# 最后一行添加如下脚本地址
/root/iptables-rules.sh
Bash
如果发现重启后设置的规则没有生效,可以试试给rc.local授权可执行权限。
chmod +x /etc/rc.local
知识补充
因为涉及到route和iptables的操作,需要具备一些这两个命令的基本增删查操作
route
ip route show    # 查看当前的所有路由条目
route add -net 192.168.44.0/24 gw 192.168.3.45  # 添加到指定网络的路由
route del -net 192.168.44.0/24  # 删除到指定网络的路由
route del default gw 192.168.3.45 # 删除多余的网关
Bash
当然,你怕操作错误,在没有配置持久化的情况下,可以选择重启docker或者服务器以清除手动添加的规则
iptables
iptables -t nat -nL --line  # 首先查看当前iptables的nat表内的规则
iptables -t nat -D PREROUTING 1  # 删除条目需要确认两个参数,PREROUTING类型与1第一条规则
iptables -t nat -I PREROUTING -s 192.168.45.0/24 -d 192.168.44.0/24 -j DNAT --to 192.168.45.1   # 插入一


 1615
1615


 被折叠的 条评论
为什么被折叠?
被折叠的 条评论
为什么被折叠?
 到【灌水乐园】发言


