


2,联系人加载
联系人加载主要是Dialer中的联系人加载,界面如下,

界面对应的Fragment为AllContactsFragment,在ListsFragment的内部类ViewPagerAdapter的getItem方法部分代码如下,
case TAB_INDEX_ALL_CONTACTS:
    mAllContactsFragment = new AllContactsFragment();
    return mAllContactsFragment;
在论述联系人之前,先论述一下LoaderManager原理。LoaderManager原理参考
2.2联系人加载
AllContactsFragment的架构图如下,

1,初始化
ContactEntryListFragment的onCreate方法主要逻辑如下,
1,调用createListAdapter方法创建Adapter 对象,
mAdapter = createListAdapter();ContactEntryListFragment的createListAdapter方法是一个抽象方法,因此需要子类实现,
protected abstract T createListAdapter();AllContactsFragment的createListAdapter方法如下,
final DefaultContactListAdapter adapter = new DefaultContactListAdapter(getActivity()) {
  @Override
  protected void bindView(View itemView, int partition, Cursor cursor, int position) {
      super.bindView(itemView, partition, cursor, position);
      itemView.setTag(this.getContactUri(partition, cursor));
      }
  };
adapter.setDisplayPhotos(true);
adapter.setFilter(ContactListFilter.createFilterWithType(
                ContactListFilter.FILTER_TYPE_DEFAULT));
adapter.setSectionHeaderDisplayEnabled(isSectionHeaderDisplayEnabled());
return adapter;
构造了一个匿名DefaultContactListAdapter对象,并覆盖了DefaultContactListAdapter的bindView方法。
当然,最后在onCreateView方法中将该Adapter设置为listview的Adapter,
mListView.setAdapter(mAdapter);2,注册IntentFilter,监听SIM卡状态的变化,监听飞行模式状态,
IntentFilter filter = new IntentFilter();
filter.addAction(Intent.ACTION_AIRPLANE_MODE_CHANGED);
filter.addAction(TelephonyIntents.ACTION_SIM_STATE_CHANGED);
ContactEntryListFragment的onStart方法中会调用startLoading方法开始读取联系人,
startLoading();startLoading 方法最终会调用LoaderManager的initLoader方法开始查询。
设置查询语句,DefaultContactListAdapter的configureLoader方法后面会论述。
2,界面加载
LoaderManager查询完成之后, AllContactsFragment的onLoadFinished方法调用流程图如下,

AllContactsFragment的onLoadFinished方法逻辑如下,
1,首先调用父类的ContactEntryListFragment的onLoadFinished方法进行处理,
super.onLoadFinished(loader, data);2,如果联系人为空,则显示mEmptyListView。
if (data == null || data.getCount() == 0) {
   mEmptyListView.setVisibility(View.VISIBLE);
}
ContactEntryListFragment的onLoadFinished方法逻辑如下,
onPartitionLoaded(loaderId, data); //处理查询的Cursor
if (isSearchMode()) { //如果是搜索联系人
  •••
} else {
  mDirectoryListStatus = STATUS_NOT_LOADED;
  getLoaderManager().destroyLoader(DIRECTORY_LOADER_ID);
   //调用LoaderManager的destroyLoader方法终止
}
onPartitionLoaded方法如下,
mAdapter.changeCursor(partitionIndex, data);会调用DefaultContactListAdapter的changeCursor方法.虽然父类ContactListAdapter实现了changeCursor方法,还是直接看CompositeCursorAdapter的changeCursor方法,逻辑如下,
notifyDataSetChanged();会调用notifyDataSetChanged方法, notifyDataSetChanged原理在此就不论述了,会调用list Adapter的getView方法重新加载信息并绘制界面。
CompositeCursorAdapter的getView方法调用流程图如下,
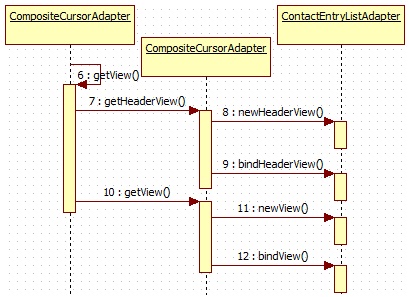
CompositeCursorAdapter的getView方法逻辑如下,
1,如果是view类型时头,就调用getHeaderView方法获取view,
if (offset == -1) {
     view = getHeaderView(i, mPartitions.get(i).cursor, convertView, parent);
}
getHeaderView方法如下,
View view = convertView != null? convertView
   : newHeaderView(mContext, partition, cursor, parent);
bindHeaderView(view, partition, cursor);
return view;
调用ContactEntryListAdapter的newHeaderView和bindHeaderView方法完成。
2,调用getView方法显示联系人信息,
view = getView(i, mPartitions.get(i).cursor, offset, convertView, parent);getView 逻辑很简单,如果存在就直接获取,否则调用newView方法获取,最后调用bindView方法,
View view;
if (convertView != null) {
     view = convertView;
} else {
     view = newView(mContext, partition, cursor, position, parent);
}
bindView(view, partition, cursor, position);
return view;
ContactEntryListAdapter是肯定需要实现newView和bindView方法的。
一般ContactEntryListAdapter的子类方法会调用ContactEntryListAdapter的newView和bindView方法。
newView 主要是构造view对象, ContactListAdapter的newView方法如下,
ContactListItemView view = super.newView(context, partition, cursor, position, parent);
view.setUnknownNameText(mUnknownNameText);
view.setQuickContactEnabled(isQuickContactEnabled());
view.setAdjustSelectionBoundsEnabled(isAdjustSelectionBoundsEnabled());
view.setActivatedStateSupported(isSelectionVisible());
if (mPhotoPosition != null) {
   view.setPhotoPosition(mPhotoPosition);
}
return view;
首先调用父类ContactEntryListAdapter的newView方法构造ContactListItemView对象,如下,
final ContactListItemView view = new ContactListItemView(context, null);
view.setIsSectionHeaderEnabled(isSectionHeaderDisplayEnabled());
view.setAdjustSelectionBoundsEnabled(isAdjustSelectionBoundsEnabled());
return view;
ContactListItemView继承于ViewGroup,因此,本质上还是一个view。
DefaultContactListAdapter的bindView方法主要逻辑如下,
1,调用父类的bindView方法,
super.bindView(itemView, partition, cursor, position);
final ContactListItemView view = (ContactListItemView)itemView; //强制类型转换
2,是否高亮显示(只有在查询状态才会高亮显示)
view.setHighlightedPrefix(isSearchMode() ? getUpperCaseQueryString() : null);3,首字符显示,
bindSectionHeaderAndDivider(view, position, cursor);4,显示联系人图标
if (isQuickContactEnabled()) {
   bindQuickContact(view, partition, cursor, ContactQuery.CONTACT_PHOTO_ID,
      ContactQuery.CONTACT_PHOTO_URI, ContactQuery.CONTACT_ID,
      ContactQuery.CONTACT_LOOKUP_KEY, ContactQuery.CONTACT_DISPLAY_NAME,
ContactQuery.CONTACT_ACCOUNT_TYPE, ContactQuery.CONTACT_ACCOUNT_NAME);
} else {
    if (getDisplayPhotos()) {
        bindPhoto(view, partition, cursor);
    }
}
PhoneNumberListAdapter里面的bindView函数调用的是bindQuickContact(QuickContactBadge),DefaultContactListAdapter调用了bindPhoto(ImageView函数,但是其他流程一模一样。在各自对应的Fragement里面调用setQuickContactEnabled来设置。在这里仅描述DefaultContactListAdapter的流程。
5,显示联系人的其他信息,
bindNameAndViewId(view, cursor); // 显示姓名
bindPresenceAndStatusMessage(view, cursor);// 显示联系人后面的拨号图标
if (isSearchMode()) {
   bindSearchSnippet(view, cursor);// 处于查询状态时,显示号码或者其他
} else {
   view.setSnippet(null);//处于没有查询的状态,不显示号码或者其他
}
bindPresenceAndStatusMessage,只有contact才显示联系人后面的图标。


 2187
2187

 被折叠的 条评论
为什么被折叠?
被折叠的 条评论
为什么被折叠?
 到【灌水乐园】发言


