


这段时间睡眠一直不好,不知道是年龄阶段还是太疲惫了。今天带给大家的是案例的第二篇(扇形菜单),先来啾啾它的容貌
手指不断的点击,动画来回收缩:

对上面这个效果,大家一点不会陌生。下面一起来看看它的具体实现。
一、SectorLayout(扇形菜单)
我们首先来分析分析效果图,展开时的动画:
缩放 0 到 1
透明度 0 到 1
旋转 0° 到 360°
半径不断增长,某角度的平移
收起菜单的动画跟展开的动画恰恰相反。
先来看看平移的动画,看看下面的分析图:
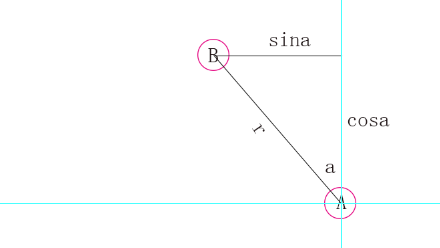
我们这里利用三角函数的知识,很容易得到 B 点的坐标,那么 a 的角度为 90° / (childCount - 1) ,唯一变化的是 r 的值,那么它的区间取值为 [0,getHeight() - getChildAt(0).getWidth()]。
缩放,旋转,透明度的动画处理比较简单,这里就不再细讲。文章的结尾处我会附上源码下载地址。
1、onMeasure()
ViewGroup 的绘制流程 onMeasure()->onLayout()->onDraw()。由于我们不会对视图做任何绘制,所以 onDraw方法这里就不做讨论。先来理理 onMeasure 测量规格(计算尺寸)的方法,ViewGroup测量规格包含了【测量自身】与【测量子视图】。
【测量自身】:
        int widthSpecMode = MeasureSpec.getMode(widthMeasureSpec);
        int heightSpecMode = MeasureSpec.getMode(heightMeasureSpec);

        int widthSpecSize = MeasureSpec.getSize(widthMeasureSpec);
        int heightSpecSize = MeasureSpec.getSize(heightMeasureSpec);

        //处理 wrap_content问题
        int defaultDimension = dip2px(200);

        if (widthSpecMode == MeasureSpec.AT_MOST && heightSpecMode == MeasureSpec.AT_MOST) {
            setMeasuredDimension(defaultDimension, defaultDimension);
        } else if (widthSpecMode == MeasureSpec.AT_MOST) {
            setMeasuredDimension(defaultDimension, heightSpecSize);
        } else if (heightSpecMode == MeasureSpec.AT_MOST) {
            setMeasuredDimension(widthSpecSize, defaultDimension);
        }
如果不处理 MeasureSpec.AT_MOST模式下的情况,默认占据剩余空间的大小,那么当你设置属性 wrap_content 的效果跟 match_parent 的效果是一样的。如果包含wrap_content我们让它占据 200dp 的一个大小,当然这个值可以根据你的需求而定。动态设置也是可以的。
注意了,本篇是没有处理 padding 属性的,如果你感兴趣可以尝试下。
【测量子视图】:
    private void measureChildViews() {
        final int childCount = getChildCount();
        final int childMode = MeasureSpec.EXACTLY;
        final int childSize = Math.min(getMeasuredWidth(), getMeasuredHeight()) / 6;
        for (int i = 0; i < childCount; i++) {
            View childView = getChildAt(i);
            if (childView.getVisibility() == GONE) {
                continue;
            }
            int measureSpec = -1;
            measureSpec = MeasureSpec.makeMeasureSpec(childSize, childMode);
            childView.measure(measureSpec, measureSpec);
        }
    }
子视图的测量模式为 MeasureSpec.EXACTLY 确定模式,如果你在布局文件 xml 中新增子视图,那么你可能需要改写这里的测量模式;子视图的测量大小为 【宽高的最小值 / 常数】,这里的常数你可以根据你的需求修改。测量模式与测量大小决定测试规格
MeasureSpec.makeMeasureSpec(childSize, childMode);
childView.measure(measureSpec, measureSpec);
完成子视图的一个测量。
onLayout()
ViewGroup 的 onLayout同样也是包含两个部分 【计算自身位置】 与 【计算子视图位置】。【计算自身位置】是根据你当前的布局文件而定,所以这里也不对其进行处理。主要分析【计算子视图位置】的方法如下:
childView.layout(int l, int t, int r, int b)你可以这样来理解 4 个参数的含义:左上角与右下角对角线两点的坐标。

根据分析图就可以很容易的得到 childView.layout 的各个参数:
   childView.layout(
           //w-r*sina-(A,B小球的半径之和)
           width - (int) (mRadius * Math.sin(Math.toRadians(angle * i))) - childSize,
           height - (int) (mRadius * Math.cos(Math.toRadians(angle * i))) - childSize,
           width - (int) (mRadius * Math.sin(Math.toRadians(angle * i))),
           height - (int) (mRadius * Math.cos(Math.toRadians(angle * i))));
处理旋转,缩放已经透明度:
    childView.setAlpha(mAlpha);
    childView.setScaleX(mScale);
    childView.setScaleY(mScale);
    childView.setRotation(mRotation);
讲到这里绘制流程差不多就完了,接着来看看动画的设计。
动画设计
相信大家已经看出来了,这里使用的是属性动画 property animation,上文已经分析了主要是【展开动画】,【收起动画】。
它们都比较简单:
【展开动画】:
    private ValueAnimator initAnimator(final boolean openAnimatorEnable) {
        ValueAnimator animator = null;
        if (getChildAt(0) == null) {
            return animator;
        }

        animator = ValueAnimator.ofFloat(0f, 1.0f);
        animator.setInterpolator(new BounceInterpolator());
        animator.setDuration(2000);
        animator.addUpdateListener(new MyAnimatorUpdateListener(this) {
            @Override
            public void onAnimationUpdate(ValueAnimator valueAnimator) {
                mRadius = (int) ((float) valueAnimator.getAnimatedValue() * (getHeight() - getChildAt(0).getWidth()));
                mAlpha = (float) valueAnimator.getAnimatedValue();
                mScale = (float) valueAnimator.getAnimatedValue();
                mRotation = (float) valueAnimator.getAnimatedValue() * ANGLE_360;
                requestLayout();
            }
        });
        return animator;
    }
当我这里处理动画,连续点击菜单的展开和收起比较突兀,比较不理想。我想实现的效果是:当动画正在展开并有没有达到最高点,我再次点击,动画会以当前点收起动画;当动画正在收起并没有达到最低点,我再次点击,动画会以当前点展开动画。做到一个连贯的效果,我是这样处理的:
    if (openAnimatorEnable) {
        mStartValue = 0f;
        mEndValue = (float) valueAnimator.getAnimatedValue();
    } else {
        mEndValue = 1.0f;
        mStartValue = (float) valueAnimator.getAnimatedValue();
    }
来保存它的一个当前值。最后来刷新从绘 requestLayout();。
为了能够更好的扩展,我这里加入了适配的方式来新增子视图。
    private void buildItems() {
        for (int i = 0; i < mAdapter.getCount(); i++) {
            final View itemView = mAdapter.getView(i, null, this);
            addView(itemView);
        }
    }
二、使用方式
这里只需要注意一点:
    @Override
    public View getView(final int position, View convertView, final ViewGroup parent) {
        holder holder = null;
        if (convertView == null) {
            holder = new holder();
            convertView = View.inflate(MainActivity.this, R.layout.activity_item, null);
            holder.mImage = (ImageView) convertView.findViewById(R.id.iv);
            convertView.setTag(holder);
        } else {
            holder = (holder) convertView.getTag();
        }
        holder.mImage.setBackgroundResource(mImages[position]);
        if (position != (getCount() - 1)) {
            holder.mImage.setOnClickListener(new View.OnClickListener() {
                @Override
                public void onClick(View view) {
                    Toast.makeText(MainActivity.this, "" + position, Toast.LENGTH_SHORT).show();
                }
            });
        }
        return convertView;
    }
if (position != (getCount() - 1)) 不要处理最后一个子视图的点击事件。因为最后一个子视图固定在了右下角且点击事件已经在SectorLayout中处理了。如果不加这句,你会发现点击并没有效果展示。
最后说一点,属性动画在监听回调的方法当中可能持有外部类的一个引用,说白了就是持有 activity 的引用,导致activity不能被回收,造成内存泄漏。处理的方式是采用匿名的内部类结合弱引用处理。


 4844
4844

 被折叠的 条评论
为什么被折叠?
被折叠的 条评论
为什么被折叠?
 到【灌水乐园】发言


