


CSS 背景
CSS 背景属性用于定义HTML元素的背景。
CSS 属性定义背景效果:
- background-color 颜色
- background-image 图片
- background-repeat 重复
- background-attachment 滚动
- background-position 位置
补充一下:
background-attachment :定义背景图片随滚动轴的滚动方式
取值: scroll | fixed | inherit
scroll: 随着页面的滚动轴背景图片将移动
fixed: 随着页面的滚动轴背景图片不会移动
inherit: 继承初始值: scroll
背景颜色
background-color 属性定义了元素的背景颜色。
页面的背景颜色使用在body的选择器中
实例
CSS中,颜色值通常以以下方式定义:
- 十六进制 - 如:"#ff0000" 或者 "#f00"
- RGB - 如:"rgb(255,0,0)"
- 颜色名称 - 如:"red"
以下实例中, h1, p, 和 div 元素拥有不同的背景颜色:
实例
p {background-color:#e0ffff;}
div {background-color:#b0c4de;}
提示:你可以为所有元素设置背景色,包括 body 一直到 em 和 a 等行内元素。
提示:background-color 不能继承,其默认值是透明色 transparent。
如果一个元素没有指定背景色,那么背景就是透明的,这样其父元素的背景才可见。
背景图像
background-image 属性描述了元素的背景图像.
默认情况下,背景图像进行平铺重复显示,以覆盖整个元素实体.
页面背景图片设置实例:
实例
效果如下:
背景图像 - 水平或垂直平铺
如果需要在HTML页面上对背景图像进行平铺,可以使用 background-repeat 属性。
默认情况下 background-image 属性 就会在页面的 水平或垂直 方向平铺。
如果只在水平方向平铺,效果如下:
如果只在垂直方向平铺,效果如下:
注意:
一些图像如果在水平方向与垂直方向平铺,这样看起来很不协调,
而有些图像,如果只是在水平方向平铺 (repeat-x), 页面背景会更好些:
实例
{
background-image:url('sakura.png');
background-repeat:repeat-x;
}
背景图像- 设置定位与不平铺
 让背景图像禁止默认的平铺, 不影响文本的排版
如果你不想让图像平铺,你可以使用 background-repeat 属性,
如果背景图像与文本是显示在同一个位置,会让页面排版显得更加合理,
因此,我们可以改变图像的位置,可以利用 background-position 属性改变图像在背景中的位置:
实例
{
background-image:url('sakura.png');
background-repeat: no-repeat ;
background-position: right top ;
}
提示:
为属性 background-position 提供一个值, 有太多滴方法啦~~
首先呢,可以使用一些关键字:top、bottom、left、right 和 center;
其次哈,可以使用长度值,如 100px 或 5cm;
最后呀, 还可以使用百分数值喔。
不同类型的值对于背景图像的放置 当然是不相同的啦。
位置关键字
图像的放置位置的关键字最容易理解的作用就像其名字的意义。
例如,top left 使图像放置在元素 内边距区 的 左上角 。
只要保证不超过两个关键字:一个对应水平方向,另一个对应垂直方向,
那么你可以设置位置关键字以任意顺序出现。
如果只有一个关键字,则会默认另一个关键字为 center。
所以,如果希望每个段落的中部上方出现一个图像,只需声明如下:
因为只有一个关键字top,所以另一个关键字默认就是center啦~
{
background-image:url('sakura.png');
background-position:top;
}
下面是等价的位置关键字:
| 单一关键字 | 等价的两个关键字 |
|---|---|
| center | center center |
| top | top center 或 center top |
| bottom | bottom center 或 center bottom |
| right | right center 或 center right |
| left | left center 或 center left |
百分数值
百分数值的表现方式更为复杂。
假设你希望用百分数值将图像在其元素中居中,
你可以按照下面的代码进行设置:
background-image:url('sakura.png');
background-repeat:no-repeat;
background-position:50% 50%;
}
这样就可以将图像放置在适当位置了啦,
图片中心与其所在的元素的中心对齐。
因此,如果你想把一个图像放在水平方向 2/3、垂直方向 1/3 处的话,
可以这样声明:
{
background-image:url('sakura.png');
background-repeat:no-repeat;
background-position:66% 33%;
}
具体的偏移长度值
具体的偏移长度值的解释的是:
小小图片的原点(即左上角)在其所在的大大元素内的偏移量.
大大的元素内边距区 左上角的偏移量,偏移后的点是 小小图像的左上角。
一图胜千言,先看下示例代码如下:
<style type="text/css">
		body {
			background-image: url('jennifer.png');
			background-repeat: no-repeat;
			background-position: 0px 0px;
		}
</style>其效果如下:
然后,下面这个是对比组,position设置值为 0px 40px,
那么小小图像的左上角将在大大元素内边距区 左上角 向右 0 像素、向下 40 像素的位置处,
代码如下:
{
background-image:url('sakura.png');
background-repeat:no-repeat;
background-position:0px 40px;
}
效果如图所示:
注意:
这一点与百分数值不同,因为偏移只是从一个左上角到另一个左上角。
也就是说,图像的左上角与 background-position 声明中的指定的点对齐。
背景- 简写属性
在以上实例中我们可以看到页面的背景颜色通过了很多的属性来控制。
为了简化这些属性的代码,我们可以将这些属性合并在同一个属性中.
背景颜色的简写属性为 "background" (不推荐!):
实例
当使用简写属性时,属性值的顺序为::
- background-color 颜色
- background-image 图片
- background-repeat 重复
- background-attachment 滚动
- background-position 位置
以上属性无需全部使用,你可以按照页面的实际需要使用.
CSS 背景属性
| Property | 描述 |
|---|---|
| background | 简写属性,作用是将背景属性设置在一个声明中。(不推荐使用!) |
| background-attachment | 背景图像是否固定或者随着页面的其余部分滚动。 |
| background-color | 设置元素的背景颜色。 |
| background-image | 把图像设置为背景。 |
| background-position | 设置背景图像的起始位置。(即图片左上角的位置) |
| background-repeat | 设置背景图像是否及如何重复。 |
CSS Text文本格式
通过CSS的Text属性,你可以改变页面中文本的:
颜色color、字符间距letter-spacing、单词间距word-spacing、
对齐文本text-align、装饰文本text-decoration、对文本进行首行缩进text-indent等等,
你可以观察下述的一段简单的应用了CSS文本格式的段落。
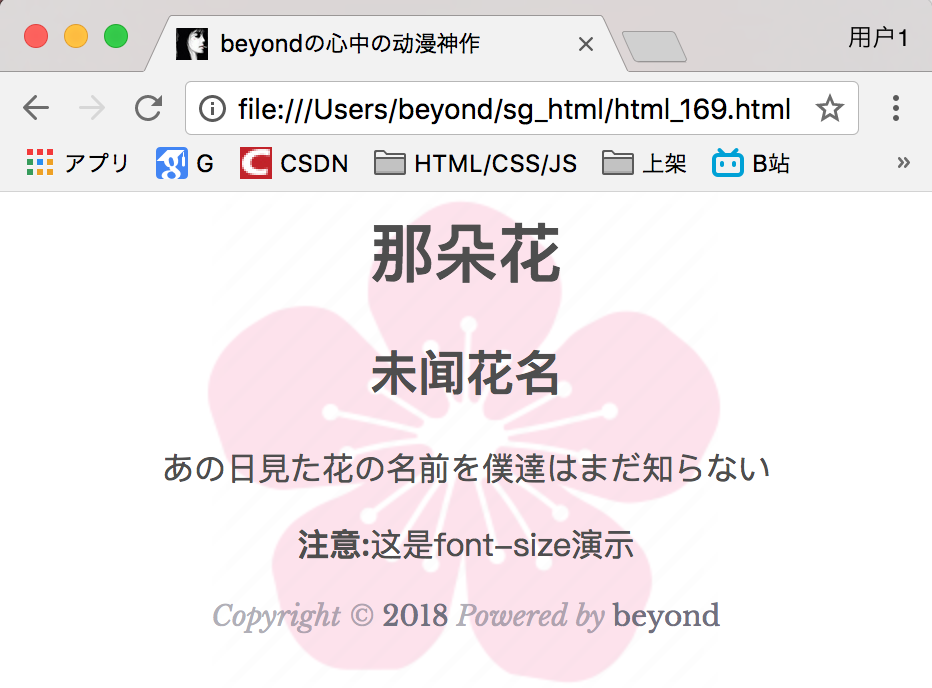
未闻花名
This text is styled with some of the text formatting properties. The heading uses the text-align, text-transform, and color properties. The paragraph is indented, aligned, and the space between characters is specified. The underline is removed from the "未闻花名" link.
Text Color
颜色属性被用来设置文字的颜色。
颜色是通过CSS最经常的指定:
十六进制值 - 如"#FF0000" 或 "#F00"
一个RGB值 - "RGB(255,0,0)"
颜色的名称 - 如"red"
一个网页的背景颜色是指在body内进行设置的:
实例
h1 {color:#00ff00;}
h2 {color:rgb(255,0,0);}
对于W3C 最标准的CSS:如果你定义了颜色属性,你还必须定义背景色属性。
所有定义了颜色属性,却不定义背景色属性的都是耍流氓
文本的对齐方式 text-align
文本排列属性是用来设置文本的水平对齐方式。
文本可 居中 或 左对齐 或 右对齐 或 两端对齐.
当text-align设置为"justify",每一行被展开为宽度相等,左|右外边距对齐(如杂志和报纸)。
实例
p.date {text-align:right;}
p.main {text-align:justify;}
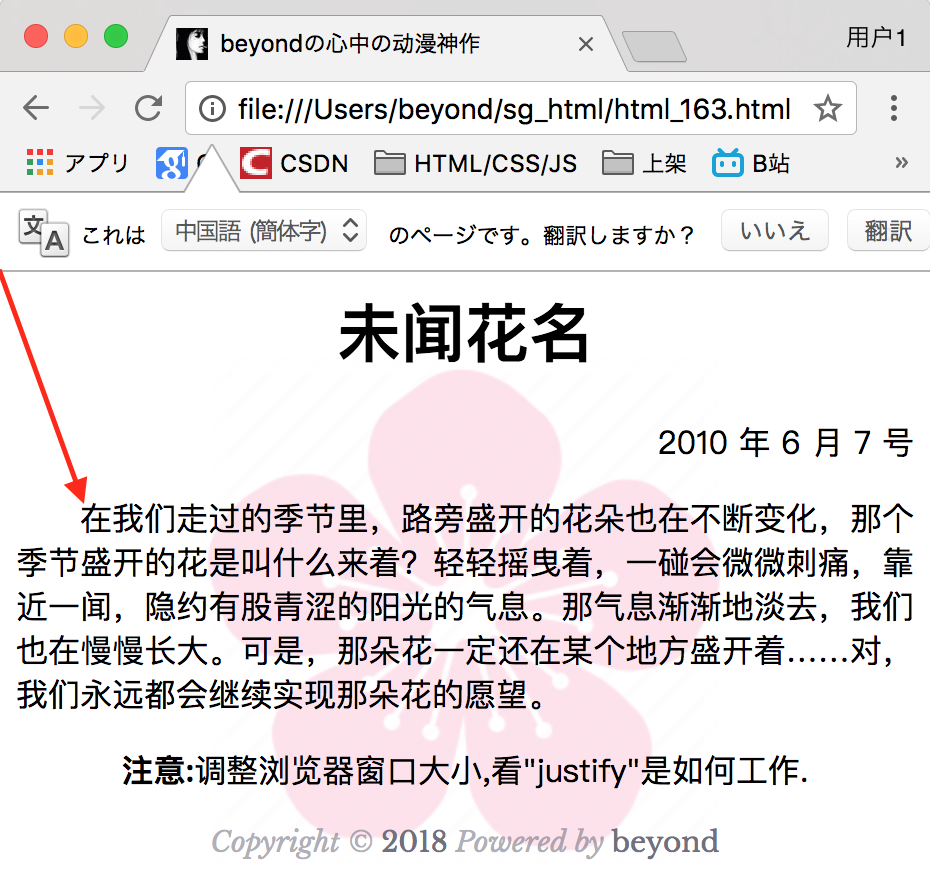
提示:如果想把一个行内元素的第一行“缩进”,
可以使用text-indent进行缩进左内边距或外边距创造这种效果。
代码如下:
<!DOCTPYE html>
<html lang="zh">
<head>
<link rel="icon" href="beyond.jpg" type="image/x-icon"/>
<meta charset="UTF-8">
<meta name="author" content="beyond">
<meta http-equiv="refresh" content="520">
<meta name="description" content="免费零基础教程">
<meta name="viewport" content="width=device-width,
initial-scale=1.0, maximum-scale=1.0,minimum-scale=1.0,user-scalable=0" />
<meta name="keywords" content="HTML,CSS,JAVASCRIPT">
<title>beyondの心中の动漫神作</title>
<link rel="stylesheet" type="text/css" href="beyondbasestylewhite3.css">
<!--[if lt IE 9]>
<script src="//apps.bdimg.com/libs/html5shiv/3.7/html5shiv.min.js"></script>
<![endif]-->
<style type="text/css">
p.pubdate {
text-align: right;
}
p.maincontent {
text-align: justify;
text-indent: 32px;
}
body{
background-image: url("sakura4.png");
background-repeat: no-repeat;
background-position: center center;
}
</style>
</head>
<body>
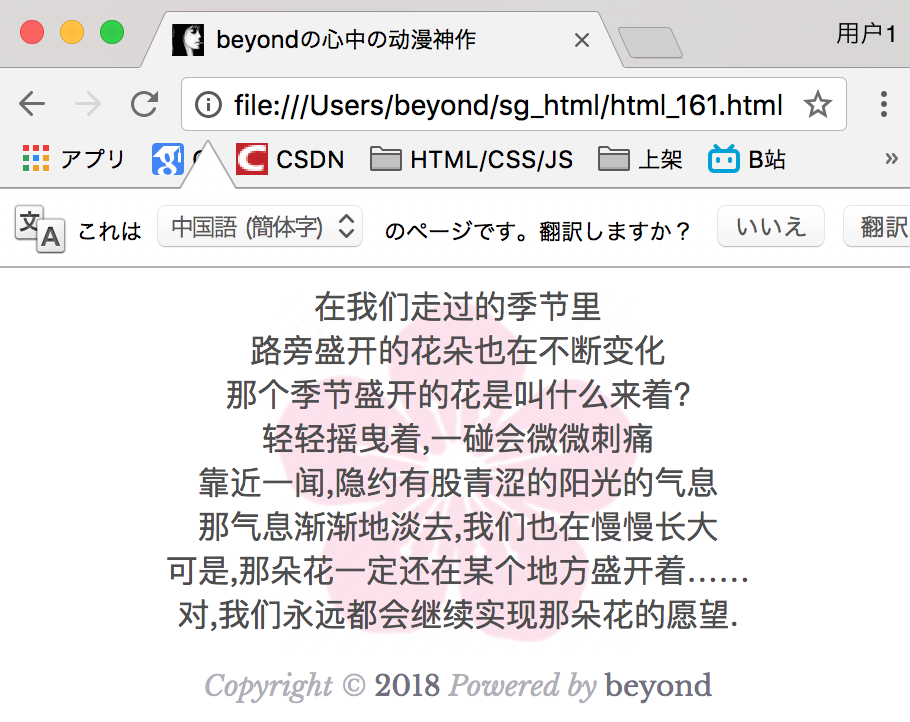
<h1 class="sgcenter">未闻花名</h1>
<p class="pubdate">2010 年 6 月 7 号</p>
<p class="maincontent">在我们走过的季节里,路旁盛开的花朵也在不断变化,那个季节盛开的花是叫什么来着?轻轻摇曳着,一碰会微微刺痛,靠近一闻,隐约有股青涩的阳光的气息。那气息渐渐地淡去,我们也在慢慢长大。可是,那朵花一定还在某个地方盛开着……对,我们永远都会继续实现那朵花的愿望。
</p>
<p class="sgcenter"><b>注意:</b>调整浏览器窗口大小,看"justify"是如何工作.</p>
<footer id="copyright">
<p style="font-size:14px;text-align:center;font-style:italic;">
Copyright © <a id="author">2018</a> Powered by <a id="author">beyond</a>
</p>
<p><time pubdate datetime="2018-03-09" ></time>
</p>
</footer>
</body>
</html>效果如下:

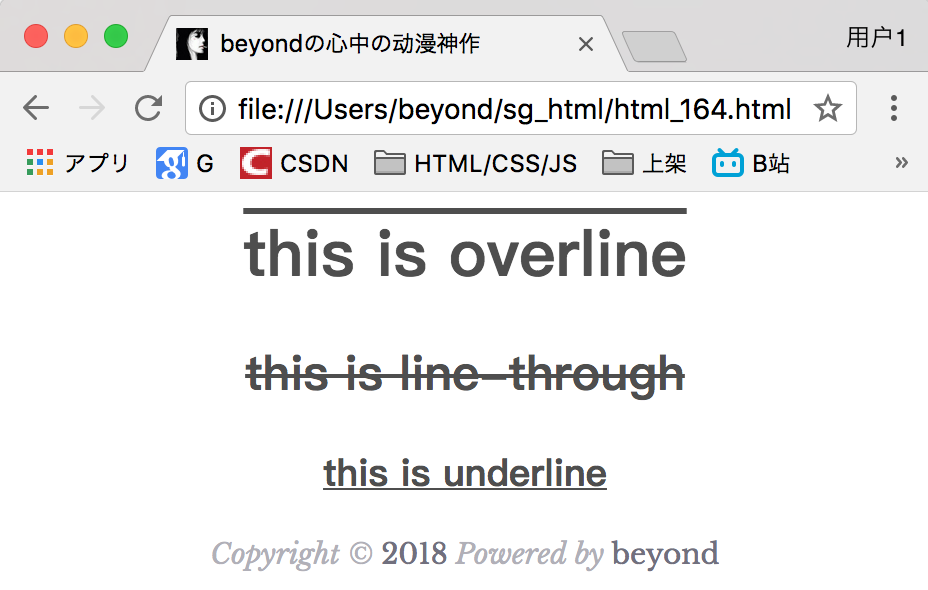
文本修饰
text-decoration 属性用来设置或删除文本的 装饰。
从设计的角度看 text-decoration属性,主要是用来删除a链接的下划线:
实例
也可以这样装饰文字:
实例
h2 {text-decoration:line-through;}
h3 {text-decoration:underline;}
对于不是链接的文本,我们严禁使用这些修饰,因为这非常地糟糕,常常混淆和误导用户。
效果如下:
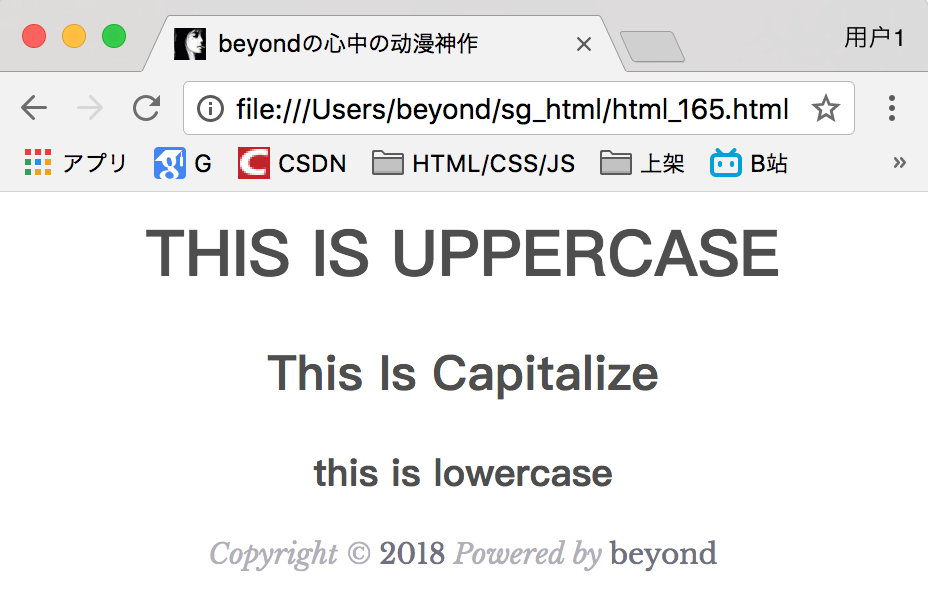
文本转换
文本转换属性是用来指定在一个文本中的大写和小写字母。
可用于所有字句变成大写或小写字母,或每个单词的首字母大写。
实例
h2.capitalize {text-transform:capitalize;}
h3.lowercase {text-transform:lowercase;}
效果如下:
文本缩进 text-indent
文本缩进属性是用来指定文本的第一行的缩进。
CSS 提供了 text-indent 属性,该属性可以方便地实现文本缩进。
通过使用 text-indent 属性,所有元素的第一行都可以缩进一个给定的长度。
实例
效果如下:
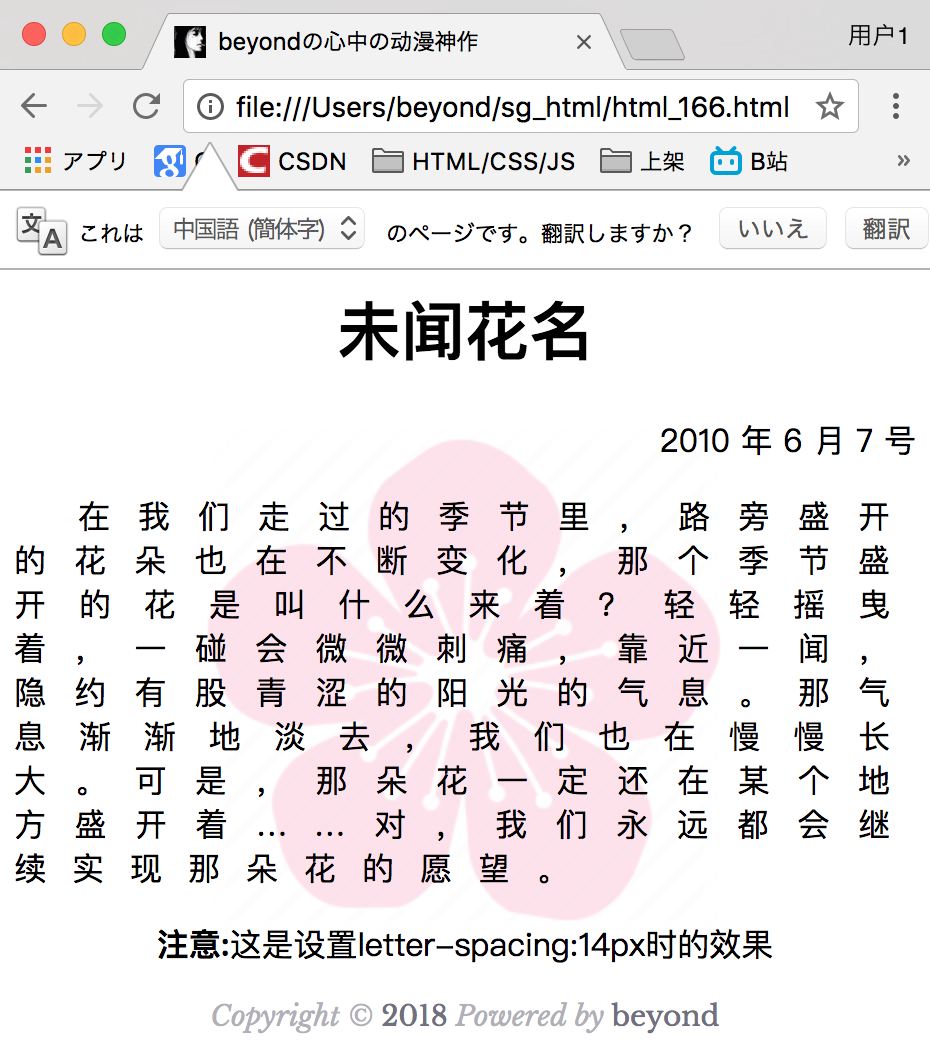
文本间隔 word-spacing,letter-spacing
word-spacing 属性可以改变字(单词)之间的标准间隔。
letter-spacing 属性可以改变字母间的标准间距
下面这个是letter-spacing设置为14px时的效果:
下面这个是word-spacing设置为5px时的效果:
注意:word-spacing对中文、日文 没有任何效果

其默认值 normal 与设置值为 0 是一样效果的。
实例
指定段落里的 字与字 之间的空间,为30像素:
word-spacing:30px; /*对中文和日文 不起作用*/
}
更多实例
指定字符之间的空间
这个例子演示了如何增加或减少字符之间的空间。
代码如下:
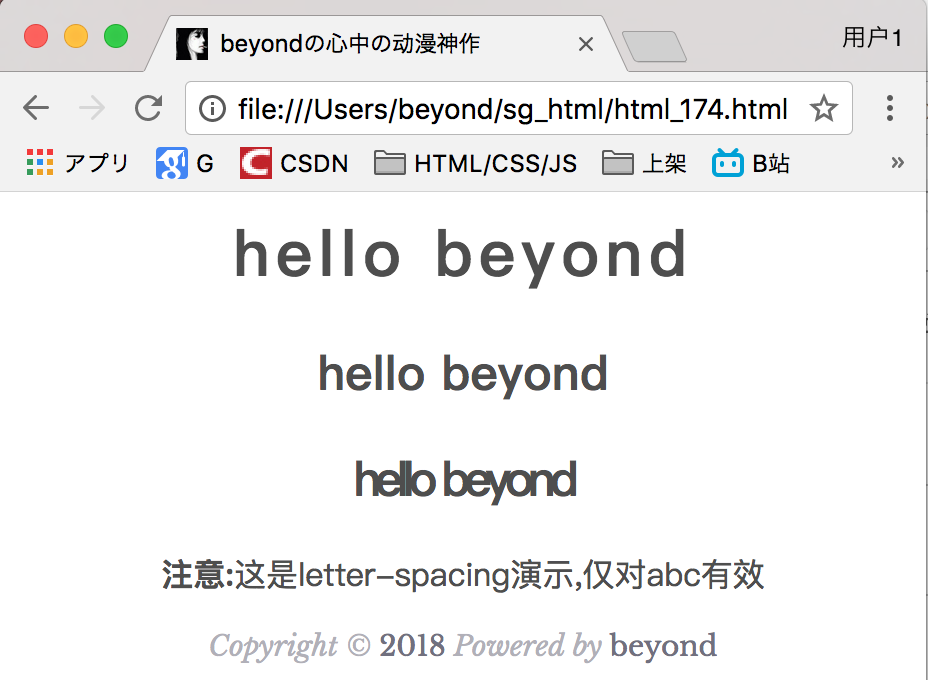
<h1 style="letter-spacing:3px;" class="sgcenter sgcontentcolor">hello beyond</h1>
	<h2 style="letter-spacing:0px;" class="sgcenter sgcontentcolor">hello beyond</h2>
	<h2 style="letter-spacing:-3px;" class="sgcenter sgcontentcolor">hello beyond</h2>


	<p class="sgcenter sgcontentcolor"><b>注意:</b>这是letter-spacing演示,仅对abc有效</p>
效果如下:
指定行与行之间的空间 line-height:115%;
大部分浏览器默认的是110%~120%之间的值
这个例子演示了如何指定在一个段落中,行与行之间的空间间隔
代码如下:
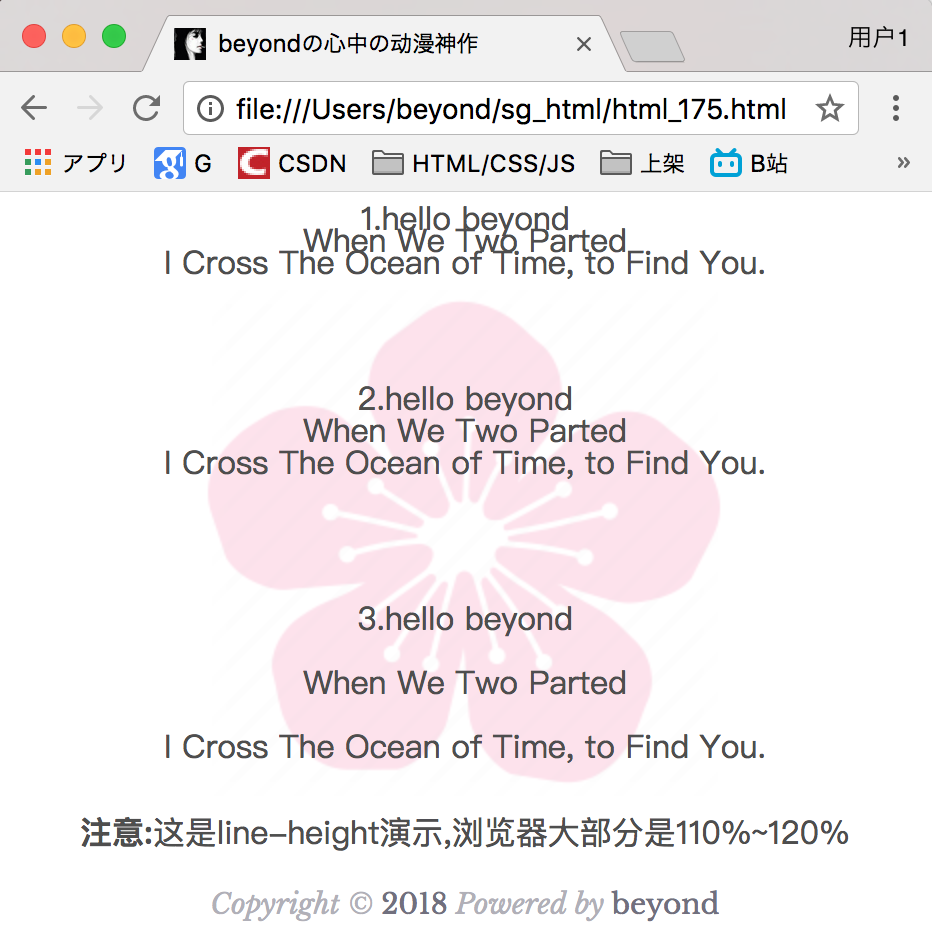
<p style="line-height:70%;" class="sgcenter sgcontentcolor">
	1.hello beyond<br/>
	When We Two Parted</br>
	I Cross The Ocean of Time, to Find You.<br/>
	</p>
	<br/>
	<p style="line-height:100%;" class="sgcenter sgcontentcolor">
		2.hello beyond<br/>
		When We Two Parted</br>
		I Cross The Ocean of Time, to Find You.<br/>
	</p>
	<br/>
	<p style="line-height:200%" class="sgcenter sgcontentcolor">
		3.hello beyond<br/>
		When We Two Parted</br>
		I Cross The Ocean of Time, to Find You.<br/>
	</p>


	<p class="sgcenter sgcontentcolor"><b>注意:</b>这是line-height演示,浏览器大部分是110%~120%</p>
效果如下:
设置元素的文本方向 direction&unicode-bidi
这个例子演示了如何改变元素的文本方向。
代码如下:
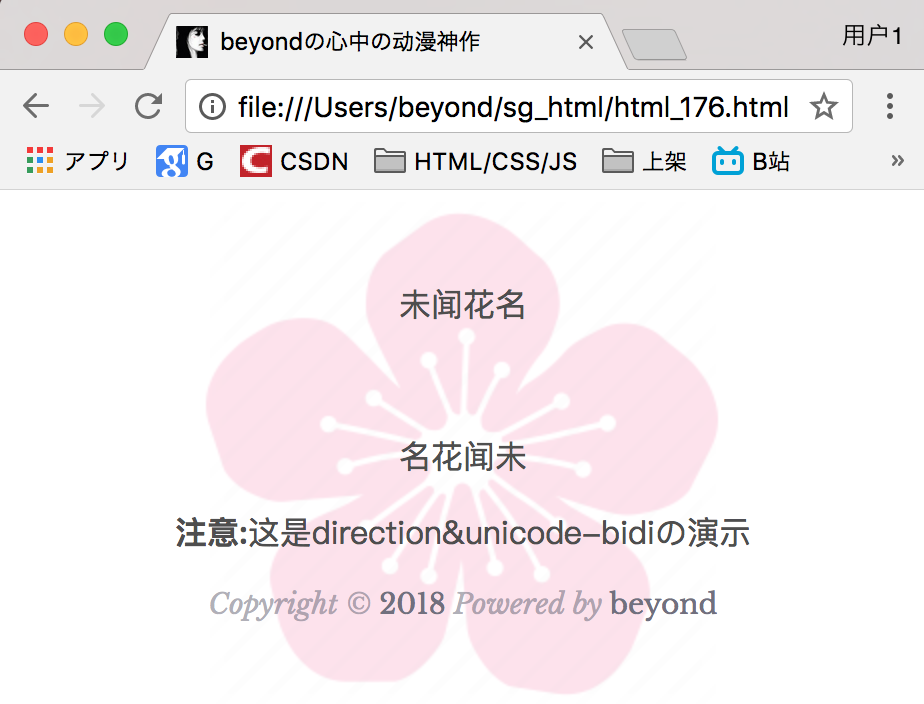
<p class="sgcenter sgcontentcolor">
		未闻花名
	</p>
	<br/>
	<p style="direction:rtl;unicode-bidi:bidi-override" class="sgcenter sgcontentcolor">
		未闻花名
	</p>

	<p class="sgcenter sgcontentcolor"><b>注意:</b>这是direction&unicode-bidiの演示</p>
效果如下:
CSS 语法
定义和用法
unicode-bidi 属性与 direction 属性一起使用,来设置或返回文本是否被重写,
以便在同一文档中支持多种语言。
属性值
| 值 | 描述 | |
|---|---|---|
| normal | 默认。不使用附加的嵌入层面。 | |
| embed | 创建一个附加的嵌入层面。 | |
| bidi-override | 创建一个附加的嵌入层面。重新排序取决于 direction 属性。 | |
| initial | 设置该属性为它的默认值。请参阅 initial。 | |
| inherit | 从父元素继承该属性。请参阅 inherit。 |
normal:
对象不打开附加的嵌入层,对于内联要素,隐式重排序跨对象边界进行工作。
embed:
对象打开附加的嵌入层,direction属性的值指定嵌入层,在对象内部进行隐式重排序。
bidi-override:
严格按照direction属性的值重排序。忽略隐式双向运算规则。
说明:
必须与direction属性一起使用
假如您想应用direction属性于内联元素的文本,您必须设定unicode-bidi属性为embed或bidi-override。
对应的脚本特性为unicodeBidi。
示例:
ltr:本段文字将按照从左到右的方向进行流动。
rtl:本段文字将按照从右到左的方向进行流动。
在元素内禁用文字环绕 white-space:nowrap
这个例子演示了如何禁用一个元素内的文字环绕(不换行!No Wrap!)。
代码如下:
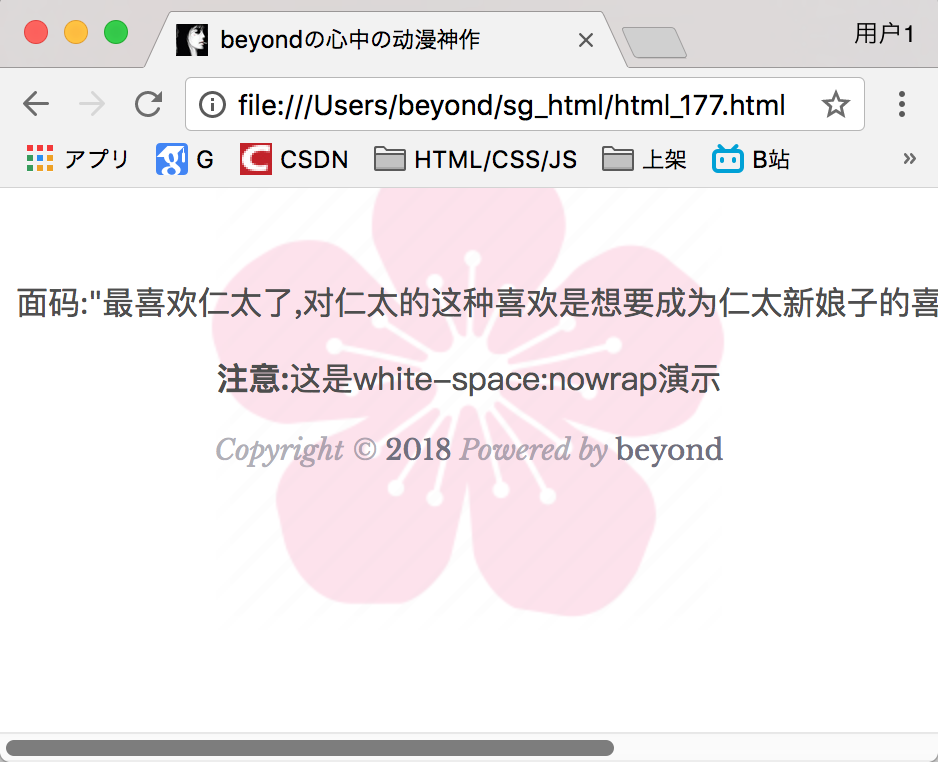
<p style="white-space:nowrap;" class="sgcenter sgcontentcolor">
		面码:"最喜欢仁太了,对仁太的这种喜欢是想要成为仁太新娘子的喜欢~~~~~~~~~~~~~~~~~~~~~~~~~~~"
	</p>


	<p class="sgcenter sgcontentcolor"><b>注意:</b>这是white-space:nowrap演示</p>
效果如下:
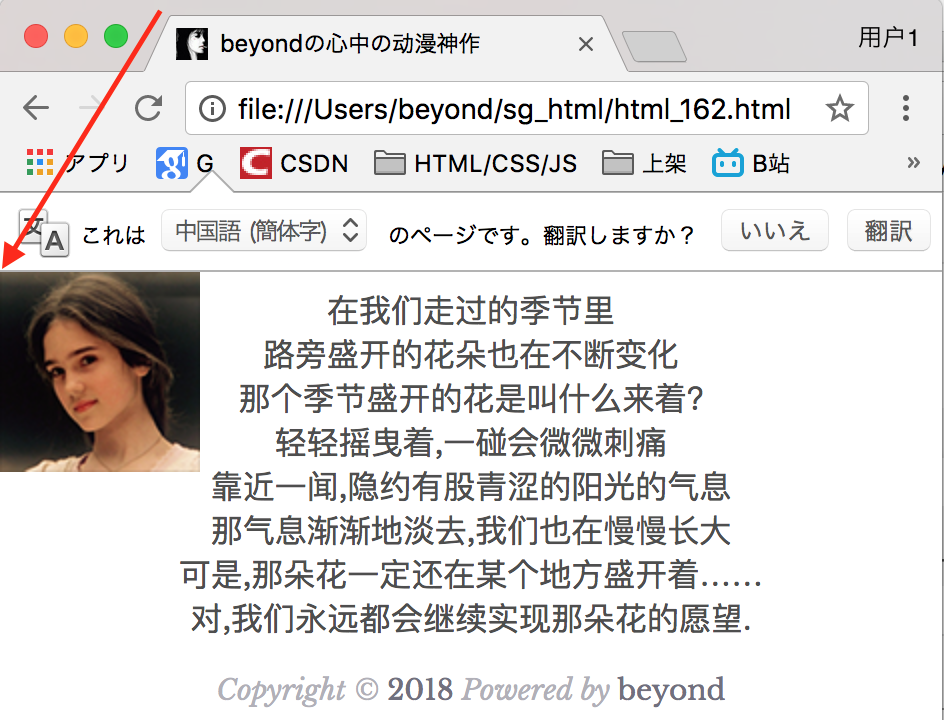
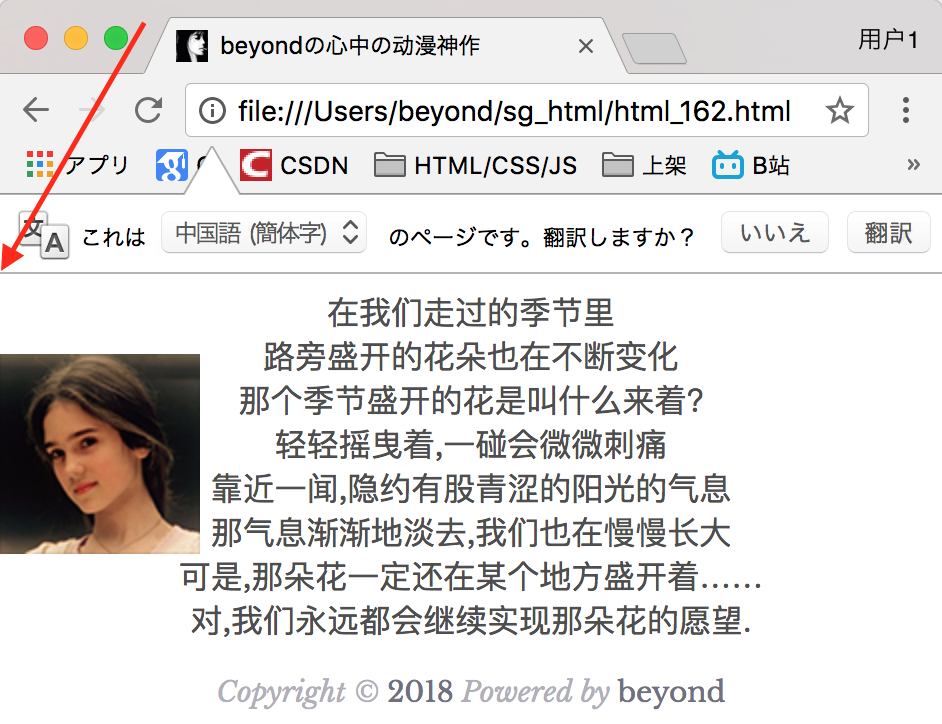
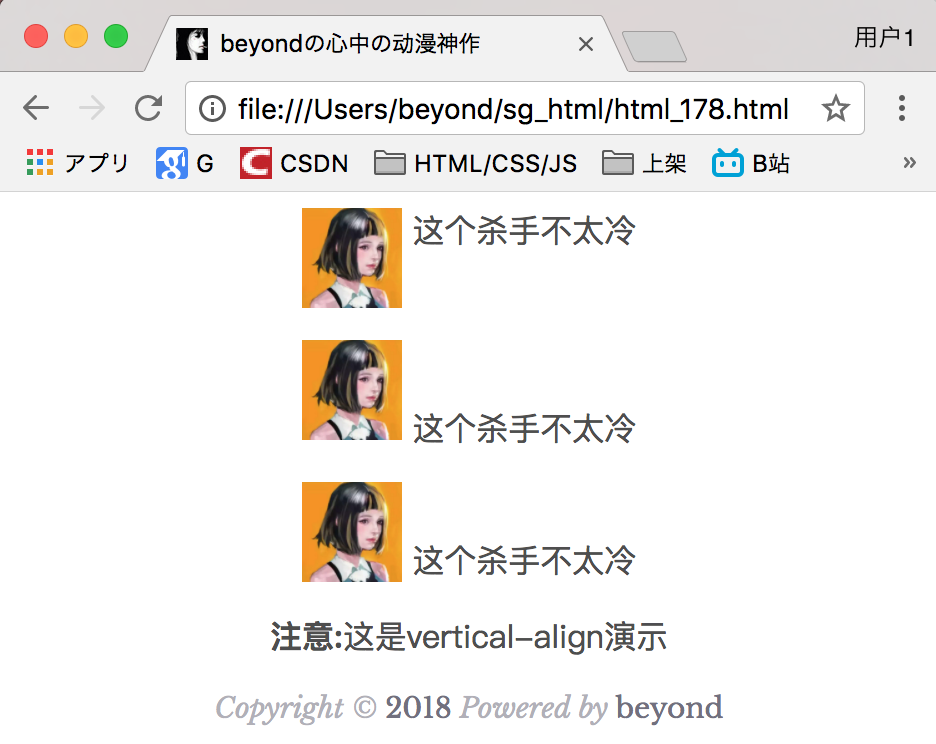
垂直对齐图像 对img设置样式vertical-align:text-top
这个例子演示了如何设置文本的垂直对齐图像。
代码如下:
<p class="sgcenter sgcontentcolor">
		<img style="vertical-align:text-top;" src="mathilda.jpg" width="50" height="50">
		这个杀手不太冷
	</p>
	<p class="sgcenter sgcontentcolor">
		<img style="vertical-align:normal;" src="mathilda.jpg" width="50" height="50">
		这个杀手不太冷
	</p>
	<p class="sgcenter sgcontentcolor">
		<img style="vertical-align:text-bottom;" src="mathilda.jpg" width="50" height="50">
		这个杀手不太冷
	</p>


	<p class="sgcenter sgcontentcolor"><b>注意:</b>这是vertical-align演示</p>
效果如下:
添加文本阴影 text-shadow
这个例子演示了如何设置文本阴影。
代码如下:
<h1 style="color:white;text-shadow:2px 2px 4px #000;letter-spacing:5px;" class="sgcenter sgcontentcolor">
		未闻花名
	</h1>

	<p class="sgcenter sgcontentcolor"><b>注意:</b>这是text-shadowの演示</p>
效果如下:

语法
注意: text-shadow属性连接一个或更多的阴影文本。
属性是阴影,指定的每2或3个长度值和一个可选的颜色值用逗号分隔开来。已失时效的长度为0???
| 值 | 描述 |
|---|---|
| h-shadow | 必需。水平阴影的位置。允许负值。 |
| v-shadow | 必需。垂直阴影的位置。允许负值。 |
| blur | 可选。模糊的距离。 |
| color | 可选。阴影的颜色。 |
所有CSS文本属性。
| 属性 | 描述 |
|---|---|
| color | 设置文本颜色 |
| direction | 设置文本方向。 |
| letter-spacing | 设置字符间距 |
| line-height | 设置行高 |
| text-align | 对齐元素中的文本 |
| text-decoration | 向文本添加修饰 |
| text-indent | 缩进元素中文本的首行 |
| text-shadow | 设置文本阴影 |
| text-transform | 控制元素中的字母 |
| unicode-bidi | 设置或返回文本是否被重写 |
| vertical-align | 设置元素的垂直对齐 |
| white-space | 设置元素中空白的处理方式 |
| word-spacing | 设置字间距 |
CSS 字体
sans means without
serif


CSS字体属性定义字体,加粗,大小,文字样式。
serif和sans-serif字体之间的区别

在计算机屏幕上,sans-serif字体被认为是比serif字体容易阅读
补充资料:
serif
西方国家字母体系分为两类:
1.serif 有衬线装饰,如宋体
2.sans serif 无衬线装饰,如黑体
serif 是有衬线字体,意思是在字的笔画开始、结束的地方有额外的装饰,而且笔画的粗细会有所不同。
相反的,sans serif 就没有这些额外的装饰,而且笔画的粗细差不多。
serif 字体容易识别,它强调了每个字母笔画的开始和结束,因此易读性比较高,
sans serif 则比较醒目。
在中文阅读的情况下,适合使用 serif 字体(如宋体)进行排版,易于换行阅读的识别性,避免发生行间的阅读错误。
Serif 和Sans Serif 区别
①Serif 的字体因为有额外的装饰,故而很容易辨认,因此易读性较高。
反之 Sans Serif 则较醒目,但在行文阅读的情况下,Sans Serif 很容易造成字母辨认的困扰,常会有来回重读及上下行错乱的情形。
②Serif 因为有额外的装饰,强调了字母笔划的开始及结束,因此较易前后连续性的辨识。
③Serif 强调一个word,而非单一的字母,
反之Sans Serif 则强调个别字母。
④在小字体的场合,通常Sans Serif 比Serif 更清晰。
中文字体中的 宋体 就是一种最标准的 serif 字体,衬线的特征非常明显。
字形结构也和手写的楷书一致。因此宋体一直被做为最适合的正文字体之一。
不过由于强调横竖笔画的对比,在远处观看的时候横线就被弱化,导致识别性的下降
对于中文来说,宋体属于serif 字体,
而黑体、幼圆、雅黑则属于sans serif 字体。
而英文,常用的 serif 字体为Times New Roman,
常用的 sans serif 字体为Arial,Tahoma。
因为黑体字属于“无衬线体”(Sans-serif),而宋体字属于“有衬线体”(Serif),
后者对于人眼的辨识来说会更轻松一些,所以阅读的时候会比较舒服。
日本文字偏欧美的无衬线体(Sans-serif),所以大部分的人都使用歌德体(相当于西洋文字的无衬线体)。
所以通常文章的内容、正文使用的是易读性较佳的 Serif 字体(如字体等),这可增加易读性,
而且长时间阅读下因为会以 word 为单位来阅读,较不容易疲倦。
而标题、表格内用字则采用较醒目的 Sans Serif 字体,它需要显着、醒目,但不必长时间盯着这些字来阅读。
像宣传品、海报类,为求醒目,它的短篇的段落也会采用 Sans Serif 字体。
但在书籍、报刊杂志,正文有相当长的篇幅的情形下,则必须采用 Serif 字体来减轻读者阅读上的负担。
在 Web 设计及浏览器设置中也应遵循此原则为上。
CSS字型

在CSS中,有两种类型的字体系列名称:
通用字体系列 - 拥有相似外观的字体系统组合(如 "Serif 有衬线" 或 "Monospace 等宽")
特定字体系列 - 一个特定的字体系列(如 "Times" 或 "Courier")
| Generic family | 字体系列 | 说明 |
|---|---|---|
| Serif | Times New Roman Georgia | Serif字体中字符在行的末端拥有额外装饰 |
| Sans-serif | Arial Verdana | "Sans"是指无,没有 - 这些字体在末端无额外装饰 |
| Monospace | Courier New Lucida Console | 所有的等宽字符具有相同的宽度 |
除了各种特定的字体系列外,CSS 定义了 5 种通用字体系列:
- Serif 字体 有衬线
- Sans-serif 字体 无衬线
- Monospace 字体 单间隔
- Cursive 字体 草书
- Fantasy 字体 梦幻体,主要用于艺术图片上
字体系列
font-family 属性设置文本的字体系列。
font-family 属性应该设置几个字体名称作为一种"后备"机制,如果浏览器不支持第一种字体,他将尝试下一种字体。
注意: 如果字体系列的名称超过一个字,它必须用引号,如Font Family:"宋体"。
多个字体系列是用一个逗号分隔指明:
效果如下:
代码如下:
<!DOCTPYE html>
<html lang="zh">
<head>
<link rel="icon" href="beyond.jpg" type="image/x-icon"/>
<meta charset="UTF-8">
<meta name="author" content="beyond">
<meta http-equiv="refresh" content="520">
<meta name="description" content="免费零基础教程">
<meta name="viewport" content="width=device-width,
initial-scale=1.0, maximum-scale=1.0,minimum-scale=1.0,user-scalable=0" />
<meta name="keywords" content="HTML,CSS,JAVASCRIPT">
<title>beyondの心中の动漫神作</title>
<link rel="stylesheet" type="text/css" href="beyondbasestylewhite3.css">
<!--[if lt IE 9]>
<script src="//apps.bdimg.com/libs/html5shiv/3.7/html5shiv.min.js"></script>
<![endif]-->
<style type="text/css">
body{
background-image: url("sakura4.png");
background-repeat: no-repeat;
background-position: center center;
}
p.sgserif {
font-family: "Times New Roman",Times,serif;
}
p.sgsansserif {
font-family: Arial,Helvetica,sans-serif;
}
</style>
</head>
<body>
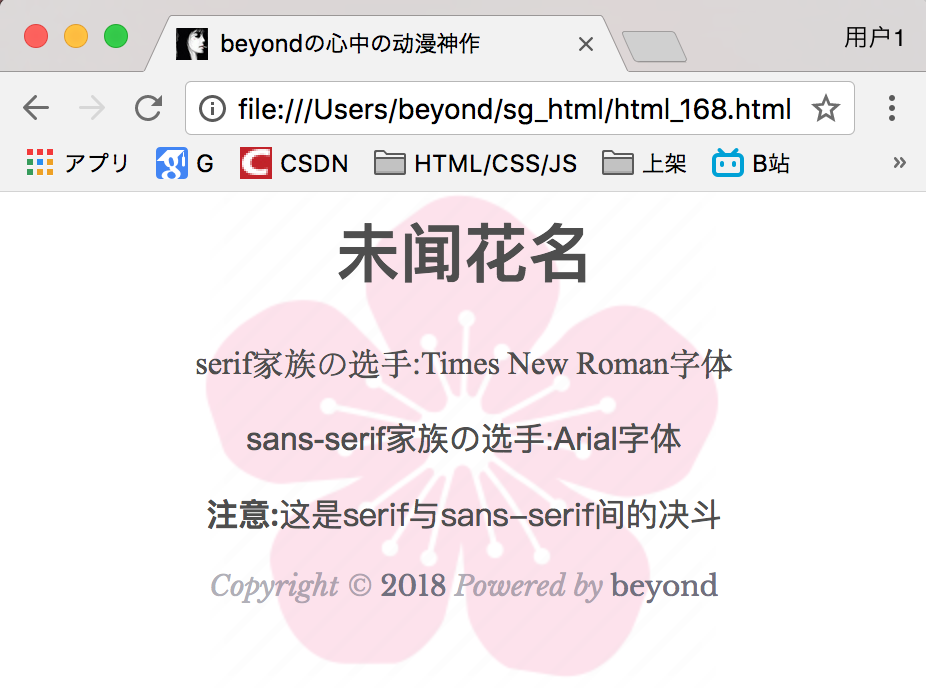
<h1 class="sgcenter sgcontentcolor">未闻花名</h1>
<p class="sgserif sgcenter sgcontentcolor">
serif家族の选手:Times New Roman字体
</p>
<p class="sgsansserif sgcenter sgcontentcolor">
sans-serif家族の选手:Arial字体
</p>
<p class="sgcenter sgcontentcolor"><b>注意:</b>这是serif与sans-serif间的决斗</p>
<footer id="copyright">
<p style="font-size:14px;text-align:center;font-style:italic;">
Copyright © <a id="author">2018</a> Powered by <a id="author">beyond</a>
</p>
<p><time pubdate datetime="2018-03-09" ></time>
</p>
</footer>
</body>
</html>实例
对于较常用的字体组合,看看我们下面补充的 Web安全字体组合。
补充一下:
CSS Web安全字体组合
常用的字体组合
font-family属性是多种字体的名称,作为一个"应变"制度,以确保浏览器/操作系统之间的最大兼容性。
如果浏览器不支持的第一个字体,它尝试下一个的字体。
你想要的字体类型如果浏览器找不到,它会从通用的字体类型中找到与你相似的:
实例
下面是一些常用的字体组合,通用的字体系列。
Serif 字体
| 字体 | 文本示例 |
|---|---|
| Georgia, serif | This is a headingThis is a paragraph |
| "Palatino Linotype", "Book Antiqua", Palatino, serif | This is a headingThis is a paragraph |
| "Times New Roman", Times, serif | This is a headingThis is a paragraph |
sans - serif字体
| 字体 | 文本示例 |
|---|---|
| Arial, Helvetica, sans-serif | This is a headingThis is a paragraph |
| Arial Black, Gadget, sans-serif | This is a headingThis is a paragraph |
| "Comic Sans MS", cursive, sans-serif | This is a headingThis is a paragraph |
| Impact, Charcoal, sans-serif | This is a headingThis is a paragraph |
| "Lucida Sans Unicode", "Lucida Grande", sans-serif | This is a headingThis is a paragraph |
| Tahoma, Geneva, sans-serif | This is a headingThis is a paragraph |
| "Trebuchet MS", Helvetica, sans-serif | This is a headingThis is a paragraph |
| Verdana, Geneva, sans-serif | This is a headingThis is a paragraph |
Monospace 字体
| 字体 | 文本示例 |
|---|---|
| "Courier New", Courier, monospace | This is a headingThis is a paragraph |
| "Lucida Console", Monaco, monospace | This is a headingThis is a paragraph |
字体样式
主要是用于指定斜体文字的字体样式属性。
这个属性有三个值:
正常 - 正常显示文本
斜体 - 以斜体字显示的文字
倾斜的文字 - 文字向一边倾斜(和斜体非常类似,但不太支持)
实例
p.italic {font-style:italic;}
p.oblique {font-style:oblique;}

italic 和 oblique 的区别
- 斜体(italic)是一种简单的字体风格,对每个字母的结构都进行了一些小改动,来反映变化的外观。
- 倾斜(oblique)文本是正常竖直文本的一个倾斜版本。
通常情况下,italic 和 oblique 文本在 web 浏览器中看上去完全一样。
字体大小
font-size 属性设置文本的大小。
能否管理文字的大小,在网页设计中是非常重要的。
但是,你千万不要傻X地去通过调整字体大小,使段落看上去像标题,或者使标题看上去像段落。
必须永远正确地使用HTML标签,
如<h1> - <h6>就只能用于表示标题,<p>就只能用于表示段落:
字体大小的值可以是绝对或相对的大小。
绝对大小:
设置一个指定大小的文本
不允许用户在所有浏览器中改变文本大小
确定了输出的物理尺寸时绝对大小很有用
相对大小:
相对于周围的元素来设置大小
允许用户在浏览器中改变文字大小
如果你不指定一个字体的大小,默认大小和普通文本段落一样,
是16像素(16px=1em)。
设置字体大小像素
设置文字的大小与像素,让您完全控制文字大小,
这个默认的h1 h2 p 的font-size大小效果图:
这个是以下参数设置过font-size的效果图:
实例
h2 {font-size:30px;}
p {font-size:14px;}
上面的例子可以在 Internet Explorer 9, Firefox, Chrome, Opera, 和 Safari 调整文本大小。
注意:以上实例不能在IE9以前的版本运行。
通过浏览器的缩放工具(快捷键Command + "+或-")可以调整页面整体的大小
用em来设置字体大小
为了避免Internet Explorer 中无法调整文本的问题,许多开发者使用 em 单位代替像素。
em的尺寸单位由W3C建议。
1em和当前字体大小相等。
在浏览器中默认的文字大小是16px。
因此,1em的默认大小是16px。
可以通过下面这个公式将像素转换为em:px/16=em
(千万注意:16 等于父元素的默认字体大小,
假设父元素的 font-size 为 30px,那么公式需改为:pixels/30=em ???Excuse Me???)
实例
h2 {font-size:1.875em;} /* 30px/16=1.875em */
p {font-size:0.875em;} /* 14px/16=0.875em */
效果图如下: (与设置px时,效果一模一样)

在上面的例子,em的文字大小是与前面的例子中像素一样。
不过,如果使用 em 单位,则可以在所有浏览器中调整文本大小。
不幸的是,仍然是IE浏览器的问题。调整文本的大小时,会比正常的尺寸更大或更小。
使用百分比和EM组合
在所有浏览器的解决方案中,
最完美的是:设置 <body>元素的默认字体大小的是百分比:
实例
h1 {font-size:2.5em;}
h2 {font-size:1.875em;}
p {font-size:0.875em;}
我们的代码非常完美有效。Perfect
它在所有浏览器中,可以显示相同的文本大小,并允许所有浏览器缩放文本的大小。
更多实例
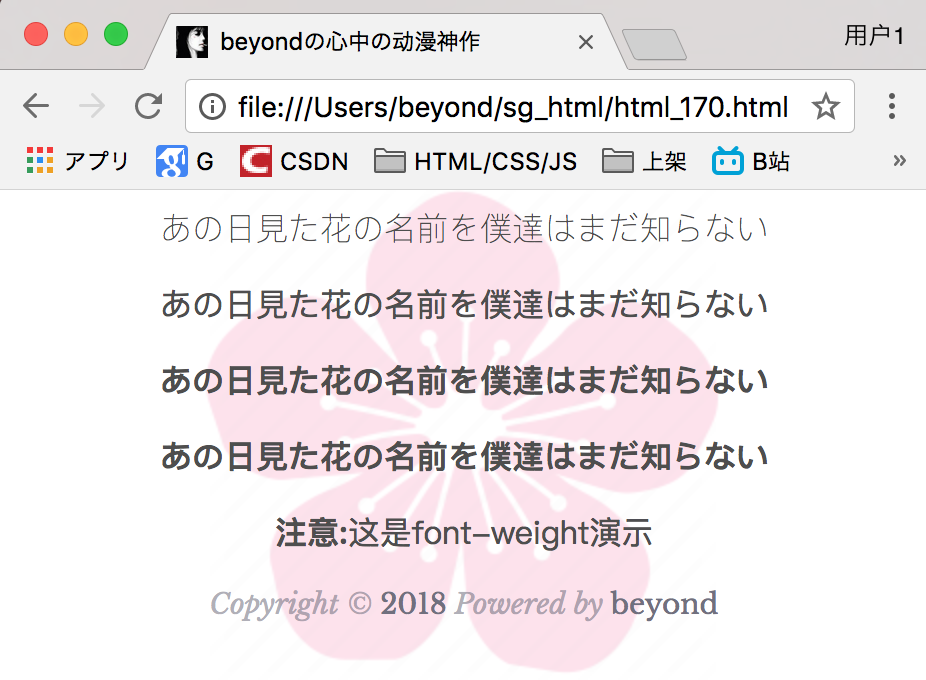
设置字体加粗 font-weight
这个例子演示了如何设置字体的加粗。
代码如下:
<p style="font-weight:lighter;" class="sgcenter sgcontentcolor">
		あの日見た花の名前を僕達はまだ知らない
	</p>
	<p style="font-weight:normal;" class="sgcenter sgcontentcolor">
		あの日見た花の名前を僕達はまだ知らない
	</p>
	<p style="font-weight:bold;" class="sgcenter sgcontentcolor">
		あの日見た花の名前を僕達はまだ知らない
	</p>
	<p style="font-weight:900;" class="sgcenter sgcontentcolor">
		あの日見た花の名前を僕達はまだ知らない
	</p>
	<p class="sgcenter sgcontentcolor"><b>注意:</b>这是font-weight演示</p>
效果如下:
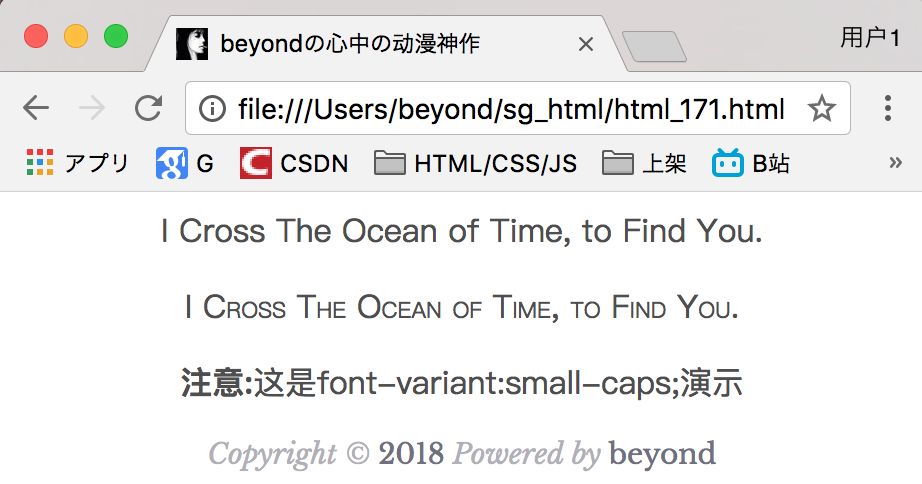
可以设置字体的转变 font-variant:small-caps;
小写字母全变成大写字母,但还是小小的大小状态
这个例子演示了如何设置字体的转变。
代码如下:
<p style="font-variant:normal;" class="sgcenter sgcontentcolor">
		I Cross The Ocean of Time, to Find You.
	</p>
	<p style="font-variant:small-caps;" class="sgcenter sgcontentcolor">
		I Cross The Ocean of Time, to Find You.
	</p>

	<p class="sgcenter sgcontentcolor"><b>注意:</b>这是font-variant:small-caps;演示</p>
效果如下:
在一个声明中的所有字体属性
本例演示如何使用简写的font属性将字体属性设置在一个声明之内。
代码如下:
<p style="font:15px arial,sans-serif;" class="sgcenter sgcontentcolor">
		I Cross The Ocean of Time, to Find You.
	</p>
	<p style="font:italic bold 12px/30px Geogia,serif;" class="sgcenter sgcontentcolor">
		I Cross The Ocean of Time, to Find You.
	</p>
效果如下:

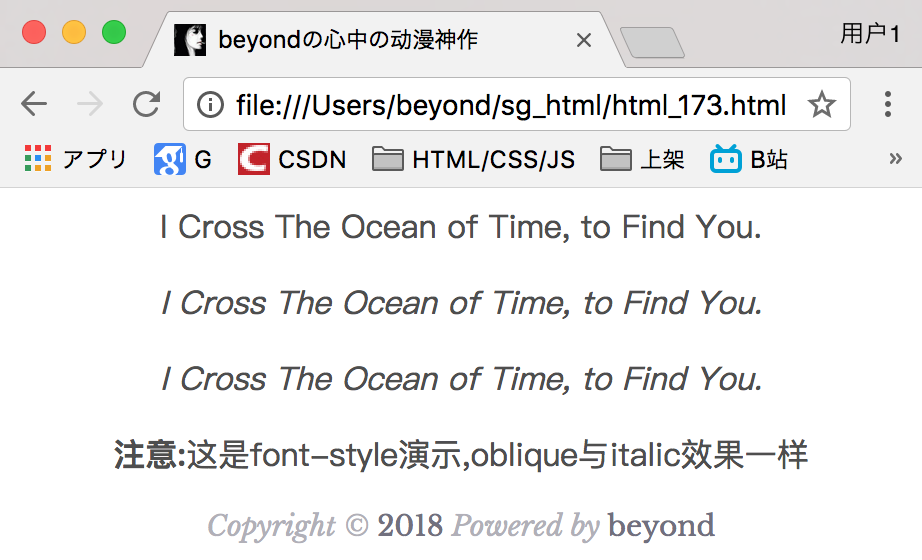
设置字体风格
本例演示如何设置字体风格。
代码如下:
<p style="font-style:normal" class="sgcenter sgcontentcolor">
		I Cross The Ocean of Time, to Find You.
	</p>
	<p style="font-style:italic;" class="sgcenter sgcontentcolor">
		I Cross The Ocean of Time, to Find You.
	</p>
	<p style="font-style:oblique;" class="sgcenter sgcontentcolor">
		I Cross The Ocean of Time, to Find You.
	</p>

	<p class="sgcenter sgcontentcolor"><b>注意:</b>这是font-style演示,oblique与italic效果一样</p>
效果如下:
所有CSS字体属性
| Property | 描述 |
|---|---|
| font | 在一个声明中设置所有的字体属性 |
| font-family | 指定文本的字体系列 |
| font-size | 指定文本的字体大小 |
| font-style | 指定文本的字体样式 |
| font-variant | 以小型大写字体或者正常字体显示文本。 |
| font-weight | 指定字体的粗细。 |
CSS 链接
不同的链接可以有不同的样式。
链接样式
链接的样式,可以用任何CSS属性(如颜色,字体,背景等)。
特别的链接,可以有不同的样式,这取决于他们是处在什么状态。
这四个链接状态是:
- a:link - 正常的 未访问过的链接
- a:visited - 用户已访问过的链接
- a:hover - 当用户鼠标放在链接上悬停时
- a:active - 链接被点击的那一刹那
实例
a:visited {color:#00FF00;} /* visited link */
a:hover {color:#FF00FF;} /* mouse over link */
a:active {color:#0000FF;} /* selected link */
示例代码如下:
<!DOCTPYE html>
<html lang="zh">
<head>
	<link rel="icon" href="beyond.jpg" type="image/x-icon"/>
	<meta charset="UTF-8">
	<meta name="author" content="beyond">
	<meta http-equiv="refresh" content="520">
	<meta name="description" content="免费零基础教程">
	<meta name="viewport" content="width=device-width,
	initial-scale=1.0, maximum-scale=1.0,minimum-scale=1.0,user-scalable=0" />
	<meta name="keywords" content="HTML,CSS,JAVASCRIPT">
	<title>beyondの心中の动漫神作</title>
	<link rel="stylesheet" type="text/css" href="beyondbasestylewhite3.css">

	<!--[if lt IE 9]>
		<script src="//apps.bdimg.com/libs/html5shiv/3.7/html5shiv.min.js"></script>
	<![endif]-->

	<style type="text/css">
		body{
			font-size: 100%;
			background-image: url("sakura4.png");
			background-repeat: no-repeat;
			background-position: center center;
		}
		/*顺序必须不能乱,link,visited,hover,active*/
		a:link {
			color: #1a5952;
			text-decoration: none;
		}
		a:visited {
			color: rgb(20,120,144);
		}
		a:hover {
			color: rgb(19,134,181);
			text-decoration: underline;
		}
		a:active {
			color: rgb(19,134,181);
		}
	</style>
</head>

<body>

	<h1 style="color:white;text-shadow:2px 2px 4px #000;letter-spacing:5px;" class="sgcenter sgcontentcolor">
		未闻花名
	</h1>

	<p class="sgcenter">
		<a href="http://baidu.com/s?wd=anohana" target="_blank">
			在线观看
		</a>
	</p>

	<p class="sgcenter sgcontentcolor">
	<b>注意:</b>
	a:hover必须在a:link及a:visited之后<br/>
	a:active必须在a:hover之后
	</p>

	<footer id="copyright">
		<p style="font-size:14px;text-align:center;font-style:italic;">
		Copyright © <a id="author">2018</a> Powered by <a id="author">beyond</a>
		</p>

		<p><time pubdate datetime="2018-03-09" ></time>
		</p>
	</footer>
</body>
</html>
效果如下:

当设置为若干 链路 状态 的样式,必须严格遵守下面的顺序规则:
- a:hover 必须跟在 a:link 和 a:visited后面
- a:active 必须跟在 a:hover后面
提示:在本文最后的附录栏目中,我们对CSS:link 选择器做了详细的介绍。
常见的链接样式
根据上述链接的颜色变化的例子,可以知道它是在什么状态。
但是, 我们还可以通过一些其他常见的方式,实现不同的链接样式:
文本修饰
text-decoration 属性主要用于删除链接中的下划线:
实例
a:visited {text-decoration:none;}
a:hover {text-decoration:underline;}
a:active {text-decoration:underline;}
背景颜色
背景颜色属性指定链接背景色:
实例
a:visited {background-color:#FFFF85;}
a:hover {background-color:#FF704D;}
a:active {background-color:#FF704D;}
More Examples
高级 - 创建链接框
这个例子演示了一个更高级的例子,我们结合若干CSS属性显示为方框。
代码如下:
<!DOCTPYE html>
<html lang="zh">
<head>
	<link rel="icon" href="beyond.jpg" type="image/x-icon"/>
	<meta charset="UTF-8">
	<meta name="author" content="beyond">
	<meta http-equiv="refresh" content="520">
	<meta name="description" content="免费零基础教程">
	<meta name="viewport" content="width=device-width,
	initial-scale=1.0, maximum-scale=1.0,minimum-scale=1.0,user-scalable=0" />
	<meta name="keywords" content="HTML,CSS,JAVASCRIPT">
	<title>beyondの心中の动漫神作</title>
	<link rel="stylesheet" type="text/css" href="beyondbasestylewhite3.css">

	<!--[if lt IE 9]>
		<script src="//apps.bdimg.com/libs/html5shiv/3.7/html5shiv.min.js"></script>
	<![endif]-->

	<style type="text/css">
		body{
			font-size: 100%;
			background-image: url("sakura4.png");
			background-repeat: no-repeat;
			background-position: center center;
		}
		/*顺序必须不能乱,link,visited,hover,active*/
		a:link,a:visited {
			display: block;
			font-weight: bold;
			color: #fff;
			background-color: #98bf21;
			width: 120px;
			text-align: center;
			padding: 5px;
			text-decoration: none;
			margin: 0 auto;
		}

		a:hover,a:active {
			background-color: #7A991A;
		}

	</style>
</head>

<body>

	<h1 style="color:white;text-shadow:2px 2px 4px #000;letter-spacing:5px;" class="sgcenter sgcontentcolor">
		未闻花名
	</h1>

	<p class="sgcenter">
		<a href="http://baidu.com/s?wd=anohana" target="_blank">
			在线观看
		</a>
	</p>

	<p class="sgcenter sgcontentcolor">
	<b>注意:</b>
	a:hover必须在a:link及a:visited之后<br/>
	a:active必须在a:hover之后
	</p>

	<footer id="copyright">
		<p style="font-size:14px;text-align:center;font-style:italic;">
		Copyright © <a id="author">2018</a> Powered by <a id="author">beyond</a>
		</p>

		<p><time pubdate datetime="2018-03-09" ></time>
		</p>
	</footer>
</body>
</html>
效果如下:

CSS 列表
CSS列表属性作用如下:
- 设置不同的列表项 标记为 有序列表
- 设置不同的列表项 标记为 无序列表
- 设置列表项 前面的标记 为图像
列表
在HTML中,有两种类型的HTML列表:
- 无序列表 - 列表项标记用 特殊图形(如小黑点、小方框等)
- 有序列表 - 列表项的标记有 数字或字母
使用CSS,同样可以列出样式,并且还可用可爱的小图像作为列表项前面的标记喔。
不同的列表项 标记
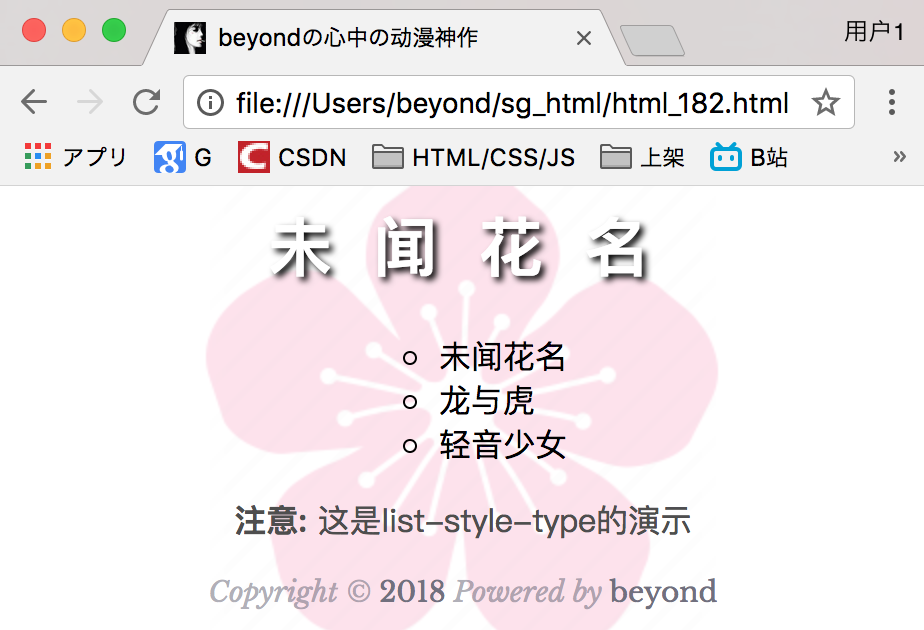
list-style-type属性指定列表项标记的类型是:
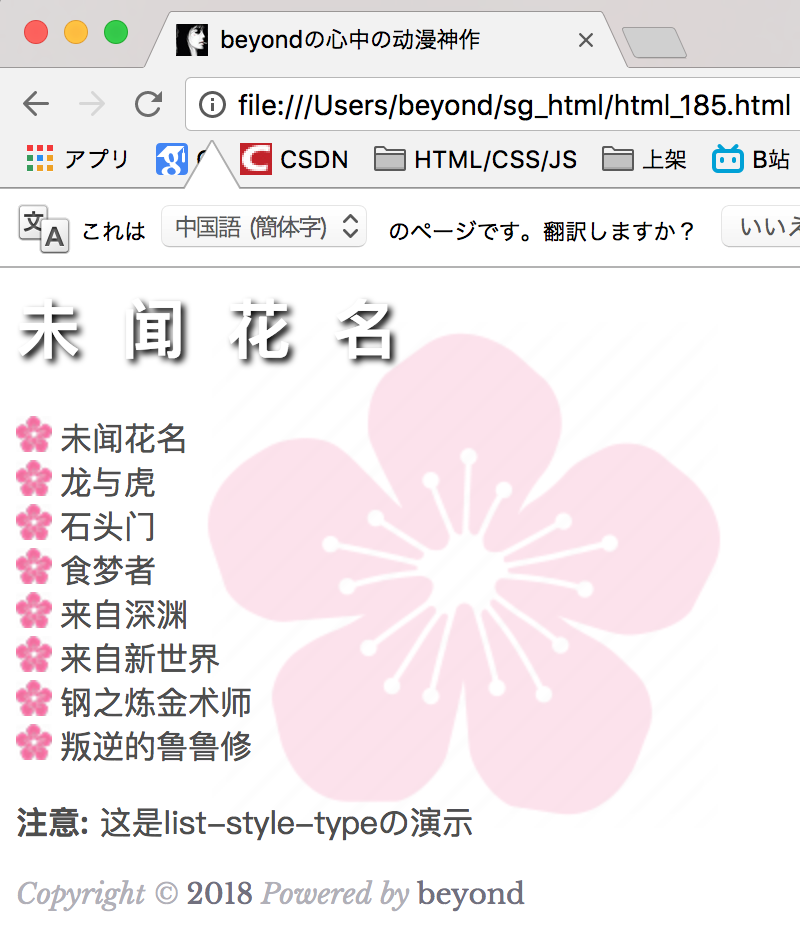
如果是给单个ul列表居中,可以使用下面代码,
<ul style="display:table;height:auto;margin:0 auto;list-style-type:circle;">
		<li>未闻花名</li>
		<li>龙与虎</li>
		<li>轻音少女</li>
	</ul>

	<p class="sgcenter sgcontentcolor">
		<b>注意:</b>
		这是list-style-type的演示
	</p>
效果如下:
多个列表样式,代码如下:
<!DOCTPYE html>
<html lang="zh">
<head>
	<link rel="icon" href="beyond.jpg" type="image/x-icon"/>
	<meta charset="UTF-8">
	<meta name="author" content="beyond">
	<meta http-equiv="refresh" content="520">
	<meta name="description" content="免费零基础教程">
	<meta name="viewport" content="width=device-width,
	initial-scale=1.0, maximum-scale=1.0,minimum-scale=1.0,user-scalable=0" />
	<meta name="keywords" content="HTML,CSS,JAVASCRIPT">
	<title>beyondの心中の动漫神作</title>
	<link rel="stylesheet" type="text/css" href="beyondbasestylewhite3.css">

	<!--[if lt IE 9]>
		<script src="//apps.bdimg.com/libs/html5shiv/3.7/html5shiv.min.js"></script>
	<![endif]-->

	<style type="text/css">
		body{
			font-size: 100%;
			background-image: url("sakura4.png");
			background-repeat: no-repeat;
			background-position: center center;
		}

	</style>
</head>

<body>

	<h1 style="color:white;text-shadow:2px 2px 4px #000;letter-spacing:5px;" class="sgcontentcolor">
		未 闻 花 名
	</h1>

	<ul style="list-style-type:circle;">
		<li>未闻花名</li>
		<li>龙与虎</li>
	</ul>

	<ul style="list-style-type:square;">
		<li>石头门</li>
		<li>食梦者</li>
	</ul>

	<ol style="list-style-type:upper-roman;">
		<li>来自深渊</li>
		<li>来自新世界</li>
	</ol>

	<ol style="list-style-type:lower-alpha;">
		<li>钢之炼金术师</li>
		<li>叛逆的鲁鲁修</li>
	</ol>

	<p class="sgcontentcolor">
		<b>注意:</b>
		这是list-style-type的演示
	</p>

	<footer id="copyright">
		<p style="font-size:14px;text-align:left;font-style:italic;">
		Copyright © <a id="author">2018</a> Powered by <a id="author">beyond</a>
		</p>

		<p><time pubdate datetime="2018-03-09" ></time>
		</p>
	</footer>
</body>
</html>
效果如下:
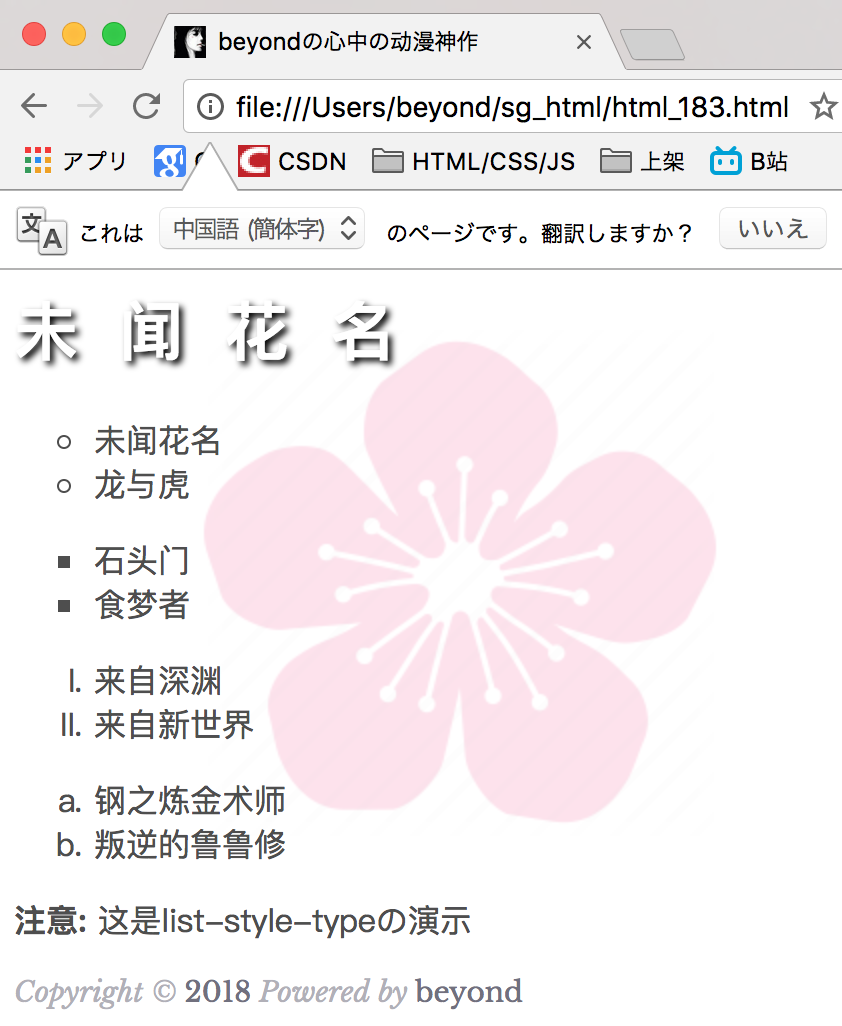
一些值是无序列表,以及有些是有序列表。
下列是对list-style-type属性的常见属性值的描述:
- none:不使用项目符号
- disc:实心圆
- circle:空心圆
- square:实心方块
- demical:阿拉伯数字
- lower-alpha:小写英文字母
- upper-alpha:大写英文字母
- lower-roman:小写罗马数字
- upper-roman:大写罗马数字
作为列表项标记的图像 list-style-image
要指定列表项标记的图像,使用列表样式图像属性 :
实例
list-style-image: url('sakura.png');
}
效果如下:
上面的例子在所有浏览器中显示并不相同,
在IE、Opera显示图像标记的位置 比 火狐、Chrome和Safari更高一点点。
提示:
利用 list-style-position 可以确定 标志 出现在列表项内容 之外 还是 内部???
如果你想在所有的浏览器放置同样的图片标志,就应使用浏览器兼容性解决方案,过程如下
浏览器兼容性完美解决方案
同样在所有的浏览器,下面的例子会显示的图像标记:
代码如下:
<!DOCTPYE html>
<html lang="zh">
<head>
	<link rel="icon" href="beyond.jpg" type="image/x-icon"/>
	<meta charset="UTF-8">
	<meta name="author" content="beyond">
	<meta http-equiv="refresh" content="520">
	<meta name="description" content="免费零基础教程">
	<meta name="viewport" content="width=device-width,
	initial-scale=1.0, maximum-scale=1.0,minimum-scale=1.0,user-scalable=0" />
	<meta name="keywords" content="HTML,CSS,JAVASCRIPT">
	<title>beyondの心中の动漫神作</title>
	<link rel="stylesheet" type="text/css" href="beyondbasestylewhite3.css">

	<!--[if lt IE 9]>
		<script src="//apps.bdimg.com/libs/html5shiv/3.7/html5shiv.min.js"></script>
	<![endif]-->

	<style type="text/css">
		body{
			font-size: 100%;
			background-image: url("sakura4.png");
			background-repeat: no-repeat;
			background-position: center center;
		}
		/*浏览器完美兼容*/
		ul {
			list-style-type: none;
			padding: 0px;
			margin: 0px;
		}
		ul li {
			background-image: url("sakura18.png");
			background-repeat: no-repeat;
			background-position: 0px 0px;
			padding-left: 22px;
		}
	</style>
</head>

<body>

	<h1 style="color:white;text-shadow:2px 2px 4px #000;letter-spacing:5px;" class="sgcontentcolor">
		未 闻 花 名
	</h1>

	<ul class="sgcontentcolor">
		<li>未闻花名</li>
		<li>龙与虎</li>
		<li>石头门</li>
		<li>食梦者</li>
		<li>来自深渊</li>
		<li>来自新世界</li>
		<li>钢之炼金术师</li>
		<li>叛逆的鲁鲁修</li>
	</ul>


	<p class="sgcontentcolor">
		<b>注意:</b>
		这是list-style-typeの演示
	</p>

	<footer id="copyright">
		<p style="font-size:14px;text-align:left;font-style:italic;">
		Copyright © <a id="author">2018</a> Powered by <a id="author">beyond</a>
		</p>

		<p><time pubdate datetime="2018-03-09" ></time>
		</p>
	</footer>
</body>
</html>
效果如下:
核心代码及解释说明如下:
实例
{
list-style-type: none;
padding: 0px;
margin: 0px;
}
ul li
{
background-image: url(sqpurple.gif);
background-repeat: no-repeat;
background-position: 0px 5px;
padding-left: 14px;
}
上面完美兼容浏览器的例子的核心代码解释:
- ul:
- 设置列表样式类型为没有列表项标记
- 设置填充和边距0px(浏览器兼容性)
- ul中所有li:
- 设置图像的URL,并设置它只显示一次(无重复)
- 您需要的定位图像位置(左0px和距离上方5px)
- 用padding-left属性把文本往右挪动腾出位置给图标 (默认图标会和第1个文字重合)
列表 - 缩写属性 (全写在一个属性里list-style)
在单个属性中也是可以指定所有的列表属性。这就是所谓的缩写属性。
为列表使用缩写属性,列表样式属性设置如下:
实例
list-style: square url("sakura.png");
}
注意:如果使用缩写属性值,千万不要搞错了顺序是:
- list-style-type 类型
- list-style-position (位置)
- list-style-image (图片)
如果上述值丢失一个,其余的仍然必须按指定的顺序书写。
更多实例
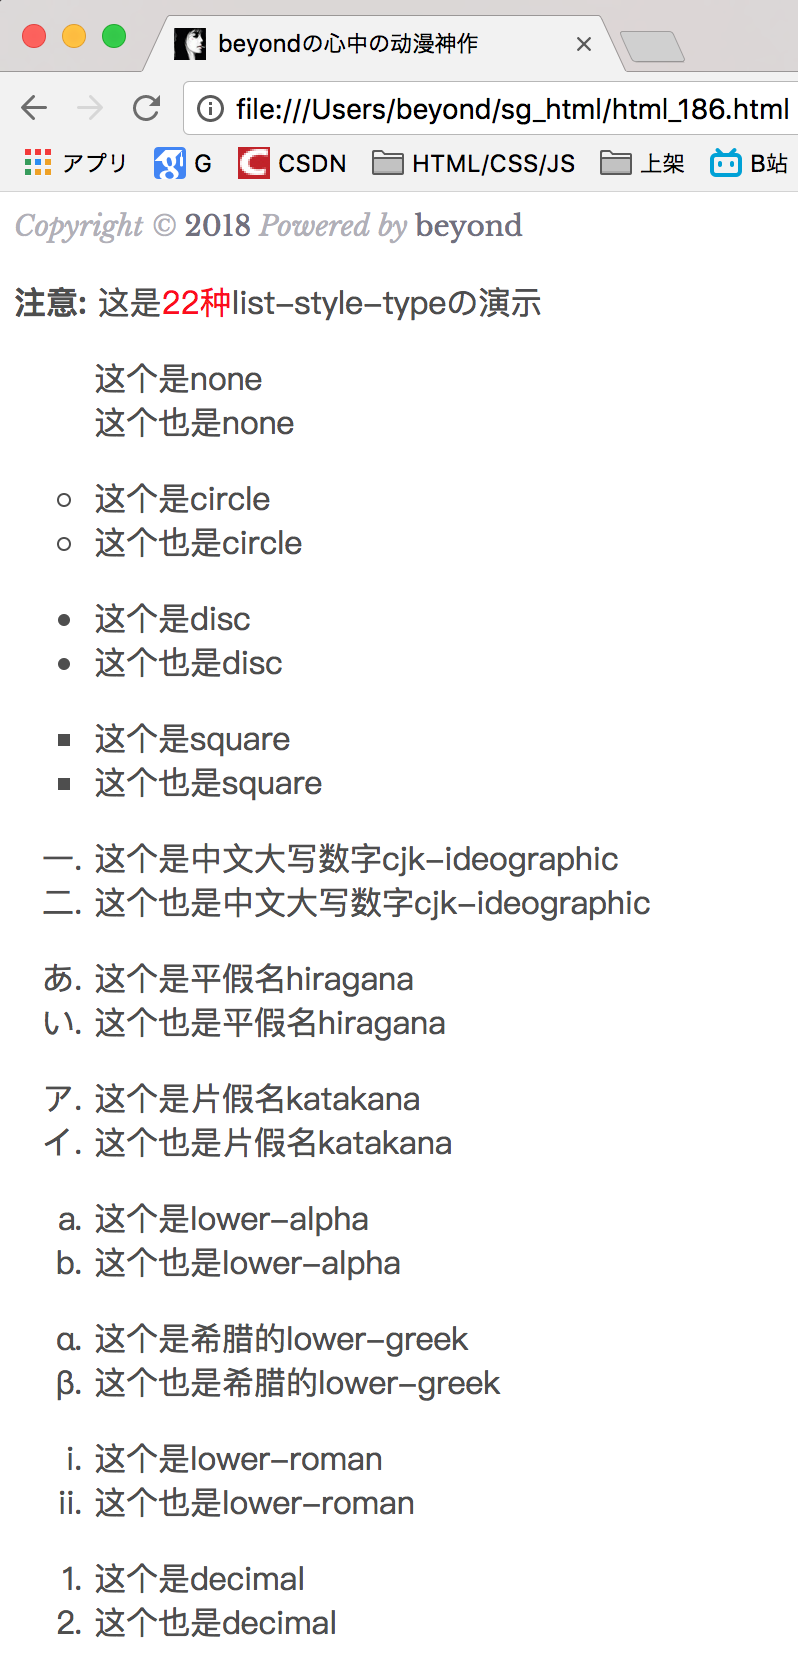
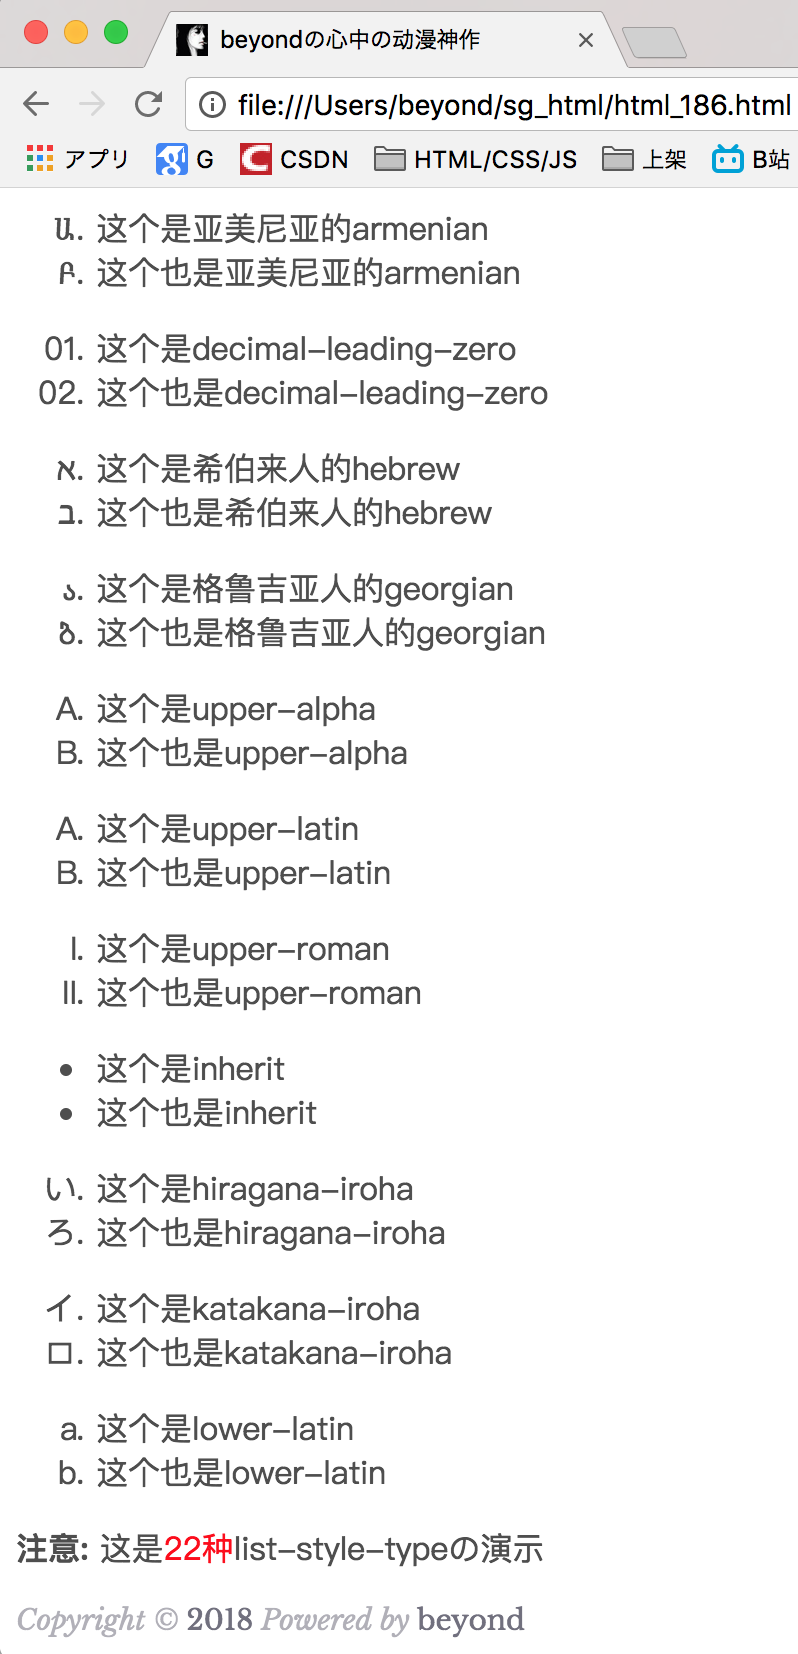
所有不同的列表项标记 (共计22种)
这个例子演示了所有不同的CSS列表项标记.
代码如下:
<!DOCTPYE html>
<html lang="zh">
<head>
	<link rel="icon" href="beyond.jpg" type="image/x-icon"/>
	<meta charset="UTF-8">
	<meta name="author" content="beyond">
	<meta http-equiv="refresh" content="520">
	<meta name="description" content="免费零基础教程">
	<meta name="viewport" content="width=device-width,
	initial-scale=1.0, maximum-scale=1.0,minimum-scale=1.0,user-scalable=0" />
	<meta name="keywords" content="HTML,CSS,JAVASCRIPT">
	<title>beyondの心中の动漫神作</title>
	<link rel="stylesheet" type="text/css" href="beyondbasestylewhite3.css">

	<!--[if lt IE 9]>
		<script src="//apps.bdimg.com/libs/html5shiv/3.7/html5shiv.min.js"></script>
	<![endif]-->

	<style type="text/css">
		body{
			font-size: 100%;
			background-image: url("sakura4.png");
			background-repeat: no-repeat;
			background-position: center center;
		}

	</style>
</head>

<body>
	<footer id="copyright">
		<p style="font-size:14px;text-align:left;font-style:italic;">
		Copyright © <a id="author">2018</a> Powered by <a id="author">beyond</a>
		</p>

		<p><time pubdate datetime="2018-03-09" ></time>
		</p>
	</footer>
	<p class="sgcontentcolor">
		<b>注意:</b>
		这是<a style="color:red;">22种</a>list-style-typeの演示
	</p>
	<!-- <h1 style="color:white;text-shadow:2px 2px 4px #000;letter-spacing:5px;" class="sgcontentcolor">
		未 闻 花 名
	</h1> -->
	<!-- 共计22种 -->
	<ol style="list-style-type:none;" class="sgcontentcolor">
		<li>这个是none</li>
		<li>这个也是none</li>
	</ol>
	<ul style="list-style-type:circle;" class="sgcontentcolor">
		<li>这个是circle</li>
		<li>这个也是circle</li>
	</ul>
	<ul style="list-style-type:disc;" class="sgcontentcolor">
		<li>这个是disc</li>
		<li>这个也是disc</li>
	</ul>
	<ul style="list-style-type:square;" class="sgcontentcolor">
		<li>这个是square</li>
		<li>这个也是square</li>
	</ul>

	<ol style="list-style-type:cjk-ideographic;" class="sgcontentcolor">
		<li>这个是中文大写数字cjk-ideographic</li>
		<li>这个也是中文大写数字cjk-ideographic</li>
	</ol>
	<ol style="list-style-type:hiragana;" class="sgcontentcolor">
		<li>这个是平假名hiragana</li>
		<li>这个也是平假名hiragana</li>
	</ol>

	<ol style="list-style-type:katakana;" class="sgcontentcolor">
		<li>这个是片假名katakana</li>
		<li>这个也是片假名katakana</li>
	</ol>

	<ol style="list-style-type:lower-alpha;" class="sgcontentcolor">
		<li>这个是lower-alpha</li>
		<li>这个也是lower-alpha</li>
	</ol>
	<ol style="list-style-type:lower-greek;" class="sgcontentcolor">
		<li>这个是希腊的lower-greek</li>
		<li>这个也是希腊的lower-greek</li>
	</ol>

	<ol style="list-style-type:lower-roman;" class="sgcontentcolor">
		<li>这个是lower-roman</li>
		<li>这个也是lower-roman</li>
	</ol>
	<ol style="list-style-type:decimal;" class="sgcontentcolor">
		<li>这个是decimal</li>
		<li>这个也是decimal</li>
	</ol>
	<ol style="list-style-type:armenian;" class="sgcontentcolor">
		<li>这个是亚美尼亚的armenian</li>
		<li>这个也是亚美尼亚的armenian</li>
	</ol>


	<ol style="list-style-type:decimal-leading-zero;" class="sgcontentcolor">
		<li>这个是decimal-leading-zero</li>
		<li>这个也是decimal-leading-zero</li>
	</ol>
	<ol style="list-style-type:hebrew;" class="sgcontentcolor">
		<li>这个是希伯来人的hebrew</li>
		<li>这个也是希伯来人的hebrew</li>
	</ol>
	<ol style="list-style-type:georgian;" class="sgcontentcolor">
		<li>这个是格鲁吉亚人的georgian</li>
		<li>这个也是格鲁吉亚人的georgian</li>
	</ol>


	<ol style="list-style-type:upper-alpha;" class="sgcontentcolor">
		<li>这个是upper-alpha</li>
		<li>这个也是upper-alpha</li>
	</ol>
	<ol style="list-style-type:upper-latin;" class="sgcontentcolor">
		<li>这个是upper-latin</li>
		<li>这个也是upper-latin</li>
	</ol>
	<ol style="list-style-type:upper-roman;" class="sgcontentcolor">
		<li>这个是upper-roman</li>
		<li>这个也是upper-roman</li>
	</ol>
	<ol style="list-style-type:inherit;" class="sgcontentcolor">
		<li>这个是inherit</li>
		<li>这个也是inherit</li>
	</ol>
	<ol style="list-style-type:hiragana-iroha;" class="sgcontentcolor">
		<li>这个是hiragana-iroha</li>
		<li>这个也是hiragana-iroha</li>
	</ol>
	<ol style="list-style-type:katakana-iroha;" class="sgcontentcolor">
		<li>这个是katakana-iroha</li>
		<li>这个也是katakana-iroha</li>
	</ol>
	<ol style="list-style-type:lower-latin;" class="sgcontentcolor">
		<li>这个是lower-latin</li>
		<li>这个也是lower-latin</li>
	</ol>


</body>
</html>
效果如下:
所有的CSS列表属性
| 属性 | 描述 |
|---|---|
| list-style | 简写属性。用于把所有用于列表的属性设置于一个声明中 |
| list-style-image | 将图象设置为列表项标志。 |
| list-style-position | 设置列表中列表项标志的位置。 |
| list-style-type | 设置列表项标志的类型。 |
CSS 表格
使用CSS可以大大提高HTML表格的外观.
| 动漫名称 | 女主角 | 放映年代 |
|---|---|---|
| 未闻花名 | 面码 | 2011年4月 |
| 龙与虎 | 逢坂大河 | 2008年10月 |
| 可塑性记忆 | 艾拉 | 2015年4月 |
| 轻音少女 | 平泽唯 | 2009年4月 |
表格边框
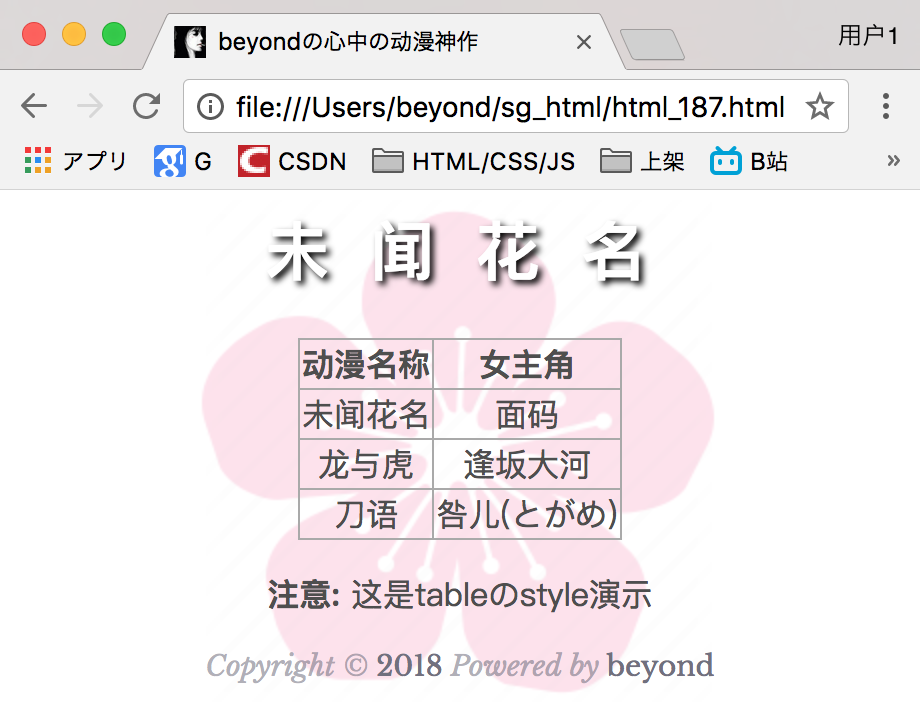
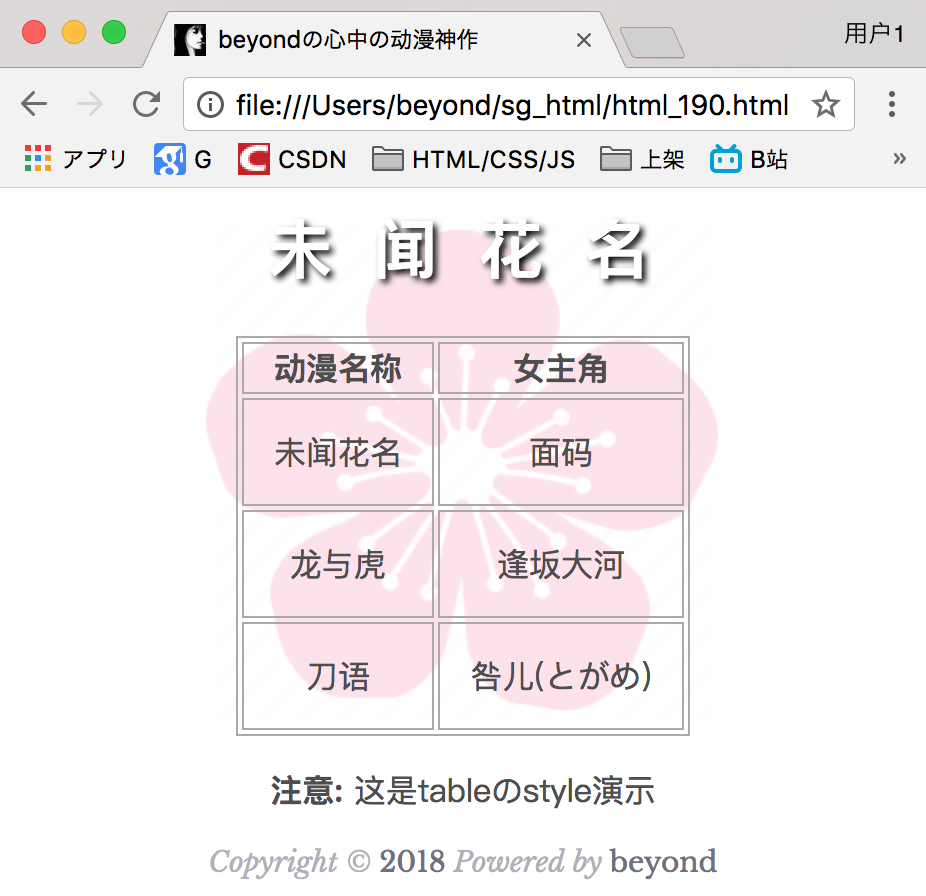
指定CSS表格边框,使用border属性。
下面的例子指定了一个表格的Th和TD元素的黑色边框:
实例
{
border: 1px solid black;
}
请注意,在上面的例子中的表格有双边框。这是因为表和th/ td元素有独立的边界。
为了显示一个表的单个边框,使用 border-collapse属性.
完整代码如下:
<!DOCTPYE html>
<html lang="zh">
<head>
<link rel="icon" href="beyond.jpg" type="image/x-icon"/>
<meta charset="UTF-8">
<meta name="author" content="beyond">
<meta http-equiv="refresh" content="520">
<meta name="description" content="免费零基础教程">
<meta name="viewport" content="width=device-width,
initial-scale=1.0, maximum-scale=1.0,minimum-scale=1.0,user-scalable=0" />
<meta name="keywords" content="HTML,CSS,JAVASCRIPT">
<title>beyondの心中の动漫神作</title>
<link rel="stylesheet" type="text/css" href="beyondbasestylewhite3.css">
<!--[if lt IE 9]>
<script src="//apps.bdimg.com/libs/html5shiv/3.7/html5shiv.min.js"></script>
<![endif]-->
<style type="text/css">
body{
font-size: 100%;
background-image: url("sakura4.png");
background-repeat: no-repeat;
background-position: center center;
}
table,th,td {
border: 1px solid darkgray;
text-align: center;
}
</style>
</head>
<body>
<h1 style="color:white;text-shadow:2px 2px 4px #000;letter-spacing:5px;" class="sgcontentcolor sgcenter">
未 闻 花 名
</h1>
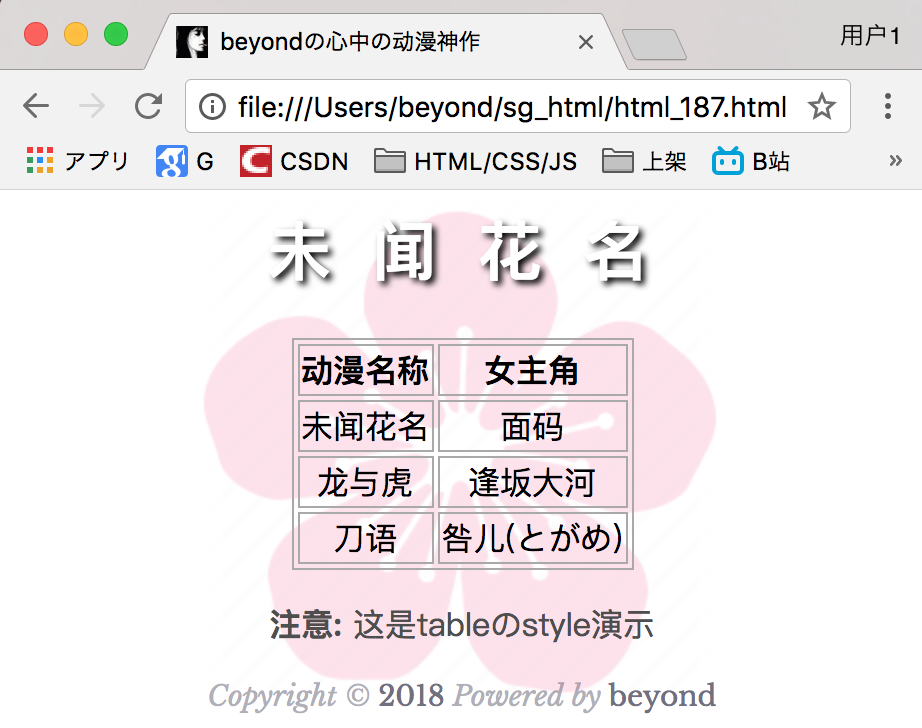
<table style="margin:0 auto;">
<tr>
<th>动漫名称</th>
<th>女主角</th>
</tr>
<tr>
<td>未闻花名</td>
<td>面码</td>
</tr>
<tr>
<td>龙与虎</td>
<td>逢坂大河</td>
</tr>
<tr>
<td>刀语</td>
<td>咎儿(とがめ)</td>
</tr>
</table>
<p class="sgcontentcolor sgcenter">
<b>注意:</b>
这是tableのstyle演示
</p>
<footer id="copyright">
<p style="font-size:14px;text-align:center;font-style:italic;">
Copyright © <a id="author">2018</a> Powered by <a id="author">beyond</a>
</p>
<p><time pubdate datetime="2018-03-09" ></time>
</p>
</footer>
</body>
</html>效果如下:
折叠边框
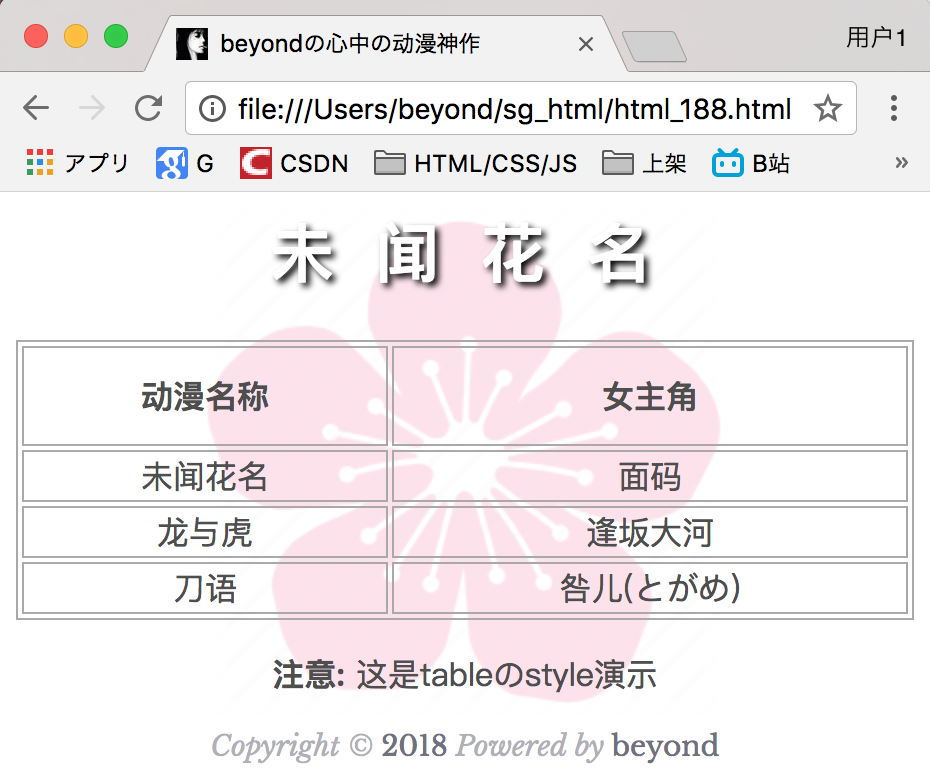
border-collapse 属性设置表格的边框是否被折叠成一个单一的边框或隔开:
实例
{
border-collapse:collapse;
}
table,th, td
{
border: 1px solid black;
}
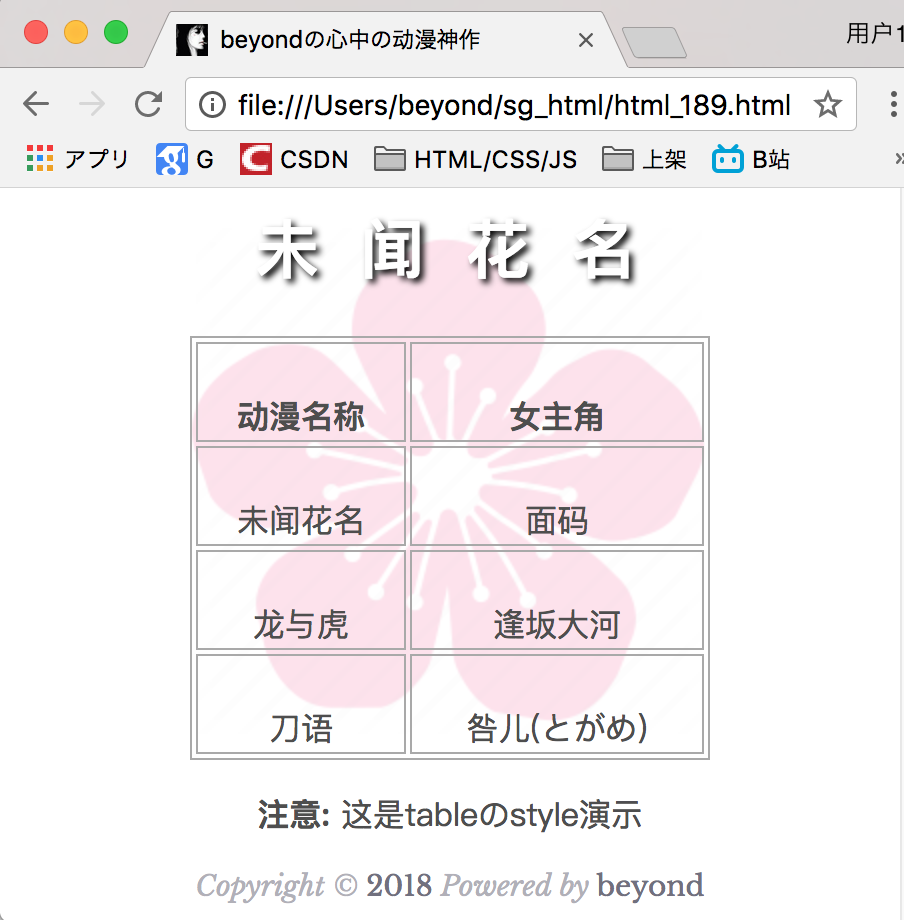
表格宽度和高度
Width和height属性定义表格的 宽度和高度。
下面的例子是设置100%的宽度,50像素的th元素的高度的表格:
实例
{
width:100%;
}
th
{
height:50px;
}
表格文字对齐
表格中的文本对齐和垂直对齐属性。
text-align属性设置水平对齐方式,像左,右,或中心:
实例
{
text-align:right;
}
效果如下:
垂直对齐属性设置垂直对齐,比如顶部,底部或中间:
实例
{
height:50px;
vertical-align:bottom;
}
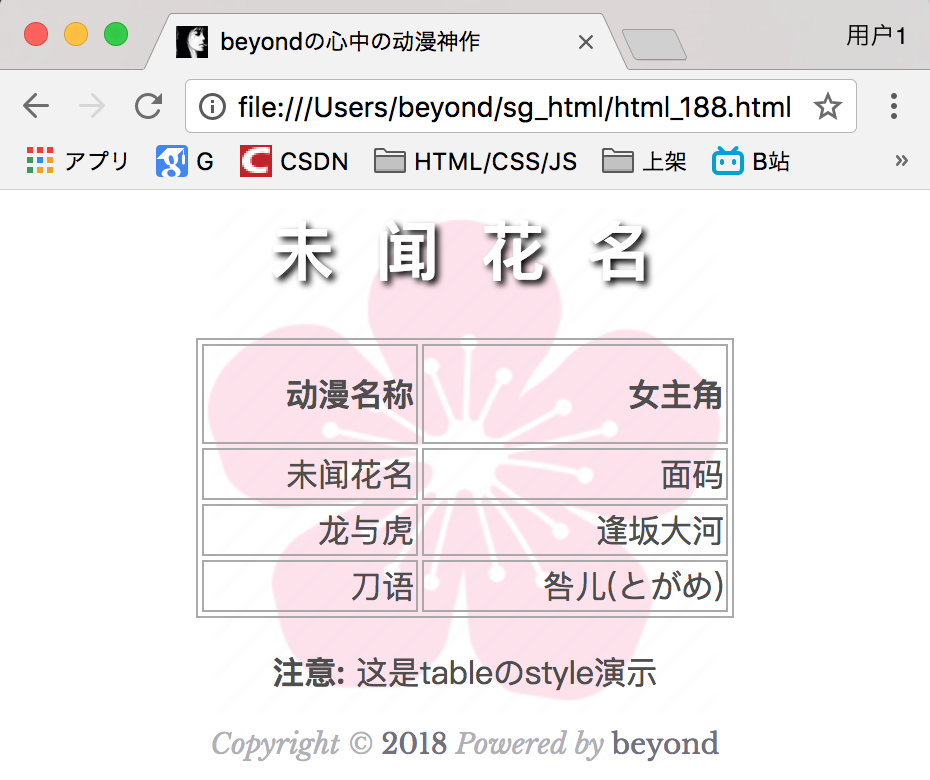
表格填充
如果在表的内容中 控制空格之间的边框,
应使用td和th元素的填充属性:
实例
{
padding :15px;
}
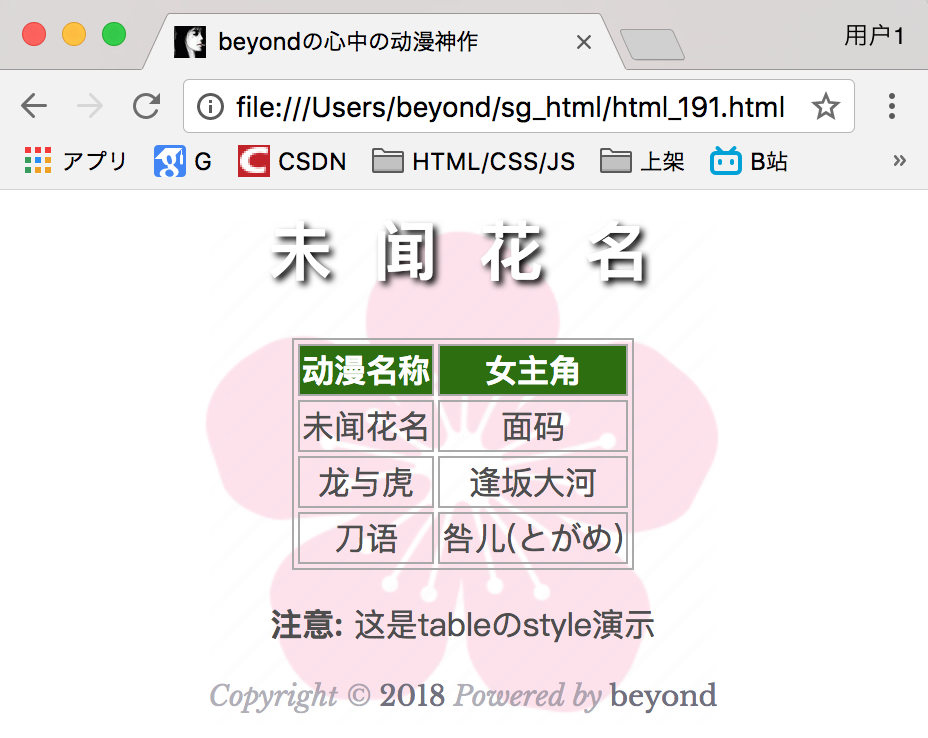
表格颜色
下面的例子指定边框的颜色,和th元素的文本和背景颜色:
实例
{
border:1px solid green;
}
th
{
background-color:rgb(41,111,2);
color:white;
}
更多实例
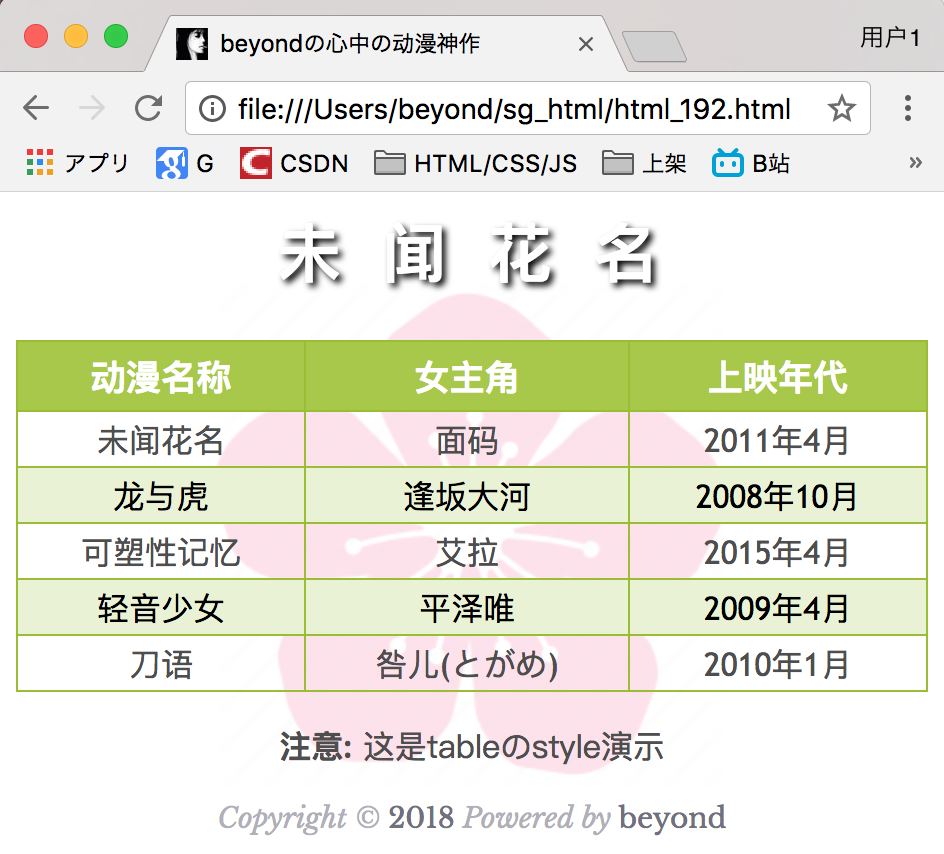
制作一个个性表格
这个例子演示了如何创建一个个性的表格。
代码如下:
<!DOCTPYE html>
<html lang="zh">
<head>
	<link rel="icon" href="beyond.jpg" type="image/x-icon"/>
	<meta charset="UTF-8">
	<meta name="author" content="beyond">
	<meta http-equiv="refresh" content="520">
	<meta name="description" content="免费零基础教程">
	<meta name="viewport" content="width=device-width,
	initial-scale=1.0, maximum-scale=1.0,minimum-scale=1.0,user-scalable=0" />
	<meta name="keywords" content="HTML,CSS,JAVASCRIPT">
	<title>beyondの心中の动漫神作</title>
	<link rel="stylesheet" type="text/css" href="beyondbasestylewhite3.css">

	<!--[if lt IE 9]>
		<script src="//apps.bdimg.com/libs/html5shiv/3.7/html5shiv.min.js"></script>
	<![endif]-->

	<style type="text/css">
		body{
			font-size: 100%;
			background-image: url("sakura4.png");
			background-repeat: no-repeat;
			background-position: center center;
		}
		#id_table {
			font-family: "Trebuchet MS",Arial,Helvetica,sans-serif;
			width: 100%;
			border-collapse:collapse;
		}
		/*表头和单元格*/
		#id_table th,#id_table td {
			font-size: 1em;
			border: 1px solid #98bf21;
			padding: 3px 7px 2px 7px;
		}
		/*表头*/
		#id_table th {
			font-size: 1.1em;
			text-align: center;
			/*比td都多了2个px*/
			padding-top: 5px;
			padding-bottom: 4px;
			background-color: #A7C942;
			color: #fff;
		}
		/*这个牛X*/
		/*表格里的行里的class_even类里的td*/
		#id_table tr.class_even td {
			color: #000;
			background-color: #EAF2D3;
		}
		#id_table tr td {
			text-align: center;
		}
	</style>
</head>

<body>

	<h1 style="color:white;text-shadow:2px 2px 4px #000;letter-spacing:5px;" class="sgcontentcolor sgcenter">
		未 闻 花 名
	</h1>

	<table id="id_table" style="margin:0 auto;" class="sgcontentcolor">
		<tr>
			<th>动漫名称</th>
			<th>女主角</th>
			<th>上映年代</th>
		</tr>
		<tr>
			<td>未闻花名</td>
			<td>面码</td>
			<td>2011年4月</td>
		</tr>
		<tr class="class_even">
			<td>龙与虎</td>
			<td>逢坂大河</td>
			<td>2008年10月</td>
		</tr>
		<tr>
			<td>可塑性记忆</td>
			<td>艾拉</td>
			<td>2015年4月</td>
		</tr>
		<tr class="class_even">
			<td>轻音少女</td>
			<td>平泽唯</td>
			<td>2009年4月</td>
		</tr>
		<tr>
			<td>刀语</td>
			<td>咎儿(とがめ)</td>
			<td>2010年1月</td>
		</tr>
	</table>

	<p class="sgcontentcolor sgcenter">
		<b>注意:</b>
		这是tableのstyle演示
	</p>
	<footer id="copyright">
		<p style="font-size:14px;text-align:center;font-style:italic;">
		Copyright © <a id="author">2018</a> Powered by <a id="author">beyond</a>
		</p>

		<p><time pubdate datetime="2018-03-09" ></time>
		</p>
	</footer>


</body>
</html>
效果如下:
设置表格标题的位置
这个例子演示了如何定位表格标题。
caption标签位置table标签下第一行,代表的是表格的标题
代码如下:
caption {
			color: Teal;
			caption-side: bottom;
			padding-top: 5px;
			font-size: 1.3em;
		}
效果如下:

附录:asdf
CSS :link 选择器
定义和用法
:link 选择器选择未访问的链接,向未访问的链接添加特殊的样式。
:link 是一个伪类,它适用于到另一个未被访问的资源的超链接。
:link 适用于未访问的URL的链接。未访问的URL是链接点不会显示在用户代理的历史记录中的URL。
此状态与 :visited 状态互斥。
例子:
a:link  {color: blue;}
*:link {text-decoration: underline;}
注意: :link 选择器对已经访问的链接没有样式。
提示: 使用 :visited 选择器设置访问过的页面链接的样式,:hover选择器当有鼠标悬停在其上的链接样式,:active 选择器设置当你点击链接时的样式。
实例 1
选择未访问链接样式:
{
background-color:yellow;
}
尝试一下 »
实例 2
激活的、已访问的、未访问的或者当有鼠标悬停在其上的链接:
a:visited {color:green;}
a:hover {color:red;}
a:active {color:yellow;}
尝试一下 »
实例 3
不同样式的链接样式:
a.ex2:hover,a.ex2:active {font-size:150%;}
尝试一下 »
.
CSS 选择器
CSS选择器用于选择你想要的元素的样式的模式。
"CSS"列表示在CSS版本的属性定义(CSS1,CSS2,或对CSS3)。
| 选择器 | 示例 | 示例说明 | CSS |
|---|---|---|---|
| .class | .intro | 选择所有class="intro"的元素 | 1 |
| #id | #firstname | 选择所有id="firstname"的元素 | 1 |
| * | * | 选择所有元素 | 2 |
| element | p | 选择所有<p>元素 | 1 |
| element,element | div,p | 选择所有<div>元素和<p>元素 | 1 |
| element element | div p | 选择<div>元素内的所有<p>元素 | 1 |
| element>element | div>p | 选择所有父级是 <div> 元素的 <p> 元素 | 2 |
| element+element | div+p | 选择所有紧接着<div>元素之后的<p>元素 | 2 |
| [attribute] | [target] | 选择所有带有target属性元素 | 2 |
| [attribute=value] | [target=_blank] | 选择所有使用target="_blank"的元素 | 2 |
| [attribute~=value] | [title~=flower] | 选择标题属性包含单词"flower"的所有元素 | 2 |
| [attribute|=language] | [lang|=en] | 选择一个lang属性的起始值="EN"的所有元素 | 2 |
| :link | a:link | 选择所有未访问链接 | 1 |
| :visited | a:visited | 选择所有访问过的链接 | 1 |
| :active | a:active | 选择活动链接 | 1 |
| :hover | a:hover | 选择鼠标在链接上面时 | 1 |
| :focus | input:focus | 选择具有焦点的输入元素 | 2 |
| ::first-letter | p::first-letter | 选择每一个<P>元素的第一个字母 | 1 |
| ::first-line | p::first-line | 选择每一个<P>元素的第一行 | 1 |
| ::first-child | p::first-child | 指定只有当<p>元素是其父级的第一个子级的样式。 | 2 |
| ::before | p::before | 在每个<p>元素之前插入内容 | 2 |
| ::after | p::after | 在每个<p>元素之后插入内容 | 2 |
| ::lang(language) | p:lang(it) | 选择一个lang属性的起始值="it"的所有<p>元素 | 2 |
| element1~element2 | p~ul | 选择<P>元素之后的每一个ul元素 | 3 |
| [attribute^=value] | a[src^="https"] | 选择每一个src属性的值以"https"开头的元素 | 3 |
| [attribute$=value] | a[src$=".pdf"] | 选择每一个src属性的值以".pdf"结尾的元素 | 3 |
| [attribute*=value] | a[src*="44lan"] | 选择每一个src属性的值包含子字符串"44lan"的元素 | 3 |
| :first-of-type | p:first-of-type | 选择每个<P>元素是其父级的第一个<P>元素 | 3 |
| :last-of-type | p:last-of-type | 选择每个<P>元素是其父级的最后一个<P>元素 | 3 |
| :only-of-type | p:only-of-type | 选择每个<P>元素是其父级的唯一<P>元素 | 3 |
| :only-child | p:only-child | 选择每个<P>元素是其父级的唯一子元素 | 3 |
| :nth-child(n) | p:nth-child(2) | 选择每个<P>元素是其父级的第二个子元素 | 3 |
| :nth-last-child(n) | p:nth-last-child(2) | 选择每个<P>元素的是其父级的第二个子元素,从最后一个子项计数 | 3 |
| :nth-of-type(n) | p:nth-of-type(2) | 选择每个<P>元素是其父级的第二个<P>元素 | 3 |
| :nth-last-of-type(n) | p:nth-last-of-type(2) | 选择每个<P>元素的是其父级的第二个<P>元素,从最后一个子项计数 | 3 |
| :last-child | p:last-child | 选择每个<P>元素是其父级的最后一个子级。 | 3 |
| :root | :root | 选择文档的根元素 | 3 |
| :empty | p:empty | 选择每个没有任何子级的<P>元素(包括文本节点) | 3 |
| :target | #news:target | 选择当前活动的#news元素(包含该锚名称的点击的URL) | 3 |
| :enabled | input:enabled | 选择每一个已启用的输入元素 | 3 |
| :disabled | input:disabled | 选择每一个禁用的输入元素 | 3 |
| :checked | input:checked | 选择每个选中的输入元素 | 3 |
| :not(selector) | :not(p) | 选择每个并非<P>元素的元素 | 3 |
| ::selection | ::selection | 匹配元素中被用户选中或处于高亮状态的部分 | 3 |
| :out-of-range | :out-of-range | 匹配值在指定区间之外的<input>元素 | 3 |
| :in-range | :in-range | 匹配值在指定区间之内的<input>元素 | 3 |
| :read-write | :read-write | 用于匹配可读及可写的元素 | 3 |
| :read-only | :read-only | 用于匹配设置 "readonly"(只读) 属性的元素 | 3 |
| :optional | :optional | 用于匹配可选的输入元素 | 3 |
| :required | :required | 用于匹配设置了 "required" 属性的元素 | 3 |
| :valid | :valid | 用于匹配输入值为合法的元素 | 3 |
| :invalid | :invalid | 用于匹配输入值为非法的元素 | 3 |
未完待续,下一章节,つづく


 873
873

 被折叠的 条评论
为什么被折叠?
被折叠的 条评论
为什么被折叠?
 到【灌水乐园】发言


