


class QRScannerController: UIViewController {
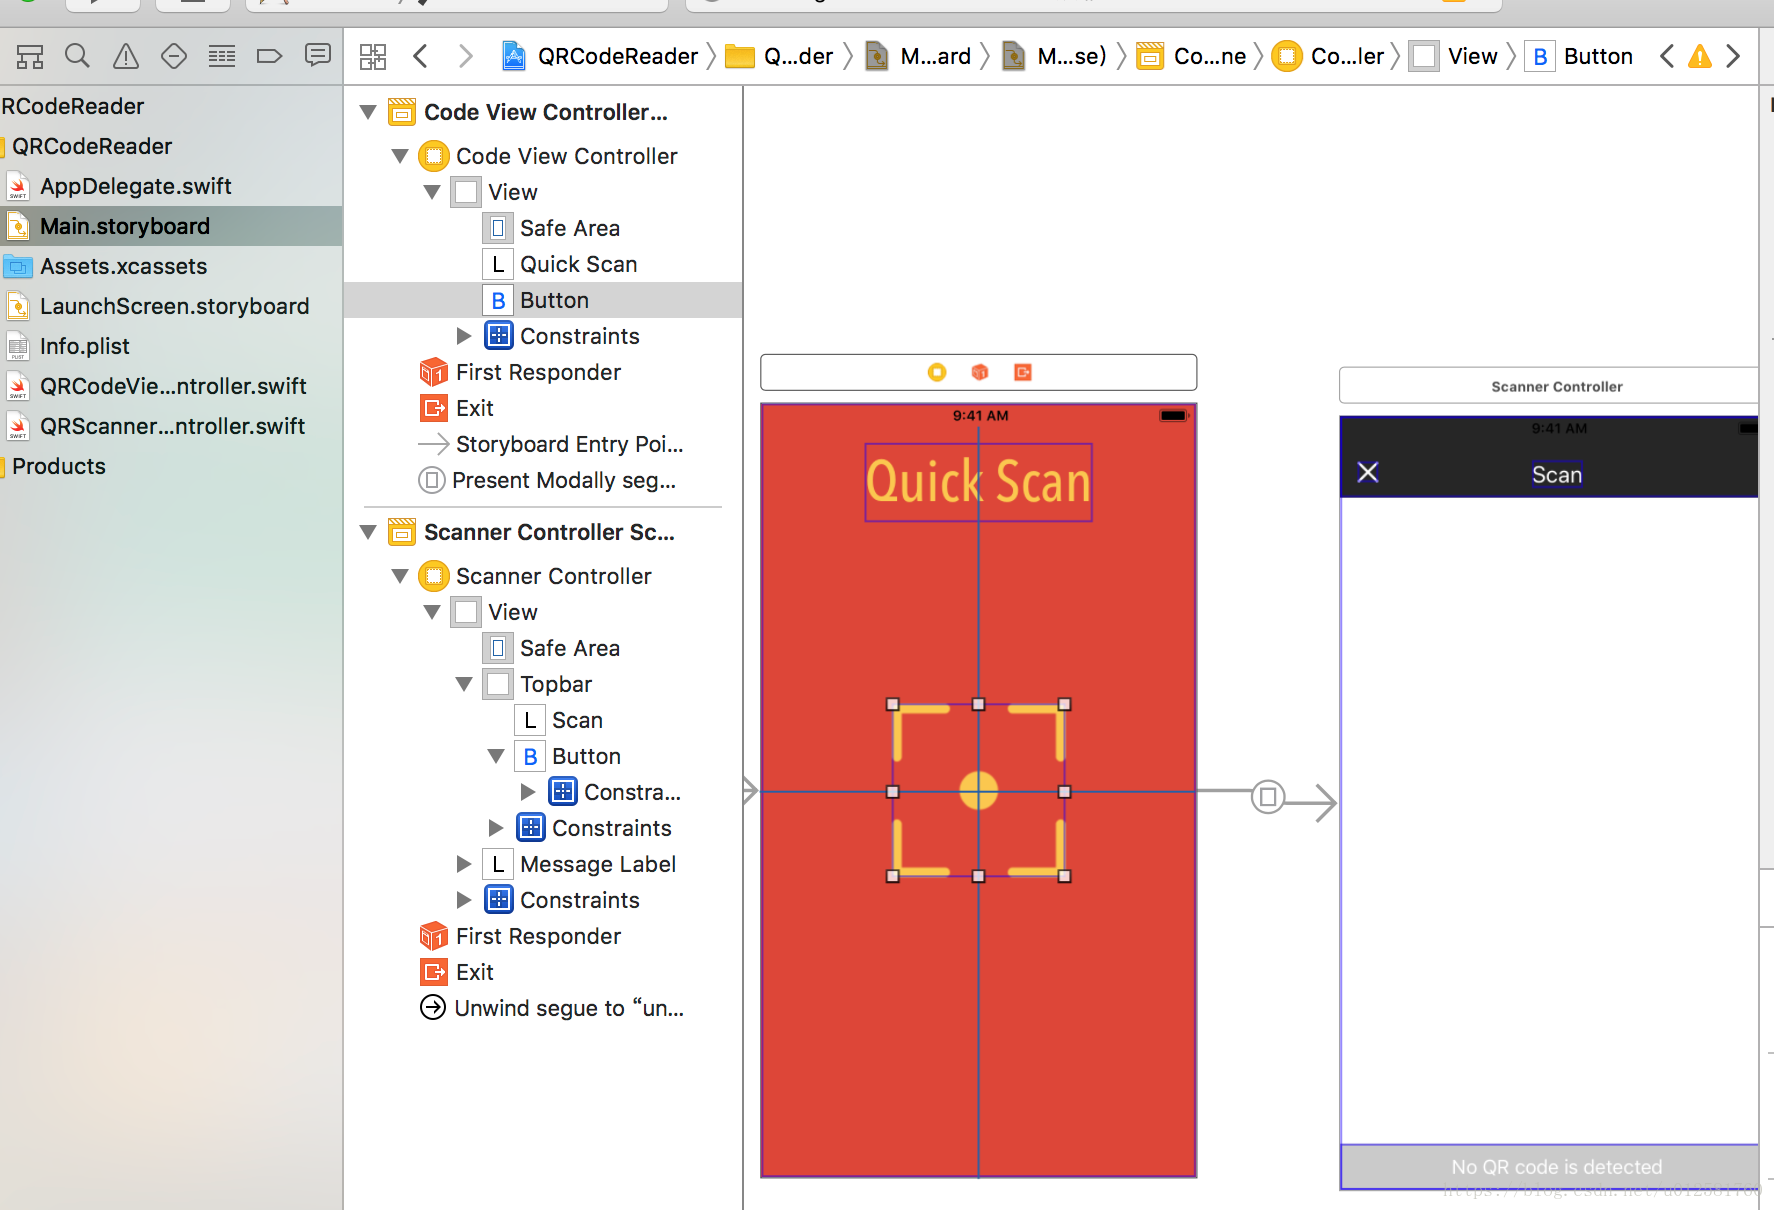
@IBOutlet var messageLabel:UILabel!
@IBOutlet var topbar: UIView!
var captureSession = AVCaptureSession()
var videoPreviewLayer: AVCaptureVideoPreviewLayer?
var qrCodeFrameView: UIView?
private let supportedCodeTypes = [AVMetadataObject.ObjectType.upce,
AVMetadataObject.ObjectType.code39,
AVMetadataObject.ObjectType.code39Mod43,
AVMetadataObject.ObjectType.code93,
AVMetadataObject.ObjectType.code128,
AVMetadataObject.ObjectType.ean8,
AVMetadataObject.ObjectType.ean13,
AVMetadataObject.ObjectType.aztec,
AVMetadataObject.ObjectType.pdf417,
AVMetadataObject.ObjectType.itf14,
AVMetadataObject.ObjectType.dataMatrix,
AVMetadataObject.ObjectType.interleaved2of5,
AVMetadataObject.ObjectType.qr]
override func viewDidLoad() {
super.viewDidLoad()
// 用这个获取device失败
// let deviceDiscoverySession = AVCaptureDevice.DiscoverySession(deviceTypes: [.builtInDualCamera], mediaType: AVMediaType.video, position: .back)
// guard let captureDevice = deviceDiscoverySession.devices.first else {
// print("Failed to get the camera device")
// return
// }
// Get the back-facing camera for capturing videos
let captureDevice = AVCaptureDevice.default(for: .video)
do {
// Get an instance of the AVCaptureDeviceInput class using the previous device object.
let input = try AVCaptureDeviceInput(device: captureDevice!)
// Set the input device on the capture session.
captureSession.addInput(input)
// Initialize a AVCaptureMetadataOutput object and set it as the output device to the capture session.
let captureMetadataOutput = AVCaptureMetadataOutput()
captureSession.addOutput(captureMetadataOutput)
// Set delegate and use the default dispatch queue to execute the call back
captureMetadataOutput.setMetadataObjectsDelegate(self, queue: DispatchQueue.main)
captureMetadataOutput.metadataObjectTypes = supportedCodeTypes
// captureMetadataOutput.metadataObjectTypes = [AVMetadataObject.ObjectType.qr]
} catch {
// If any error occurs, simply print it out and don't continue any more.
print(error)
return
}
// Initialize the video preview layer and add it as a sublayer to the viewPreview view's layer.
videoPreviewLayer = AVCaptureVideoPreviewLayer(session: captureSession)
videoPreviewLayer?.videoGravity = AVLayerVideoGravity.resizeAspectFill
videoPreviewLayer?.frame = view.layer.bounds
view.layer.addSublayer(videoPreviewLayer!)
// Start video capture.
captureSession.startRunning()
// Move the message label and top bar to the front
view.bringSubview(toFront: messageLabel)
view.bringSubview(toFront: topbar)
// Initialize QR Code Frame to highlight the QR code
qrCodeFrameView = UIView()
if let qrCodeFrameView = qrCodeFrameView {
qrCodeFrameView.layer.borderColor = UIColor.green.cgColor
qrCodeFrameView.layer.borderWidth = 2
view.addSubview(qrCodeFrameView)
view.bringSubview(toFront: qrCodeFrameView)
}
}
override func didReceiveMemoryWarning() {
super.didReceiveMemoryWarning()
// Dispose of any resources that can be recreated.
}
/*
// MARK: - Navigation
// In a storyboard-based application, you will often want to do a little preparation before navigation
override func prepare(for segue: UIStoryboardSegue, sender: Any?) {
// Get the new view controller using segue.destinationViewController.
// Pass the selected object to the new view controller.
}
*/
}
extension QRScannerController: AVCaptureMetadataOutputObjectsDelegate {
func metadataOutput(_ output: AVCaptureMetadataOutput, didOutput metadataObjects: [AVMetadataObject], from connection: AVCaptureConnection) {
// Check if the metadataObjects array is not nil and it contains at least one object.
if metadataObjects.count == 0 {
qrCodeFrameView?.frame = CGRect.zero
messageLabel.text = "No QR code is detected"
return
}
// Get the metadata object.
let metadataObj = metadataObjects[0] as! AVMetadataMachineReadableCodeObject
if supportedCodeTypes.contains(metadataObj.type) {
// If the found metadata is equal to the QR code metadata (or barcode) then update the status label's text and set the bounds
let barCodeObject = videoPreviewLayer?.transformedMetadataObject(for: metadataObj)
qrCodeFrameView?.frame = barCodeObject!.bounds
if metadataObj.stringValue != nil {
messageLabel.text = metadataObj.stringValue
}
}
}
}
如果把下面扫描到的信息用UIAlertController显示出来则
import UIKit
import AVFoundation

class QRScannerController: UIViewController {

    @IBOutlet var messageLabel:UILabel!
    @IBOutlet var topbar: UIView!

    var captureSession = AVCaptureSession()

    var videoPreviewLayer: AVCaptureVideoPreviewLayer?
    var qrCodeFrameView: UIView?

    private let supportedCodeTypes = [AVMetadataObject.ObjectType.upce,
                                      AVMetadataObject.ObjectType.code39,
                                      AVMetadataObject.ObjectType.code39Mod43,
                                      AVMetadataObject.ObjectType.code93,
                                      AVMetadataObject.ObjectType.code128,
                                      AVMetadataObject.ObjectType.ean8,
                                      AVMetadataObject.ObjectType.ean13,
                                      AVMetadataObject.ObjectType.aztec,
                                      AVMetadataObject.ObjectType.pdf417,
                                      AVMetadataObject.ObjectType.itf14,
                                      AVMetadataObject.ObjectType.dataMatrix,
                                      AVMetadataObject.ObjectType.interleaved2of5,
                                      AVMetadataObject.ObjectType.qr]

    override func viewDidLoad() {
        super.viewDidLoad()

        // Get the back-facing camera for capturing videos
        let deviceDiscoverySession = AVCaptureDevice.DiscoverySession(deviceTypes: [.builtInDualCamera], mediaType: AVMediaType.video, position: .back)

        guard let captureDevice = deviceDiscoverySession.devices.first else {
            print("Failed to get the camera device")
            return
        }

        do {
            // Get an instance of the AVCaptureDeviceInput class using the previous device object.
            let input = try AVCaptureDeviceInput(device: captureDevice)

            // Set the input device on the capture session.
            captureSession.addInput(input)

            // Initialize a AVCaptureMetadataOutput object and set it as the output device to the capture session.
            let captureMetadataOutput = AVCaptureMetadataOutput()
            captureSession.addOutput(captureMetadataOutput)

            // Set delegate and use the default dispatch queue to execute the call back
            captureMetadataOutput.setMetadataObjectsDelegate(self, queue: DispatchQueue.main)
            captureMetadataOutput.metadataObjectTypes = supportedCodeTypes
//            captureMetadataOutput.metadataObjectTypes = [AVMetadataObject.ObjectType.qr]

        } catch {
            // If any error occurs, simply print it out and don't continue any more.
            print(error)
            return
        }

        // Initialize the video preview layer and add it as a sublayer to the viewPreview view's layer.
        videoPreviewLayer = AVCaptureVideoPreviewLayer(session: captureSession)
        videoPreviewLayer?.videoGravity = AVLayerVideoGravity.resizeAspectFill
        videoPreviewLayer?.frame = view.layer.bounds
        view.layer.addSublayer(videoPreviewLayer!)

        // Start video capture.
        captureSession.startRunning()

        // Move the message label and top bar to the front
        view.bringSubview(toFront: messageLabel)
        view.bringSubview(toFront: topbar)

        // Initialize QR Code Frame to highlight the QR code
        qrCodeFrameView = UIView()

        if let qrCodeFrameView = qrCodeFrameView {
            qrCodeFrameView.layer.borderColor = UIColor.green.cgColor
            qrCodeFrameView.layer.borderWidth = 2
            view.addSubview(qrCodeFrameView)
            view.bringSubview(toFront: qrCodeFrameView)
        }
    }

    override func didReceiveMemoryWarning() {
        super.didReceiveMemoryWarning()
        // Dispose of any resources that can be recreated.
    }

    // MARK: - Helper methods

    func launchApp(decodedURL: String) {
        // 警告信息 warning attempt to present<UIAlertController:0xxx> on <ORCodeReader.QRScannerController:0x107xx>while a presentation is in progress!
        // 因为该方法在每次条码被扫描时会被调用,所以当app已经呈现一个UIAlertController时,可能会再呈现另一个UIAlertController,要解决这个问题,需要先检查App在调用present(_animated:completion:)方法之前,是否已经出现了UIAlertController物件,在iOS中当你使用present(_animated:completion)方法来呈现一个视图控制器时,所呈现的视图控制器是存储在目前视图控制器的presentedViewController属性,比如:当QRScannerController实例调用present(_:animated:completion:)方法来呈现UIAlertController时,presentedViewController属性被设为UIAlertController,当UIAlertController解除时,presentedViewController属性将会设为nil
        if presentedViewController != nil {
            return
        }

        let alertPrompt = UIAlertController(title: "Open App", message: "You're going to open \(decodedURL)", preferredStyle: .actionSheet)
        let confirmAction = UIAlertAction(title: "Confirm", style: UIAlertActionStyle.default, handler: { (action) -> Void in

            if let url = URL(string: decodedURL) {
                if UIApplication.shared.canOpenURL(url) {
                    UIApplication.shared.open(url, options: [:], completionHandler: nil)
                }
            }
        })

        let cancelAction = UIAlertAction(title: "Cancel", style: UIAlertActionStyle.cancel, handler: nil)

        alertPrompt.addAction(confirmAction)
        alertPrompt.addAction(cancelAction)

        present(alertPrompt, animated: true, completion: nil)
    }

}

extension QRScannerController: AVCaptureMetadataOutputObjectsDelegate {

    func metadataOutput(_ output: AVCaptureMetadataOutput, didOutput metadataObjects: [AVMetadataObject], from connection: AVCaptureConnection) {
        // Check if the metadataObjects array is not nil and it contains at least one object.
        if metadataObjects.count == 0 {
            qrCodeFrameView?.frame = CGRect.zero
            messageLabel.text = "No QR code is detected"
            return
        }

        // Get the metadata object.
        let metadataObj = metadataObjects[0] as! AVMetadataMachineReadableCodeObject

        if supportedCodeTypes.contains(metadataObj.type) {
            // If the found metadata is equal to the QR code metadata (or barcode) then update the status label's text and set the bounds
            let barCodeObject = videoPreviewLayer?.transformedMetadataObject(for: metadataObj)
            qrCodeFrameView?.frame = barCodeObject!.bounds

            if metadataObj.stringValue != nil {
                launchApp(decodedURL: metadataObj.stringValue!)
                messageLabel.text = metadataObj.stringValue
            }
        }
    }

}


 2343
2343


 被折叠的 条评论
为什么被折叠?
被折叠的 条评论
为什么被折叠?
 到【灌水乐园】发言


