


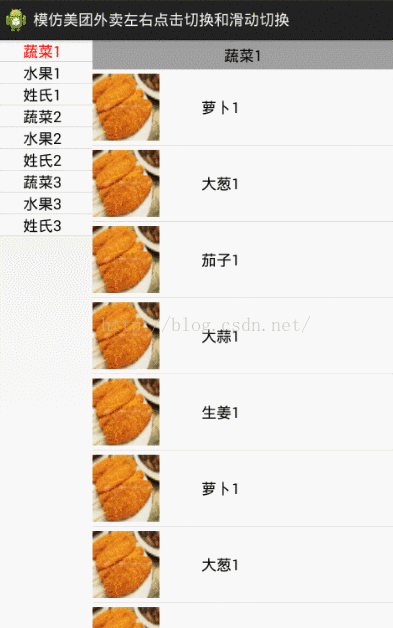
先上效果图:
实现思路:
1.先说右边标题:
首先,右边的数据源集合中的Javabean中含有三个属性name,type,title,而每个条目中会默认含有一个标题.
如果这是第一个条目,就让标题显示出来,再如果这个条目的类型和上一个条目的类型不一样,就让这个条目的标题显示出来,否则,就隐藏标题, 这样我们就做到了每种类型只有第一个数据标题显示出来
接着,在Listview的外层(也就是MainActivity的布局文件中),默认放一个标题(下面都称作是主标题)
最后,设置右边Listview的滚动监听事件 在onScroll方法中,我们要做两件事:
第一件事是每当前第一个可见条目的类型和当前左边Listview选择的类型(红色字体的类型) 不一样时,需要将主标题的内容改变
第二件事 同时切换左边Listview的选中状态
2.再说左边的Listview
左边的Listview需要设置条目点击事件,在点击事件中需要干三件事:
第一 将左边点击条目的字体颜色改变
第二 将右边Listview滚动至左边Listview所选择类型相同的区域
第三 改变主标题的内容
说到这,大家可能还是云里雾里的,还是不知道左边的类型和右边的类型是怎么关联起来的?没关系,在下面的代码解析中你就会明白!下边是具体的实现步骤:
一.写布局
1.在MainActivity的布局文件中 添加应有的控件
- <span style="font-size:14px;"><LinearLayout xmlns:android="http://schemas.android.com/apk/res/android"
- xmlns:tools="http://schemas.android.com/tools"
- android:layout_width="match_parent"
- android:layout_height="match_parent"
- android:orientation="horizontal"
- tools:context=".MainActivity" >
- <ListView
- android:id="@+id/lv_left"
- android:layout_width="0dp"
- android:layout_height="match_parent"
- android:layout_weight="1" >
- </ListView>
- <RelativeLayout
- android:layout_width="0dp"
- android:layout_height="match_parent"
- android:layout_weight="3" >
- <ListView
- android:id="@+id/lv_Right"
- android:layout_width="match_parent"
- android:layout_height="match_parent" >
- </ListView>
- <TextView
- android:id="@+id/tv_title"
- android:layout_width="match_parent"
- android:layout_height="wrap_content"
- android:background="#9f9f9f"
- android:gravity="center"
- android:padding="5dp"
- android:textColor="#000000"
- android:textSize="18sp" />
- </RelativeLayout>
- </LinearLayout></span>
注意 这里边将Listview和主标题textView放在一个相对布局中,并且先放Listview,后放textView,目的是将主标题放在Listview的空间的上方
2.左边Listview的Item布局文件
- <span style="font-size:14px;"><?xml version="1.0" encoding="utf-8"?>
- <LinearLayout xmlns:android="http://schemas.android.com/apk/res/android"
- android:layout_width="match_parent"
- android:layout_height="50dp"
- android:background="#f9f9f9"
- android:gravity="center"
- android:orientation="vertical" >
- <TextView
- android:id="@+id/tv_left"
- android:layout_width="wrap_content"
- android:layout_height="wrap_content"
- android:text="左边条目"
- android:textColor="#000000"
- android:textSize="18sp" />
- </LinearLayout></span>
- <span style="font-size:18px;">3.右边Listview的Item布局文件</span>
- <span style="font-size:14px;"><?xml version="1.0" encoding="utf-8"?>
- <LinearLayout xmlns:android="http://schemas.android.com/apk/res/android"
- android:layout_width="match_parent"
- android:layout_height="wrap_content"
- android:background="#f9f9f9"
- android:gravity="center"
- android:orientation="vertical" >
- <TextView
- android:id="@+id/tv_right"
- android:layout_width="match_parent"
- android:layout_height="wrap_content"
- android:background="#9f9f9f"
- android:gravity="center"
- android:padding="5dp"
- android:text="右边条目"
- android:textColor="#000000"
- android:textSize="18sp" />
- <LinearLayout
- android:layout_width="match_parent"
- android:layout_height="90dp"
- android:gravity="center_vertical"
- android:orientation="horizontal" >
- <ImageView
- android:layout_width="80dp"
- android:layout_height="80dp"
- android:background="@drawable/jipai" />
- <TextView
- android:id="@+id/tv_content"
- android:layout_width="wrap_content"
- android:layout_height="wrap_content"
- android:layout_marginLeft="50dp"
- android:text="左边条目"
- android:textColor="#000000"
- android:textSize="18sp" />
- </LinearLayout>
- </LinearLayout></span>
二.创建Javabean
- <span style="font-size:14px;">public class BaseData {
- private String name;
- private int type;// 类型 后边要根据类型显示标题
- private String title;//
- public BaseData(String name, int type, String title) {
- super();
- this.name = name;
- this.type = type;
- this.title = title;
- }
- public BaseData() {
- super();
- }
- public String getTitle() {
- return title;
- }
- public void setTitle(String title) {
- this.title = title;
- }
- public String getName() {
- return name;
- }
- public void setName(String name) {
- this.name = name;
- }
- public int getType() {
- return type;
- }
- public void setType(int type) {
- this.type = type;
- }
- }</span>
三.创建两个adapter
1.左边Listview的adapter
- <span style="font-size:14px;">/**
- * 左边的adapter 注意要给textview设置tag
- * @author HaiPeng
- *
- */
- public class LeftAdapter extends BaseAdapter {
- private Context context;
- String data[]={"蔬菜1","水果1","姓氏1","蔬菜2","水果2","姓氏2","蔬菜3","水果3","姓氏3"};
- public LeftAdapter(Context context) {
- super();
- this.context = context;
- }
- @Override
- public int getCount() {
- return data.length;
- }
- @Override
- public Object getItem(int position) {
- return null;
- }
- @Override
- public long getItemId(int position) {
- return 0;
- }
- @Override
- public View getView(final int position, View convertView, ViewGroup parent) {
- ViewHold vh = null;
- if (convertView == null) {
- convertView = View.inflate(context, R.layout.item_left, null);
- vh = new ViewHold();
- convertView.setTag(vh);
- vh.tv_left = (TextView) convertView.findViewById(R.id.tv_left);
- } else {
- vh = (ViewHold) convertView.getTag();
- }
- vh.tv_left.setTag(position);
- vh.tv_left.setText(data[position]);
- return convertView;
- }
- public class ViewHold {
- TextView tv_left;
- }
- }</span>
2.右边Listview的adapter
- <span style="font-size:14px;">/**
- * 右边listview的adapter
- *
- * @author HaiPeng
- *
- */
- public class RightAdapter extends BaseAdapter {
- private Context context;
- private ArrayList<BaseData> data = new ArrayList<BaseData>();
- public RightAdapter(Context context) {
- super();
- this.context = context;
- }
- /**
- * 这个方法是用来更新数据源
- *
- * @param context
- */
- public void updateData(ArrayList<BaseData> lists) {
- data.clear();
- data.addAll(lists);
- this.notifyDataSetChanged();
- }
- @Override
- public int getCount() {
- // TODO Auto-generated method stub
- return data.size();
- }
- @Override
- public Object getItem(int position) {
- return null;
- }
- @Override
- public long getItemId(int position) {
- // TODO Auto-generated method stub
- return 0;
- }
- @Override
- public View getView(int position, View convertView, ViewGroup parent) {
- ViewHold vh = null;
- if (convertView == null) {
- convertView = View.inflate(context, R.layout.item_right, null);
- vh = new ViewHold();
- convertView.setTag(vh);
- vh.tv_content = (TextView) convertView
- .findViewById(R.id.tv_content);
- vh.tv_right = (TextView) convertView.findViewById(R.id.tv_right);
- } else {
- vh = (ViewHold) convertView.getTag();
- }
- vh.tv_content.setText(data.get(position).getName());
- if (position == 0) {//如果是第一个 需要显示标题
- vh.tv_right.setVisibility(View.VISIBLE);
- vh.tv_right.setText(data.get(position).getTitle());
- } else if (!TextUtils.equals(data.get(position).getTitle(),
- data.get(position - 1).getTitle())) {//如果这个标题和上一个不一样 也需要将标题显示出来
- vh.tv_right.setVisibility(View.VISIBLE);
- vh.tv_right.setText(data.get(position).getTitle());
- } else {
- vh.tv_right.setVisibility(View.GONE);
- }
- return convertView;
- }
- public class ViewHold {
- TextView tv_content;
- TextView tv_right;
- }
- }</span>
四.MainActivity中操作
1.初始化数据
- <span style="font-size:14px;">private void initData() {
- lists = new ArrayList<BaseData>();
- String title[] = { "蔬菜1", "水果1", "姓氏1", "蔬菜2", "水果2", "姓氏2", "蔬菜3",
- "水果3", "姓氏3" };
- String name1[] = { "萝卜", "大葱", "茄子", "大蒜", "生姜", "萝卜", "大葱", "茄子",
- "大蒜", "生姜", "萝卜", "大葱" };
- String name2[] = { "苹果", "梨", "香蕉", "西瓜", "橘子", "大枣", "菠萝", "红提", "葡萄",
- "樱桃", "椰子" };
- String name3[] = { "郑", "王", "伊", "荆", "汤", "王", "孙", "李", "钱", "赵",
- "祁", "韦", "宏" };
- for (int i = 0; i < name1.length; i++) {
- lists.add(new BaseData(name1[i] + 1, i, title[0]));
- }
- for (int i = 0; i < name2.length; i++) {
- lists.add(new BaseData(name2[i] + 1, i, title[1]));
- }
- for (int i = 0; i < name3.length; i++) {
- lists.add(new BaseData(name3[i] + 1, i, title[2]));
- }
- for (int i = 0; i < name1.length; i++) {
- lists.add(new BaseData(name1[i] + 2, i, title[3]));
- }
- for (int i = 0; i < name2.length; i++) {
- lists.add(new BaseData(name2[i] + 2, i, title[4]));
- }
- for (int i = 0; i < name3.length; i++) {
- lists.add(new BaseData(name3[i] + 2, i, title[5]));
- }
- for (int i = 0; i < name1.length; i++) {
- lists.add(new BaseData(name1[i] + 3, i, title[6]));
- }
- for (int i = 0; i < name2.length; i++) {
- lists.add(new BaseData(name2[i] + 3, i, title[7]));
- }
- for (int i = 0; i < name3.length; i++) {
- lists.add(new BaseData(name3[i] + 3, i, title[8]));
- }
- //假数据创建的方式比较low,大家不喜勿喷
- //看下边这个集合,这个集合是右边所有要显示标题的条目的position
- ArrayList<String> showTitle = new ArrayList<String>();
- for (int i = 0; i < lists.size(); i++) {
- if (i == 0) {//第一个必须显示
- showTitle.add(i + "");
- } else if (!TextUtils.equals(lists.get(i).getTitle(),
- lists.get(i - 1).getTitle())) {//如果跟上一个条目的type不一样就必须显示
- showTitle.add(i + "");
- }
- }
- }
- //这个集合也就是就是左边和右边类型联系的桥梁</span>
2.初始化布局,我用的xutils的注解
- <span style="font-size:14px;"> @ViewInject(R.id.lv_left)
- private ListView lv_left;
- @ViewInject(R.id.lv_Right)
- private ListView lv_Right;
- @ViewInject(R.id.tv_title)
- private TextView tv_title;
- //但不要忘记在onCreate方法ViewUtils.inject(this);
- leftAdapter = new LeftAdapter(context);
- lv_left.setAdapter(leftAdapter);
- rightAdapter = new RightAdapter(context);
- lv_Right.setAdapter(rightAdapter);
- rightAdapter.updateData(lists);// 将数据源传递给Listview
- tv_title.setText(lists.get(0).getTitle());// 主标题栏设置默认初始值</span>
3.先看右边的Listview的滚动监听事件
- <span style="font-size:14px;">lv_Right.setOnScrollListener(new OnScrollListener() {
- @Override
- public void onScroll(AbsListView view, int firstVisibleItem,
- int visibleItemCount, int totalItemCount) {
- int currentPosition = showTitle.indexOf(firstVisibleItem + "");//当前选中的一级条目的position
- //firstVisibleItem是右边Listview当前第一个可见条目的position 根据//showTitle.indexOf(firstVisibleItem + "")可以得到这个数字在showTitle集合中的排序(是第几个),而这个排序刚好就是
- //左边Listview当前所选中的条目的position 这样我们就能根据左边的类型判断右边的类型了
- // updateLeftListview(firstVisibleItem, currentPosition);//这个方法下面会说 是一个抽出来的方法 左边//Listview的点击事件也会用到
- }
- @Override
- public void onScrollStateChanged(AbsListView view, int scrollState) {
- }
- });</span>
4.左边Listview的点击事件
- <span style="font-size:14px;">lv_left.setOnItemClickListener(new OnItemClickListener() {
- @Override
- public void onItemClick(AdapterView<?> arg0, View arg1, int arg2,
- long arg3) {
- int firstVisibleItem = lv_Right.getFirstVisiblePosition();
- //右边Listview当前第一个可见条目的position
- updateLeftListview(firstVisibleItem, arg2);
- lv_Right.setSelection(Integer.parseInt(showTitle.get(arg2)));
- //arg2是点击(选择)左边条目的第几个
- //根据这个数字我们就能通过Integer.parseInt(showTitle.get(arg2))得到在点击左边后应该跳转到右边第几个条目
- // 通过etSelection方法跳转
- }
- });</span>
5.updateLeftListview方法
- <span style="font-size:14px;"> /**
- * 更新左边Listview字体颜色 并且更改主标题的内容
- *
- * @param firstVisibleItem
- * 右边当前第一个可见的条目position
- * @param currentPosition
- * 左边listview当前被点击或者要显示为红色的条目position
- */
- private void updateLeftListview(int firstVisibleItem, int currentPosition) {
- if (showTitle.contains(firstVisibleItem + "")) {//右边的Listview滑动到这firstVisibleItem这个条目时
- // 而showTitle中包含firstVisibleItem 那么这个时候我们就需要将主标题的内容修改和firstVisibleItem的标题一样
- // 并且左边Listview需要更改颜色的条目(点击需要更改或者右边滑动应该改变的textView)的字体颜色改变掉
- tv_title.setText(lists.get(firstVisibleItem).getTitle());//将主标题的内容修改和firstVisibleItem的标题一样
- TextView lasTextView = (TextView) lv_left
- .findViewWithTag(lastPosition);
- if (lasTextView != null) {//在右边Listview第一次加载过程中会一直调用监听中的onscroll 这时的textView可能为空
- lasTextView.setTextColor(Color.BLACK);//先将上一个textView字体的颜色改成黑色
- }
- TextView currenTextView = (TextView) lv_left
- .findViewWithTag(currentPosition);
- if (currenTextView != null) {//再将当前要改变的extView字体的颜色改成红色
- currenTextView.setTextColor(Color.RED);
- }
- lastPosition = currentPosition;
- }
- }</span>
到这大家应该大概明白左边点击切换右边,右边滑动切换左边是怎么实现的了吧
这里是源码的下载地址http://download.csdn.net/detail/jeff169/9520261


 2万+
2万+

 被折叠的 条评论
为什么被折叠?
被折叠的 条评论
为什么被折叠?
 到【灌水乐园】发言


