


日常开发中接触到的敏感数据包括但不限于数据库和其他中间件及其他系统的账号密码,日志中的个人数据,比如手机号、身份证号和住址等等信息…这里我们只讨论在代码层面如何加密保护敏感数据,主要是配置文件中的敏感数据处理和推送到git仓库平台如何隐藏敏感数据。
对对敏感数据的加密保护方法多种多样,不同层面上有不同的方法。对于数据库密码这类信息,常用的连接池比如Druid带有加密工具,但是比较局限,如果是Spring Cloud很多服务的项目,可以用配置中心,统一管理各个服务的配置;如果是想加密整个配置文件,可以使用git-encrypt工具配置git使用。
Spring Cloud 配置中心
这里先列出一些基本项目概念和作用:
- 注册中心:服务发现治理。
- 配置文件git仓库:微服务项目各个服务的配置(这些配置也可以不放在git仓库,放本地也行)
- 配置中心服务端:拉取git仓库的配置文件,提供给其他微服务使用。
- 客户端微服务:通过注册中心(或链接地址)找到配置中心服务端,根据{application name}-{profiles-active}.yml找到该服务的配置文件。
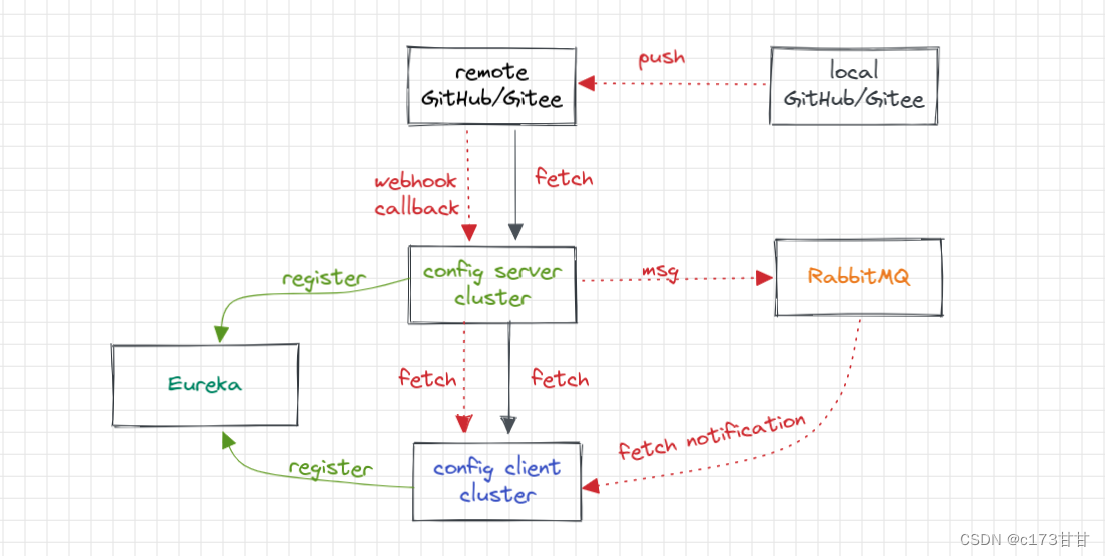
配置中心的作用就是统一管理微服务配置,微服务中一般一个服务会有多个节点,个节点大部分配置都是相同的,使用配置中心可以避免重复写配置,并且发生修改时可以批量地修改多个节点。
配置中心服务端、客户端和配置存储
主要看三个jar包配置,对应三个功能:
<!-- spring cloud server配置 -->
<dependency>
    <groupId>org.springframework.cloud</groupId>
    <artifactId>spring-cloud-config-server</artifactId>
</dependency>
<!-- spring cloud bus依赖实现配置自动更新,rabbitmq -->
<dependency>
    <groupId>org.springframework.cloud</groupId>
    <artifactId>spring-cloud-starter-bus-amqp</artifactId>
</dependency>
<!-- webhook通知配置中心刷新的接口 -->
<dependency>
    <groupId>org.springframework.cloud</groupId>
    <artifactId>spring-cloud-config-monitor</artifactId>
</dependency>
<!-- 不想暴露配置可以加上security依赖,限制必须账号密码访问 -->
<dependency>
    <groupId>org.springframework.boot</groupId>
    <artifactId>spring-boot-starter-security</artifactId>
</dependency>
存储配置文件可以用git仓库,或者直接放在本地。
git仓库
如果用GitHub的仓库可能会碰到一些问题,GitHub私有库已经不支持账号密码方式访问,需要用git协议。用git仓库根据Spring Cloud文档生成密钥:
ssh-keygen -m PEM -t rsa -b 4096 -f ~/config_server_deploy_key.rsa
根据文档写配置,然后你就会看到启动有错误:
ERROR: You're using an RSA key with SHA-1, which is no longer allowed. Please use a newer client or a different key type. Please see https://github.blog/2021-09-01-improving-git-protocol-security-github/ for more information.
GitHub不再支持SHA-1的加密方式了,需要换一种加密方法生成密钥,根据stackoverflow的解决方法,用ecdsa签名算法生成密钥:
# generate id_ecdsa & id_ecdsa.pub
ssh-keygen -m PEM -t ecdsa -b 256
具体的配置:
spring:
  cloud:
    config:
      server:
        git:
          #uri: https://github.com/zgshen/lin.git # 若是git协议需要设置ssh key
          uri: https://gitee.com/zdshen/lin-config-spring.git
          #search-paths: lin-config-spring #配置文件所在目录
          default-label: master
          # http 协议
          #username: # 公开库不需要填写
          #password: # github私有库已经不支持账号密码方式访问,需要用git协议
          # git 协议
          #ignore-local-ssh-settings: true # git协议私有库忽略,手动填写下面private key,rsa过时,用ecdsa签名算法
          #private-key: |
          #             -----BEGIN EC PRIVATE KEY-----
          #             ......
          #             -----END EC PRIVATE KEY-----
    bus:
      trace:
        enabled: true
  security:
    user:
      name: nathan
      password: 123
  rabbitmq:
      host: localhost
      port: 5672
      username: guest
      password: guest
encrypt:
  key: ${ENCRYPT_KEY}
本地
本地的配置就简单多了。
# 本地配置文件名字必须是native,不能是local或其他名字
spring:
  cloud:
    config:
      server:
        native:
          #resources目录下 #放在config server下请求ip:/actuator/refresh自动刷新不会生效,需要放在其他地方用绝对路径
          #search-locations: classpath:/config
          search-locations: file:///project/gitFile/lin/lin-config-spring
    bus:
      trace:
        enabled: true
  security:
    user:
      name: nathan
      password: 123
  rabbitmq:
      host: localhost
      port: 5672
      username: guest
      password: guest
encrypt:
  key: ${ENCRYPT_KEY}
启动后就可以访问各服务的配置,接口访问规则:
# 不带 {label} 分支信息,默认访问 master 峰值
/{application}-{profile}.yml
/{application}-{profile}.properties

# 带 {label} 分支信息
/{application}/{profile}[/{label}]
/{label}/{application}-{profile}.yml
/{label}/{application}-{profile}.properties
最后到git平台上,在存储配置的仓库去设置Webhook的回调接口 http://{ip:port}//monitor?path=*(path用于定位哪些服务应该更新配置。这里使用 * 来通知所有服务),当有新的提交push到仓库时就会出发回调请求服务端接口,然后再通过MQ发消息通知有变动的客户端重新拉取新的配置。
客户端比较简单,引入config和mq等依赖就行:
<dependency>
    <groupId>org.springframework.cloud</groupId>
    <artifactId>spring-cloud-starter-config</artifactId>
</dependency>
<dependency>
    <groupId>org.springframework.cloud</groupId>
    <artifactId>spring-cloud-starter-bus-amqp</artifactId>
</dependency>
...
客户端的配置文件:
spring:
  application:
    name: lin-config-client
  profiles:
    active: dev
  cloud:
    config:
      uri: http://localhost:9000
      label: master
      profile: dev
      username: nathan
      password: 123
      #discovery:
      #  service-id: lin-config-server
      #  enabled: true
直接直接写服务端的uri地址,多个的话写discovery service-id,也就是在Eureka注册的服务id名。
存储库则是直接写yml配置文件,比如有个服务名称是spring-test-api,配置文件的文件名根据dev和prd或其他环境可写成spring-test-api-dev.yml和spring-test-api-prd.yml等。
配置的加密
在上面服务端和客户端的配置文件中可以看到一项配置是:
encrypt:
  key: ${ENCRYPT_KEY}
这是用于加密的加密密钥,这里用的是变量,在idea测试的时候可以写在Configurations的Environment variables中,在机器上运行的话就写在机器的环境变量中,比如Linux用zsh的话就是 在~/.zshrc 文件加上:
export ENCRYPT_KEY=nathan2022
在配置中心服务端,访问 http://{ip:port}/encrypt/status get请求返回ok就表示正常,
http://{ip:port}/encrypt post请求将数据加密,其中–user nathan:123 是spring security的basic认证:
# nathan @ nathan-tp in ~/Documents/lin-config-spring on git:master o [16:53:15]
$ curl -u nathan:123 http://localhost:9000/encrypt/status
{"status":"OK"}


# nathan @ nathan-tp in ~/Documents/lin-config-spring on git:master o [16:53:29]
$ curl --user nathan:123 -i -XPOST --data 'nathan' http://localhost:9000/encrypt/
HTTP/1.1 200
Content-Type: text/plain;charset=UTF-8
Content-Length: 64
Date: Wed, 27 Jul 2022 08:54:24 GMT

cab819603b5cb0e87fc7597c9948b33270a9d16954b3113ca14741a3adbd5a09
cab819603b5cb0e87fc7597c9948b33270a9d16954b3113ca14741a3adbd5a09 就是‘nathan’字符串加密生成的字符串。
比如有个客户端服务用到数据库,可以对账户密码进行加密:
spring:
  datasource:
    driver-class-name: com.mysql.cj.jdbc.Driver
    url: jdbc:mysql://localhost:3306/lin?characterEncoding=UTF8&useSSL=false&serverTimezone=Asia/Shanghai
    # 包含{cipher}的内容必须放在引号里面
    username: '{cipher}cab819603b5cb0e87fc7597c9948b33270a9d16954b3113ca14741a3adbd5a09'
    password: '{cipher}6a74f568c18e7d926bf8ab0427a03d8fb8f307f58088a196b7450cac5add41c0'
加密的字段值要以{cipher}开头,后面接的就是通过 http://{ip:port}/encrypt 接口生成的加密串。这样,我们就实现了对敏感数据的加密。
git-crypt
上面我们看到的是Spring Cloud配置中心的使用以及如何对具体的配置字段进行加密,如何想对整个配置文件加密可以用工具git-crypt。
Ubuntu下的安装,执行命令:
sudo apt install git-crypt
在仓库根目录新建.gitattributes文件,加密的规则就写在这个文件中。
# 需要被加密的文件,可以用通配符
#config/*.yml filter=git-crypt diff=git-crypt
#*.config filter=git-crypt diff=git-crypt

spring-client-prd.yml filter=git-crypt diff=git-crypt

# Making sure that .gitattributes is never encrypted. DON'T TOUCH THAT LINE AND ONE BELOW
.gitattributes !filter !diff
如果在未成功加密之前就进行了提交,历史文件是不会自动加密的,需要有变动重新提交才会加密,或者运行 git-crypt status -f 然后提交并 push 远端。
查看加密的文件有哪些:
git-crypt status -e
重新clone仓库到另一个文件夹。
# nathan @ nathan-tp in ~/Documents/lin-config-spring on git:master o [9:54:52]
$ cat spring-client-prd.yml
GITCRYPT1=f��L6��I��?��6Q$
S� V�N����4��=6��W?
��2RH>*_
�o7�e�ȑ҃I���T�����-D!�o&l�ո|���H���ͷ��
��L��p��(y� )�w��)ي��(k�$�ɵCP�ɻ%F���,p)��f�ps
���f3
�
딇<A�V"T?������̟�A������>��MVC(�g����c
$ާ�ZϨ!�!�W�O%
# nathan @ nathan-tp in ~/Documents/lin-config-spring on git:master o [9:54:56]
$ git-crypt unlock /home/nathan/app/backup/key
# nathan @ nathan-tp in ~/Documents/lin-config-spring on git:master o [9:57:26]
$ cat spring-client-prd.yml
config:
name: lin-config-client
active: prd
version: 1.0.0
spring:
datasource:
driver-class-name: com.mysql.cj.jdbc.Driver
url: jdbc:mysql://localhost:3306/lin?characterEncoding=UTF8&useSSL=false&serverTimezone=Asia/Shanghai
username: nathan
password: 123456%
可以看到文件被加密了,都是乱码,GitHub上面看到的是一个raw文件。用导出的密钥解密之后就能看到原始文件了。
本文涉及的代码可以在GitHub找到,包含lin-config-spring、lin-config-server和lin-config-client三个工程。


 1172
1172


 被折叠的 条评论
为什么被折叠?
被折叠的 条评论
为什么被折叠?
 到【灌水乐园】发言


